- April 13, 2019
- Walls
- dgyzi
Drywall is a universal material. It can be mounted on almost any surface. Let's talk about how to cover walls with plasterboard with your own hands. Let's consider the technologies that are currently used in construction. Let's find out how you can cover a wall with plasterboard yourself, while simultaneously insulating it.
Material selection
Drywall for walls can be different; the desired one is chosen based on the conditions of the room in which they plan to carry out repair work:
- normal – suitable for rooms with normal humidity levels;
- moisture resistant – used for bathrooms and rooms with high humidity;
- fire-resistant - they are used to sheathe sections of the wall around stoves, fireplaces, chimneys;
- fire and moisture resistant - designed for finishing attics, attics, furnaces in private homes.
The minimum thickness of plasterboard for wall cladding is 12.5 mm . Thinner materials are used for other purposes: finishing the ceiling or creating three-dimensional structures.
Installation methods
There are 2 methods of fastening gypsum boards: frame and frameless.
The latter is used if the walls in the room do not have significant curvature. Frameless installation will be cheaper, since the sheathing material is attached directly to the surface requiring leveling, fixed with glue; the construction of additional sheathing is not required. Attaching plasterboard to the wall in this way is only possible if the ceiling height does not exceed 3 m.
The frame method is suitable when you need to lay insulation or communications under the sheathing. In this case, the sheathing is first placed on the wall, and only then the gypsum board is secured.
Where should I place the profiles?
Once the locations for the sheets have been determined, you can start working on CD profiles. They need to be placed under horizontal and vertical plasterboard joints, and after that you need to add 2 additional profiles (along the edge of the opening and a lintel above the window), as well as on two sheets, two profiles are needed for each. The central structures should be shifted under the edge of the window opening, this is done so that the step does not exceed 600 mm, after which you need to add one more in the middle. The perimeter of the wall and the space under the window are places for installing UD profiles.
Frameless method
To decorate walls with plasterboard with your own hands you will need:
- GKL;
- construction level;
- set of spatulas;
- rule;
- a jigsaw or a sharp construction knife for cutting sheathing material;
- construction grater;
- square, pencil;
- rubber mallet;
- electric drill with a special attachment for mixing the solution;
- screwdriver;
- gypsum putty;
- brush and roller for applying primer;
- primer with antifungal additives;
- serpyanka (tape for sealing gypsum board joints);
- self-tapping screws
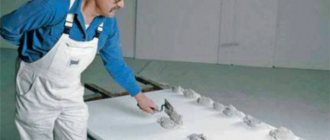
Before covering the wall with sheets of plasterboard, it is necessary to prepare the surface.
Preparation
The old covering from the wall must be removed. If the surface is painted with oil paint, and it is not possible to completely remove it, notches are made on the wall with an ax or hammer drill. This is necessary to improve adhesion.
All irregularities, recesses and cracks are filled with putty or polyurethane foam. After the solution hardens, remove excess so that nothing protrudes above the surface.
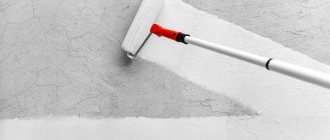
Before attaching drywall to the wall, you need to prime it and mark it. First, the surface is cleaned of dust with a broom or brush. Then apply one or several layers of deep penetration primer, using a roller for smooth areas, and a paint brush for corners and other hard-to-reach places. Allow at least 2 hours between coats. You should start marking only after the wall is completely dry.
Marking
Wall cladding with plasterboard is carried out only after marking the surfaces, otherwise distortions are possible. To work you will need a level. The easiest way to work is with a laser, but a bubble one will also work.
The marking should be carried out taking into account possible deformation of the sheets: a gap of approximately 1 cm should be left between the end of the gypsum board and the floor, and 5 mm between the gypsum board and the ceiling. A control line is drawn near the ceiling; it is usually not required from below, since it is easier to form the required indentation by placing 10 mm thick plywood under the plasterboard during installation.
Using a plumb line, check the evenness of the corners of the room and draw a vertical line at the junction of the walls. Attach drywall to the walls begin from this mark.
Glue selection
The composition is selected taking into account the evenness of the surfaces.
| Wall type | Suitable formulations |
| Rovnaya | Gypsum or cement glue, polyurethane foam, polymer mastic |
| With significant irregularities | It is recommended to purchase glue in the form of a dry mixture, since the consumption will be high. Additional fastening of sheets with dowels may be required |
| Brick | Gypsum or cement based adhesive |
Installation with gypsum or cement based adhesive
This is the most popular way to install drywall on walls.
Work order:
- The dry mixture is diluted with water in the proportions specified by the manufacturer.
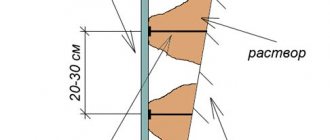
- The plasterboard is turned over to the wrong side. Apply the mortar in long broken lines along the edges of the slab around the entire perimeter. On the sheet itself, glue is applied in dots with a diameter of 12-15 cm, maintaining a distance of about 20-30 cm between them. For reliable fixation of drywall on the wall, it is necessary that at least 10% of the entire area of the slab is covered with adhesive.
- Work starts from the corner. Place 1 cm thick plywood on the floor to leave a gap. Bring the drywall to the wall to the vertical marking line, apply it, and align it relative to the line.
- Apply the rule over the stove to evenly distribute the composition. Using a building level, make sure that there are no deviations to the side. If they exist, they correct the shortcomings.
- After the adhesive composition has completely dried, the drywall is additionally fixed using dowels.
- Using a similar method, further cladding of the walls is carried out with whole sheets of gypsum plasterboard, and only after this they begin cladding the remaining narrow sections of the wall. To do this, measure the open sections of the wall and cut out parts of the required size from the slabs.
GCR is cut with a jigsaw or knife. The edges should be made at an angle so that the joints can later be filled with putty.
Installation on polymer compounds
Cladding gypsum board walls with synthetic glue can be done in two ways - apply the composition to the slab in the same way as when using dry mixtures, or first fix the sheets on the surface with dowels, having previously leveled them, and then fill the voids between the drywall and the base with foam.
The hardening time of the glue depends on the composition.
Fixing with polyurethane foam
To cover walls with plasterboard using this method, apply foam to the edges around the perimeter of the slab and draw several lines along the main part. Immediately after applying the composition, the sheet is applied to the wall and its position is leveled.
The final hardening time is about a day. After this, the drywall will be firmly glued to the wall, and it will no longer be possible to tear off or correct its position .
For uneven surfaces, a different method is used - first fix the plasterboard, and then foam the voids.
Step-by-step instructions for finishing walls with plasterboard using this method:
- The plate is fixed to the wall along the marking line. Drill holes in the wall for dowels (the gypsum boards are not removed). In total, for one sheet, for reliable fixation, you will need about 10-12 screws, which will need to be placed evenly over the entire area.
- After drilling the holes, the sheet is set aside, then plastic dowels are inserted into the wall.
- Foam rubber is glued to the back side of the plasterboard using double-sided tape. Pieces of material should be placed at a distance of 15 cm from the holes made. To determine which side should be used to attach the drywall to the wall, and which side should the foam be attached to, you should inspect the slab. There are no markings or markings on the front, and there is a slight bevel at the side edge.
- Place the sheet on the wall and secure it with self-tapping screws. The position of the sheet can be leveled by tightening the fasteners to different depths - in the place where the wall deviates, the self-tapping screw is not screwed in all the way.
- This method is used to install drywall on walls.
- Make holes in the plasterboard, placing them in the areas between the screws. Through these holes, polyurethane foam is pumped into the space between the sheet and the wall.
- After the foam has hardened (in at least a day), the screws can be recessed a couple of mm into the sheets or the fasteners can be completely unscrewed and then these areas can be puttied.
This technology of covering walls with plasterboard involves a large consumption of foam, but allows you to cope with significant curvature without installing a frame.
Fitting plasterboard sheets and installing them.
Before the procedure, you need to make sure that the plasterboards do not touch the ceiling and floor (4 mm); this is important, because the quality of sound insulation depends on it. If the surfaces are horizontal (there is a right angle), then you need to measure the width and height of the plasterboard. There are times when the floor is not level, then it is necessary to cut off the resulting slope. After this, you can proceed to defining the sheet parameters.
The finished sheets are attached using a screwdriver and a drill, so that the structure is strong and strong; the screw should sink slightly (no more than 2 mm, otherwise a crack will appear that will have to be repaired with putty). It happens that the heads of the screws remain on the surface of the profiles and do not allow the drywall to lie flat; in this case, you will have to dent them a little using a hammer.
I advise the master to work with the sheets sequentially, this will allow you to correct errors in time if they arise. After this, you need to protect and sheathe the surfaces of the slopes and move on to the partition.
As for protection, this will require two profiles, one of them will be installed along the edges of the opening, and the second under the window opening itself. First, guides are created by attaching them to the window sill and to the upper slope along the UD profile. At the bottom of the window opening you need to insert a CD profile of the required size; it is recommended to use a block to secure it. Here you need to pay attention to the distance between the surface and the profile itself; if it allows you to use long fasteners that can pass through, then this is an ideal option. If the distance is too small, then the block will need to be tightened using a screw and secured through the corner. Once everything is ready, you can start attaching the plasterboard sheets. Additional rigidity can be created by adding a lintel to the structure. After all this, all that remains is to create the window frame and insert the glass.
Frame method
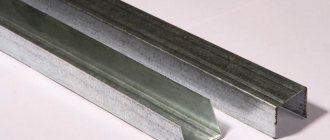
To work you will need:
- GKL;
- metal profile;
- building level;
- drill or hammer drill;
- pendants;
- spatulas;
- construction knife or jigsaw;
- tape measure, pencil;
- metal scissors.
Covering walls with plasterboard begins with preparing the surfaces. It is believed that the frame finishing method does not require removal of the old finish and priming, but it is recommended to do it - this will increase the service life of the erected structure.
The frame can also be made from wooden slats, but this method is used less and less. Wood is susceptible to rotting and deformation, so finishing walls with plasterboard using wooden lathing is impractical.
Marking
Work order:
- A plumb line is fixed to the wall in the corner under the ceiling.
- Screw in the self-tapping screw in the place where the plumb line touches the floor. Mark all 4 walls this way.
- Stretch the thread around the entire perimeter, securing it to the screws. The resulting line is transferred to the floor and ceiling.
The minimum distance from the wall for installing the frame is 4 cm . There is no point in making it too large - the greater the distance from the base to the plasterboard partition, the smaller the usable area of the room.
Frame installation
The guide profile is attached to the floor and ceiling along the marking lines using dowels. Before this, it is recommended to stick a sealing tape on the back of the profile in order to reduce the vibrations that will be transmitted by the floors to the frame.
The profile is cut using metal scissors.
The next step is to mark the lines for installing the rack profile. The racks should be placed at a distance of 60 cm, so that when facing walls with plasterboard on a metal frame, the joints of the slabs fall directly on the center of the profile. If a high load is subsequently planned on the plasterboard partition (for example, shelves, wall cabinets, a TV will be installed), then the distance is reduced to 40 cm.
By measuring the distance from the top to bottom rails and subtracting 1 cm, you get the required height of the racks. Parts of the required length are cut from the profile. Place it first into the lower guide, then into the upper, positioning it in accordance with the markings. The racks are attached to the wall using hangers.
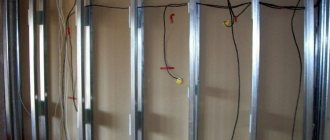
Before covering the wall with plasterboard, insulation is laid, if necessary.
Installation of gypsum boards
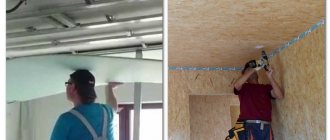
Proceed to installing the sheets on the frame. The cladding begins with whole slabs, placing them in a checkerboard pattern: the solid sheet is secured first, aligning it along the bottom guide. The next sheet is mounted on the ceiling rail. This technique makes the structure stronger.
Self-tapping screws are used to attach drywall to the wall on a profile. Screw them in, setting the minimum number of turns on the screwdriver, otherwise the sheet may be damaged.
The total number of fasteners per 1 sheet is at least 45. 5 screws are screwed into the short side of the gypsum board, the rest are distributed along the long sides and the center of the slab. The fastener head should be recessed into the sheet by 1 mm. Do not tighten the screws too much.
When they finish covering the walls with plasterboard with their own hands, they move on to finishing the constructed structure.
Finishing
At the final stage, the joints of the slabs are grouted. The method is selected taking into account what decorative finishing will be used in the future.
When using elastic materials (plastic tiles, non-woven or photo wallpaper with a PVC base), chamfer both edges at an angle of 22.5 °, then the angle of the resulting groove will be 45 °. After this, fill the groove with gypsum-based starting putty.
When finishing plasterboard walls with other materials, the seams are processed differently. Cut the edge at an angle of 45° so that the angle formed between the plates is 90°. To fill the grooves, use adhesive putty. It is applied generously, then rubbed, and the serpyanka is immediately applied on top, pressing it into the solution. After hardening, the composition is rubbed, forming an even plane.
Having learned how to properly cover walls with plasterboard yourself, you can begin repair work. If you adhere to the work technology in the process, the finished structure will be stable and durable.
How to attach a CD profile?
To begin with, lines are marked on the wall where the CD profile will be located. Along the resulting lines you need to secure “P”-shaped brackets at a distance of every 500 mm. If it is necessary to improve sound insulation, dichtungs are attached under them. After this, you need to make a retreat from the floor and from the ceiling (500 mm each), and divide the rest of the space into equal distances. After the “U”-shaped brackets are secured, the CDs are installed in the UD profiles (they must not be allowed to dangle).
Then you need to remove the profiles and attach the screws; once the procedure is completed, you need to bend the ends of the brackets.
Finishing walls with plasterboard in a wooden house
Everyone chooses for themselves... the house in which they will live. Someone builds a house from concrete blocks, despite the horror stories told about concrete structures, someone prefers a house made of brick, and someone prefers to build from environmentally friendly wood, without fear of fire.
Fire danger is perhaps the most serious and severe drawback of wooden houses, despite all its advantages. And although building materials are treated with fire retardants, they partially solve the problem.
Another disadvantage is the instability of the walls due to fluctuations in humidity in the wood. A new home is especially unstable. Several years will pass before the new building settles down and all the logs (beams) fall into place.
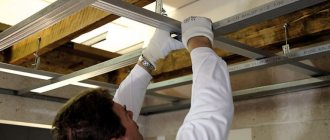
How to install a frame for a plasterboard ceiling
- Installation of profiles around the perimeter . First, a line is drawn along the perimeter, which is measured with a water level. From the resulting line it is worth measuring the place for the future installation of the profile. Then, using scissors, cut the solid profile into several parts of the required length and secure in the resulting places using a hammer drill. To perform the attachment quickly and efficiently, you should use special dowels.
- The procedure for marking the ceiling and fastening hangers . When making markings, it is necessary to take into account the location of the supporting structures that are necessary for the installation and arrangement of gypsum sheets; it is necessary that small gaps remain between the joints. It is very important at this stage to correctly understand and identify the lines that are parallel to each other. Then it is necessary to arrange the carriers so that they are either in the center or at the edges of the sheet. To attach the hangers, you can use dowels, after which you need to attach the profile guides to them. By using a laser level, it is possible to control the horizontal level as accurately as possible.
- Procedure for attaching longitudinal profiles . To create additional strengthening of the frame, you need to secure the longitudinal profiles. The distance between them can be calculated using the method used to install the sheets. As for the distance, for longitudinal fastening it should be 400 mm, and for transverse fastening no more than 600 mm. Crabs are perfect for this step. Using this method allows for additional sound and thermal insulation. The result of the first three points is the presence of a general frame diagram intended for further work related to finishing the ceiling with plasterboard.
Advantages of finishing walls with plasterboard
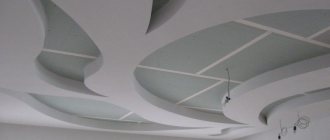
GKL is a favorable material for building finishing. You can sheathe interior partitions with plasterboard not only in a wooden house, arrange exclusive suspended ceilings in several tiers, create niches or shelves.
The manufacturer offers several brands of gypsum boards:
- GKL - standard;
- VGKL - waterproof;
- OGKL - fire resistant;
- OVGKL is waterproof and fire resistant at the same time. This drywall is more expensive than standard, but will also last much longer. It is not afraid of high humidity, and will not ignite at the slightest spark.
For finishing inside the house, it is advisable to use the last two brands of gypsum plasterboard. For installation in the toilet and bathroom (shower) rooms, a waterproof sheet of plasterboard is better suited.
It is necessary to say a few words about the advantages of covering wooden walls with plasterboard:
- With this finishing, you get perfectly smooth surfaces that can be puttyed, painted, covered with any type of wallpaper, and even ceramic tiles can be glued onto them.
- Provide some thermal and noise insulation.
- Relatively low price of material and work process.
GKL boards are easy to work with. They are freely cut with a jigsaw, which allows you to cut out any shapes (for ceilings), any sizes of slabs for wall cladding. You can work with plasterboard yourself, without the involvement of specialists.
Finishing rules
Inside the house, wooden walls can be protected with fire-resistant gypsum board sheathing. Finishing the walls with plasterboard in a wooden house will even out the unevenness of the log or paving stones and give it an ideal look. Heat and waterproofing materials are placed between the wall and the sheathing, and electrical wiring is located.
But before we start covering a log or cobblestone wall, we need to take into account several nuances.
The first nuance
Wood, unlike brick or concrete, is a living, organic material. The tree breathes. In conditions of high humidity, it is able to absorb moisture, and in conditions of low humidity, it releases water into the atmosphere.
Poor people buy raw wood in the hope of drying it themselves. It costs less than dry. Building a house from raw wood creates some problems, since during the drying process the wood decreases in size and sometimes warps. As a result, cracks form in the wooden wall.
Pre-purchased material should not be placed on damp ground. It is necessary to place unnecessary boards, beams, and pallets under it. Provide a canopy. Between the logs (beams) you should lay bars 4–5 cm high so that air circulates between them. This way you will ensure ventilation and natural drying.
Ideally, construction of a house will begin in late spring - early summer. Warm air and sunlight will speed up the drying of the wood. Do not rush to caulk and cover the walls with plasterboard. The building should be open for at least another month to dry out a little. After this time has passed after the walls have been erected, all cracks should be caulked, that is, soft plastic material should be hammered into the cracks between the logs. It could be:
- Dry moss - in Rus', walls have long been caulked with dry moss;
- Tow is a fibrous material used by plumbers for waterproofing;
- Jute is a material made from jute wood;
- Sealant is a synthetic foam material.
All these materials do not allow moisture to pass through or accumulate and fill cracks well.
Second nuance
Wood is a flammable material. And dry wood - even more so. And in order to make it more difficult to ignite, it is necessary to treat the masonry inside and outside with fire retardants - anti-flammable agents. But this is not enough.
To protect your home from fire, it is important to install the electrical wiring correctly. After all, a short circuit is possible in it. Finally, overheating of contacts under high load on the electrical network can also cause a fire. Electrical wiring is laid in plastic (metal) boxes from the outside. In this case, the boxes must be of high quality and non-flammable. It is possible to lay wires between the wall and plasterboard sheathing. The best option for protecting wires in this case is to lay them in metal sleeves. We install the electrical wiring at the same time as installing the frame under the drywall.
Protection against fungi and other microorganisms is necessary. After fire retardants, the walls are treated with antiseptics.
The third nuance
This point is directly related to covering walls with plasterboard in a wooden house. The fact is that fresh wood, especially if poorly dried for some time, will shrink. It's connected:
- with loss of moisture from the tree;
- With the landing of logs or beams in place, their compaction among themselves under the influence of the weight of overlying logs and the roofing superstructure.
The landing of the house can be 10–15 cm per floor.
It was mentioned above that wood breathes, either absorbing moisture or losing it. This factor also affects the unstable behavior of the walls. Some tree species are prone to warping, especially with high humidity or sudden temperature changes. And if plasterboard sheets are firmly attached to such a wall, they will quickly begin to crack, change their location, and become deformed. To avoid this, a so-called sliding or floating frame was developed. Its essence lies in the fact that it does not move along with the load-bearing walls of the house. Plasterboard sheets are attached to this frame.
Frame arrangement
It is no coincidence that the frame is called sliding. It is designed in such a way that the shrinkage of the external walls does not affect or displace the internal cladding. You will learn about the intricacies of installing such a frame below.
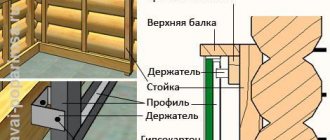
Metal carcass
The metal frame consists of the following elements:
| Name of parts | Options | Where are they used? |
| Horizontal guide profiles | 28×27 mm | They guide and guide the racks along the floor and serve as supports for the main racks |
| Vertical U-shaped racks | They form the basis of the frame on the wall. | |
| Ceiling profiles | 60×27mm | Hold the frame, serve as load-bearing |
| Self-tapping screws with washers | D=4 mm, Length - 50–100 mm. Depends on the distance of the profile to the wall. | Necessary for attaching the frame to the wall. |
| Small screws | The frame parts are connected to each other. |
The following tools are required for work.
- Roulette,
- Level,
- Screwdriver,
- Grinder for cutting profiles,
- Step ladder,
- Pencil or marker.
First, a horizontal guide profile is attached to the floor. Then areas for installing vertical posts are marked. They are located at a distance of 40 or 60 cm from each other, so that every second (third) rack falls on the joint of the drywall sheets. The length of the racks should be 10–12 cm less than the distance from the floor to the ceiling. It is advisable to choose the thickness of the profiles for the racks at least 0.6 mm.
Next, take each rack, mark the attachment points on it so that they do not fall between the logs (beams) of the wall, and so that there are no gaps or cracks at the attachment point. From the marking down, use a grinder to cut a groove, the length of which should be 10 cm and the width about 5 mm (slightly larger than the diameter of the screw).
The cut is made in such a way that the marking point is approximately in the middle of the cut. The edges of the groove should be smooth and even. Therefore, they must be cleaned with sandpaper. There should be at least 3-4 marking points, and accordingly, grooves on each rack. All racks and their installation locations must be numbered.
Where the racks are not tightly adjacent to the wall, it is necessary to secure stops made of plywood or pieces of timber at the fastening points so that all the risers are in the same plane. Simple self-tapping screws can be used as stops. Now that the marking is completed, all the racks are marked and numbered, you can begin to install them.
The racks are attached to the wall with self-tapping screws with washers, which are screwed into the upper part of the groove, with an indentation of 1 cm. The self-tapping screw should hold the racks tightly, but you should not tighten them all the way; the washer under the screw head should turn.
Next stage. The same U-shaped profiles are attached to these racks, but inverted towards the first ones. Fastening is done with self-tapping screws on the side. Stiffening ribs are laid across the wall. Thus, the metal frame for covering the walls with plasterboard is ready.
There is another way to install a frame under drywall. It is suitable for log walls, walls with large irregularities.
What will you need for work?
To work with a wall measuring 3x4.5 m, you will need the following amount of materials and tools:
- plasterboard sheets (4 pcs.);
- UD profile (6 pcs.);
- UD fasteners (50 pcs.);
- CD profile (9 pcs.);
- “P” - shaped bracket (50 pcs.);
- fasteners for “U”-shaped brackets (100 pcs.);
- self-tapping screw 9.5 mm (150 pcs.);
- screws (200 pcs.) and a screwdriver;
- dichtung (for UD – 20 m);
- dichtung (for CD – 55 m);
- mesh (10 m);
- fugenfüller (1.5 kg);
- corner for putty and other small tools.
And also, ideally, have a tool like this that allows you to instantly attach sheets to the profile:
Wooden frame
A wooden frame is easier to install, but is not as stable as a metal one. It can only be arranged in a well-maintained house. All beams for a wooden frame must be dry and treated, like the walls, with a fire retardant and antiseptic.
Wooden beams are attached in the same way as metal ones. Through eyes are cut into the beams. The hole for the self-tapping screws must be countersunk so that the head of the screw is recessed and does not protrude above the beam.
Installation on a metal frame
Installation of plasterboard slopes using this method is the most effective and durable. It is suitable for plastic windows and for installing slopes on the front door.
The location of the guides must be strictly vertical relative to the door slopes and in the corner. Then the crossbars must be installed in increments of 50 cm . To properly make plasterboard slopes at the front door, measurements should be taken after the frame is installed.
Fastening drywall to a metal frame is the most durable option
Do-it-yourself plasterboard door slopes are fixed in place with self-tapping screws. It is important to control the effort when screwing in the screw so as not to damage the drywall. Door slopes made of plasterboard for interior doors will look neat in any interior.
Plasterboard wall covering
When starting the installation of plasterboard sheets, it is necessary to take into account some features of the cladding. Before covering the walls with plasterboard, it is recommended to first make the ceiling. To finish the ceiling, soft hangers and rods should be used.
Do not tightly join the wall and ceiling slabs. It is recommended to leave a gap of several centimeters between them. This gap is closed with a cornice. The drywall below should also not fit tightly to the floor. It is located one to two centimeters higher. This gap will be covered by a baseboard. The plinth and cornice are attached to horizontal surfaces.
When installing drywall, it is also recommended to leave a gap of 1–2 mm. This gap is glued with sickle tape and hidden under putty. When the walls move, this clearance will prevent cracks from appearing. The sheets are fastened with self-tapping screws at a distance of 30–35 centimeters from each other. The screw heads are slightly recessed into the sheet. Then they will be sealed with putty.
The use of a frame structure allows for vapor and heat insulation of walls using a special vapor barrier film and mineral wool.
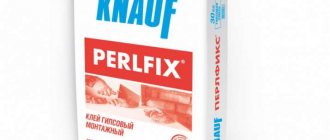
Installation using putty
Finishing putty can be used as an adhesive material - it has better adhesion. The putty should have a paste-like consistency.
Finishing slopes with plasterboard with your own hands using putty is done in the following way:
- when the surface is cleaned of dirt and dust, it is moistened with water;
- on parts made in advance, putty should be applied in the form of separate islands;
Putty is applied to the panel in strokes - The product is placed in the required position and moved so that the adhesive mass spreads. In this position, the slope is left for 12 hours, supported if necessary;
After installing the drywall, install a support - After a while, the support can be removed and wait for the adhesive mixture to dry completely.