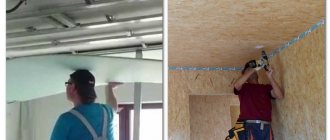
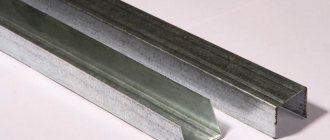
When building housing using Canadian technology, a natural question arises about the interior decoration of the premises. An excellent solution would be plasterboard in a frame house followed by finishing work.
The construction of such houses has a lot of positive aspects; the surfaces inside the building require minimal finishing, which determines the choice of material. The fastest way to make rooms look lived-in is to cover the walls with plasterboard sheets. They create a perfectly flat surface and do not require significant costs in further plastering work.
Nuances when attaching drywall to log walls
It is known that log buildings are subject to settlement in the first years after their construction, as well as to constant changes in their size under the influence of atmospheric phenomena. For example, the height of wooden walls increases with high humidity, and, on the contrary, decreases in dry weather.
Basic conditions for installing drywall on wooden walls
It is these factors that must be taken into account when covering wooden walls with plasterboard, taking into account the following two main conditions:
- The frame (lathing) for fastening plasterboard sheets must have sufficient rigidity and not depend on possible deformations of the wooden walls. That is, if the height of a wooden wall changes, this does not affect the drywall in any way.
- Finishing the walls with plasterboard should be done only after the log house has completely shrunk for one to two years. This approach will allow plasterboard walls not to experience the forces that arise when the frame settles.
- For wet rooms, use only moisture-resistant plasterboard, for example, from KNAUF.
- To ensure the necessary rigidity when facing with ceramic tiles, plasterboard should be laid in two layers with the joints offset relative to each other.
Scheme of fastening lathing for plasterboard sheets
To ensure independent fastening of drywall, it is necessary to install a frame made of galvanized profile and fasten it to an intermediate wooden sheathing, as shown in this picture:
Vertical posts are processed to match the profile of the logs and are rigidly fixed to the wall, as described in the article on wall cladding with clapboard.
The horizontal strips to which the metal profile is attached are the main elements of the wooden sheathing, providing independent fastening of the gypsum board. This is achieved by attaching them to the vertical posts with self-tapping screws through an oval groove in the plank itself.
When the height of the wall changes, the self-tapping washers slide along the steel plate, leaving the wooden planks, and with them the entire plasterboard sheathing, in place. Since the metal frame is rigidly fixed to the floor through a guide profile, it has sufficient rigidity to cover plasterboard sheets with ceramic tiles.
Description and dimensions
Drywall has good soundproofing and thermal insulation properties, it is light, durable and inexpensive.
The plasterboard sheet has the following dimensions:
- height – 2 – 4 m;
- width – 1.2 m;
- thickness – from 6.5 mm.
You can level the walls with plasterboard yourself using two methods:
We sheath using the frameless method
For durability and reliability of frameless leveling of walls with plasterboard in the house, it is worth using thick sheets - 12 mm or more.
Preparing the walls in the room for work:
- remove old paint or wallpaper;
- we remove and plaster flaking and suspicious areas;
- remove dust and dirt from the surface;
- cover the walls 2-3 times with primer.
For the next stage - cutting out sheets of drywall, you will need: a long level, usually a sharpened stationery knife.
On a sheet of paper laid on a clean, flat surface, use a level pencil to apply markings. We make a shallow cut along the level and break the material. Using a file or an abrasive sponge, remove the chamfer from the edges.
For frameless wall coverings, you will need a special adhesive that is applied to both the wall and the drywall.
Glue is applied to drywall:
- along the perimeter of the sheet, with an interval of 0.5 - 0.6 m;
- We fill the inner area with “bloopers” at intervals of 0.2 m.
We apply the sheet to the wall, level it using a level, a rubber mallet or a wide wooden beam. Glue hardening time – up to 40 minutes.
We seal the joints with sickle tape, and apply another 2-3 layers of glue on top of it. After it dries, sand the joints and prime them.
Sheathing using the frame method
How to mount the frame correctly
If you have to level wooden or very uneven walls in a room, you need to first build a frame. It can be made of wood or metal.
You need to know that:
- a house heated all year round is finished with thick plasterboard (from 12 mm);
- a house that is used exclusively in the summer season and is unheated must be sheathed with moisture-resistant material;
- Don't neglect fire-resistant drywall.
Ideally, to decorate wooden walls with plasterboard, the frame should be wooden, since in metal, oxidation processes can begin, leading to rotting of the wood.
We nail wooden beams for the frame according to certain rules:
- timber size – 3 x 3 cm;
- horizontal location with an interval of 0.4 - 0.6 m;
- small gaps every 1 - 1.5 m for air circulation;
- indentations from the ceiling and floor are needed for ease of fastening sheets;
- pegs under the bottom row for attaching skirting boards.
We treat the wood with an antiseptic solution. We place a self-adhesive backing under the sub-grid to improve sound and vapor insulation.
Alignment of walls in a house with plasterboard with a metal frame is carried out using two types of profiles - ud (guides, 28 x 27 mm) and cd (load-bearing, 60 x 27 mm). The former serve to define the plane of the surface, and the latter serve to strengthen the structure and volume.
We install ud profiles on the floor, ceiling and adjacent walls:
- we start by installing a guide profile along the floor;
- We insert the wall guide profile into the floor one and fasten it with self-tapping screws;
- We insert wall profiles into the ends of the ceiling guide.
Next, we strengthen the frame and give it volume. Here it is important to ensure the rigidity of the profiles and maintain the specified plane:
- we mark vertical lines from the ceiling to the floor every 0.4 or 0.6 m from any wall;
- Along the drawn lines with a given interval, we mount U-shaped brackets to the walls;
- We cut the supporting profiles of the required size and insert the ends into the guide ceiling and floor profiles according to the markings made. We fasten them with metal screws with a diameter of 3.5 mm and a length of 9.5 mm;
- Next, we attach the profiles to the existing wall. We screw them to the U-shaped bracket on both sides with the same screws.
How to properly insulate and sheath
The next stage of repair is the laying of hidden communications, insulation and soundproofing of the walls in the room.
We cut mineral insulation (Ursa, Izover) into strips of the required width and lay them between the supporting slats. Or you can purchase sheet insulation with dimensions of 1 x 0.5 m and lay it in the cavity.
Features of installing drywall in a wooden house
There are two ways to attach drywall to surfaces: frameless and framed.
Installing gypsum boards directly on timber walls is undesirable, due to changes in the volume of wood depending on environmental humidity. Rigid fastening of the slabs will certainly lead to the appearance of distortions and cracks in the coating. In addition, the uneven relief of the walls and ceiling made of timber does not allow the gypsum plasterboard to be installed perfectly evenly.
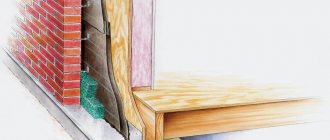
Interior finishing of a wooden house with plasterboard is possible only with the help of a frame. A budget option for old, established buildings and country houses is to install gypsum boards on slats or beams made of softwood. In this case, the sheathing should not be tightly adjacent to the floor and ceiling of the room. The gaps are covered with plinth.
The mobility of walls in a new house made of wooden beams can reach 6 cm in height. Therefore, drywall is installed on a sliding frame made of metal profiles. This method allows you to avoid cracks from shrinkage of the house and perfectly level the surface.
Preparatory work
A preliminary calculation of the amount of materials and a detailed plan for covering walls and ceilings with plasterboard will help you draw up an estimate and prepare tools for its implementation.
The first step is to draw a sketch drawing of all the surfaces that need to be leveled. Then the lines for the location of the frame and the places of fastenings are drawn on the plan. At the design stage, it should be taken into account that the vertical joints of the slabs must fall on the profile axis with a horizontal shift in each row. Based on a carefully compiled project, you can easily calculate the number of required profiles, drywall sheets, connecting parts and fasteners.
To carry out high-quality fastening of gypsum boards, you will need a standard set of tools: a level, tape measure, marker and chalk for marking fasteners, a drill, a screwdriver, a knife or saw for cutting.
Guide profiles are installed along the lower and upper perimeter of the room. The first vertical post is fixed at a distance of 30 cm from the corner of the room, then in increments of 60 cm. Horizontal planks are fixed at the same intervals to support the structure. The ceiling plan is marked in the same way.
Installation of frame base and drywall in a wooden house
Fastening the frame begins with precise marking of lines for fixing the guide profiles. In a wooden house, these parts are rigidly fixed only to the surface that is being leveled. That is, the wall frame is not connected to the ceiling and floor.
If your house is still shrinking. then before starting work, prepare sliding fasteners for vertical profiles. A strip is screwed to the first level connector (“crab”) with self-tapping screws, on which the PAZ 2 sliding support is mounted. It is this support that is fixedly attached to the wall of the house. In this case, the crab together with the profile can move freely up and down within 6 cm. Sheets of drywall are cut out so that there is a small gap between the floor and the ceiling. This fastening allows the wall to “breathe” without compromising the integrity of the skin. Shrinkage seams along the floor and ceiling are covered with floor and ceiling skirting boards.
Crab type mount
Sliding mount "PAZ 2"
Fastening with crabs to the wall
If the house is no longer new and the shrinkage is behind us, then the “crabs” can be attached directly to the wall without fear of cracks appearing.
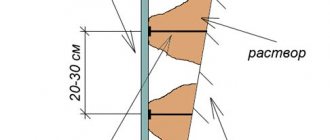
Work order:
- Horizontal guidelines for the guides are carried out at a distance of 10–15 cm from the upper and lower edges of the wall;
- Mark the lines for attaching the vertical posts;
- The guide profiles are rigidly fixed to the beam along the lower and upper markings;
- Sliding connections for vertical supports (4 for each) are secured along the guide lines;
- The main metal profiles and horizontal jumpers are installed on the crabs.
General view of the frame after installation
After installing the frame, the electrical wires are enclosed in a metal box so as not to damage them when attaching the KGL. If necessary, heat and sound insulation is placed in the cells between the racks. For this purpose, mineral wool is used.
Sheathing the frame with plasterboard slabs is done on metal profiles with a pitch between screws of 30 cm. The fastener caps should be buried 1 mm in the cardboard. Before finishing, the joints and fasteners are puttied, having previously been glued with serpyanka.
Attaching drywall sheets to the frame
Puttying joints using serpyanka
This video explains simply and clearly all the subtleties that need to be taken into account when installing the frame:
Installation from the edge of the wall
Installing drywall in this way in a frame house is not difficult if the calculations are followed. It will be necessary to use a building level, according to which the first sheet is set. Before this, you should mark and adjust the edge, which will subsequently be joined to the adjacent ceiling. A sheet of drywall is leaned against the frame of the house and fixed.
The following sheets are installed along the walls, maintaining order. The joining must be done closely along the beveled edges. If the material has right angles, then you will need to leave a gap of three millimeters between the plates. If necessary, before installing the last sheet, adjust its edge to the plasterboard from the adjacent wall
Afterwards, the installation of skirting boards with slopes in the corners of the room is carried out. If necessary, parts can be adjusted. The plinth is fixed with nails or self-tapping screws.
Now let's look at the cladding of walls that have an opening for a door. The procedure is performed as follows:
- The position of the ceiling door trim is marked on the cut of the drywall sheet. This is done by holding a sheet of material level with the door post;
- A strip two and a half centimeters wide is cut between the markings and the top cut of the sheet. The edge should lie in the center of the post;
- The sheet is fixed to the frame. By analogy, installation is carried out on the opposite side of the door, where it is also necessary to cut off 2.5 centimeters from the edge of the edge;
- To place it over the opening, you need to mark and cut a sheet of drywall that will be placed between two slabs on either side of the door;
- All edges will need to be cleaned using sandpaper.
After installation, the surface of the plasterboard sheets is puttied. In this case, it is necessary to carefully go through the places of cuts and joints. Next, the door frame and trim are installed. The final stage is the installation of skirting boards, nailed (or screwed) through a layer of drywall to the building frame.
Stand made of two profiles
The simplest method of strengthening a plasterboard partition is to make a frame from reinforced rack profiles, but very often this cannot be used due to the fact that the structure will be too bulky and massive, and the apartment may not be very large in any case. The use of a reinforced profile, the width of which is 100 mm, will increase the gap between the real wall and the false wall or, if it is a partition, significantly increase its thickness. This will affect the area of the room. Therefore, in small rooms and apartments it would be advisable to use another method - creating a rack from two profiles. Two profiles will withstand a greater load than one. They are connected to each other with self-tapping screws, the distance between the screws is 150-200 mm.
This method is not very common, since the profile is not intended for such work, and the design is not so practical, but it is quite suitable as one of the options.
Conditions for the construction of houses without finishing
1. First of all, we do not have any advance payment. Payment only upon completion and acceptance of work at your site.
2. Payment for each individual service. We have assembled the frame, you like everything - pay for the frame, and move on. No “all inclusive”, “turnkey for 2 million” and other deceptions, there is an area and there is a cost factor and nothing more.
3. Low prices. No extra people, no “margin”, payment only for work. No hidden fees or bad news in the middle of installation. All prices are already indicated in each project and no changes can be made.
4. High quality frames. Reliable roof frames using Canadian or Finnish technology. Frame posts 150x50, floor joists and trusses 200x50. A rigid frame, regular 150×50 jibs attached to the corners of the frame, you will walk on the floor as if on a concrete floor.
5. Don’t overpay anyone. Give the complex areas (frame, roof, cladding) to us, and do the rest yourself - insulation, interior finishing.
Mounting methods
The question often arises: Is it possible to attach drywall to a wall without a profile? Drywall can be attached to the wall in two ways: framed or frameless.
One of them is selected based on the conditions:
- type of main surface;
- magnitude of elevation differences;
- the nature of the premises;
- operating conditions of the finishing material.
The frame method is the main one and has some advantages over fixing gypsum boards directly on the wall, but it is more difficult to implement and requires large financial investments.
Its advantages are as follows:
- The curvature of the wall does not matter.
- The main surface does not require careful preparatory work.
- Insulation or soundproofing material can be laid under the drywall.
- Inside the frame there is enough space for communications - heating pipes, electrical wiring.
This method involves the formation of a frame from a galvanized profile, to which sheets of drywall are already attached.
If the dimensions of the room do not allow you to construct a frame, you can attach drywall to the wall without a profile.
The frameless method is simpler, but its implementation requires the following conditions to be met:
- A solid base, cleaned of old finishes and not damaged by microorganisms.
- The wall is protected from moisture and is also well insulated.
- The surface is thoroughly cleaned of dirt, dust and oil.
- There should be no significant distortions of the wall.
- The height of the ceilings should not exceed the length of the gypsum board, since without a frame it will not be possible to perform high-quality transverse joining.
The disadvantage of the frameless method is limited design possibilities. In this case, it will not be possible to form wall niches.
Advantages of using the material
Using drywall in a frame house for cladding is a rational solution that has its pros and cons, but the advantages still outweigh the disadvantages. The material is lightweight and environmentally friendly. It is easy to install, no need to wait for it to dry.
Fastening is carried out as follows: the sheet material is fixed using screws or glue, after which its surface can immediately be painted, plastered, or covered with wallpaper. In addition, a layer of insulation can be installed under the drywall. To do this, before its installation, mineral wool and a vapor barrier are fixed to the surface, which are covered with a sheet of plasterboard.
We insulate the walls before installation
Before installing drywall, optional insulation is installed - mineral wool, polystyrene foam or another. To prevent the insulation from getting wet, a vapor barrier film is attached on top of it. All materials are purchased with a 10% reserve.
To install, for example, polystyrene foam, the following stages of work are performed:
- Additional alignment of the walls is carried out or the most protruding section along which installation will be carried out is determined;
- The wall is treated with a primer;
- Polystyrene foam is installed in the reverse order of drywall - that is, pieces are first placed on small surfaces, and then large sheets are used;
- Window openings and other potential gap hazards are additionally puttied;
- After a couple of days, the sheets are additionally secured with disc-type nails, for which holes are drilled in the wall;
- If at this stage there are gaps left, they are covered with pieces of polystyrene foam or polyurethane foam (toluene-free!), the excess is cut off with a knife, and the joints are once again covered with an adhesive solution.
A special stapler is used to attach the cotton wool. You should also avoid the appearance of cracks or clearings at this stage, since otherwise the meaning of thermal insulation will be lost.
Insulation of a wooden wall under plasterboard with cotton woolSource gipsokarton-blog.ru
The stage of treating walls against fungus and fire should be carried out before laying the insulation.
Next, the drywall itself is attached, while maintaining the order - large sheets are attached first, then small elements.
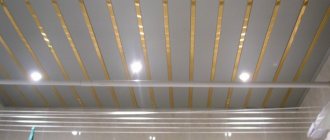
Ceiling plasterboard
The process is practically no different from wall cladding. Along the perimeter of the room, a UW ceiling guide profile is attached to the walls, always level. The ceiling is marked for the main profile and hangers are installed. All profiles are inserted into the guides, but are not fixed with hangers. First, a thread is stretched across several places from one guide to the opposite one, which will mark the desired level and the profiles are already fixed along it. After this, you can begin installing the sheets on the ceiling, which is best done together.
Video description
For some more useful insulation tips, watch the video:
Installation of drywall on walls
This step seems simpler than the previous one, but it still requires:
- observe the technological gaps - you can leave 1 cm at the bottom, then cover it with a plinth, you will need more at the top - about 5 cm;
- in addition, you need to leave 2 mm between the sheets themselves, then cover them with putty;
- the option of “overlapping” installation is allowed, when the edges of the sheets are manually processed, forming angles of 45 degrees, then placed “butt”; horizontal lines for laying drywall should not converge (sheets are laid in a “checkerboard” order);
- It is recommended to screw in the screws at a distance of a maximum of a quarter meter from each other, but no more;
It is better to glue the seams on top with tape (“serpyanka”) and then putty.
Internal plasterboard cladding of a frame house
Published on August 15, 2017 in the category Building materials // 0 comments // Author: Admin
- 5
- 4
- 3
- 2
- 1
(0 votes, average: 0 out of 5)
Whenever a frame house is being built, the question is what to cover it with. Many people ask whether it is possible to sheathe a panel house with plasterboard. Experts say that it is not only possible, but also necessary; this option is the most optimal. We will find out whether this is so, and how to properly decorate the interior of a frame house with plasterboard.
Video description
In some cases, to save space, profiles are recessed into the walls. In this case, it is necessary to take into account the inevitable shrinkage of a wooden house. Clearly shown in the video:
The gaps between the ceiling and the sheets are closed with decorative elements, but it is worth knowing that they should not be attached to the walls either. To maintain flexibility in the movement of structures, the screws are not tightened tightly; I leave a small gap in case the structure “walks.” But the head of the screw should be “recessed” so that later you can properly putty the surface or hang wallpaper.
In the bathroom and kitchen, drywall must be covered with waterproofing. Source dp32.ru
The final finishing of a wooden house with plasterboard after installation also allows for laying tiles.
Ceramic tile cladding
The process of covering walls with ceramic tiles is considered a “delicate” job that requires certain skills. However, the process of laying tiles is extremely simple:
- the surface is carefully primed;
- the carefully primed surface is covered with a special tile adhesive;
- The tile is applied to the glue;
- The position of the laid tiles is checked with a building level and, if necessary, it is adjusted with a special rubber hammer;
- Uniform jointing of the tiles is ensured by installing special plastic crosses between them.
There are other options for choosing materials for interior decoration. The article briefly describes only the most common ones. And which one you give preference to – the choice is yours.
Read with this
- How to attach drywall to a wall: 2 installation methods
- Interior finishing of timber houses with plasterboard sheets
- Required profile for a plasterboard partition: 3 types
- Technology for constructing a frame house from metal profiles
- How to sheathe a ceiling with plasterboard: tools and necessary materials, markings, arrangement of the frame, installation of sheets
- Metal sheathing
- How to make a lathing for plasterboard on a wall: types of lathing, materials
- Reviews from real owners about frame houses
- Painting drywall: 4 finishing features
- Stages of building a frame garage with your own hands
Basic materials
When choosing a material for construction, you should perform a good engineering calculation. There are several design options:
- Frame and sheathing;
- Frame-panel;
- Sip panels;
- Frame-fill.
This method involves the use of boards to construct the frame. The structure is sheathed in addition to the timber. The thickness of the boards is 25 mm, the size of the chipboard slabs ranges from 16-20 mm.
We suggest you read: Thermal insulation of a stove from a wooden wall
The inside of the walls is insulated. The thickness of the walls depends on the insulation
The finishing and the distance between the boards are also taken into account.
The construction method has many advantages. The structures are erected quite simply and quickly. A small number of workers will be required, no special equipment will be needed.
The thickness of the walls is determined by the size of the timber and the selected insulating material. On average it is about 150 mm.
This is the most economical construction option. This method is mainly used to build utility rooms, but it is also used for residential buildings. The walls of the structure are insulated with slag, sawdust, expanded clay or cellulose filler. The frame is sheathed with a slab.
The thickness of the walls depends on the external and internal finishing, on average 150 mm.
Frame of a house under a roof without finishing
The practice of modern frame house construction requires quality work at every stage. Until recently, this type of construction as the frame of a house under a roof without finishing was not known to a wide range of customers. People ordered turnkey frame houses. Usually they came to some exhibition center of houses, selected it by appearance according to the “what is” type and ordered construction. After this, the customer and the contractor’s company signed one contract for all work and proceeded to installation. As a result, the customer received what he wanted, that is, the picture of the appearance of the house that he saw at the exhibition site. The work was completed and the satisfied customer moved into the house. Home Sweet Home. Is it worth telling what the owner of the house encountered after two weeks or a month of living in such a house. Suddenly it turned out that the floor was creaking and more like a trampoline, that the rolled insulation had slipped and there was no fifteen centimeters under the ceiling at all and the wall there was freezing. And even the worst thing was that the house was shaking. What can I say, I myself worked for several years in the largest company in Bronnitsy and I know this kitchen from the inside. The houses left much to be desired. Despite the fact that the house was built for a ridiculous 700 thousand or a million rubles, it was just a beautiful picture of the facades. It was impossible to live in such a house; it could only be burned. Suing such companies was ineffective, since competent lawyers not only drafted the contract in the right way, but also represented the interests of the company on behalf of the defendant in the courtroom. Often such lawsuits were lost; the customer could only bulldoze the house and build a new one or endure freezing and sagging boards. For many at that time, faith in reliable frame houses had completely died; some customers went to foam concrete options or to mortgaged apartments, which is especially sad for our ideology.
But time does not stand still and the trends towards improving the quality of the frame and each individual unit are becoming higher. Many information resources have been posting more and more information on structural components of frames and video reviews. Competition, mainly on YouTube, forced designers to improve their skills and improve the design of frames for increasingly reliable performance. For customers this resulted in higher prices. Nobody wanted to order a house for a million anymore, and companies that had good designers began to push away cheap competitors and enter the market themselves. The price per square meter of a turnkey frame house grew by leaps and bounds, but was still below the average price of an apartment in the Moscow region. Prices went beyond the level of 16-20 thousand rubles per square meter. But then the market faced another problem - the global and, as a consequence, the Russian financial crisis, which worsened in 2014. The incomes of Russians, read Muscovites, began to fall and paying 3 million rubles for a frame house in 120 square meters became unaffordable for many. Moreover, competition, constantly spurred by the entry of new players into the market, largely thanks to Business Youth, has made the opportunity to “take” such an order for the average construction company almost impossible. Everything was divided among the mastodons of frame housing construction.
Moreover, most of the customers were ready to carry out the basic work themselves, such as insulation, flooring, interior finishing, drainage system, metal structures for retaining snow and treating the boards with fire protection. All the customer needs from the contractor is the frame of the house under the roof without finishing
That is why, in order to stay afloat, many companies, including us - Karkas Master, began to use separate construction. Only a frame under the roof or a frame under the roof without finishing and insulation is the basis of our work.
Frameless method
There is a frameless method of finishing with plasterboard in a wooden house. Its advantages are that there is no need to make a complex sheathing from beams or metal profiles, as well as in maintaining the maximum usable space in the room, because the thickness between the load-bearing walls and the gypsum board sheets will be the smallest. To attach drywall, you do not need screws or self-tapping screws; it is done using glue.
The frameless method of sheathing with plasterboard can only be used if the maximum difference in the wooden walls in the house does not exceed 20 mm. It is better to select sheets with a thickness of 9.5 - 12.5 mm. Drywall is attached to a vertical surface using putty-based adhesive.
To prepare the glue, use starting putty in a ratio of 13 - 14 kg per 1 liter of water, mix thoroughly with a mixer. Before applying to the walls, they should be primed with a deep penetration acrylic or polymer primer. For better adhesion, you can prime the drywall sheets themselves. Then, using a spatula, apply spots of glue 130 - 150 mm wide on the walls, smooth them and lean the sheet against it, then level it.
These operations are repeated with the following sheets. It is necessary that the finished adhesive composition does not stand idle for more than 30 minutes, otherwise it thickens and loses its beneficial properties. The joints between the sheets are then coated with putty and covered with reinforcing tape.
Tools and materials for work
You should immediately decide how the drywall will be attached.
- If the frame house is already sheathed from the inside with OSB boards and the evenness of the walls is not satisfactory, and communications are laid in the frame, the sheets can be attached directly to the sheathing.
- If the frame is not sheathed on the inside at all, drywall is used as an internal sheathing element, after first checking the evenness of the installation of the supporting structure.
- If the walls need to be leveled, you will have to make a frame for drywall - metal or wood.
To work with drywall you will need:
- Drywall knife.
- Materials for the frame - metal profiles (wall CD or ceiling CW) and guides (for walls UD or ceiling UW) or wooden beams 4x7 cm.
- A wood saw for cutting bars or metal scissors when working with a profile.
- Screwdriver.
- Edge plane for chamfering the edges of sheets.
- Self-tapping screws for drywall and profiles.
- Tile adhesive - if the drywall is attached directly to the internal OSB cladding.
- Putty.
- Serpyanka - for reinforcing seams.
Internal frame of a house without finishing
Why drywall
- inexpensive;
- does not require special preparation of the base surface;
- has good breathability;
- is friendly with any adhesive compositions;
- can be used for installation of false walls and partitions;
- subject to any finishing treatment.
Of course, there are no ideal products – even Apple is no exception here – but the balance is clearly in favor of the pros, please note:
- afraid of direct contact with water;
- easily subject to deformation due to mechanical stress;
- It is very difficult to mount hanging furniture and some accessories with significant weight.
Perhaps one thing is clear - there are no worthy alternatives to drywall and are not expected. Therefore, the ability to attach this material to the wall is one of the basic skills of a home craftsman, which, without a doubt, you can become.
Methods for installing gypsum boards
To decorate a frame house, interior finishing with plasterboard is carried out in two ways - the same as during renovations in ordinary apartments:
- 1st method – frameless installation;
- 2nd method - using frame structures.
Installing gypsum boards using the first method is the least expensive and labor-intensive process. Sheets of material are simply attached to a gypsum adhesive mixture, such as Perlfix. The use of such fastening allows you to very quickly complete the interior decoration of rooms. But there is one drawback: adhesive fastening makes it possible to design only straight surfaces.
The frame installation method is more universal, since such structures can be used to create various shapes: arches, columns, domes, which is very important for designer renovations.
Also, the finishing method based on metal profiles is more durable due to the use of multiple attachment points.
Finishing the inside of a frame house with plasterboard using one of the selected methods is the most optimal option, in which you can quickly bring any new building into a residential appearance.
Frameless installation
To finish a room using gypsum plasterboard without a frame, you will need only two types of materials - glue and drywall itself with the addition of a small number of screws.
We use only special gypsum assembly adhesive. The most proven product is Perlfix from the Knauf company.
It is better to use drywall with a thickness of at least 12 millimeters, then it will provide sufficient strength to the walls.
And of course, you need a minimum set of tools: a tape measure, a level, plaster spatulas, a mixing attachment, an electric drill.
Installation is carried out in several stages:
- The surface of the walls is treated with a primer with antiseptic additives.
- Each sheet of drywall is cut to the required size. There are sheets of different parameters on sale. Typically the dimensions are: length – 2.5 meters, width – 1.25 m.
- Gypsum mounting adhesive is prepared by adding water and thoroughly mixing using a mixer.
- The mixture is applied to the surface of the plasterboard with a spatula or trowel along the perimeter in increments of 400 - 500 millimeters, and inside - every 200 - 250 mm.
- After processing, the plasterboard sheet is applied to the wall surface and leveled.
- For additional fastening, it is recommended to add several self-tapping screws screwed directly into the wall.
Construction adhesive dries very quickly, so do not prepare it in large quantities.
If suspended ceilings are planned, then additional fastening with self-tapping screws must be made along the upper cut of the sheet.
To level, you can tap the sheet a little, but be sure to use a rubber mallet or a wide wooden beam.
Frame finishing method
The most common method of installing plasterboard structures. It has a lot of positive advantages: strength, durability, resistance to various influences and others. More complex than the frameless method, but nevertheless allows you to create real works of art from plasterboard.
Most often, a wooden frame is used in frame buildings, since the walls are often made of wood. But you can use metal profiles that are properly galvanized.
What is needed to install plasterboard structures in this way?
- Roulette and level.
- Guides and rack profiles (marked UD and CD, respectively).
- Direct hangers for attaching frame posts to walls.
- Self-tapping screws: for wood 45, 25 millimeters, as well as “fleas” (“bugs”).
- Drill and screwdriver.
- Grinder and metal scissors.
Of course, the list may be wider; other types of profiles are used for interior partitions, and an arched one will also be needed.
So, how do you make a frame-based finish?
1st stage. The surface of the walls is being prepared. Be sure to treat well with antifungal compounds. You also need to do the wiring, and if planned, lay the insulation.
2nd stage. Marking. Marks are made where the guide profile will be laid and the racks will be installed.
3rd stage. Assembly. To begin with, lay a guide profile on the surface of the floor and ceiling and fix it using self-tapping screws. Stands are inserted into the guides and secured to them using “fleas”. Each of the slats is additionally secured with hangers to the walls. The quantity should be three to four per sheet.
The fastening plate is placed under the rack profile and secured with self-tapping screws. The edges are folded and firmly screwed to the stand. The excess ends are cut off or most often bent inward.
The strength of the entire structure is ensured by transverse slats made of the same CD profile.
All connections between metal parts are made using small self-tapping screws. The entire base is leveled.
4th stage. Sheathing. Plasterboard sheets are cut to the required parameters. They are applied to the frame and secured with 25 mm self-tapping screws. To fix, you need to step back 15 - 20 millimeters from the edge of the sheet, the pitch of the points is 250 - 350 mm, in three or four rows.
5th stage. Preparing for finishing. The assembled structure is being prepared for plastering. The joints are sealed with sickle tape. The surface is primed.
The wooden frame is mounted directly to the walls or on previously laid main beams.
Connections between the slats are ensured by mounting angles and self-tapping screws. The wooden base must be dry and treated with an antiseptic.
Apply glue to the GLK sheet with a comb, press it against the wall, and then screw it with a self-tapping screw with a wide thread. Make grooves for the wiring. The width of each gypsum board sheet, which is used for upholstering a frame house, is 1205 mm. Thus, the following installation step must be observed: from the edge of the sheet - 400 mm, then - 405 mm, to the edge of the sheet - 400 mm.
The pitch with which the screws are fastened should be 250 mm. It is recommended to install glass wool between the frame slats, which will greatly improve the heat-saving and sound-proofing properties. 2) Cross frame, when a horizontal sheathing made of 50x50 mm timber is mounted to the studs of the external walls for an additional layer of insulation, vapor barriers and a vertical sheathing made of 25x75-100 inch boards with a pitch of 400 mm under plasterboard 12.5 mm thick. Communications pass behind gypsum board (or vapor barrier, subject to careful sizing of wire and pipe outlets). Finishing the walls with plasterboard is the penultimate stage in the construction of a frame house.
In my opinion, thanks to the appearance of plasterboard on the walls, the magical transformation of frame walls into living space occurs. The assembly of partitions will require the presence of a load-bearing beam with a cross-section of at least 50-100 mm. They are attached to the floor and ceiling, and the racks of the interior partition frame are mounted on them.
In finishing frame houses, it is quite advisable to use a frame made of wooden beams for sheathing with plasterboard. After all, in fact, the house is built from the same material. Moreover, installation will cost slightly less than, for example, when using a metal profile. Vapor barrier. The sheets are produced with polymer-polyethylene backings that provide moisture resistance and thermal insulation qualities.
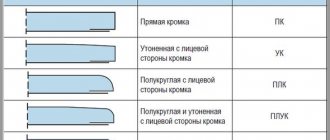
They reflect thermal radiation and are used for interior work. Sheet width 0.9-1.2 m; length - 1.8-3 m; thickness is standard. The cut shape is rectangular or beveled.
According to parametric data, the material is divided into four types: standard and narrow, underlying, thermal insulation, vapor barrier.
Wooden sheathing
It is especially appropriate if drywall is being installed in an old wooden house. Its shrinkage is complete, and the walls are probably not too smooth. But the main thing is that they only breathe and will not change much in size.
- A block measuring 75x25 mm is taken under the support posts. More is possible, less is in no case. Naturally, the sheathing is made from lumber treated with fire retardants and antiseptics, followed by drying.
- For guides and crossbars, 50x25 mm strips are sufficient.
- The support posts are attached in increments of 1.2 meters, that is, the width of the gypsum board sheet. At least one guide is mounted between them. If you want greater structural strength, stuff them more often. The main thing is that there should be a support post in the center of the sheet, and a guide at the junction of the plates.
- The crossbars are packed in such an order that they are located at the junction of the narrow sides of the gypsum board. Do not forget that horizontal seams should not line up: drywall is installed in a checkerboard pattern or at least with a noticeable offset.
All slats are leveled. The largest protrusion of the wall is taken as the reference point. In places of depressions, wedges are placed, hewn to the required thickness. When finishing the interior of your house with plasterboard on a wooden frame, the slats are attached to the lumber with screws and a washer at a distance of 20-30 cm. They should not be tightened too much so that the sheathing does not deform during natural movements of the walls.
How to decorate the facades of a frame house?
The main element of such a house is a wooden or metal frame system filled with insulation. The options for finishing a frame house are so varied, it all depends on your taste and capabilities.
All wooden elements are treated with antifungal and fire retardant compounds.
The walls of a frame house look like this:
Many people wonder: is double-sided wall covering with OSB boards necessary? This, of course, leads to an increase in the cost of the structure, but will provide the house with rigidity and solidity. You can safely hang furniture and other equipment on the walls.
The technology of frame house construction will not require additional time for shrinking the house and drying the building materials, so you can almost immediately begin finishing the walls, both external and internal.
There are several options for finishing facades. Like any facade, it can be plastered and painted, the walls can be lined with siding, clapboard, or a block house (imitation of a wooden house) can be used.
There are two ways to plaster the facades of a frame house:
- plastering is carried out using sheets of façade foam plastic, previously fixed to the façade using glue and clamping dowels;
- or plastered directly on OSB sheets, having previously treated the joints with frost-resistant sealant, pasted the walls with fiberglass mesh and primed them. But this method is not durable; it is more suitable as a temporary option.
Cladding with siding is a budget option, while the facades look finished and neat. A variety of colors and imitation of various textures provide ample opportunities to make the house attractive and combine it with the color of the roof and window frames.
First, along the perimeter of the facades, a sheathing is made of 50x25 mm bars or metal profiles in increments of 50 cm, to which panels or siding strips are subsequently attached with self-tapping screws. Decorative profile corners are installed at the corners of the house.
Facade boards can be used as a facing material, as do residents of Scandinavian countries who prefer more natural and environmentally friendly materials. In addition, wood provides additional thermal protection.
To fasten the board you will need the same frame of bars. In addition, for durability, the board must be treated with an antifungal compound, primed and painted in two layers.
There are several types of façade board fastening:
- horizontal or vertical;
- tongue-and-groove connection:
- butt or overlap fastening.
Composite boards meet increased requirements: they will last longer than conventional boards and do not require additional treatment with varnishes and mastics.
A type of wooden facade decoration is a block house, while the house looks as if it was built from timber.
The facades of a frame house can be faced with clinker tiles or artificial stone, which will give the house not only an attractive appearance, but also protect the walls from precipitation and damage. Before cladding, an insulating material - foam plastic - is attached to the surfaces and covered with a reinforcing mesh, and then the tiles are glued to a flexible adhesive.
Cladding facades with brick is not the cheapest option, because the frame construction system itself is primarily attractive due to its low cost compared to other types of construction. However, there are adherents of this finish. Nevertheless, such cladding increases the reliability of facades and gives the house a respectable appearance.
A ventilated gap must be left between the walls and the brickwork. For such cladding, a foundation with a high load-bearing capacity will be required, on which the brickwork will rest.
Plasterboard wall covering
The work must begin with the installation of a film-type vapor barrier membrane. Such material can be single- or multi-layer and differ in its properties and cost. Fastening is done with a stapler.
It is recommended to stuff wooden planks up to 4 mm thick on top, which will create an air gap between the membrane and the gypsum board or gypsum board. This is if the frame is wooden. Drywall is taken with a thickness of 12.5 mm. A less thick one is suitable for the ceiling.
Sheathing is performed with sheets placed vertically or horizontally
It is important that the sheets meet with uncut edges. It is recommended to leave a gap between the bottom of the sheet and the floor from 15 to 35 mm
Fasten to the timber not only with screws. It is better to use a screwdriver rather than a screwdriver. The use of nails with flat heads is allowed. Fasteners start from the center to the edges of the sheet. The joints should not touch the door frame.
The recommended step for screwing screws into the ceiling is 20 cm. Screw them in in pairs: on adjacent sheets, the distance between them is at least 5 cm in length.
Installation is completed with putty, primer and finishing. Seams usually require three layers of putty. Each stage is accompanied by priming followed by drying. Paint, tiles or wallpaper are used as finishing.
Interior finishing of a frame house with plasterboard
One of the most popular materials for finishing frame-type residential buildings is plasterboard. It is ideal for this case because it is lightweight and does not overload walls and ceilings. In addition, frame houses are built quickly, so their owners expect that the work on the interior finishing of the frame house with plasterboard will be completed as soon as possible so that they can already move in. Installation of gypsum board panels does not take much time, of course, provided that it is carried out by professionals who know exactly what needs to be done and how and have extensive experience. Such craftsmen work on the staff of the Rosprofstroy group of companies, so we carry out the interior finishing of a frame house with plasterboard quickly and with very high quality. We do things many times faster than our competitors, because we work in 3 shifts, seven days a week, and use the most modern equipment.
The interior finishing of a frame house with plasterboard is done at the rough stage. There are several specific points that must be taken into account in the work:
- Walls and ceilings in frame buildings initially have no flaws, so gypsum plasterboard is used not so much for leveling as for strengthening load-bearing structures and serves as a base for finishing.
- It is very convenient to hide communications and wires behind gypsum board panels.
- Multi-level ceilings are often made from this material according to exclusive design projects, and thus unique interiors are created in individual rooms of frame houses.
- Frame-type residential buildings are valued for their environmental friendliness and practicality, and finishing with plasterboard, which is also a natural and safe material, only enhances these advantages.
GSK Rosprofstroy carries out interior finishing of a frame house with plasterboard
on a metal frame. The free space between the panels and the wall is used for laying cables and locating communications that are not exposed to the interior. Stages of work:
- According to pre-applied markings, frame parts are attached to the wall using self-tapping screws;
- Wires are laid in special boxes;
- if necessary, a layer of insulation is laid;
- GKL panels are mounted on the frame using self-tapping screws;
- The joints between the sheets of gypsum board are sealed with putty, all seams are sanded.
After completing the process, the craftsmen begin finishing - applying decorative plaster to the layer of drywall, gluing wallpaper or tiles, etc.
Installation of a wooden frame under plasterboard
Tracing the lines connecting the partition to the walls
To draw lines, use the rule
Before proceeding directly to the installation of the partition, it is necessary to make a routing (marking of lines) along which the partition will adjoin the walls, floor and ceiling of the room. (See also the article How to build a partition from plasterboard: features.)
To do this, measure the distance at which the plane of the future partition should be located and step back the width of the gypsum board sheet from it.
It is better to do this along the ceiling-wall line. Having marked the desired point under the ceiling, it is easy to move it plumb down the wall. To do this, hammer a nail into a point, hang a plumb line and mark the corresponding point at the bottom of the wall, near the floor.
A centered weight with an axis indicator should be used as a plumb line.
We connect these two points and get the first line. Next, you need to draw a line perpendicular to the wall from the bottom point.
- This can be done by constructing an “Egyptian triangle” - a right triangle with an aspect ratio of 3:4:5, where 3 and 4 correspond to the legs, and 5 is the hypotenuse. In this case, we put one leg along the wall from the bottom point, making it a multiple of three.
- From the bottom point we build an arc of a circle in the direction perpendicular to the wall with a radius that is a multiple of four.
- From the other end of the leg, built along the wall, we build a circular arc with a radius that is a multiple of five so that it intersects with the previously constructed arc.
- By connecting the intersection point of these arcs with the original lower point, we get a perpendicular to the wall. We draw a line on the floor along this perpendicular - the second line of our partition.
In the place where the floor line connects to the opposite wall, mark a point below. Using a level or plumb line, transfer it to the ceiling. We connect the lower and upper points and get the third line. (See also the article Drywall niches in the wall: how to make.)
We connect the two upper points on the walls along the ceiling and get the fourth and last line. Thus, we must draw a rectangle along the lines floor-wall-ceiling-wall, along which the partition will adjoin the room.
Frame installation
Wooden frame for plasterboard partition.
As can be seen in the photo, the frame consists of a frame, vertical and horizontal bars. The installation of the frame should begin with the frame.
To do this, fasten the bars along the lines that we built along the walls and ceiling. If the house is wooden, we fasten them with screws or tenons to the ceiling beam, floor joists and walls.
If the building is made of stone, we fasten the bars with dowels and screws. You can also use direct hangers or brackets.
The Knauf bracket can be used to attach beams to the wall.
We attach solid bars along the walls and ceiling. Along the floor, the timber should diverge in both directions from the doorway. If the opening is located against the wall, the bottom beam will be solid and will lie on one side of the opening.
So, we attach all the bars and use an impact drill with a concrete drill to drill holes in the walls and ceiling.
Doorway
The doorway is formed by double risers
Instructions for installing a doorway with your own hands:
- To do this, we install two risers on either side of it. The width of the opening should be 4–5 cm wider than the door frame.
- We install risers and strengthen them with additional bars.
- At the height of the door frame plus 2-3 cm, we install a horizontal jumper, which we connect with two vertical bars to the ceiling rail.
- Vertical beams give the structure additional rigidity and are needed for joining sheets of drywall.
We cover the walls
Wall sheathing, performed with plasterboard in a frame house, occurs according to the following principle: a sheet of material is attached to the frame posts using nails or self-tapping screws. In the case of a metal frame, you will need to screw in self-tapping screws. A sheet of drywall can be attached both vertically and horizontally, depending on the size of the room and in order to reduce waste of building materials.
The internal walls of a frame house can be blank, dividing the space by partitions, or have openings for doors. In the first case, the sheets are attached from one edge to the other. In the second option, you need to work from the door in different directions.