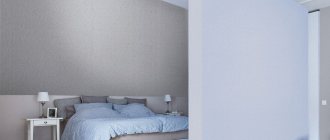
Using wallpaper you can easily create an atmosphere of comfort in your home. A large selection of this finishing material on the market allows you to choose it in accordance with any interior ideas. Many different tones, all kinds of textures and patterns - all this makes wallpaper a good assistant in repairs. After the decision is made to decorate the walls with a paper embodiment of the design idea, many people wonder how to glue wallpaper onto drywall?
Pasting wallpaper onto drywall is considered the most common method of finishing walls. The gluing process itself does not take much time and does not require special skills. The only caveat is the fact that wallpaper makes quite a lot of demands on surface quality.
Is special preparation necessary before wallpapering?
Before you start gluing wallpaper, the surface of the drywall must be well prepared. Many people think that gypsum board has a perfectly flat surface, so the question arises: is it possible to glue wallpaper onto drywall without first preparing the walls?
In principle, you can glue wallpaper onto drywall without preparation, but as a result you will get the following:
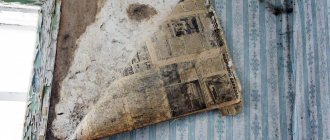
- The putty joints and places where screws are attached will be visible through the finishing. If they are not treated at all, the wallpaper in these places will tear, and rust from the screws may appear on them.
- Wallpaper on drywall without putty is glued “tightly”, which will cause a lot of problems in the process of subsequent repairs. When it becomes necessary to replace the wallpaper with new ones, you will have to either tear off the old ones with pieces of drywall, or stick them on top of the old ones.
There is only one conclusion: drywall must be prepared for wallpapering.
All preparatory activities can be presented in the form of a step-by-step scheme, each point of which requires careful implementation.
Features of drywall
GCR stands out for its health-safe properties and ease of use. It’s easy to get smooth walls with it, and the result is pleasing to the eye. At the same time, after work there is a minimal amount of garbage left, which is also a plus. You can also note the following advantages of drywall:
- Good sound insulation;
- Not highly flammable.
The material is lightweight, so it is easy to transport and work with.
GCR stands out for its health-safe properties and ease of use.
Stage No. 1. Primer
The primer improves the adhesion of the putty to the drywall, prevents the absorption of moisture from the putty and wallpaper glue into the plasterboard, as well as the development of fungus and mold.
USEFUL INFORMATION: Plasterboard ceilings: design for the hall, two-level, figured, photo
The most common is acrylic primer, although other types can also be used. The mixture can be purchased ready-made or dry, requiring independent preparation. If the choice is made in favor of a composition for home-made preparation, it is important to strictly follow the dosage suggested by the manufacturer.
Priming drywall for wallpapering is done with a brush or a fleecy roller. The composition must be distributed as evenly as possible over the wall and wait until it dries completely.
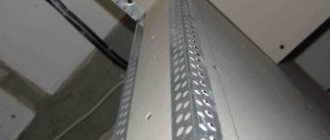
Stage No. 2. Sealing joints
Correct application of joint sealing technology allows you to make the joint, which is the weak point of the plasterboard structure, strong and invisible. Drywall seams are filled with a special putty designed specifically for these purposes (Knauf Fugenfüller, Knauf Uniflot, etc.), or with a high-quality starting mixture.
- If there is no chamfer at the ends of the sheets, it is removed with a knife at an angle of 45 degrees.
- The space between the sheets will be filled with joint putty, which must dry before starting the next stage.
- To reinforce joints during the process of sealing them, serpyanka is used - fiberglass tape with an adhesive composition specially applied to the surface. It must be glued very tightly in the center at the joints between the sheets. If the material does not adhere well, it is permissible to add PVA glue in a small amount.
- The seam is puttied.
- After drying, the putty is rubbed down with fine-grained sandpaper.
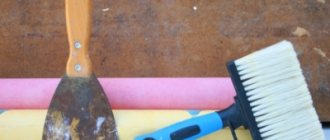
Tools and materials for work
To get started, you first need to take care of the necessary tools and materials. For this process you need to prepare:
- Painting knife or scissors;
- Tape measures and marker for marking;
- A spatula for sealing seams and a plastic spatula for smoothing wallpaper;
- Serpyankas of different sizes;
- Wallpaper and glue for them;
- Reinforcing mesh;
- Primer.
To get started, you first need to take care of the necessary tools and materials.
Where does gluing begin?
For a new premises you need to do the following:
- The wall is checked for flaws and they are eliminated.
- The sheets are primed; it is better to work with a brush in the fastening and joining areas.
- The joints are reinforced and the mesh is secured using a special mixture.
- After the layer has dried, small defects are eliminated with sandpaper.
- The fastening points are covered with putty, and after drying they are cleaned.
- All fasteners and joints are covered with another layer of primer solution.
- All markings must be covered with putty.
After preparation, a vertical strip is drawn on the surface with a level, the length for cutting the wallpaper is measured, 5 cm is added to it. The adhesive solution is prepared in advance according to the instructions.
The glue is applied both to the surface and to the strips; it is possible to apply glue only to the surface, it depends on the type of wallpaper. Gluing is done from top to bottom, the strips are carefully smoothed out. They are glued end to end.
Gluing is done from top to bottom, the strips are carefully smoothed out.
How to glue in corners
Carefully apply the adhesive solution in the corners using a brush, measure the distance from the sheet of wallpaper to the corner in order to cut the appropriate width. To the measurement you should add 5-15 centimeters to enter the adjacent wall when working with an internal corner, and 2-3 cm for an external one.
On the adjacent wall, after gluing the strip, its width is measured and a vertical line is made. It will become a guide for gluing another strip, overlapped.
Carefully apply the adhesive solution in the corners using a brush, measure the distance from the sheet of wallpaper to the corner in order to cut the appropriate width.
How to stick under the baseboard
Flexible and soft ceiling plinths are glued to the material using liquid nails. If the skirting boards are already installed, then the finishing material is glued onto it. Using a spatula, the baseboard is moved aside to slide the wallpaper under it. Excess parts are cut off. The baseboards on the floor are fixed on top of the finishing, leaving a couple of centimeters of material underneath them.
If the skirting boards are already installed, then the finishing material is glued onto it.
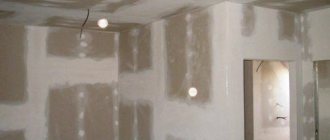
Stage No. 3. Puttying plasterboard walls
You can prepare the putty solution yourself using a construction mixer, or you can purchase a ready-made mixture. For drywall, two types of putty are used: starting and finishing.
- Using starting putty, you can eliminate any defects and damage to drywall caused during the installation process.
- The finishing mixture must be applied at the finishing stage; it gives smoothness and allows you to remove minor defects and irregularities. If the drywall has no defects, one layer of finishing putty will be enough, and the starting putty may not be used.
USEFUL INFORMATION: How to make a plasterboard partition with a door with your own hands
The puttying process itself is performed with two spatulas. The small one is necessary in order to draw the solution from the container, the wide one allows you to apply and evenly level the putty.
Features and Recommendations
Important recommendations for this process that will help you complete the perfect repair:
- You should start gluing from the door or window opening;
- The material must be cut on a clean horizontal surface;
- It is necessary to completely remove air from under the wallpaper;
- Excess glue must be wiped off immediately;
- Trimming the excess part of the strip is done under the ruler with a knife.
The material must be cut on a clean, horizontal surface.
Wallpaper under drywall without putty can be glued, but this is not advisable, because unsightly defects may appear on the surface. And the appearance of the coating will be ruined. You should work slowly, paying special attention to preparation. Then the decoration of the walls in the country house or at home will delight the eyes of the owners.
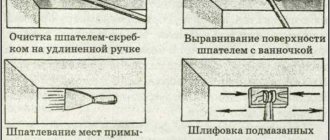
Stage No. 4. Grinding
After complete drying, the surface is rubbed with sandpaper. Sanding is done with coarse-grained and then fine-grained sandpaper.
This stage of wall preparation must be performed carefully and slowly. Carelessness can cause chips to appear, after which it will be necessary to repeat the puttying of the walls again.
Before starting work, make sure you have personal protective equipment, since sanding produces a lot of caustic dust that can get into your eyes and respiratory tract.
Stage No. 6. Wallpapering
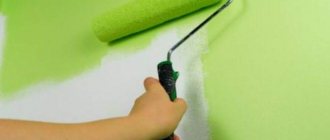
Before gluing wallpaper onto drywall, you need to select the appropriate adhesive and mark the wall along the width of the roll. This will allow you to calculate the number of rolls needed for gluing and will facilitate the entire process.
It will be more convenient and practical to apply the glue with a special roller. First of all, you need to coat the inside of the canvas, and then the section of the wall where you plan to glue the canvas. Next you can glue the sheet. It will be good if you have an assistant, because it is quite difficult to hang high-quality wallpaper alone.
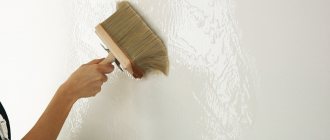
The sheet pasted on top must be leveled from the center to the edge. When the canvas is completely glued to the plasterboard wall, it needs to be smoothed out well using a piece of dry cloth. The sheets must be glued end to end, without overlap. As for corners, it is recommended to glue the corner itself first, and then the wall that is adjacent to it.
USEFUL INFORMATION: Knauf plasterboard: all types and sizes of sheets, technical characteristics
You can watch a special video on how to stick wallpaper on drywall. To avoid electric shock, the room must be de-energized.
How to glue non-woven wallpaper
This procedure must be followed as recommended.
How to properly glue non-woven wallpaper:
- First, prepare the wallpaper - cut blanks for the entire wall or ceiling at once;
- Wallpaper with a large pattern will require selection of the pattern; the size of the fit can be determined by the pictogram on the label;
- The glue is chosen specifically for non-woven wallpaper; stir the composition thoroughly, avoiding the formation of lumps;
- Let the mixture sit well;
- Glue it in such a way that excess glue is always removed with a damp cloth, but don’t be afraid to soak the interlining;
- Glue the sheets end to end;
- To fasten securely, the corner can be coated with glue.
Non-woven fabric is a thin material, so the surface under the wallpaper can be visible. For this you need high-quality primer and putty.