A few nuances
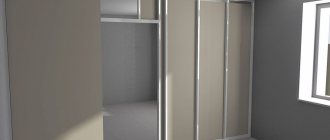
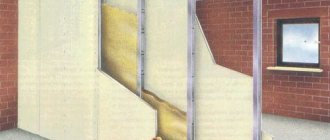
Let me immediately note a few nuances. A plasterboard partition is essentially a hollow structure. A frame covered with plasterboard sheets, between which there may be insulation. Therefore, if there will be a door in the partition or heavy or power elements will be mounted on the plasterboard partition, embedded parts must be provided in the frame structure.
Particular attention is paid to the stretch ceiling, or rather to the preparation of the partition frame for the installation of the stretch ceiling. The choice of suspended ceilings on the market is huge. You can see matte and glossy stretch ceilings, colored and white, with sound insulation or lighting on the website https://mokpotolok.ru.
Another thing is important. Whatever suspended ceiling you purchase, whatever installation method you choose, you need to strengthen the partition frame in the areas where the supporting fabric is attached to the partition. Usually this is 3-4 cm from the draft ceiling.
To strengthen the structure, they use embedded beams or reinforce the upper guide profiles of the partition frame by inserting one profile into another.
The advantage of plasterboard floors in apartments and houses
Drywall is a universal building material used in repair work. A partition created from GC sheets has a number of features:
- Features of the materials are resistance to moisture, temperature changes, and light weight. The created partitions do not weigh down the supporting structure of the building. Galvanized profiles do not rust. HA sheet does not emit harmful substances. Installation of the partition is easy, and the design is durable. It is possible to install lighting, make heat and sound insulation. The surface of the created wall is smooth, ready for finishing.
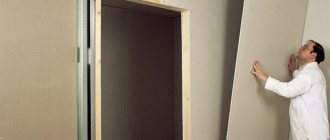
- Easy wall installation with doors. Installation of the structure is within the capabilities of a beginner. To get the job done correctly, you should follow the masters’ plan and take into account the nuances that arise during work.
- Electrical wiring and pipelines are laid inside the structure being created. It is possible to install hidden doors.
All materials used for the construction of the structure have reasonable prices, accessible to anyone.
Purchase of material and preparation of tools
For the partition you will need material from the following calculation.
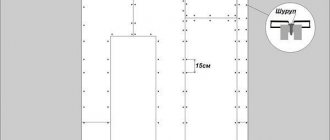
- The vertical posts of the PS and frame are attached in increments of 600 mm;
- Horizontal PN guides along the ceiling and floor must be installed along the entire length of the ceiling and along the floor, with the exception of the doorway;
- Drywall sheets are sheathed in two layers, offset by the installation step of the vertical posts;
- To strengthen the doorway, a wooden block measuring 50 by 50 mm is placed in the vertical posts.
- For finishing you need to buy a painting mesh (sealing the seams), a primer and putty for drywall.
Choosing a location and marking
It is difficult to overestimate the use of a laser level when marking.
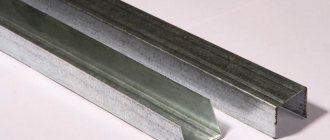
To create a frame, you will need metal profiles. Guide profiles (PN) are mounted on the floor and ceiling, and the rack profile (PS) is mounted vertically. But first you need to decide on a place and mark it. Surely everything has been clear for a long time about the installation location of the partition. But there is no need to rush to find space under the door.
Before you build a plasterboard partition with a door, you need to know that the standard step between PS is 50-60 cm. We also know that the first profile is 50-60 cm away from the wall, so the location for the door must be chosen based on this. This way you can save on PS in order to use it as the edge of the doorway. In any case, the door will be made between the profiles, so the place for it needs to be selected in such a way as to consume a minimum amount of material.
A laser level is simply irreplaceable when it comes to marking for the frame. With its help, you can immediately see the lines where the profile should go on the floor, ceiling and walls. With its help, the installation of a plasterboard partition with a door is carried out without any special problems or difficulties. The finished structure will be smooth and without distortions.
When a line is made to indicate the place where the profiles are attached, it should not indicate the center of the PN. Many people make this mistake. The line should always indicate the place where the edge of the profile will pass.
If you don’t have something as useful as a laser level at hand, you can use a water level and a plumb line. With them, the markings will take a little longer, but a person with a head on his shoulders and arms growing from the right place will be able to do everything smoothly. Using what levels and how to install a plasterboard partition with a door is up to you. When the place for fastening the profiles has been chosen, then using a tapping cord you need to create lines on all planes (wall, floor, ceiling). Then along these lines there will be PN.
Installation of the partition frame
Installation of the plasterboard partition frame is done in the following sequence:
1. Guide profiles PN 50×50 mm are installed on the ceiling and floor. On the floor, the guide profile is interrupted by the doorway. For fastening on concrete, a dowel-nail is used, for fastening on wood, self-tapping screws, for fastening on brick, a screw with a plastic dowel is used.
Important! A sealing tape of the Dichtungsband type is laid between the guide profile and the wall (floor). It improves the sound insulation and vibration resistance of the partition.
2. Installation of guides is done in increments of 600 mm. With this step, the sheets of drywall fall into the middle of the profile.
Important! It is better to install the frame racks from the doorway to the walls.
3. The frame post is inserted into the lower profile, bent and inserted into the profile on the ceiling. The stand is attached strictly vertically with a cutter or two metal-to-metal screws (TB 19 mm).
4. We pay special attention to the racks in the doorway. To install the door, we place a wooden beam 50×50 or 50×40 mm into these racks. We secure the beam to the rack with a self-tapping screw.
Important! Near the door, we strengthen the partition with additional racks. We get that there will be two posts on each side of the door, 20-30 cm apart.
Another way to prepare a doorway is to attach the block not inside, but outside the frame.
5. At the top of the doorway, install a horizontal lintel. We connect the horizontal lintel and vertical pillars of the doorway, as in the photo. You can read a separate article: How to connect drywall profiles. We also place a wooden block in the horizontal lintel.
Features of plasterboard partitions
Both an ordinary swing door made of wood and a compartment door that can be moved to the side or completely immersed in the body of the bulkhead are installed in the plasterboard partition element. You can also equip an arched opening. Taking into account the characteristics of the material, it is possible to construct a hidden panel, making the doorway invisible against the background of the plasterboard partition.
If we analyze the features of the interior false wall itself, lined with gypsum sheets, then it has advantages and disadvantages:
| pros | Minuses |
| Light weight and versatility. A durable metal profile allows you to install a lightweight frame structure of any configuration and size, without creating additional load on load-bearing wall and ceiling floors. | The comparative fragility of drywall compared to materials for solid construction (brick, concrete, wood). This figure increases only when one or more layers of sheathing are added. |
| Safety. Drywall is an environmentally friendly material, specially treated to increase fire-resistant properties and moisture resistance. | Low resistance to high humidity. Deformation and destruction are possible due to direct exposure to water, for example due to flooding by neighbors. |
| Easy to install and remove. In addition, it is possible to hide electrical wires, sewerage and drainage pipes inside the frame. | It is impossible to mount heavy shelves and cabinets on the surface of a false wall. The partition can support a weight of up to 70 kg, provided that accessories are attached to the frame parts, and the plasterboard sheets themselves can support no more than 15 kg. |
GCR has a completely flat surface with unlimited finishing possibilities. Even partition elements made according to the simplest drawing can become works of art. It should be noted that various types of sheets can be used for cladding: in addition to ordinary gypsum board, moisture-resistant, fire-resistant and insulated sheets in the form of sandwich panels are produced.
Covering the partition with plasterboard sheets, sound insulation
1. First, one side of the partition frame is sheathed. The sheets are attached from the doorway to the walls. The pitch between the screws is 400 mm, the offset of adjacent rows of screws is 50 mm.
2. After covering one side of the partition, we add a sound insulator, also known as insulation, into the structure. A good soundproofing option is mineral wool sheets. Their size fits well with the pitch of the racks.
3. We complete the installation of the partition by covering the frame on the second side.
Important! It is recommended to cover the partition in two layers, with 12.5 mm sheets. This will strengthen the partition structure. When covering in one sheet, you need to make transverse guides in the frame structure, at a distance of 60 cm from the floor and ceiling.
How to make a partition with a door with your own hands
Before making a gypsum plasterboard partition with a door, you need to take into account a number of important parameters. This includes the possible load on the base and frame, the size and type of the future door, and the dimensions of the finished structure.
The construction of a delimiting element requires preliminary calculations that will help avoid problems at the construction stage. To carry out successful self-installation, all calculations must be indicated in the drawing. Any construction work requires the use of a specific tool set. In this case you will need:
- gypsum board plane;
- spatula;
- spirit level or laser level;
- knife for cutting gypsum sheets;
- plumb line;
- screwdriver or drill;
- tape measure and pencil.
The materials you will need are the sheets themselves, a metal profile 7.5 cm wide, several wooden blocks, self-tapping screws with dowels, primer, putty and sickle. You also need to select gypsum board before building a plasterboard partition with a door.
For residential premises, ordinary sheets can be used, and for the kitchen and bathroom - exclusively moisture-resistant ones. The thickness of the slabs is 12.5 mm.
Do not forget about preparing the room for the installation of the partition element. You need to clear the space in the room, prime the wall and ceiling.
This must be done when the partition is built in the bathroom or kitchen. After the primer has completely dried, you need to, checking the drawing, mark the ceiling wall and floor. Be sure to use a level to draw clear and even lines.
Installation of a frame for a wall with a door
How to properly make a plasterboard partition with a door? To do this, decide in advance on the location of the zoning element that you plan to install yourself and the location of the opening.
There are two ways to install a plasterboard interior partition with a door:
- The opening is made near the wall. In this case, a continuous metal profile is laid up to the opening on one side. Please note that on the other side it is necessary to leave space for the platband at a distance of at least 100 mm from the corner.
- The door will be located at or near the center of the structure. In this case, the installation of the profile is carried out on both sides of the opening.
The opening in the plasterboard structure is made 10–20 mm wider than the door frame to correct the location of the door. The manufacture of a frame for a plasterboard bulkhead with a doorway is carried out according to the following algorithm:
- In accordance with the outlined lines, a galvanized guide profile is laid on the floor. Dowels and screws are used for fastening. The length of the profile is measured not from one wall to another, but only to the place where the doorway is planned. To ensure that the self-built frame structure has good soundproofing qualities, a special damper tape is placed under the profile before fixing it. Fastening elements are placed in increments of 0.5–0.6 m.
- Installation work is transferred to the ceiling. You can make marking easier using a laser level or plumb line. The ceiling rail is attached in the same way as the lower profile using dowels and self-tapping screws.
- Install vertical profiles with mounting on the walls.
- Place two vertical frame posts to indicate the location of the door. They are securely fixed with self-tapping screws with a press washer on the upper and lower guides.
- Intermediate profiles are installed at intervals of 60 cm from the wall. In this situation, it will not be possible to achieve such a distance between the posts along the entire length of the frame, but there is no need to make it larger.
- To set the width of the doorway, cut off the required length profile and two more small posts, approximately 10 cm each. This is necessary in order to assemble the U-shaped jumper. It is attached with the posts up at the location of the horizontal crossbar above the door.
- To give rigidity to the lintel, one or two rack profiles are mounted. Their length is equal to the distance from the crossbar to the ceiling guide. In other words, you mount the frame above the doorway.
All elements of the partition frames are fixed to each other using self-tapping screws. The construction of a doorway in a partition structure made of gypsum board requires strengthening the rigidity of the frame that fits the doorway. For this purpose, a wooden beam is used with such a thickness that it fits tightly into the profile. Or install two reinforced profiles fastened together.
If it is intended to install a sliding compartment-type door in the wall, after creating the frame, a system of guides is installed. Such options are even better for rather fragile drywall, because they do not create impact loads on the jambs during operation.
To prevent furniture from interfering with the opening of the sliding door, install a false wall. To do this, install an additional sheathing, the elements of which are spaced from the main partition at a distance of the thickness of the sliding door and 1–1.5 cm of margin for free opening. A characteristic feature of this design is the absence of a frame for the width of the sliding door. When arranging a solid base, the width of the wall increases by 5–6 cm.
You can also assemble an “invisible” door for a bulkhead from plasterboard:
- A frame is made from a metal profile, 4–5 mm smaller than the dimensions of the door frame. Transverse profiles are installed along the length of the frame to strengthen the structure and give it rigidity. At the installation points of fittings (door hinges, locks, handles), it is necessary to place wooden blocks the size of the width of the galvanized profile.
- A single sheet of gypsum board the size of the door or trimmings after wall covering is installed on a metal frame. Self-tapping screws are tightened in increments of 25 cm for a whole sheet at a distance of 1.5 cm from the edge of the door leaf and 2.5 cm from the corners to avoid chipping.
- Align the edges flush with the profile. The perimeter of the door on both sides is covered with a perforated metal corner.
After this, a layer of putty is applied. After setting, the surface is covered with an acrylic-based primer and decorative finishing is done with plastic, laminate, film or paint in the same way as the main wall.
Installation of plasterboard sheets
If you plan to make a structure from gypsum plasterboard with a door with your own hands without insulation, electrical wires and other communication elements are pulled inside the frame to the plasterboard lining. Electrical cables are packed in corrugated tubes in advance.
The fastening of the sheathing sheets begins with the installation of solid gypsum boards from the main wall. The joints of the gypsum sheets should fall in the middle of the rack profile.
The material is fastened in the same way as when covering the surface of the ceiling or load-bearing and interior walls. The first self-tapping screw is screwed in at a distance of 1–1.5 cm from the edge of the sheet. Installation of fasteners is carried out at a distance of no more than 25 cm between them. The optimal spacing of screws is 10–15 cm. The heads of the screws should be recessed into the drywall to a depth of no more than 1 mm. The shortest length of hardware is 2.5 cm if the cladding is done in one layer of gypsum board. If the frame is covered in two layers, then the length of the screws is 3.5–4 cm.
The minimum length of fastening elements is determined by the thickness of the profile and plasterboard and the screw exit is not less than 1 cm.
If a partition with a door is mounted on a frame made of wooden blocks, then 2 cm is added to the thickness of the gypsum board. After installing all the sheets on one side of the partition, they begin cladding the other side.
To achieve uniform distribution of loads, it is recommended to cover the frame with sheets of plasterboard with a vertical offset of 0.4 m relative to each other.
When cladding gypsum boards, remember that the sheet must be fixed along the entire perimeter - to add additional parts or parts of non-standard size, it is necessary to install additional profile elements in the frame.
Insulation and sound insulation
Since the delimiting elements made of gypsum sheets are hollow inside, insulation and sound insulation can be made using modern materials.
The best choice for these purposes would be roll insulators, for example, mineral wool. But isolon, polystyrene foam, polystyrene and polyurethane foam are also used.
This is a material in sheet format, which is attached with glue, taking into account the tight fit of the sheets to each other. Additionally, this type of insulating material is secured with plastic dowel umbrellas.
In this case, fixation is performed both at the joints and in the middle of each sheet with 1-2 dowels. The elastic insulator, cut with a small allowance, is inserted inside between the posts at random.
The space between the profiles is filled with insulating material after covering one of the sides with plasterboard.
After laying the insulator, they begin to line the other side. If it is planned to install communications in the false wall or install a sliding door, then insulating material is not placed in these places.
Finishing
When the entire structure of the plasterboard partition with the door is mounted and lined, you can begin finishing work. To do this you will need:
- Treat all slab joints with reinforcing tape.
- Apply starting putty to the seams.
- The gypsum board attachment points also need to be puttied.
- Sand the protruding parts on the surface of the partition with sandpaper.
- Apply as even a layer of finishing putty as possible.
- After drying, remove all irregularities with fine sandpaper.
- Prime the surface of the structure.
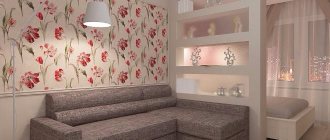
After the solution has set, they begin to install the door and decorate it. Final finishing means painting the entire bulkhead or covering it with wallpaper. Any other decorative materials of the owner’s choice are also used, for example, plastic or thin tiles.
The final stage is door installation. It is secured with self-tapping screws. The distance between the doorway and the frame is filled with polyurethane foam.
Before foaming, be sure to install two or three spacers between the vertical posts of the door frame to prevent their deformation during foam polymerization.
After hanging the door, it is also worth inserting inserts between the door frame and the leaf with a thickness of 2–3 mm. They are removed after the foam has completely set.
Even a novice builder with no experience can build a plasterboard partition with a doorway on his own. The main conditions for an ideal result are compliance with the vertical and horizontal levels when installing frame elements and maintaining the overall composition in the interior of the room.
Painting works
After installing the partition, the seams on the partition and the screws for fastening the sheets are sealed. After they dry, the partition is primed and puttyed with the required number of layers. Read the article in detail: Puttying plasterboard walls
©gipsokart.ru
Other articles in the section: Drywall partitions
- Tall plasterboard partitions
- How to make a doorway in a plasterboard partition
- Interior partition made of plasterboard with a door
- Installation of a plasterboard partition
- General information about plasterboard partitions
- DIY plasterboard partition
- Partition made of two layers of plasterboard: technology of covering 2 layers of plasterboard
- Rules for installing plasterboard partitions
- Profile for plasterboard partitions
- Calculation of a plasterboard partition
Preparatory stage
Drawing up a drawing
Development of a partition scheme. Here you should take into account such points. Since you are installing not just a plasterboard partition, but a doorway, you need to choose a place for it in the “new” wall. In this regard, one should proceed from the specifics of the further use of adjacent rooms, their filling with household appliances, furniture, and so on.
Is there anything supposed to be mounted on the gypsum plasterboard sheathing? The sheets themselves do not differ in strength; they acquire it only with additional reinforcement. And if you simply cannot attach a shelf, a lamp, hang a massive picture or something similar to a plasterboard wall, then it is necessary to provide for the installation of load-bearing elements in the sheathing. The practice of constructing partitions from gypsum plasterboard shows that the installation of single vertical racks from profiles is impractical for a number of reasons. One of them is that a relatively thin metal “plays” under strong pressure.
A simple solution is to install a second, additional guide. If significant strengthening of the structure is necessary, it is advisable to place wooden blocks (thick slats) in the required places.
If the partition diagram is drawn up correctly, it is not difficult to find these elements after covering the frame. Alternatively, leave marks on the floor with a pencil or felt-tip pen.
When planning to make a partition from plasterboard, you should immediately determine which door it will have - a hinged or sliding one. In the latter case, when calculating the insulating material, the volume of its purchase is significantly reduced. And if the opening is large and the width of the room is small, then the cavities between the gypsum boards are generally left unfilled; otherwise the doors simply won’t move apart.
Vertical posts require reinforcement. Therefore, jumpers from the PN profile are installed between them. The layout of their location is developed independently.
Taking measurements
The dimensions of the room at the location of the partition are determined. You need to understand that floor slabs do not lie in a strictly horizontal plane. Therefore, the height should be measured at opposite walls. For what? If its difference is significant, then you will have to think about how to level out this drawback. The prospect of cutting a sheet of drywall at an angle, moreover, cutting off a small fragment from it, is not the best. Most likely, 1 – 2 samples will be hopelessly damaged.
The distances from the walls to the vertical posts that form the doorway are measured. This is necessary to calculate the required length of the lower guide profiles, since the threshold is not made. Consequently, you will have to attach two PN slats to the floor (before the passage).
Calculations
A gypsum plasterboard partition is made on your own, including due to reasonable savings on paying for the services of third-party specialists. The same applies to purchasing materials. A certain supply of them is necessary, but large quantities of surplus are not needed; the prospect of quick use is illusory, which means a waste of money.
You should not immediately buy drywall sheets and profiles at the first retail outlet you come across. Although they are of standard dimensions, not all manufacturers strictly adhere to standard dimensions. The task is to select samples so that you have to do as little cutting as possible. This will make your work easier and save on waste optimization.
On the other hand, in certain areas you will have to install small fragments of gypsum boards and install jumpers (to strengthen the frame) from profiles. Consequently, materials should be selected according to linear parameters with the expectation that after cutting them, finished “parts” will be obtained.
The connection of plasterboard sheets is done on vertical posts. The recommended interval between them is within 55±5 cm. If the gypsum boards are large, then one additional rack is mounted approximately in the middle to prevent pushing through the wall.
Recommended intervals between fasteners (mm): for profiles - 50, plasterboard - 25.
Installation of the box in the lumen
Before installing the door into the partition, you need to complete all finishing work.
Installation into the gap of the door frame in a plasterboard partition is done in the following way:
- We place the structural element along the wall. We move the box to one of the planes of the plasterboard wall. We level it around the perimeter. For a “wavy” wall, place the box along the most convex part.
- We fasten the frame with screws from the side where the sash is installed. In the place of future hinges we drill holes with a diameter of 4 mm. We insert screws into them, but do not screw them in completely.
- We insert wooden wedges between the box and the edge next to the attachment points. With their help, we adjust the vertical position of the box, controlling the level. When the inserts are positioned, we perform final fixation.
- Having secured the structure, we perform a control check of the vertical and horizontal position of the box. This is necessary in order to identify distortions before the work is completed.
- Fill the seam on the hinge side with foam. This is done in order to additionally secure the door frame before hanging the lamella. Fill the joint with polyurethane foam evenly from bottom to top.
- On the handle installation side, fill the seam with a dotted line so that later you can align this part.
- The remaining cracks need to be filled with polyurethane foam, and when it dries, remove the excess with a knife.
During fastening of the box, constant level control is necessary to prevent accidental shifting and deformation from high loads.
Door frame
Those who have experience in carpentry should assemble the door frame themselves: this option will be cheaper. It must have angles of 90 degrees, and is assembled according to the calculated dimensions of the opening in the partition, otherwise the canvas simply will not close.
In addition, do not forget about damper gaps and the quality of the wood.
If you are not sure that you can assemble the box, it is better to purchase a ready-made structure, and, based on its dimensions, mark the door.
Door frame assembly
From a box beam you need to assemble a structure in the shape of the letter P. We saw down the joints of the bars at an angle of 45 degrees (joint to joint) or fasten them with an overlap by sawing out a quarter on each of them. For rigidity, the bottom is connected with a thin strip or a threshold is made, if required.
The width of the box should be 1–2 cm narrower than the opening. This is required to correct the position of the sash.
This indicator is taken into account when assembling the frame base when using standard doors, the dimensions of which can be found below.
Covering the frame with HA sheets
Covering the frame with sheets in the area of the doorway has several features.
- First, the seam between the sheets of civil code must not be allowed to touch the border of the doorway. This will lead to cracks in the future.
- Second, there is no need to join the sheets horizontally at the height of the doorway. Sheathing should be done in a single sheet.
Work stages include
I believe that work on drywall can be divided into two technological approaches.
- The first approach is professional. It complies with all technological maps developed by drywall manufacturers. The most famous technological sheets of the Knauf company.
- The second approach is amateur. It is possible due to the versatility of plasterboard profiles.
For example, a proper plasterboard box should be made from PS rack profiles. In an amateur approach to installation, the rack profile can be replaced with any other PN or PP profile, the main thing is that the structure is durable.
Next, I will show two options for making a doorway in a plasterboard partition:
- Professional doorway in a plasterboard partition on a frame made of metal and wood according to the Knauf technological map;
- Doorway in a partition made of HA in apartments, private houses, small spaces.
How to use drywall to reduce a doorway
Often when installing a door, you need to come up with something to fit it into an existing opening. It is especially difficult to do this in permanent load-bearing walls. It is possible to achieve what you want by laying bricks, but this is a very labor-intensive method. Doing this using plasterboard technology is the easiest option.
How to reduce the height of a doorway
If you have mastered the technology of installing a standard plasterboard partition, then it will not be difficult for you to reduce the opening above the future door. To do this, you need to imagine that you need to build a standard partition from gypsum fiber board, only the floor and ceiling will be two planes of the wall inside the opening:
- After cutting pieces of guides to the required length, secure them to the left and right inner plane of the opening.
Do not forget to deepen the guides inward by the thickness of the drywall (usually 12.5 mm) so that the gypsum plasterboard sheet sits flush with the wall.
- Prepare pieces of racks along the width of the opening, insert and immediately secure them inside the guides at the top and bottom,
- Sew up the metal frame with plasterboard on both sides.
In this way, you can sew up the opening above the door only to the thickness of the plasterboard partition. If you need to do this for the entire thickness of the opening, then repeat the operation of installing the metal frame on both sides of the opening, and then sew up the metal frame on three sides: from the sides and from the bottom.
How to reduce the width of a doorway
Covering an opening on the side or reducing the width of the opening is no different from installing a standard plasterboard partition. You just need to imagine that the top of the opening is the ceiling.
Reduction of the opening across the entire width occurs:
- with the installation of 2 mini partitions made of metal frames on one and the other side of the opening,
- by covering with plasterboard the 2 outer sides of the opening and the inner plane of the resulting opening.
Finishing a doorway with plasterboard
If you need to level the opening inside to a small thickness, when installing a metal frame will unnecessarily reduce the opening, then plasterboard is best suited for this:
- Dust and prime the surface that requires leveling.
- Cut a sheet of drywall to the required size.
- Prepare spacers or supports if you need to level the vertical plane.
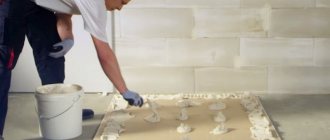
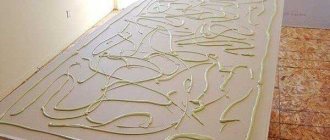
- Attach the sheet to the installation site to understand how much adhesive solution will be needed.
- Apply the putty or plaster mixture diluted in advance, taking into account possible sinuses, pointwise (Rotband Knauf is perfect for this), and in some cases, as for leveling slopes, foam the space between the sheet and the wall.
- Fix the sheet in the required position and wait until the adhesive solution dries.