A plasterboard partition for zoning a room looks like a monolithic wall of a simple or complex shape, solid or not reaching the ceiling in height. But in fact, it is much lighter: it consists of a metal (less commonly, wooden) frame and sheets of plasterboard, between which heat and sound insulating material is usually laid.
Having chosen the option you like for zoning the room, you can install such a partition yourself.
Why do we need plasterboard partitions?
The main purpose of plasterboard partitions is to delimit and zoning space in an apartment. The need for this may arise if the rooms are already combined, as well as in the case of very large rooms or a corridor. Then a partition is an alternative to a blank wall, which creates a feeling of cramping.
In addition, it also performs a decorative function. You can build niches for vases with plants, additional lighting, a beautiful bookcase or shelving into plasterboard walls. Therefore, decorative partitions in the interior can play one of the main roles.
Advantages of the structure
Partitions can be installed both in an apartment of a new building, where the kitchen is often already combined with the living room, and in a remodeled apartment.
The advantages of their construction are obvious in comparison with blank walls:
- light penetration in distributed rooms is better than with a blank wall;
- ease of construction;
- lighter design, which creates less load on the floor;
- low cost;
- variety of shape options;
- various design possibilities.
This option is better adapted to the specific layout of the room, helps different zones perform their functions, and is also more aesthetically pleasing.
We mount the frame
Installation begins with attaching the guide profiles to the ceiling and floor. They are laid along the marking lines, having previously glued damper tape to the base, and fastened in increments of about 50 cm, but at least 3 points for each element, regardless of its length.
Fasteners are selected in accordance with the base material:
- wood screws - for wooden floors;
- dowel-nails 6x40 mm for concrete floor;
- anchor dowels for concrete ceilings.
Make sure that the fasteners do not get into the electrical wiring Source www.hapori.ru
If the guide needs to be extended, the profile is cut with metal scissors or a grinder and attached butt to the previous one.
The next step is installing the racks. If necessary, they are overlapped, driving one profile into another by at least 40-50 cm and fastening them on the sides with self-tapping screws.
Options for using a partition
A solid partition with a door can also be erected from plasterboard, which has the above-mentioned advantages compared to a blank wall made of brick or concrete. Such a structure and a partition that does not reach the ceiling are slightly different options.
Interior partition
In an apartment where isolated rooms are not enough to allocate personal space to each family member, a continuous plasterboard partition with a door can be erected.
If one of the rooms created in this way does not have a window, then for natural lighting it is advisable to make openings in the partition and install frames with glass in them. It is important to determine the dimensions of the doorway so that opening and closing the door does not create discomfort.
For zoning
If you don’t want to divide the space so that you get several separate but small rooms, you can delimit it into several functional zones.
This is done with the help of a partition that does not reach the ceiling in height and performs not only delimiting, but also decorative functions. In this case, you can choose an individual height and shape, as well as add additional functions, for example, in the form of a bookcase, a bar counter, a niche for vases and plants.
Selection of fasteners and tools
To attach all the elements of the interior partition from gypsum plasterboard you will need:
- dowels 6x40 mm for attaching the frame to the floor, wall and ceiling;
- black phosphate self-tapping screws. The length of the self-tapping screw should be 25 mm if the wall plasterboard is attached in one layer. Sometimes, for greater reliability and better sound insulation of the interior partition, sheets of plasterboard are attached in two layers on top of each other. In this case, 3.5x35 mm self-tapping screws will be required for the second layer;
- bugs (small self-tapping screws with a drill and a press washer) are used to fasten profiles to each other. They should be as short as possible (for example, 4.2x19 mm), and the cap should be as flat as possible. The presence of a drill in the “bugs” makes it easier for them to pass through two profiles.
- Sealing tape must be used. It is installed between the surface and the frame, thereby improving the sound insulation characteristics of the assembled structure.
In addition to the fasteners, you will need special tools for the job. Without them, installation of an interior plasterboard partition will not be possible. Such tools include a screwdriver, drill, level, plumb bob, tin snips, construction knife, hammer and tape measure. However, this list is not complete or mandatory. Some tools will not be needed, but others may come in handy instead (hole saw, cutter, hammer cord, hammer drill, edge plane, etc.).
When the partition for dividing the room is assembled, it will need to be prepared for finishing. For these purposes you will need:
- primer;
- roller with a container for it;
- putty;
- serpyanka;
- set of spatulas;
- reinforcing corners;
- sandpaper.
Zoning methods
The above options for partitions for zoning a room are just general designations for two structures that are different in design. With the help of a solid partition, closed zoning is performed, and with the help of a lighter partition, open zoning is performed. Each of them can contain a large number of nuances of individual execution and additional functional loads.
Open
The arrangement of functional areas of different apartment premises has its own characteristics.
Living room
Not only do guests come here, but all family members often gather to have dinner together and discuss various issues. In the room you can distribute not only areas for the kitchen and the living room itself, but also a dining area, as well as a separate corner for relaxation and warm family conversations.
For such a more detailed distribution, designers advise, in addition to a simple “no frills” partition, to also install a shelving partition, a structure with a built-in aquarium or space for vases with plants. You can also make openwork forged decor.
The idea of installing additional lighting in the demarcation structure also contains many possibilities for individual execution. In terms of decorative value, it may be preferable to a sliding partition between the kitchen and living room.
Living room
If there are few rooms in the apartment, then a situation may arise where the bedroom and study are one room. This can lead to a situation where it is no longer possible to fully work or rest. This problem can be solved with the help of a partition or no doors at all, or with light sliding doors.
For such functional areas, it is especially important to take care of the penetration of natural light. Therefore, you can consider options for creating openings with glass frames, shelves (through which light still penetrates better) or simply with wider openings for entry and exit. They can be made in the form of an arch, or have any other shape.
Children's
For better development of the child, it is advisable to provide areas for rest and sleep, study and play in the children's room. This separation has the advantage that some inevitable clutter in one area will not unduly interfere with the proper functioning of the other.
Non-standard forms of openings for entry and exit and various niches in the structure are especially relevant for children's rooms. Of course, if you don’t want to create stationary structures, then a simple screen will help to zone the space in the nursery.
The considered zoning options practically do not require deep penetration into the structures of walls and floors, and therefore will not cause their partial destruction.
Closed
This option means dividing one room into two separate ones. When a separate entrance can be arranged in each of them, the rooms become isolated, and a lightweight version of the wall is built without doorways.
If one of the newly formed rooms does not have a window, openings are provided in the partition for natural lighting through glass or other light-conducting material.
If one of the rooms will be a passageway, then it is necessary to build an indoor doorway. It is not necessary to insert a door into it. But if there is such an opportunity, you can create a design with maximum individuality. For example, build an arch, an irregularly shaped opening with various curves, and various protrusions.
If, nevertheless, a door between rooms is necessary, then the racks for the door frame are constructed either entirely from wood, or using a metal profile supplemented with wooden blocks.
For simple sliding doors, an additional top beam is installed. Sliding doors can also be cassette doors: they move inside the wall. The construction of a plasterboard wall in this case is precisely the most successful.
Preparing the walls for finishing
Having coped with the task of how to make a plasterboard partition in a room, you can think about decorating it - painting or wallpapering. But for this you need to do some preparatory work:
- First, holes are cut in the casing for the output of communications, installation of sockets and switches.
- Then the depressions from the heads of the screws and all the joints between the plates are puttied, while simultaneously gluing them with reinforcing tape.
Puttying seams between gypsum board sheets Source prorab.help
- After the putty has dried, the surface is sanded, dust is removed and coated with a primer.
- The final stage is to putty the entire surface with a thin-layer non-shrink mixture.
On a note! If you stick wallpaper directly onto drywall without a putty layer, it will be difficult to remove it during repairs without damaging the cardboard shell of the sheets.
Requirements for the partition frame
Set of rules SP 163.1325800.2014 “Structures using plasterboard and gypsum fiber sheets. Design and Installation Rules" provides a number of requirements for the partition frame made of metal and wood.
For a metal frame, the requirements are as follows:
- The profiles may have minor (invisible to the naked eye) damage to the zinc surface in places of bends - microcracks, as well as abrasions - this is allowed by the rules. The main thing is that they do not violate the unity of the coverage.
- Deviations in the height and width of the profile section may differ from the nominal dimensions up or down by no more than 1 mm, and in length - by 3 mm.
- The profiles can be slightly twisted around the longitudinal axis, which is permissible by no more than one degree per 1 m of length. This minimal twisting is eliminated when laying the profiles on a horizontal plane and during final installation into the structure.
- Local curvature. Allowed in a size of no more than 2 mm per 1 m of profile length.
- General curvature. To obtain its permissible dimensions, you need to multiply the permissible local curvature values by the entire length of the profile.
- Waviness on the surface of the profile. Its permissible parameter is 2.5 mm, and the wavelength is no more than 150 mm.
- Scratches, cracks in the metal base, and deep scratches on the surface of the profiles are not allowed at all.
- It is necessary to have the ability to install utility elements inside the frame. To do this, technological holes must be made in the walls of the rack profiles.
From a constructive point of view, differences exist only in the materials used to make the frame. But there are also some differences in the ways of connecting its structural elements.
The requirements for a wooden partition are determined by the physical properties of the material.
For a wooden frame, the requirements are as follows:
- In its manufacture, lumber from coniferous species of at least 2nd grade and only from pine, spruce, fir, larch and cedar must be used. The surface roughness should not exceed 1250 microns for selected, first and second grade materials.
- If the thickness of the lumber is 40 mm or more (with the exception of selected grades), then oblong and stitched knots are acceptable. Their dimensions along the minor axis can be up to 6 mm, and their depth can be up to 3 mm. The dimensions along the major axis are not limited.
- The bars for making the frame should be treated with fire retardants and antiseptics.
- Wood moisture content is no more than 12%.
- The section of the rack bar is 50 × 60 mm, the guide bar is 40 × 60.
Thus, all requirements, regardless of the frame material, are drawn up to prevent its deformations, which can cause destruction of the partition structure.
Advantages
Instead of a door to a large living room, semicircular arches are often made. In order to visually enlarge the space.
Despite the fact that hardware stores offer a wide variety of materials, plasterboard is most often chosen for the manufacture of walls . This is explained by its many advantages:
- Lightness and strength of the material.
- A large assortment from which you can choose moisture-resistant and even fire-resistant sheets.
- It is easy to cut and can be given any shape.
- Easy installation of the structure.
- The material is environmentally friendly.
- Affordable price.
It is quite easy to install such a structure with your own hands.
How to make a partition with your own hands
Building a plasterboard partition with your own hands is not that difficult. To do this, you will need to purchase the necessary materials and tools, as well as be careful when performing the work.
Required tools and materials
The main thing for work is sheets of ordinary drywall 12 mm thick. They can be purchased at a very affordable price.
You will also need:
- For use in the kitchen - moisture-resistant plasterboard, the surface of which has a soft green color so that it can be distinguished from the usual one.
- Metal profile or wooden blocks for constructing the frame. Product width: 75 mm - for the option of laying soundproofing material between sheets, 50 mm - for laying thin insulation or hollow space between them.
- Meter and tape measure - for precise measurements.
- Construction square. Required during the design and installation stages. On the first - for marking, on the second - to check the correctness of the structure.
- Construction level - to determine the horizontal and vertical planes and frame racks.
- Plumb line - for designing an ideal vertical. To do this, certain points on the floor and ceiling are combined.
- Pencil - for drawing work when marking.
- Self-tapping screws. Needed for working with parts made of both metal and wood.
- Fiberglass serpyanka mesh - for reinforcing joints.
- Putty with a gypsum base - for sealing joints and smoothing out defects in the surface of sheets.
- Screwdriver - for tightening screws.
- Metal scissors. They are required both for cutting blanks of various parts and for making notches on a metal profile.
- Electric jigsaw - for preparing blanks from bars and cutting sheets of drywall.
- Spatula - for sealing joints.
- Sandpaper - to level the putty layer.
- Primer - for application to the surface of the partition before painting.
- A construction knife or hacksaw with fine teeth - for various works with sheets of drywall.
- Planer with a beveled blade - for cutting chamfers.
- Electric drill and drill set. For self-tapping screws you need to drill holes.
- Hammer - for driving in dowels.
Arrangement of a solid frame and with an opening for the door
The frame is constructed immediately after the marking is completed.
Procedure:
- To install the profile to the ceiling, you need to screw the guide fittings.
- Attach the rack profile to the floor and secure it using dowels. Drill holes for the dowels through the guides and then remove them.
- Drive dowels into the holes.
- When the profile is installed on the floor, use a plumb line to check the location of the profile with the guide on the ceiling.
- Install guides on the walls along the vertical marking lines.
- Insert the bottom of the vertical profile into the horizontal guide on the floor.
- Attach the guides to the ceiling in the same way as on the floor. Self-tapping screws need to be screwed in at a distance of 250-300 mm.
- If a doorway is expected, use a plumb line to mark its location on the ceiling profile. Determine and mark the heights for the guides installed on the sides of the doorway.
- Install these guides and strengthen them with wooden blocks, screw them with self-tapping screws.
- After measuring the space between the doorway and the walls, you should calculate the number of vertical posts. Secure them at a distance of 300-600 mm from each other.
- Cut the pieces to the required length. Install the racks with their ends into the guides on the floor and ceiling. Level.
- Use self-tapping screws to fasten the profiles at the joints.
The following nuance should be added to this. If the walls in the room are wooden, then there is no need to use dowels. You can screw self-tapping screws through guides directly into the walls.
Electrical wiring installation
Performed immediately after the final installation of the frame.
To do this, do the following:
- Drill holes for wires in metal profiles.
- Pull wires equipped with insulating tubes through them. Leave the ends outside.
- Once the electrical wiring is done, sheets of drywall can be attached to one side of the frame.
- To install sockets and switches in the partition, you need to cut holes and route the wires into them.
It is advisable to connect and install sockets after the partition is completely installed. But if it is convenient, you can insert boxes for them immediately after wiring.
Sheathing the gypsum board frame
Sheathing with plasterboard sheets (GKL) is finally carried out after laying the heat and sound insulation. But before this, one of the sides of the frame is formed.
Procedure:
- Cut sheets of drywall.
- Sheathe one side of the partition. Attach the cut sheets to the metal profile with self-tapping screws more than 3 cm long. Screw them in at a distance of 15-20 cm from each other.
- After covering one side, install heat and sound insulation.
- Then decorate the second side of the partition in exactly the same way as the first.
If a door is provided, then after the frame is completely covered, a door frame is mounted into the partition. To strengthen it, it is enough to use three or four self-tapping screws.
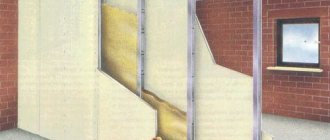
Laying heat and sound insulation
It is carried out after installing the gypsum board on one of the sides of the frame. Heat and sound insulating material is placed between the guides. For this you can use mineral wool, isover, and expanded polystyrene.
Hiding seams between gypsum boards and finishing
This is the final stage of work on creating a plasterboard partition.
Work order:
- Attach a serpyanka mesh to the surface of the gypsum board.
- Apply a layer of primer, then putty on the seams between the sheets. The layers need to be aligned.
- Before the putty dries, attach a reinforcing tape over it, which is pressed down using a spatula.
If the partition is to be covered with wallpaper, then its surface must be completely puttied.
Selecting materials
The choice of plasterboard sheets and materials for the frame depends on where the partition will be located, what soundproofing requirements are imposed on it and some other points.
For cladding
Before making partitions from plasterboard, you need to select sheets with certain characteristics. If they separate living rooms, a regular grey-brown gypsum board intended for finishing dry heated rooms will do.
There are also other types of cladding panels with a gypsum core on sale.
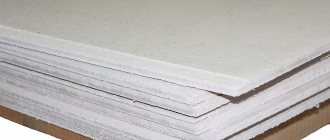
- GKLV - green sheets, characterized by increased moisture resistance.
Moisture-resistant plasterboard sheets Source stroy-market63.ru
They are recommended to be used for finishing walls and erecting partitions in rooms with high humidity and temperature changes. These are bathrooms, showers, laundry rooms, unheated terraces, etc. If the partition is lined with ceramic tiles, it is also better to build it from this material.
- GKLO - pink sheets, fire-resistant.
In country houses, they are recommended to designate the boiler room and other areas with increased fire hazard.
On a note! Sheets with a greenish gypsum core and a pink “cover” are fire and moisture resistant.
Fire-resistant plasterboard sheets Source pozharanet.com
The thickness of the material varies from 6.5 to 20 mm. For interior partitions, sheets from 12.5 mm, which have sufficient rigidity and impact resistance, are recommended. Products of greater thickness are rarely found on sale, therefore, if there is a desire to enhance noise protection and increase the strength of the structure, the frame is faced not in one, but in two layers on each side.
The most common sheet size is 120x250 cm. This length allows you to cover rooms with standard ceiling heights, and the width is convenient for installation and transportation.
Products with dimensions of 60x120 cm are also quite popular. They can be easily transported in a car trailer without using delivery services. This option can be considered if you need to decide how to make a small-sized plasterboard partition or a decorative interior structure of complex shape. If you need to cover a large continuous surface, it is better to use full-size sheets - it is more economical in all respects: the cost of the material itself and installation work, the cost of fasteners, putty for seams and other “consumables”.
It is more convenient to install decorative partitions from small sheets Source prorab.help
Delivery of such material to the site is possible only by freight, so the required quantity must be calculated accurately. To do this, you should sketch a drawing to scale, marking openings, niches and other structural elements on it, and calculate how many whole sheets are needed to cover one side. Then multiply the resulting value by 2 in the case of a single-layer coating or by 4 if there are 2 layers of plasterboard on each side. It is advisable to add 1-2 more sheets depending on the scale of the structure in case of damage to the material.
This diagram will help determine the optimal arrangement of sheets - vertically or horizontally Source www.bus-rus.com
For frame
The frame for mounting drywall can be assembled from dry wooden blocks or special galvanized profiles. Each material has its own advantages, but wood is used less often, since it is faster to make a partition from a profile, and it is more reliable in operation. Unlike bars, which tend to deform when drying out and changes in microclimate, they retain dimensional stability and original strength. But wood has better soundproofing characteristics.
For installation you will need 2 types of profiles:
- guides that are attached to the floor and ceiling and set the orientation of the partition in space;
- rack-mount, which are load-bearing elements and give the structure the necessary rigidity.
All of them have a U-shaped cross-section with different heights and widths of the walls. The racks must fit tightly into the guides; this must be taken into account when choosing the section size.
Types and sizes of profiles Source ibuildrussia.ru
As can be seen from the table, the length of products also varies. Therefore, before you make a partition from plasterboard and profiles with your own hands, you need to measure the height of the ceilings and select racks of the required length to avoid unnecessary waste.
It is important! Some craftsmen use ceiling profiles 28x27 mm and 60x27 mm to install the partition frame. You shouldn't do this if you don't want to end up with a wall with poor sound insulation that vibrates when you walk around the room.
See also: Contacts of companies that specialize in interior redevelopment
The thickness of the wall is also of considerable importance: in order for the screws to hold well and not turn when attaching plasterboard boards, it should be 0.6 mm or more.
The number of profiles is also calculated according to the following scheme:
- The racks are set in increments of 60 cm.
- The rack profile is also used to frame openings.
- The length of the guides is equal to twice the length of the partition.
Wooden blocks will also be needed - they are used to strengthen the racks around the doorways.
For sound insulation
The empty space between the cladding slabs is filled with insulation, which in this case acts as a noise absorber.
Rockwool mineral wool Source sprb.by
The best option would be mineral wool in rolls or in the form of slabs, the density of which should be 40 kg/m3 or higher. This material is rigid enough not to settle over time.
Advice! Choose mats 60 cm wide - they will fit tightly between the frame posts without additional fastening.
When deciding how to make an interior partition made of plasterboard that maximally insulates adjacent rooms from extraneous noise, it is worth thinking about preventing vibration waves from the walls of the building. This is achieved with the help of elastic damper tapes, which are glued to the profiles in places where they contact the walls and ceilings.
Installation of self-adhesive tape on the profile Source mr-build.ru