Here are instructions describing the installation of a plasterboard ceiling. It is quite detailed and understandable even to those who have not encountered gypsum boards. All stages are considered - from design to rough finishing. In addition to standard techniques, you will learn some tricks to save time or money. At the beginning of the article there are lists of necessary tools and materials, as well as recommended conditions for such work. Then a brief procedure is given. And from the next section, which is called “Plan and Calculations,” a detailed description of each stage begins.
Where does the installation of plasterboard on the ceiling begin?
From wall decoration. The fact is that proper installation of drywall on the ceiling requires perfectly smooth walls. So, before starting ceiling work, the walls must be prepared for finishing (plastered and puttied). Or at least covered with plasterboard.
The future ceiling also needs to be prepared. Remove old finish if it is in the way. Secure all communications to the ceiling - wires, air ducts, pipes.
The rules for installing a plasterboard ceiling are almost the same as for installing walls. There are some difficulties. But overall, the idea is worth it, even if this is your first time encountering gypsum boards. Of course, to install plasterboard ceilings, it is advisable that you have at least some skill in handling power tools and have some physical strength.
What is drywall, its advantages
Drywall is made of three layers: front, back and a core of natural gypsum.
The gypsum core can include various additives and fillers that improve the technical and operational properties of the material.
The outer shell is made of thin but quite durable cardboard, which gives the sheets the necessary rigidity. Cardboard acts as a reinforcing material and is an ideal base for any fine finishing.
The front layer is made of two layers of cardboard, which, depending on its purpose, comes in three colors: white, green and red.
The outer surface of the front layer is made of cardboard with a high cellulose content, which increases adhesion.
This side should always face the inside of the room and is intended for finishing.
The back layer is marked according to the type of material. This side should always face the wall during installation.
Drywall is perfect for finishing residential premises, as it consists of environmentally friendly natural materials. The breathable structure of the sheet allows you to regulate the humidity in the room, creating a healthy and comfortable microclimate for living.
GVL has other advantages:
- installation eliminates dirty and wet finishing processes;
- high speed of work due to the large size of sheets;
- ease of installation does not require special experience and allows you to do the work yourself;
- it is possible to create any curved and arched structures;
- the front surface of the sheet is compatible with all putties, adhesives and finishing materials;
- The cost of plasterboard structures is significantly lower than plastering and other types of cladding.
It is possible to use the sheet even if the gypsum core is broken, while maintaining the paper layers and reliable fastening of the damaged area.
Along with its advantages, gypsum board has disadvantages:
- all types of plasterboard sheets, including moisture-resistant ones, are afraid of direct contact with water;
- it is impossible to hang even light paintings and decorative items on the lined surface;
- fragility and weak strength allows damage to the skin, even accidentally hitting it with heavy objects.
Drywall is a universal finishing material used for finishing walls, ceilings, and floors. It is used to create interior details, curved surfaces and shaped structures.
The material is capable of bringing any design ideas to life.
TOP 3 best products according to customers
Plasterboard sheet Knauf/Knauf 2500x1200x9.5 mm
260.00 rub.
Product code 32
Knauf plasterboard sheet is a rectangular element that consists of two layers of sp.....
What is needed to install a plasterboard ceiling?
You will have to work with long and relatively heavy materials. You will definitely need an assistant.
The tools you will need are:
- water or laser level;
- pencil;
- marker;
- metal scissors (a grinder will do);
- perforator;
- hammer;
- knife;
- a screwdriver and several PH2 Phillips bits.
The list should be supplemented with tools and devices that will make your work much easier:
Chalk shnu
Special bit for drywall with limiter
An ordinary building level would also be useful. If you don't have a hydraulic level or a laser level and have nowhere to get them, you can get by with a regular one.
Trick: how to do without a laser level
- Secure a regular level with electrical tape to a long, perfectly straight bar;
- place the bar on a known horizontal surface;
- If the bubble is not exactly in the middle, slide a thin wedge under the appropriate end of the level. Try to perfectly align the bubble;
- rotate the bar 180°. Make sure that in this position the bubble is exactly in the middle.
So instead of a short and inaccurate level, you got a long and accurate one.
You will also need finishing tools. The list will depend on the type of finish, but in any case the following are necessary:
- spatulas - narrow and wide;
- bucket (or other convenient container).
It is advisable to have an attachment for a drill (mixer) for mixing construction mixtures.
A simple bench will help a lot. Forget about stepladders - working on them is inconvenient. Make a simple bench out of boards or roll up a simple bench out of chipboard. Calculate its height so that there is 10-15 cm above your head to the future ceiling surface.
List of materials:
- guide profile;
- ceiling profile;
- single-level connectors (“crabs”);
- longitudinal connectors (if longitudinal profiles longer than 3 meters are required);
- straight hangers (for heights up to 20 cm);
- anchor suspensions + rods (for heights over 20 cm);
- dowel-nails with a diameter of 6 mm
- or wood screws for wooden walls and ceilings (black, with a rare thread pitch);
- self-tapping screws with a press washer 4.2 x 13 mm (silver, without drill head);
- self-tapping screws for drywall (black, with frequent thread pitch)
- and the drywall itself;
- as well as putty;
- primer;
- and serpyanka.
How many materials will you need? In order to have enough, but not have any surplus, you need an accurate calculation. How to do it, read in the section “Scheme and calculations”.
Frameless
Based on gluing sheet fragments to the base. Why fragments? Because it is quite difficult to correctly orient and hold the entire sheet until it fully adheres for a long time. Most often, the sheet is divided into 4 parts.
The first method: prepare the glue yourself using gypsum, chalk, PVA, and other ingredients. The procedure is complex and has almost fallen into disuse.
The hinged method of planting sheets on polyurethane foam is more technologically advanced and accurate.
To do this, apply the foam to the sheet or part of it, wait until the foam begins to expand (10 - 15 minutes), and apply the material to a clean, primed base. Better adhesion and less expansion of foam for sticking polystyrene foam.
But it is better to pump foam between the fixed sheet and the base. To do this, small through holes are made on the surface of the sheet through which it will be fed. Then the sheet is fixed with a leveling distance.
Self-tapping screws or dowels must have a large diameter washer in order to prevent the fastener head from breaking through the sheet. At least two rods with end crossbars are installed to prevent the sheet from bending due to expanding foam.
After hardening, remove the washers from the fasteners and screw them in again. The finish is standard. When working with foam, you must follow the safety rules stated on the container.
Frameless ceilings are installed in small rooms.
Work plan
We will conditionally divide the installation of gypsum boards on the ceiling into five large stages. Next, each section of the article will describe these stages in full detail.
- Scheme and calculations;
- marking;
- installation of profiles and hangers;
- installation of drywall;
- finishing/
By measuring the room and drawing up a diagram, you will get a clear idea of how much materials will be needed.
The technology of installing drywall on the ceiling requires care. To ensure that the structure does not warp, it is necessary to accurately mark the perimeter of the room.
Let's take the hammer drill. No less care is required when securing the guide profile around the perimeter. Ceiling profiles are fastened with a screwdriver.
We lift and secure the sheets of drywall. A lot of work with a screwdriver.
All that remains is to putty the ceiling. Here it is - a perfectly flat surface on which it is convenient to apply any finish.
And now the whole process of work with all the details.
Stage 3. Guide frame
After preparing everything you need, you can start working.
Step 1. First, use a tape measure to determine the lowest corner of the room. It is marked with:
- 5 cm from the ceiling, if you do not plan to install built-in lighting fixtures;
- 9 cm, if planned.
Step 2. Using a level, mark the same height in the remaining corners. After this, several more marks are placed along each wall at the height of the first point; all marks are connected to each other with a pencil, using a stretched cord or a long ruler. Although there is another option - to mark these lines pointwise.
Step 3. A guide profile is attached to the walls. If joining seams are planned between the corners (and in large rooms this cannot be done without it), then the structure must be additionally strengthened to prevent the elements from “moving apart” under its weight. Any dense material is suitable for this - tin, plastic or plywood - which must be placed over each seam and secured to the wall with strong dowels.
Drill holes for dowels through the profile
Note! A special sealing tape (“serpyanka”) is more suitable for this, but it is not sold in all hardware stores.
After this, the corner joints of the profile are strengthened.
Scheme and calculations
So, you have your walls ready. They are covered with plasterboard, ideally plastered and covered with a layer of putty. Measure every wall in the room. Very high precision is not required here; the main thing is to understand how much materials you need and how to install drywall on the ceiling (longitudinal or transverse).
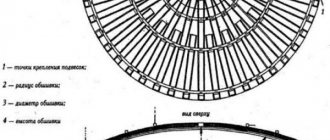
Draw a diagram of the room on paper. Draw drywall sheets on a diagram to see which arrangement will produce the least waste.
Scheme for calculating the distribution of sheets on the ceiling.
The sheets should be arranged like brickwork. That is, each next row is shifted relative to the previous one by half the length of the sheet.
Dimensions of plasterboard boards
The most common size is 2.5 by 1.2 m. Sheets 2.7 or 3 m long are less common. The usual thickness is 12.5 mm, but lighter 9.5 mm is allowed for the ceiling. Although, according to Knauf technology, sheets are laid in 2 layers, which allows you to create a durable structure and get rid of cracks in the ceiling.
Now let's count the number of profiles. The technology for plasterboard ceilings is as follows: first, a metal guide profile is fixed around the perimeter. Ceiling profiles are inserted into it and attached to it. Additionally, the profiles are attached with hangers to the ceiling.
Technology for installing plasterboard ceilings
Important: guide profile installation rules
There should be no gaps between the guide profile sections. In the corner, one profile is inserted into the other until it stops. On one plane, profile sections are joined into a joint. If there is an outer corner, then one of the profile sections should stick out 27mm. In this way, a continuous belt is obtained from the guide profile.
To count the number of dowel nails, focus on the fastening approximately every 40-50 cm.
Long sections of the ceiling profile are installed exactly every 50 cm. Plasterboard boards are placed across them. Thus, the edges of each sheet will lie clearly in the middle of the profile. No edge should hang in the air! The edges adjacent to the walls will be attached directly to the guide profile.
Scheme of fastening gypsum plasterboard profiles
Jumpers are inserted across the longitudinal profiles. These are sections of the same ceiling profile, installed in increments of 60 cm. The principle is the same: all edges of each gypsum board sheet should fall in the middle of the profile. The middle of the sheet should also be secured. The length of the lintels = 50 cm minus the width of the ceiling profile (60 mm), that is, 44 cm.
Suspensions are installed along the entire length of the longitudinal profiles in increments of 60 cm.
For clarity, draw all the profiles on your diagram so as not to make mistakes in the calculation. Each intersection of the ceiling profiles is one crab and three metal screws (with a press washer).
Self-tapping screws for drywall are screwed in in increments of 15 cm . Just take the total length of all profiles in centimeters and divide it by 15.
Buy putty at the rate of 1 kg of ready-made mixture per 1 m2, approximately 3 kg per sheet . A kilogram of the finished mixture, not the powder.
Materials should be purchased with a small margin - about 20%. Quickly calculate the required amount of material for the ceiling using an online calculator.
Types of plasterboard sheets
Plasterboard sheets are available in various types with standard and improved technical and operational characteristics
Ordinary sheets (GKL) , intended for interior decoration in conditions of normal humidity. The most popular type of drywall has a white coating.
Moisture-resistant sheets (GKLV) , green in color, containing modifiers that prevent the saturation of gypsum with moisture and the formation of mold and fungi. Used in places with high humidity: bathrooms, kitchens, bathrooms. When carrying out additional waterproofing measures, the material can be used in showers, swimming pools or laundries.
Fire-resistant sheets (GKLO) , red, treated with fire retardants to prevent burning and the spread of fire. Available with a red coating. Designed for places with high temperatures, rooms where there is a risk of fire: boiler rooms, electrical panels, ventilation shafts.
Figure 2. Fire-resistant, moisture-resistant and regular drywall.
Arched flexible gypsum board with increased plasticity, designed for the construction of complex curved structures. A reinforcing mesh made of fiberglass in several layers is inserted into the gypsum core of the sheets, ensuring the fracture strength of the product.
Reinforced plasterboard GKLU , produced in thicknesses from 18 to 25 millimeters. Such sheets are produced fire-resistant and moisture-proof. They have increased strength and can withstand loads from shelves, small cabinets and other interior parts.
Manufacturers produce sheets of different parameters. They can make a custom order according to your sizes.
Standard sizes of gypsum boards:
- length 2000, 2500 and 3000 mm;
- width 600, 1200 mm;
- thickness from 6, 9, 12.5 mm.
Reinforced and fire-resistant sheets are produced in thicknesses of 15, 18 and 25 mm;
Lightweight arched - 6 mm;
The weight of the structure depends on the thickness, so before purchasing a sheet, carefully study the technical specifications and select the options necessary for your repair.
Ordinary plasterboard sheets are one of the most affordable finishing materials.
The price of special-purpose products can be several times higher than regular sheets.
Flexible arched drywall is the most expensive option. The use of such material makes sense if you need arches with a small radius. For other curved structures, ordinary drywall, bent dry or wet, is quite suitable.
Figure 3. Dry bending of sheets.
For dry bending, we make deep parallel cuts on the convex side of the sheet. Their frequency depends on the radius of curvature.
Figure 4. Wet bending of sheets.
We bend it using the wet method, treating the side that will be concave with a needle roller and moistening it with water. The other side of the sheet should remain dry. We bend the sheet to the desired shape and fix it with self-tapping screws.
Figure 5. Manufacturing of curved structures.
Sheets are available with straight edges and with thinned and rounded edges.
Refined edges are suitable for fine finishing of the surface, when the joints of adjacent sheets are reinforced and sealed with putty.
For the installation of the lower layers of multilayer structures, it is better to choose sheets with straight edges.
Marking
So, we begin the actual installation of the ceiling plasterboard.
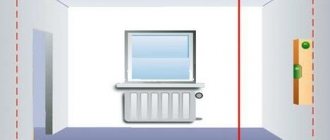
Typically, plasterboard on the ceiling is mounted strictly horizontally. Arm yourself with a level and get ready to draw a horizontal line around the entire perimeter of the room. You can limit yourself to short strokes every half meter. The main thing is that the ends of the markings meet exactly at the same level.
The correct placement of plasterboard sheets on the ceiling is important
To avoid buying tools
There is no point in buying rather expensive equipment for a one-time job. Tools such as a laser level, hammer drill and screwdriver can be rented.
You can draw a line with a pencil along a long straight bar. A piece of ceiling profile is suitable for this purpose. You can put marks only in the corners, then drive nails into them and pull the lace. But it’s even easier to stretch a chalk cord between these marks and slam it on the wall - you will be left with a perfect, straight and clearly visible line.
Using this marking you will need to install a guide profile. Remember that the finishing surface of the ceiling will be about a centimeter lower.
Next, you need to mark the installation locations of the ceiling profiles. Place marks directly on the wall, just below the guide profile attachment line. They should be visible even after installing gypsum board sheets. Apply strokes in 50 cm increments for installing long ceiling profiles, in 60 cm increments for lintels.
It remains to mark the junction of the longitudinal profile with the jumpers. Draw on metal with a marker. Place strokes every 60 centimeters on the longitudinal profiles. You can do this even before you install them in the guide profiles. Mark the ends where you started: they should all end up on one side of the room.
Ceiling calculation
It consists of fixing the ceiling plan on paper, calculating the area and perimeter. Then the frame is marked.
These data serve as the basis for determining the required amount of materials - basic and additional. Of course, with a 10% margin.
The online calculator will quickly calculate everything you need. It is imperative to check the result on another one. We must also remember that the results obtained do not guarantee complete accuracy. It’s a good idea to consult with a competent consultant at a building materials store.
Installation of profiles and hangers
Drill the guide profile with a 6 mm drill bit in increments of about 40 cm. In principle, you can punch it with a hammer drill directly at the installation site. When drilling into a wall, hold the profile tightly. Make sure that it does not move relative to the markings.
Through drilling of the guide profile is allowed
If you have plasterboard walls, then you need to imagine how far away the plasterboard is from the wall. The working part of the dowel (with a notch) must sit completely in the concrete.
On walls longer than 3 m, be sure to “splice” the guide profiles by inserting one into the other. They also need to be joined in the corners. Then install the longitudinal ceiling profiles, inserting their ends into the guide profile.
Trick: how to insert a ceiling profile into the guide more easily
Use scissors to cut off the corners at the ends of the ceiling profile. This will make it much easier to insert it into the guide, especially if you are working alone.
It is best to install the hangers before you secure the longitudinal profiles and install the lintels. You just need to make sure that the profiles are exactly in place: they will guide you where to place the hangers.
For fastening into concrete, a dowel-nail is usually used. You can also take a wedge dowel - it holds much stronger, but it is also much more difficult to dismantle.
Concrete floors in old apartments are treacherous. It often happens that a drill, having traveled a little less than a centimeter, falls into the void. You can deal with such surprises in different ways:
- take a very long dowel-nail;
- attach the suspension in another place;
- Instead of a dowel-nail, drive in a wooden plug and secure the suspension with a self-tapping screw.
It is better to attach the direct suspension not to the outer holes (which are in the petals), but to the adjacent ones, located closer to the middle. Attaching it by the petals is, of course, more convenient: it’s easier to get to them when the frame is already assembled. But this method will allow the ceiling to sag a little.
You can use direct hangers even when the ceiling height from the ceiling is more than 20 cm. You just need to use two instead of one hanger.
But it is much more convenient to use an anchor suspension. The rod of the anchor suspension is attached to the ceiling in the same way as a direct suspension, through an eyelet previously bent 90° with pliers. Please note that you only need to bend the eyelet itself. The rest of the bar should remain perfectly straight.
Where to install hangers? Above each of the long ceiling profiles, in increments of about 50-60 cm. They should not fall on the junction of the longitudinal and transverse profiles! Refer to the previously applied markings.
Direct suspension
After nailing straight hangers, bend the legs 90° down. Do this carefully - after bending, the legs should remain perfectly straight.
When all the hangers are nailed, install the longitudinal profiles according to the markings (every 50 cm). Secure them with self-tapping screws through the guide profile, one at each end.
Attaching the profile to the ceiling
Screwing screws without a drill is not that difficult. The main thing is to use a suitable bat (marked “PH2”). Press firmly on the screw (but without fanaticism) and turn at medium speed. After a second or two, the sharp tip will pierce the metal, and then the self-tapping screw can be screwed in without difficulty.
Attaching the profile to the suspension
Cut the jumpers. Please note that the length of the outer jumpers will not be 44, but 47 cm. Attach the jumpers with crabs.
Ceiling crab for connecting cross profiles
The crabs are snapped on top. They have special petals with holes for fastening with self-tapping screws to the profile. Bend the petals and attach the crab with one screw to the long profile. Before doing this, make sure that it has not moved relative to the mark. Screw two more screws through the same petals into each jumper.
How to save money on crabs
Make the jumpers 6 centimeters longer. Cut the side flaps 3cm off each end. Screw the remaining middle part with a self-tapping screw directly to the long ceiling profile from below. Don’t be confused by the fact that the head of the screw sticks out a little: this will not be a serious obstacle to the tight fit of the drywall.
Options for connecting profiles without using a crab in the photo:
With such savings, the rigidity of the frame will suffer somewhat. Of course, the ceiling won't collapse; It will just be a little less smooth and durable.
Do not rush to screw straight hangers to the profile. The problem is that profiles 2 m or more in length will inevitably sag. Especially if you used an extension cord (longitudinal connector).
We eliminate the sagging using a cord stretched tightly across all longitudinal profiles:
- screw one screw into the guide profile at each end of the room, in the middle of the wall;
- tie a string to them and pull it tightly;
- you can see that the long profiles “lie” on the lace. Before securing with hangers, lift them so that they hang 1-2 millimeters above the lace.
When all the hangers and all the jumpers are screwed to the longitudinal profiles, the frame is ready. We proceed to installing drywall on the ceiling.
Video:
Frame
There are enough types of frames. Choosing the right one is based on several parameters.
- The height of the room, the need to hide electrical wiring, lamps, ventilation ducts.
- Availability of materials.
- Project budget.
- Quality of subsequent finishing.
There is no point in inventing something of your own. Whatever the frame, the step between the profile or wooden slats should not exceed 600 mm.
If this value is applied to the width of the gypsum fiber sheet, then it must be supported by no less than three profiles - this is a strict rule.
The long side of the sheet is also attached in increments of 500 - 600 mm. In this case, the ceiling should not be additionally loaded.
Wooden frame
In a wooden house with a similar ceiling - the most suitable solution. Such a ceiling - if it is made of two layers of gypsum fiber board on a slab - will be an important part of the insulated floor.
Rice. 4
A dry block is all you need. Dry (12%) because the tree reacts very sensitively to changes in humidity. When it increases, the frame may swell, which will inevitably break the joints between the sheets of drywall.
The same thing will happen when the wet frame begins to dry out.
Treatment with compounds against rotting and woodworms is mandatory.
Rice. 5
Wood is not used in rooms with high humidity.
Metal carcass
The basis of any design is a KNAUF suspended ceiling on a single-level metal frame P 113.
Rice. 6
Material consumption is approximate. Losses are inevitable when cutting sheets. Additional materials may be needed for complex ceiling configurations. For example, it is simply impossible to calculate the number of profile extensions (4) and fasteners for them without relying on specific conditions.
Calculation of interceiling space
The height from the sheet to the rough ceiling is adjusted by the length of the direct suspension leg (6). It is equal to 120 mm. Thickness 0.9 mm. Maximum load – 40 kg.
The height of the PP 60 x 27 ceiling profile is 27 mm.
120 mm – 27 mm = 93 mm.
The “crab” connection (5) protrudes above the profile by 2-3 mm.
93 – 3 mm = 90 mm. This is the maximum distance where the necessary communications can be placed.
Minimum: 27 (profile height) +3 (crab) + 3 (hanger thickness + bend radius + wall profile thickness) = 33 mm (excluding plasterboard thickness).
This system allows you to level a plasterboard ceiling without any problems. The guide profile PN 28 x 27 (3) is mounted horizontally on the wall. It sets the required height and level for the ceiling profiles, which are attached to the ceiling with hangers.
If a larger inter-ceiling space is needed, a suspended ceiling on a two-level metal frame P 112 is used. Below are the main characteristics and the approximate consumption of materials.
Rice. 7
This design, due to the suspension with a clamp and rod, allows you to place air ducts and insulation in the interceiling space. It is also possible to use non-flammable KNAUF-Fireboard sheet.
Other designs can be seen on the KNAUF website.
Installation of drywall sheets
But first you need to do insulation (if in your case it is necessary). There are different ways to insulate a ceiling. Perhaps the most convenient is mineral wool insulation. Roll insulation is simply placed on top of the frame. Wear gloves, goggles and a respirator - dust from mineral wool irritates even the skin, not to mention the mucous membranes.
And now you can screw the gypsum board sheets. Start from the edge where the whole sheet fits. Place the sheet across the long profiles, close to the walls. If you did everything correctly and accurately, then the edges of the sheet along the entire length will be exactly in the middle of the ceiling profiles.
Screw the sheet to all profiles, both at the edges and in the middle. Along the edge, the screws should go approximately every 15 cm, in other places you can increase the pitch to 20-25 cm.
How to attach sheets
GCR has a front side and a back side. On the front side there is a rounded chamfer along the longitudinal edges of the sheet and there is a slight unevenness. The reverse side is always flat - for a tight fit to the surface.
Screw in the screws ten millimeters from the edge. You need to retreat at least 15 mm from the cut edge. Retreat at least five centimeters from the corners!
The screw head should be slightly recessed into the surface of the slab. Do this carefully: the self-tapping screw is quite easy to tighten, especially if you lack experience. In such work, a special bit for drywall with a limiter is very helpful.
You can see where the profiles go by the marks on the wall. However, you can draw out a sheet of drywall in advance, even before you lift it and start attaching it. Continue the longitudinal row of sheets, end to end, without gaps. It is difficult to do this work without an assistant.
Devices for not holding a sheet of drywall
Make a support. Take a board slightly longer than the height of the ceiling, screw a piece of board about a meter long across it to form the letter “T”. Reinforce with two planks diagonally. This device, similar to a mop, is used by craftsmen all over the world when installing drywall on the ceiling.
Methods for installing a gypsum board ceiling without an assistant:
Using the lift
Homemade option for holding a sheet on the ceiling
The next row starts with half a sheet. The technology requires that the seams between the sheets do not intersect crosswise. The correct arrangement of the slabs resembles brickwork.
How to cut drywall sheets
With a knife. It can be clerical. Mark exactly the middle and make a cut along the ruler. You probably still have a piece of the ceiling profile left - use it as a ruler. The cut can be shallow; it is enough to cut through the paper. Place the same profile under the cut or place the sheet on the edge of the table and break it. All that remains is to cut the paper from the back side.
If you need to cut a very narrow strip, it is easier to use a hacksaw.
The cut edges need to be chamfered additionally. This is necessary for high-quality putty. Using the same knife, cut off a few millimeters from the front side at an angle of about 45°. Precision is not required at this stage. Do not touch the factory longitudinal edges - their chamfer is already rounded.
Detailed secrets of working with drywall.
Stage 2. Preparing equipment and consumables
Of course, each master has his own list of necessary tools, since in this matter a lot depends on dexterity and the ability to use them. But there are those without which it is unlikely that the work will be completed successfully:
- metal scissors;
- “serpyanka” (tape for seams);
- hammer drill, drill bit for it;
- guides;
- screwdriver;
- water level at least 2 m long;
- laser level (for measuring the entire room);
- dowels;
- protective equipment – respirator, plastic glasses;
- ceiling profiles;
- “crab” fasteners;
- self-tapping screws;
- anchors for fixing suspensions;
- roulette;
- ceiling suspensions;
- hammer;
- mounting knife;
- drywall.
Tools
Note! Depending on the characteristics of the ceiling, the list can be supplemented, for example, with clamps for joining profiles located at different heights (if there are large stones in the concrete that interfere with normal drilling), etc.
Final finishing
Prime the ceiling with a roller or large brush. Using a small brush, carefully go over the seams.
After the primer has dried, apply the sickle tape. It is glued only to the junction of two factory seams, as well as to the corners. Immediately after this you can putty the seams.
Mix a small amount of putty. At this stage, you only need to cover the seams and recesses from the screws. Apply the putty with a narrow spatula, then level it with a wide one.
According to the technology, the seams need to be puttied twice. So you will have to wait for the putty to dry, then apply a second, thin layer. But before that, be sure to scrape off all the burrs with a spatula (just don’t use much force).
And now, in a good way, you need to apply a third, continuous layer of putty. The result will be a smooth white surface ready for painting. Many people neglect the correct way of painting without glare and the stains are then noticeable. More about this
Ceiling preparation
Cleaning from peeling plaster, mold, mildew. Sealing cracks, priming. Then drying and treatment with antibacterial agents.
An inspection of a wooden ceiling is carried out more carefully to detect and remove areas of rot on the boards. Even in their absence, the ceiling is treated with antiseptics such as Farbex. A coating of two or three layers with intermediate drying will not be superfluous.
After this, electrical wiring and other communications are secured (if necessary).
Then the level at which the ceiling will be located is determined. A laser or water level is used. Appropriate marks are made on the walls.
How to make multiple levels
In apartments (houses) with high ceilings, it becomes possible to install multi-level suspended ceilings. In this case, the number of interior design solutions tends to infinity. There are no particular difficulties in this design of the ceiling space. The order of work is not much different from the technological process for installing one level:
- plan in advance and draw on paper a level layout;
- transfer the drawing to the walls and ceiling: mark the levels of fastening of drywall and load-bearing profiles;
- mount the frame for the first level;
- bend the side profile to fit the selected pattern;
- install the side frame;
- mount the second level frame;
- route the wiring for the lamps;
- cut drywall for both levels;
- attach plasterboard at both levels;
- cut and then bend the gypsum board strip for installation on the side frame;
- close the box;
- carry out finishing treatment of the installed ceiling;
- cut holes for the lamps and then paint the ceiling;
- install lamps.
Thus, installing a suspended ceiling is not difficult. There is only one problem: this kind of work cannot be done alone.
Painting gypsum boards and installing lighting
When painting a plasterboard structure, be sure to use a painting mesh and a special bandage, which are necessary for gluing the joints and connecting the sheets to the walls.
Markings for spotlights are made before final painting. This will prevent stains and make it visible. The final layer of paint is applied towards the most intense light streams. If there are several windows in the room, the last painting is performed perpendicular to the window opening facing the sunny side.
To properly decorate the ceiling surface, you must strictly follow the instructions. When constructing a ceiling frame, a diagram of plasterboard profiles will help achieve the desired result. Otherwise, there is a risk of creating an unreliable design that will have to be redone.
Fix the main profiles in one plane
YouTube channel “Stone Guys”
To obtain a perfectly flat surface for plasterboard cladding, you need to align all the beams in one line. The easiest way to do this is with regular thread.
Lift all profiles 10–15 mm up and secure by inserting screws into the holes of the hangers. Stretch a thread across the profiles between the walls and secure them with self-tapping screws on the guides flush with the latter.
Also, the correct installation of profiles can be controlled using a bubble level / YouTube channel “KNAUF Russia”
Starting from the outermost one from the wall, release the profiles one by one and, aligning them so that they barely touch the thread, secure them with four 3.5 × 9 mm screws - two on each side.
First, fix the hangers in the middle of the beams to remove any slack. After this, the main profiles will almost clearly fall into place. All that remains is to check the thread and tighten the screws into the hangers.
Installing drywall without sheathing
If the ceiling is made of wood, then drywall can be installed without a frame, that is, fixed directly to the base. The main condition is a flat surface. To hold the sheets under the ceiling, you will also need an assistant, a lift or T-shaped supports made of bars. The material is raised to the desired level and fixed to the ceiling using a screwdriver and self-tapping screws. The manipulations are similar to those when installing sheets on a frame, but in this case the drywall is attached to the ceiling.
Secure the hangers
YouTube channel “KNAUF Russia”
Next, at the previously marked points, install hangers for the main frame profiles. In reinforced concrete floors - using metal wedge anchors and a hammer drill, in wooden floors - with self-tapping screws and a screwdriver. After installation, bend the hangers down.
For sound insulation, you can also stick sealing tape on them or coat them with silicone. An even greater effect is achieved when using special anti-vibration suspensions with elastic inserts.
Install wiring and sound insulation
Electroas.ru
Before covering the frame with plasterboard, you need to lay electrical cables. As a rule, they are attached to the ceiling or suspensions. Under no circumstances should wires be laid inside the frame, as there is a risk of damaging them with screws when installing the sheets.
YouTube channel “KNAUF Russia”
To increase the sound insulation of the ceiling, mineral wool slabs are laid between the frame profiles or on top of it. If the free ends of the suspensions are sufficiently long, they are bent, thereby holding the sound insulation layer.
Install support profiles
YouTube channel “KNAUF Russia”
Now, across the main ones, it is necessary to mount load-bearing profiles that will hold the drywall. Cut the beams to size from the same PP 60 × 27 profile and fasten them using single-level connectors (“crabs”).
If you don’t have special fittings at hand, you can use trimmed PN profiles about 100 mm long as improvised guides. They need to be attached to the main profiles with screws, and the load-bearing ones must be inserted into them and also secured with self-tapping screws.
Applying markings for assembling a frame from metal profiles
The work begins with marking. This will require a building level. A level 2 meters long is suitable, which has 4 marks in the viewing window - two on each side of the air bubble. First you need to draw a straight horizontal line on the walls. It must be absolutely flat and close at the starting point. Then mark the attachment points on the ceiling of the direct hangers. The result should be a grid with cells of 60x60 cm. The gap at the edges may be smaller. But you need to pay attention to the symmetry of the cells on opposite sides.
Seal the joints
YouTube channel “KNAUF Russia”
Upon completion of installation, all sheet joints are covered with putty using reinforcing tape. To do this, first make sure that the screws are securely fastened and, if necessary, tighten the protruding heads with a screwdriver.
Then use a brush to brush off any dust at the joints of the sheets and prime all cut edges. Fill the seams with putty using a putty knife. Glue reinforcing tape in the center of the joint and press it in with a spatula. Next, apply a second layer of putty. Use the same compound to seal the fastening points of all self-tapping screws.
Facts about drywall
Types of drywall:
- GKL - ordinary drywall. The color of the marking is blue, the sheet is grey.
- GKVL is a plasterboard with increased moisture resistance and antiseptic properties. The color of the marking is blue, the leaf is green.
- GKLO is a material with increased fire resistance. The color of the marking is red, the sheet is gray.
- GKLVO is a plasterboard that has increased moisture and fire resistant characteristics. The color of the marking is red, the leaf is green.
The advantages of drywall include:
Physical and technical characteristics of plasterboard sheets.
- No toxic components and high environmental friendliness.
- Good soundproofing qualities, which allows it to be used in the construction of various partitions.
- Good plasticity, which makes it possible to create unusual figured structures, multi-level suspended ceilings, various alcoves, etc.
- Light weight, which allows the use of plasterboard structures in places where monolithic concrete floors and brickwork are unacceptable.
- Easy to install, working with drywall does not require special skills and knowledge.
- Drywall is a good way to quickly level a variety of surfaces. Where it is necessary to spend hundreds of kilograms of plaster and a lot of time to eliminate defects, a plasterboard sheet allows you to create a perfectly flat surface in 60 minutes.
Like any other material, drywall has its drawbacks. Compared to the advantages, they are so insignificant that plasterboard firmly holds a leading position in the building materials market. The disadvantages of drywall include:
- Fragility. Transportation and storage of drywall must be done in a horizontal position, carefully and carefully.
- Reducing the area of the room during installation by installing profiles and sheets.
Related article: Real and nominal battery capacity
Stage 7. Final finishing of the ceiling
Expert opinion:
Masalsky A.V.
Editor of the “construction” category on the Stroyday.ru portal. Specialist in engineering systems and drainage.
Particular attention is paid to seams, since the aesthetics of the future structure directly depends on the quality of their sealing.
Step 1. First, the seams are sealed with a primer - this will change the porous structure, it will become denser and, as a result, absorb the putty better. After this, you need to wait until the primer is completely absorbed and dry.
How to seal seams in drywall
Step 2. Putty is applied to the screw heads and seams between the sheets. To do this, you need to use only a high-quality spatula, with sharp and even edges.
The putty must be special, intended for seams (this point needs to be clarified at a hardware store or in the manufacturer’s instructions).
Step 3. When the seams are completely dry, they should be taped with seam tape. It is typical that the joints are sealed with an overlap. The tape is treated with putty, and all detected cracks are sealed at the same time.
Grouting joints
Step 4. After the putty layer has dried, a finishing coat (for example, paint, plaster, etc.) is applied.
Finishing
Step 5. Lighting fixtures are installed (if they are provided for in the previously drawn up project).
Video - Installation of spotlights
Note! When installing a suspended plasterboard ceiling with your own hands, do not forget about personal protective equipment. Use goggles and a respirator - they will keep you healthy.
What to do if the plasterboard wall is wet?