Do you want to straighten a wall and at the same time give it a picturesque look? Creating decorative patterns using “Sand” plaster is the ideal solution to “perpetuate” your renovation.
You can do this kind of work either with the help of professionals or on your own. In addition, this unusual type of coating is displacing ordinary wallpaper and paint from the market. And more and more people want to transform their homes.
Everyone is faced with the choice of material for repair. With all the variety of types of decorative plaster, I would like to combine quality and the best price. In addition, this type of finishing has a variety of decorative effects. The walls will no longer be boring and dull.
What is decorative plaster “sand” and its composition
Mostly decorative plaster is found with quartz sand, but sometimes with fine river sand. Finely crushed shells and shimmering mother-of-pearl particles are added to the overall mixture for a luxurious and shiny effect. Sand plaster is more suitable for interior finishing, but if you plan finishing work outdoors, it is necessary to add protective impurities.
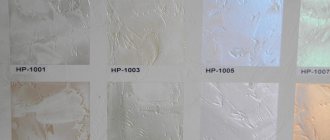
Decorative plaster with sand effect is divided into two types:
- The mother-of-pearl coating has the appearance of velvet combined with silk. This shimmer is characterized by the addition of those same shimmering particles and shells. Only silk plaster itself is more similar to noble fabric.
- The matte finish resembles sandstone (natural stone). But using such natural stone in apartments is impractical, especially due to cost, so decorative “sand” is a good option for simulating natural stone.
Scope of application and interesting examples
Designers often use textured sand-effect plaster to decorate interiors and facades. The main thing is to choose an individual style for each room and facade. Calm pastel colors are used in the bedrooms. In the hall and hallway, Venetian plaster is suitable, which will create a rich atmosphere. Tapestries, stucco molding, crystal vases and a chandelier will add pretentiousness.
Venetian plaster is well suited for decorating the interior of a hallway
By adding terracotta color to the plaster mixture, you can decorate the fireplace area. Warm tones will create the look of fire reflection across the entire wall all the way to the top. And mother-of-pearl notes will shimmer in the texture of the finish, imitating the glare from flames.
Decoration in a classic style and pastel colors will decorate the bathroom, toilet and bedroom. And decorating the stairwell and hallway with gold will look luxurious and add solemnity to the apartment.
African motifs are especially popular. Having decorated one wall in the living room in this style, creating an imitation of leather, you can hang masks on it, a picture with a landscape of sandy deserts and a caravan of camels, and place an African-style vase next to it.
African motifs in the interior have not lost their relevance for many years
In the rustic version, the interior is decorated with simple drawings. It is advisable that pearlescent or shiny particles are not added to the plaster; quartz sand should also be absent. Beige, olive, cream and sand colors are ideal for adding simplicity to the room.
Those who prefer oriental style are recommended to use bright colors, quartz sand, pearl color, shimmering particles, bronze, copper and gold paints. Accessories are also selected to match the color of the walls: decorations, pillows, trestle beds, carpets with oriental patterns.
Light plaster with pearl tints is suitable for the office. This tone will visually expand the space and create a favorable atmosphere for work. Against the background of this plaster, order wooden furniture several shades darker. A glass table for guests and plastic shelves for work documents and accessories will help complement the interior.
Decorative plaster with a pearl sheen is perfect for decorating a study area
Venetian plaster is suitable for rooms decorated in the Italian style. A living room made in this style looks noble. Thanks to the particles added to the material, the walls acquire a shine that is visible in certain lighting. Paintings in gold frames, expensive wooden furniture, and lush carpets will help create an intimate atmosphere.
Sand plaster is not suitable for all styles. For example, such finishing is not at all suitable for Scandinavian design and high-tech style premises.
Advantages and disadvantages
Like any building material, textured sand is endowed with advantages and disadvantages.
In addition to the exquisite coating, a number of qualities can be identified that determine superiority in the market:
- The environmentally friendly mixture without synthetic impurities allows you to use decorative sand plaster on the walls in a children's room;
- Durable plaster will last for many years if properly used. Having selected a high-quality composition, you can forget about repairs for 10 years or more;
- Resistance to dampness. The plastered surface can be washed and wet cleaned. But to increase resistance to moisture, it will have to be additionally coated with wax;
- Fine quartz is added to the composition, which protects against fungus and mold;
- The universal mixture allows you to simultaneously work with several building materials. Hides unevenness and serves as the main finishing;
- Variety of colors. An unlimited number of colors allows you to create walls in any artistic style.
Negative properties include the absorption of odors. Decorative sand is not applicable in the kitchen, especially if the sand is periodically exposed to chemically active detergents.
Kinds
Shallow river
The plaster contains fine river sand . This allows you to make the surface unique, characterizing it with such qualities as:
- durability;
- environmental friendliness;
- natural effect;
- low price;
- versatility;
- beauty;
- moisture resistance.
Sand plaster is suitable for finishing all types of surfaces . It has good adhesion to:
- concrete;
- brick;
- tree;
- plasterboard.
It is not afraid of moisture and is not afraid of any temperature changes. Decorative materials can create unusual textures . Surfaces with this pattern are preferred because of its aesthetics and natural origin. Decorative plaster “sand” creates the same effect: such an interior certainly cannot be called boring.
Attention
Most often, sandy compounds are used to protect walls from mold and mildew. Under a layer of sand plaster, the wall breathes, so microorganisms and fungi cannot accumulate on it. It would be good if additional quartz was added to the mixture. This will give greater strength to the surface and will guarantee the absence of accumulation of microorganisms in the future.
There are many variations in color and coating pattern . In order for the desired effect to be achieved, all debris and dust must be thoroughly removed from the surface. If cracks, dents and unevenness are found on the wall, then the base is initially treated with a layer of simple plaster.
After the primary layer of material has dried, a thin layer of acrylic-based plaster is applied to it. Only after this is a deep penetration primer applied, and then all subsequent work begins to create a texture from the sand mixture.
Sand plasters are:
- With a pearlescent tint . Silk and a velvety base give this effect. The shimmer is obtained due to the addition of shells and shimmering particles to the composition.
- With a matte finish . Reminiscent of sandstone or natural stone. Decorative sand in this case perfectly imitates the natural origin of the finish.
Quartz
Plaster with the addition of quartz is distinguished by fine fractions of quartz sand. It is also similar in properties to sand, but has a difference. Quartz particles are more iridescent. The mixture with their addition turns out rich and shimmers beautifully. This moment may not always be suitable for purchasing the mixture. Some materials require a strictly matte base: for them, a sand mixture will be the best option.
Attention
Quartz composition is durable and strong. Plaster with the addition of such particles lasts quite a long time and does not deteriorate under the influence of the external environment. Such a mixture is not afraid of moisture or sudden temperature changes. Mold and mildew do not form on the surface or inside the wall. Quartz repels microorganisms and does not allow them to settle on the surface.
This decorative coating looks amazing in any residential or non-residential area. You can choose from different designs, shapes, and colors. You can decorate any area of the apartment with this coating. Plaster looks impressive in :
- bedroom;
- hall;
- living room;
- hallway
Many people use an interesting solution when updating the design in the kitchen area. Only in the bathroom it is not always possible to successfully create a composition due to the clumsiness and uniformity of the coating. But according to the tips of the masters, this zone can be given an extraordinary style.
What tools will you need?
The preparation of tools must be approached no less responsibly. During work, everything should be at hand; I would like to avoid partial “repurchase” of equipment in the future. Tools must be of high quality; when purchasing, you must inspect them for irregularities and nicks. A special tool is produced for applying decorative compositions. When using conventional tools, defects may occur when working with structural plaster with your own hands.
Required set of accessories:
- Spatulas of different sizes, 3-4 pieces are enough;
- Scrapers for cleaning old materials;
- A trowel for uniform application of the building mixture;
- Venetian trowel;
- Drill with attachment or construction mixer;
- Rollers of different sizes;
- Container for the solution, if a roller is involved in the work;
- Brushes and brush;
- Bucket for water;
- Rags for removing excess plaster and moistening tools;
- Covering material;
- Masking tape.
Individual protection means:
- Gloves;
- Specialist. cloth;
- Protective glasses;
- Respirator.
With the prepared tools, you can start working with decorative sand.
A special tool differs from a standard one in the quality of the metal, rounded edges and often beveled edges. You can make such a tool yourself by modifying ordinary cheap store samples, but it is better not to do this and use professional equipment.
Selecting the necessary tools
To work with plaster that imitates sand, you will need a number of tools:
- scraper;
- spatulas of various sizes and purposes;
- trowel;
- grater;
- rollers of several sizes;
- brushes, combs and brushes;
- container for preparing the solution;
- drill with an attachment for mixing the composition.
There are various types of tools available in the market. It is better to give preference to stainless steel products. This will help avoid troubles associated with the appearance of yellowness on the composition.
Preparing the wall
Careful treatment of the walls will save you from further troubles and will be the key to successful plastering. Preparation for decorative plaster will help avoid swelling and peeling of the sand decor.
- Preparation. The first step is to clean the entire surface of previous coatings. If necessary, remove loose old base. Clean all greasy dirt using chemicals, and remove dust and small particles with a vacuum cleaner.
- Alignment. Next, the wall is leveled with gypsum plaster until it is smooth. In the case where the defects are very large, you can use a cement-sand mixture.
- Primer . After applying a deep penetration primer, which strengthens the base, it serves as a fastening element with sand plaster . To ensure durability and ensure good adhesion, the wall is coated with primer twice. The primer should dry for 5-6 hours.
Surface preparation and application of a decorative layer
First of all, we devote time to the surface on which sand decorative plaster will be applied. This material is always applied to the wall, because it looks extremely ridiculous on the ceiling. Preparing the wall consists of cleaning and leveling it. It is necessary to clean off previous coatings (wallpaper, paint) and weak layers of plaster. After cleaning from dust, dirt and grease stains (if any), you need to level the wall with putty until smooth. There should be no cracks or scratches. After this, a deep penetration primer is applied to the smooth coating using a fur roller.
Priming removes remaining dust, makes the base more durable, and also improves the adhesion of the next layer. With its help, we get a better and more durable coating.
The dry coating should be painted with acrylic paint. Its color should be several tones darker than the base coat. To do this, it is better to tint the paint yourself in the same way as you would tint decorative plaster yourself. It’s enough to just add the color to the total mass, and then stir everything until you get a single-color mass. Paint is applied using a velor roller. It is applied in a continuous, even layer.
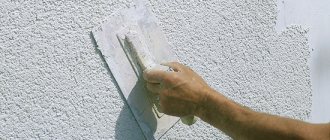
After the paint has dried, you can proceed directly to applying a decorative coating with a sand effect. We also tint it in a top color that is lighter than the base paint. The actual application of the material to the wall is best done with a hard-bristled brush in multidirectional movements. In this case, small vortices will be created, similar to sand dunes. When working with large areas, the coating is applied to small sections of the wall, 2-3 square meters in size. The next section is applied before the previous one dries, covering the torn edges. In this case, it will be extremely difficult to notice the joints.
In a day the plaster will dry, and in a week it will be completely ready for use. In some cases, two layers of decorative sand plaster are applied. This technique is used only if pre-painting is not used. The advantages of this method over the option described above are very doubtful.
Possible sand effect designs
The advantage of decorative sand is that it can be used to create a variety of textures. Sometimes this requires selecting a specific mixture with appropriate fillers, and sometimes only special tools and skills are enough.
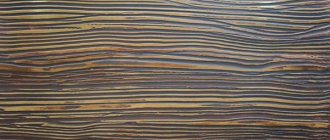
- The effect of a sandy wind can be achieved if the second layer of decorative plaster is applied with wide cross strokes. To implement this idea, it is best to tint the solution in 2-3 colors and apply them in a cross pattern. After the surface has dried, it must be sanded.
- Decorative sand plaster creates the effect of sand dunes if the finished coating is treated with mother-of-pearl pastes. They are able to highlight the quartz particles in the solution, awakening their natural shine. The resulting shimmering pattern will be somewhat reminiscent of sand dunes.
- The effect of river sand is obtained if the solution is applied with a brush in diagonal movements.
Technology of applying decorative plaster with sand effect
The method of application depends on the effect you would like to achieve, but the general sequence will be the same.
- Surface preparation.
- Preparation of the solution and its tinting. Sand mixtures for the most part do not require any additional preparation other than adding color, because sold ready-made. The only recommendation here is to strictly follow the instructions given by the manufacturer.
- Applying the base layer . The base is tinted to match the color of the base coat, but two shades darker. The base contains paint or primer and a tint of the desired color. The primer will level and smooth out all small cracks and irregularities. Apply two layers with a fur roller, there should be a period of drying time between them, 30-40 minutes is enough. When the paint has dried, you can apply the main decorative layer.
- First stage of application. The prepared solution is applied with a stiff brush or roller with a fur cover. After gradually applying the first layer, wait a few minutes.
- Second stage of application. Next, apply the second layer. It will take a day for it to dry completely, but to use the wall it is better to wait a week.
Regarding the choice of colors, you can choose the color yourself; the most common are pastel colors (yellow, beige, light brown).
Often the base is applied using acrylic paint and a velor roller, rather than the decorative sand itself.
Designers are developing new ideas for decorating living spaces. In this regard, the use of sand plaster mixture for decoration is completely justified. The result is stunning. The main condition is the choice of high-quality equipment and materials, which will greatly speed up the process.
Peculiarities
Decorative plaster is a finishing with which various reliefs and other visual effects are created on surfaces.
Thanks to this material, you can imitate expensive finishing materials, while significantly reducing costs.
Decorative plaster “sand” is quite widely used in interior design and this is not without reason, because the material has a number of advantages:
- The plaster contains quartz or river sand, which helps create a varied coating on the surface of the walls.
- The material tolerates high humidity well. The coating can be cleaned with a damp cloth. To enhance its moisture-resistant properties, “sand” plaster can be coated with wax, after which the use of such a finish is permissible even in the bathroom.
- The composition is completely environmentally friendly and does not cause allergies.
- The material has high vapor permeability, that is, the walls underneath “breathe.” The surface can absorb and then release moisture back, maintaining an optimal indoor microclimate.
- Sand plaster has a fairly long service life, reaching more than 10 years. At the same time, the texture and brightness of the colors are preserved in their original form.
- The composition has increased resistance to the formation of fungus and mold.
- A wide range of colors will help you choose this coating for almost any interior.
- Due to its properties, this coating can also be used outside buildings.
The disadvantages of the material include its cost , but it is still significantly lower than that of good wallpaper. Another disadvantage is the fact that this coating absorbs odors well, so it is not recommended to use it in the kitchen.
What effects can be created using a decorative sand mixture?
Applying sand plaster yourself is not a difficult task for anyone. But if you want to decorate the interior with intricate patterns, then you will have to use the tips of the masters. Having decided to create textured walls, you need to select “sand” plaster with the appropriate components. The application sequence is the same, but the technique for creating the drawings is different.
If desired, if one layer is not enough, you can apply a second one, and sometimes the presence of a second layer is mandatory.
Before starting work on the wall, be sure to practice. Decorative sand can be applied to small pieces of fiberboard or drywall.
So, the effects of sand decor:
- Decorative plaster sand dunes This pattern is associated with the desert. The effect is created using a brush.
- Using movements of the hand, cross-shaped strokes are applied, from side to side. Hold the brush at a gentle angle, as if working with a spatula;
- Until the surface has dried, you need to carefully inspect it for missing areas and correct if necessary;
- The dried surface must be shaded with a clean brush to avoid a sloppy look (if you use a dirty brush, the result will not be a beautiful drawing);
- If necessary, you can add another layer that will increase the density of the “sand vortices”.
- Decorative plaster sand swirl effect. This style is very similar to the previous one.
- It is carried out according to the scheme of chaotic “swirling” application (circular movements are added to the cross movements).
- Disperse the material throughout the entire volume of the wall. Do not overload the brush with material to avoid large “blunders”.
- Next, use a clean brush to blend the sand in the same direction.
- If you come across areas with no plaster, you can go through this place again.
- Rain effect.
- The design is applied evenly with a wide brush in one direction, it can be diagonal or perpendicular to the floor.
- Cover the surface in small sections, as sand plaster dries quickly and seam joints may remain.
- After drying, use a clean brush to lightly move it along the wall to remove excess material.
- Pebbled leather is applied in two layers. The second row is made using a stencil. Upon completion, the surface is sanded.
- For the burlap effect, you will need a fine-bristled brush. The direction of brushing gives the appearance of the design.
The last two effects are rarely used or performed by other structural mixtures.
When working with large areas, you need to apply the material in pieces of 1 - 1.5 m2. The edges of the applied surface should remain uneven, as if torn, so that when work continues, joints are not noticeable.
What is the solution?
Sand plaster for finishing work is a composition whose consistency is similar to wall paint. It combines the properties of plaster and paint, which allows the mixture to be used to create various design projects. Even a person without experience can work with such material.
This is interesting: Peach curtains in the room: creating an appetizing interior (21 photos)
Consumption of decorative plaster “Sand”
Before starting work, everyone asks the question of cost, and this question is closely related to the consumption of the mixture.
Several factors influence the amount of solution required:
- Wall defects. If they are impressive, then it is worth treating the first layer with ordinary and then decorative plaster with quartz sand.
- Base of the wall. For brick, concrete, wood, mortar will be needed in different quantities. Using a good primer will help (if required, use 2 or even 3 layers of primer).
- Selecting a mixture manufacturer. The manufacturer indicates consumption and recommendations on the packaging.
We recommend focusing on a flow rate of 100-250 ml/m. An online decorative plaster calculator will help you calculate the required amount of mixture.
As a conclusion, it can be noted that a decorative mixture with sand is one of the most common types of finishing. It is not difficult even for a beginner to master its application. Dare, practice, and decorating the walls in your home will delight you for many years with a beautiful and original coating.
What does it consist of?
The main feature of the composition of such plaster is inclusions of fine river sand. Other components are binders, a solvent, and various antiseptic additives to prevent the formation of mold and mildew.
For textural variety, along with quartz sand, mother-of-pearl chips, crushed shell rock or other minerals are added.
In appearance, plaster can be matte or pearlescent. The second group of compositions contains reflective particles, due to which, when rays hit at a certain angle, the surface acquires a pearlescent effect.
Plaster with sand: how to apply?
You can do the interior design yourself if you understand the technique of applying the material in advance. There is nothing difficult about this work. You just need to follow the technology, and then the decorative coating will last a long time.
First prepare the walls. The base for applying plaster must be smooth and clean. Therefore, remove the wallpaper, glue and paint, and fill the cracks and holes with putty. Before decorating, the walls must be primed. In this case, the plaster will adhere better, and it will also prevent the formation of mold.
In order for the plaster to adhere well, you need to carefully prepare the walls. They need to be cleaned, puttied and treated with a primer.
Then you need to dilute the dry mixture with water in a container, following the instructions written on the box. According to the technology, any plaster is applied in two layers. The first becomes the basis, and the second - the texture.
The resulting pattern depends on the application technique. The easiest way is to spray. You need to dip a stiff brush into the mixture, and then, at a short distance from the wall, hit the board with the bristles. Splashes will fly onto the surface, and after drying the desired pattern will appear. It is more difficult to work with a spatula. But without it, it will not be possible to create a surface with the “sand dune” or “wind” effect. Movements can be made in one direction or crosswise. The color of the walls can be made deeper and more complex. To do this, before applying the substance they need to be painted with colored acrylic. The color of the dye should be several tones darker than the plaster. For example, you can paint a wall light gray and cover it with a silver-effect material on top. Dense white paint will be combined with mother-of-pearl plaster, and deep yellow, brown or terracotta will be combined with golden plaster. In modern projects, unexpected combinations of colors are increasingly common. Sand plaster is used for walls, but this coating is not suitable for application to the ceiling.
How to apply?
Despite the simplicity of the process, it is worth repeating the obvious truths once again, which will protect you from possible mistakes in the plastering process. There are really no difficulties during application, but careful preparation of the walls may come as a surprise to someone.
- First of all, the wall is thoroughly cleaned. In this case, even small contaminants should be removed, since they do not promote adhesion. To remove stains, special chemicals and industrial vacuum cleaners are used. If the base of the wall itself is cracked or looks loose, the damaged areas must be carefully cleaned.
- All significant surface irregularities are sealed with relatively inexpensive gypsum plaster (it is not recommended to use a cement-based analogue: it takes too long to dry). As an alternative, you can also use acrylic-based putty.
- For greater durability of the repair, the wall must be primed in two layers. What’s interesting: instead of a primer, you can use ordinary water-based paint, but then you will have to select the shade as accurately as possible so that it matches the subsequent finishing.
- The purchased mass must be prepared for application. Exactly how to do this will be written on the packaging. Usually the procedure is not complicated: the mass just needs to be thoroughly mixed, in some cases adding a little water.
- The plaster itself is usually applied to the wall using a stiff brush. If, when working with other types of finishing, a stable direction of movements is usually provided, then in this case, on the contrary, it is not welcome - the movements should be chaotic, since this allows you to create a complex and unpredictable pattern.
- The application of plaster usually occurs gradually, in pieces of 2-3 square meters, but the next piece must be started before the previous one is completely dry - this is the only way to hide the joints.
One layer of applied plaster is usually quite sufficient. The work will take at least a day to dry, but it is better to fully use the room only after a week, in order to eliminate the possibility of accidentally touching the under-dry surface.