The fashion of design works changes several times during the season. When cold weather sets in, fashion trends in living space design are the same, but as soon as the weather changes, the direction of fashion also changes direction. The soaring plasterboard ceiling has remained unchanged in apartment design trends. It differs in shape and design. There may be not 2 levels in the ceiling, but more. Design works are presented in the photo, they can be seen in advertisements and in guest appearances.
An example of soaring ceilings in the interior of a room But, the owners of the apartment come up with a soaring ceiling, which for him will be the highlight of coziness and comfort.
Types of designs
Using drywall (gypsum plasterboard) you can create a wide variety of shapes and arbitrary designs. The following options are possible in a floating ceiling:
- One level. The entire design work occurs on a flat plane. This design is the simplest in its manufacturing technology.
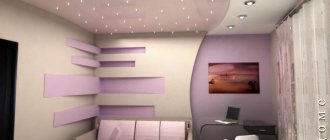
- 2 and 3 levels. One level is mounted on top of another, creating beautiful outlines and extraordinary lighting.
- Many levels. Installation of a multi-level plasterboard ceiling is the most difficult.
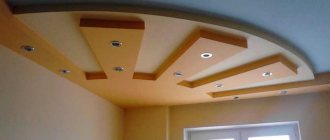
Design of a multi-level floating ceiling made of plasterboard
Attention! A soaring ceiling can only be achieved with the right lighting. To do this, you should select the necessary electrical lighting fixtures. The most commonly used strips are LEDs and lamps. Before you start creating a floating ceiling, you should make a calculation that will take into account the height of the ceiling and the number of centimeters that will go to the floating ceiling.
Types of lighting for a floating ceiling
In design designs, there are 2 types of ceiling lighting:
- Open. This is the most common lighting situation in the room. For lighting electrical devices, holes are made in the ceiling structure and lamps are placed there.
- Hidden. Lamps are placed in the gap between the levels. It looks mysterious. The room acquires some mystery and comfort.
Diagram of a hidden lighting device on a floating ceiling
In order to make lighting in a floating ceiling use:
- LEDs. There are no difficulties in installing these diodes. They are economical in their functionality and cheap in pricing. The main advantage is adjustable room lighting. There is contour lighting: 1 meter - up to 60 diodes and main lighting: 1 meter - 120 diodes.
- Neon. Long service life (10 years). Energy saving, minimal heat transfer, wide choice. The downside is the price (it is more expensive than diodes).
- Optical fiber. It lasts a very long time and consumes little electricity. With its help, it is possible to create various lighting effects. This fiber is fireproof. The pricing policy is too high, and it is difficult to supply fiber.
What forms are there?
Such designs offer unlimited possibilities for creating a wide variety of shapes.
- Floating lines. An arbitrary lighting element in the form of straight and wavy stripes or broken lines, in the form of a zigzag, allows you to evenly illuminate a room or interestingly play up its zoning.
- Along the perimeter. Visually expands the room and gives it depth and additional space.
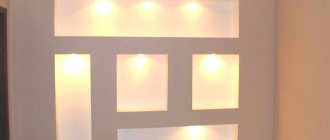
- Geometric figures. Circles, squares, rectangles, ovals and other geometric shapes are the most popular elements for modern interior design.
- Free form. Create a beautiful and unconventional ceiling design.
- On one wall. This asymmetrical shape, located along one wall, allows you to organize partial lighting and give the interior a mesmerizing look.
- With a niche. Various types of niches, such as for a cornice, for a chandelier or around the entire perimeter of the room, are not only decorative, but also functional.
Backlight functionality
- General. Indoors, with the help of lighting, a single picture of the room is created.
- Zonal. The room is divided into zones using lighting. It is possible to create a bright light spectrum above the desktop and dim light above the sofa.
- Decorative. Mainly used by designers to illuminate certain elements of a room (a large vase with flowers or individual niches in the walls).
Advantages and disadvantages
A special feature of a floating ceiling made of plasterboard is the “airiness” effect. The ceiling seems to “float” above the room. This effect is achieved using backlighting. There are also other advantages of floating ceilings:
- With the help of drywall and lighting, you can make the room cozy and beautiful. With such a ceiling at home, there will always be a calm and balanced atmosphere of life;
Option for design and decoration of a floating plasterboard ceiling - Visually, this design causes confusion and stupor: “how to make a floating ceiling?” There's nothing complicated about it. Even with minimal knowledge about electricity and drywall installation, you can make a floating ceiling with your own hands;
- Each ceiling level has a flat and smooth surface. Drywall is perfectly flat in its design;
- all the materials needed to create this ceiling do not have toxic components, so this design is environmentally friendly;
- drywall is not a fire hazard;
- the boiling ceiling hides all the unevenness in the room;
- visualization of room enlargement;
- possibility of using the entire color range;
- in this type of ceiling, you can make your own design, which will be distinguished by originality and individualism;
Original design of a soaring ceiling in an apartment - with such lighting there is significant energy savings;
- Any person with minimal knowledge of electricity and working with drywall will be able to install such a ceiling.
LED backlighting also has several advantages:
- Diode devices for lighting a room consume very little electricity.
- Despite the fact that the diode strip has low heat transfer, it cannot overheat and catch fire.
- The tape is small in size. It is much easier to hide it in the structure, leaving only the lighting.
A floating ceiling has one big disadvantage - it will look ugly in small rooms.
How to design a two-level stretch ceiling: options
A two-level ceiling is the best solution for small rooms. It is done in the bedroom, in the nursery, in the kitchen. Before installation, you should decide on the design of the room and choose the right lighting fixtures.
Kitchen
In the kitchen, it is desirable to differentiate between zones. It is better to create different ceiling levels above the work areas, highlighting them with the help of lighting.
You can combine lamps of different colors; they will help create a clear boundary between zones. It is better to take no more than three shades of lamps. You can place a small chandelier in the center of the room. Workplaces should be additionally illuminated with point light sources.
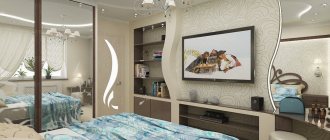
Bedroom
For sleeping areas, it is better to choose lighting fixtures with dim light. You can create a “space design” of a room for photo printing. The space theme will be complemented by flickering LEDs that will imitate stars.
For a “floating” bed, the same floating ceiling is suitable. It will look organic in rooms with high ceilings. For illumination, LED strips of warm colors and spotlights are used.
In the bedroom you should avoid bright colors of lamps and choose warm colors. Cold shades create a working atmosphere, which is not suitable for sleeping areas.
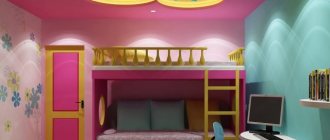
Children's
For a children's room, you can use sunny, interesting colors and designs - photo printing, bright rainbow lights, and original shaped lamps are suitable. A two-level ceiling can be made with the illusion of the sky and clouds (photo printing on the ceiling canvas will help for this). Hanging elements with shimmering effects will help create the right atmosphere. Any drawings that children like are suitable as decorative elements. The backlight can be placed along the contour of these drawings. Any child will be delighted.
It is important not to overload the room with an abundance of colors; sharp bright colors will quickly tire the child. It is better to choose neutral solutions
Corridor and living room
The corridor ceiling, made in 2 levels, is decorated with square or round inserts along the entire length. To create space, it is better to choose white colors. LED lighting and spotlights are used in corridors and hallways.
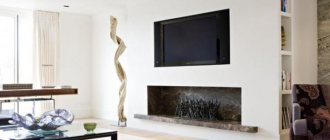
Original and unusual design solutions are selected for the living room. Ceiling elements are made to contrast with the entire design of the room, highlighting them with lamps of the same color. To create volume, lighting is installed around the perimeter from the outside. Ceilings using geometric shapes look original.
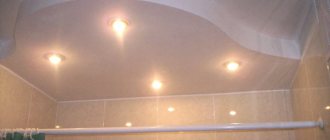
Bathroom
It is better to make a two-level ceiling design for the bathroom. With lighting along the outer perimeter from moisture-proof light sources. Maintaining clear symmetry of lines and shapes so as not to create a feeling of negligence. There is no need for a main light source in the bathroom.
The lamps in the bathroom are only waterproof. An ordinary lamp will quickly fail; if water gets on it, it can cause a fire.
Plasterboard ceilings have gained immense popularity due to their characteristics. They are lightweight, easy to install and maintain, are inexpensive and allow you to create original, unique designs. Properly selected lighting will help create a unique room design.
Construction materials and working tools
To get started with a floating ceiling, you first need:
- Ceiling diagram for at least 2 levels. It is impossible to make a ceiling without it. It would be even better if there was a drawing that would indicate all the necessary points.
Floating ceiling design diagram - Decide why you need such a ceiling? How will it look in a certain room? Will it “overhang” or make the room dark and small?
- You need to decide how many levels there will be in the ceiling so that there is no excessive pomp.
- And you also need to determine what type of lighting will be (neon, ribbon, lamps, chandelier).
Tools for working with drywall:
- Building level.
- Meter.
- Drill with hammer and screwdriver.
- Construction knife and blades.
- Set of spatulas.
- Ladder.
- Container for making mixtures.
- Hacksaw for drywall.
- Scissors for metal.
- Pliers.
- Wire cutters.
- Hammer.
- Drywall roller, brush.
Materials needed to make the ceiling.
Frame design of a floating ceiling made of plasterboard
- Drywall. You should buy thin sheets so that the structure is not heavy and weighty.
- Profiles – guide and rack.
- Dowels.
- Construction tape.
- Self-tapping screws.
- Crabs.
- Putty.
- Construction mesh.
- Grout with different hardness.
- Primer.
- Wires.
- Lighting.
- Insulating tape.
- Klemni.
It is advisable that the room is well lit and ventilated. The video shows step-by-step instructions for installing a floating ceiling made of plasterboard.
Description of technology
Floating ceilings are the latest technology in the design field. At its core, this is a tension structure with ceiling lighting, which creates the effect of floating. However, unlike other types, there is no need to install additional suspended structures. Because for the installation of floating ceilings, special profiles are used, which not only serve as fasteners, but also contain space for LED lighting.
The light rays are directed towards the wall, due to this a feeling of volume is created. The installation process is not very difficult, as it might seem at first, let's look at it in detail.
Installation principles
The very first installation step is to select the type of canvas and backlight color. There are no restrictions regarding the shape of the ceiling; the materials used allow you to create everything to your liking. In terms of color, there is also freedom of choice; in addition to standard colors, it is possible to design a suspended suspended ceiling with illuminated photo printing or a pattern.
There are many varieties of such paintings; paintings of the daytime or starry sky are especially popular. Then you need to choose a backlight that matches the base, although you can create a specific contrast. Having selected all components, you can proceed directly to the installation, which consists of the following steps.
Installation steps:
- Schematic drawing of the ceiling shape;
- Accurate measurement of hangers, perimeter corners and other parts. What should be taken into account here is that the canvas itself must be placed 12-16 centimeters below the base;
- Installation of profiles on walls;
- Installation of wiring for main lighting and adjustment devices;
- Installation of plasterboard boxes in places previously marked for this purpose;
- Fastening the canvas;
- A small hole is cut in the canvas for the main lighting. A special ring is installed there, the wiring connected to the lighting device is brought out into it;
- The overlap joints of plasterboard materials should not be visible; to do this, you need to carefully putty these places.
The installation process of floating ceilings differs from standard suspended ceilings; this is also due to the design features; we will consider them in more detail.
Design Features
Among the main features, we can highlight the locking system of profiles, because it differs significantly from the usual technology. This system involves fixing LED lighting to create a space between the canvas and the wall, which ensures a floating effect. The structure consists of:
- Aluminum profile;
- Stretch ceiling fabrics;
- Harpoon;
- LED strip;
- Light-diffusing insert.
The profile is installed either around the perimeter of the room or on the sides of the ceiling structure itself. The canvas is tucked tightly, and its edges are fixed with a clamp (harpoon). The LEDs are placed directly in the profile, between the mounting strips, and a diffuser insert is installed on top. It is used to soften the light, since the diodes themselves produce light that is quite harsh and unpleasant to the eye.
An important design detail is the backlight control device. The most common and simple option is a device that turns the backlight on and off; this can be done using a remote control. However, there are more complex devices, the functionality of which also includes adjusting the brightness, turning the light of the strips on and off, and changing color combinations. There are also devices with which you can turn on/off the light using a timer.
We talked about the basic installation principles and design features of all floating ceilings, now we will look at all their varieties separately.
Selecting a lighting fixture
Before you start work, you need to choose lighting products. Mainly used for floating ceilings:
- LED Strip Light;
- Fluorescent lamp;
- Incandescent lamp;
- Optical fiber;
- Halogen lamps.
Lighting devices can be combined. Let's say a diode strip is built along the edge of a 2-level floating ceiling, and a chandelier is hung in the center of the same ceiling.
Attention! Bulbs and wires may become hot. If there is incorrect insulation or an incorrect electrical circuit, then the wiring may catch fire.
Preparatory work before installing the profile frame
Installation of even the simplest configuration of plasterboard ceilings should begin with careful preparation. At the first stage, a ceiling project is created. It includes:
- Carrying out measurements of the room - dimensions, heights, surface curvature, level of ceiling lowering.
- Creation of a preliminary design - appearance, number of levels, location, configuration and dimensions of floating elements.
- Lighting design – types, quantity and connection points of lighting fixtures. The placement of doses and the layout of electrical wires should be provided.
- Choice of box design for hidden lighting (creates a floating effect) and installation diagrams.
- Marking – location of supporting profiles, attachment points for suspensions and lintels, transition lines from level to level. All markings are first worked out on paper and only then transferred to the ceiling surface.
The finished project is a guide to action. Using it, you can calculate the needs for materials, purchase lighting system elements, select paint colors, and prepare the necessary tools.
You should not rely on the accuracy of the human eye and make an “approximate” drawing - this will lead to large expenses for reworking the entire structure. You should use graph paper for drawings. Specify dimensions in millimeters - this will protect you from serious miscalculations when using the centimeter unit.
Drafting
Before starting work, you should visually see how many transitions there will be and what the structure will be. And it’s also worth deciding on the lighting.
Scheme for installing lighting for a floating ceiling The first thing you need to do is a drawing. It is necessary to put all measurements on it, indicate the places where the profiles and transition points will be, and also indicate the points of passage of lighting. When running new wiring under drywall, it should be done directly into the wall above or into the ceiling joist. You should not make a drawing “by eye”. This is fraught with incorrect lines and transitions. If asymmetry was intended, this is also laid out for the project.
Necessary calculations and drawings
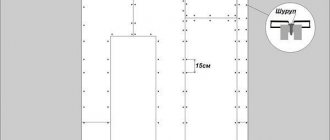
The markup is standard. To find the lowest point of the ceiling, you need to use a level. From this point you need to step back 10 cm. This distance will allow you to lay soundproofing material (if required) or run wires for lighting at the first level. This point is placed on all 4 walls, after which a line is drawn indicating the lower point along which the profile will be attached.
Drawing with dimensions for mounting profiles on the wall and ceiling. Next, going down another 8 cm, draw the same lines through all the walls. This will be the border of level II. On the ceiling itself, lines are drawn 60 cm apart from each other. These are the future profiles. On these lines, another point is placed every 60 cm. These are future pendants. A drawing of a niche for lighting is made at the first level of the ceiling.
Useful tips
A plasterboard ceiling, consisting of two levels and lighting, is considered a complex structure, therefore, in order to install it correctly, you must first draw up sketches of the future composition, then assemble the system. Despite the fact that the installation process may seem difficult, it is quite possible to cope with it yourself.
For novice craftsmen, when installing two-tier ceilings, it is recommended to use the following useful tips:
- The second level of the suspension system plays a decorative role, so its design must be approached responsibly by choosing unusual ideas. The technology for installing the structure will depend on the shape and size of the second tier, since often the figures can have a cutout or go down to the first level.
- Installation should begin by measuring the perimeter of the ceiling and determining the height for each tier. To ensure that the calculations are performed correctly, you should use a laser or hydraulic level. For each level of the system, a mark is placed, after which a tapping cord is attached, and a working plane is formed.
- The drawing of the future ceiling is drawn directly on the floor slabs to fix the evenness of the lines, and UD profiles are attached to the surface.
- To give the structure volume, you need to make guides from CD profiles. At the same time, when working with profiles, it is necessary to leave a small margin of length.
- The profiles are fixed with special metal screws. If necessary, they can be bent in any direction of the structure. In the case when the profile is placed opposite the ceiling, its direction is aligned as follows: cuts are made to the base every 5-10 cm, after which the segment is directed in the desired direction.
- Cutouts in plasterboard ceilings must be made from rigid profiles that can withstand the load. They are attached to the ceiling using U-shaped brackets.
- All load-bearing profiles, unlike conventional wall structures, are mounted at intervals of 40 cm. To increase their strength, you can take steps of 30 cm. Such reinsurance will increase the strength characteristics of the frame and protect the structure from possible cracking under the influence of the weight of the second tier.
- Unlike walls, the load-bearing ceiling profiles are fixed directly to the ceiling itself, so the fastenings are subject to enormous load. To make the system durable, you should additionally attach metal brackets to the profiles, maintaining a distance of at least 60 cm.
- It is advisable to combine the process of making a frame and covering it with sheets of plasterboard. Therefore, it is best to sheathe the second tier first, and only then start finishing the first main one. This way the work can be done faster and more conveniently.
- The most difficult thing in designing a two-level ceiling may seem to be bending the plasterboard sheets. To do this, they are traditionally soaked, after which they are leveled with a special roller, but all this can be done in a different way. If you need to create shapes with a small radius, then drywall will bend well even when dry. In order not to break it, it is necessary to make even cuts along the parallel, observing a step of 5 cm. The resulting workpiece will easily bend and be puttied.
- In order for the original ceiling to complement the interior of the room, you should worry about its lighting. For two-level systems, LED strips are considered the ideal lighting option. They are best attached along the perimeter of the lower tier, which forms a small niche. The result is a stunning light effect. In this case, the lower level should protrude beyond the perimeter of the frame by 50 or 70 mm. The edges of the drywall sheets are aligned along all boundaries, then guide profiles are placed and the LED strip is mounted.
- The design of a two-tier ceiling must be selected strictly in accordance with the design style of the room. It should be harmoniously combined with wall decoration and flooring. Depending on the functional purpose of the room, you can install structures that visually divide the space into separate zones.
Installation of the structure
The initial ceiling level is made according to the marked diagram. In some options, the center is left empty for a stretch ceiling. Then the frame is made in a circle. The main profile is immediately attached along the wall. He is the guide. If the ceiling has several levels, then it is worth attaching all the profile guides at once. For this you will need dowels and a hammer drill. To ensure accurate fastening, the profile must be constantly leveled using a level.
Variant of floating ceiling designs with lighting Attention! There is no need to create a framework for all levels at once. It is better to spend a little more time on the manufacture of the structure, but there will be quality and accuracy. Further. Suspensions are attached to the marked points in the ceiling. For illuminated ceilings, use the main profile 28/27, and the rack profile 60/27. In this case, the design will be of high quality (not flimsy).
Using a cutter, you need to fasten the main and rack profiles. If this is not the case, you can use metal screws (they are small). The profiles are also attached to the hangers using self-tapping screws.
In order for the frame to be level, the fishing line should be tensioned. To make the structure reliable, jumpers are placed between the rack crossbars. They can be made from profile scraps. Their length is 60 cm.
Construction and installation of the frame
When assembling the second level of the ceiling, you should carefully study the drawing and know what the finished ceiling will look like. There are options that the frame should be assembled only in the center of the ceiling or vice versa, only at the edges. In this case, marking is carried out only in the place where the second level will be.
Attention! To assemble the next level you need a trimmed profile. When the “ribs” are cut, the profile bends inward and outward.
With the help of curved profiles, it is possible to create asymmetrical shapes or geometric shapes. With simple ceiling shapes with lighting, it is possible to create a level II frame even before covering with plasterboard.
An example of a second-level frame design for a ceiling If the next level involves various curved lines, then the basic structure is sheathed with sheets, and then the marking and sheathing of the next level comes. Manufacturing a structure for hidden lighting. Hidden lighting requires a guide rack profile.
- A guide profile is attached to the ceiling along the one attached to the wall.
- Jumpers are inserted into it (ceiling) perpendicularly, every 40 cm they are attached to the profile.
- After mounting, the wall profile protrudes 10 cm. This protrusion is a niche for lighting.
- The result is a multitude of protruding profiles. They are hemmed with plasterboard.
At the end, there should be a niche made of plasterboard, where the lighting will be inserted.
- I – longitudinal profile;
- II – I level;
- III – profile guides;
- IV – load-bearing metal profile;
- V – jumper;
- VI – diode strip;
- VII – rim for masking the backlight.
Drywall installation
In order to sheathe the frame with sheets, you must follow the rules:
- It is required to cover the ceiling with plasterboard.
- After the frame is made, but there is no casing yet, you need to make all the necessary wires and connections.
- All wires should be in a special sleeve, and not scattered throughout the structure.
- Sheathing with plasterboard does not have to be carried out where there will be level II. It is enough that the base sheet of drywall extends 20 cm under the second level.
- Holes for lamps are made using special crowns.
This can be seen in more detail in the photo.
Installation work
The installation of a plasterboard ceiling with lighting begins by transferring the drawing to the ceiling. Then the frame is installed. To make the frame, you need to use the same profiles as for a conventional suspended structure. Frame installation has the following steps:
- in place of the center line of the marking, stepping back 10 cm from it, we attach the starting profile to the walls. All lines must be measured to the building level;
- We install suspensions that are attached to the ceiling;
- we fix the frame of the main profile to them;
- We fasten all the profiles together with self-tapping screws.
Ceiling frame with open lighting
Plasterboard ceilings with hidden lighting require the creation of certain “shelves” or niches. To do this, as mentioned above, the frame is installed on two levels. To get “shelves” you need:
- at the first level, draw the boundary of the second level;
- lower the level by about 5 cm and secure the starting profile. It is best to use "UD";
- We attach the hangers and secure them with self-tapping screws. If the size of the “shelves” is small, then they can be installed using liquid nails;
- The starting “UD” profile should also be secured from below;
- insert ceiling profiles;
- we bring out the wires - and the structure is ready.
Second-level frame with a “shelf” for lighting
After this, plasterboard ceilings with lighting can be finished with sheets. The best plasterboard manufacturers today are considered to be Knauf, Lafarge, Rigips and Giproc. Do-it-yourself ceiling lighting involves first making the necessary holes for lamps in sheets of plasterboard. They need to be made the same size as the lighting fixture. The completion of the installation work is the connection of the lamps. The following nuances should be taken into account here:
- The LED strip should be cut only in special places;
- One-color ribbons must be connected using contacts “+” and “-”;
- when connecting RGB strips, you should connect V+ to “R”, as well as “G” and “B”, respectively;
Note! It is unsafe to connect more than 3 (about 15 meters) coils. If a longer length is needed, the tapes are attached in parallel
The tapes are connected in compliance with their polarity. After connecting, you need to double-check the voltage of the tape with the controller and power supply in test mode. If everything is fine, they can be installed in niches or glued to the desired location. The end of the installation is filling the joints of the sheets and final finishing of the structure. The Knauf putty has proven itself best. By following all the recommendations, you can create a unique plasterboard ceiling with lighting in your bedroom or other room with your own hands.
How to soundproof plasterboard partitions Characteristics and features of moisture-resistant plasterboard
Making lighting on the ceiling
After the sheathing is done, the lighting is installed. The spotlight requires corresponding holes made with a crown. If the holes have flaws, the decor of the lamp will cover them. When installing the LED strip you should:
Options for placing lamps on the ceiling
- Check it in advance;
- When cutting the tape, you need to see in what places this can be done. You can’t just cut it like that;
- When connecting tapes of different colors, you should solder contacts with the same names. If the tape is the same tone, then “+” and “-” are soldered;
- You need to pull it a little so that it does not hang out of the niche.
Depending on what finances were spent on the entire project, this will be the floating ceiling made of plasterboard with lighting. If the option is budget, then the lighting device can be a chandelier in the middle of the ceiling. There can also be a combination of chandelier and ribbon lighting.
Plasterboard finishing - how to do it right
Sheets of plasterboard are attached to the installed frame of the floating ceiling. It is important to ensure that the joints are on the profiles, and that special holes are prepared for the lamps. The finished plasterboard surface is puttied, primed, puttyed again, rubbed and painted.
If it is a two-level ceiling, then both frames lying in two planes are sheathed, while the lighting is mounted around the perimeter of the lower level or in the profile of the upper tier.
To create the effect of hanging in the air, an LED strip is suitable as the main lighting for the ceiling. Flexible, quite bright and economical in energy consumption, the tape will make the ceiling design complete and harmonious.
LED strip as a backlight is not only a bright and stylish option. This lighting is more than functional. You can adjust the brightness and colors using the remote control depending on the need to create a particular environment. This function will be especially useful for organizing gala evenings and celebrations in cafes and restaurants.
Final stage
If a floating ceiling is made in a large room, say a hall, then you can use such types of tape as: SMD5050, SMD3028, RGB. If these strips are used as the main light in a room, then after 3 years the quality of light will drop by 40%, but if it is additional lighting, then the strip will last a long time. A strip 5 meters long contains up to 120 light bulbs. The more bulbs, the brighter the light.
The tape, where on average there are 60 diodes per meter, does not dazzle the eyes with bright illumination. The light in the room is not annoying and soft.
Attention! If you are making a floating ceiling in the kitchen, then you should choose a tape with IP65, 67, 68 protection. These tapes have a seal that prevents dust and moisture from reaching the diodes. Caring for such tapes is simple, compared to tapes without protection.
Installation and connection of lighting
Scheme for attaching LED lighting to a suspended ceiling When your frame is ready, you can finally attach the lighting.
Follow these basic rules for installing LEDs:
- Cut the tape only in specially marked areas.
- To connect several strips into one, you can connect them using special LED connectors for connecting and connecting power. However, it would be safer to solder the tape yourself with a regular soldering iron.
- The power supply must have a reserve of 20-30% power, otherwise sooner or later it will burn out.
- Fastening to metal areas should only take place on insulating material.
- Under no circumstances should you confuse the location of the 220 volt voltage input from the outlet and the 12 volt outlet. Do not work under voltage.
The connection diagram is as follows:
LED strip connection diagram
- One end from the power supply goes to the 220 volt wire, and the other to the LED strip.
- If you are using an RGB strip, then connect it through the controller while maintaining the polarity. The red wire is positive, blue or black is negative. You cannot swap them.
- Connect and check the functionality of the LEDs. If everything is in order, you can stick it to the required place using self-adhesive film.
When long sections of the tape are connected in series, the voltage at its end drops, and the glow differs in different sections. It would be more correct and safer to connect sections over 5 meters parallel to each other using a wire with a cross-section of 1.5 mm. In this case, you need to have a high-power power supply, and if you don’t have one, you can use two weaker ones. In this case, to extend the wire from the 220V network, a cross-section of 0.75 mm is enough.
Connection diagram for a long strip with one power supply
Scheme for parallel connection of several power supplies, if a tape length above 5 meters is required
A video that clearly explains how to connect an LED strip to the network:
Connecting an LED strip is a fairly simple thing. The main thing is to buy the appropriate power supply and observe the polarities. LED ceiling lighting allows you to create a spectacular look, and you can do it yourself.
A selection of photos of the design of floating plasterboard ceilings
Required materials to create a ceiling with light lines
- Plasterboard ceiling 9.5 mm.
- Profiles: PNP, PP, aluminum for LED strip.
- Hangers for fixing ceiling profiles.
- Dowel-nails and anchor-wedges 6*40.6*60.
- Screws for fastening profiles, hangers 11 mm, for plasterboard 3.5*25 mm.
- Electrical wires for wiring.
- For a light strip in the ceiling: LED strip, plexiglass, plastic corners (the smallest ones).
- PVA glue.
- Primer mixtures.
- Putty materials for reinforcing seams, sickle tape.
- Finishing putty.
Materials for creating a floating ceiling
Required materials for the floating line
Materials are purchased at a rate of 10% more.
Preparation matters
The work done before installing the metal frame will indicate the strength of the entire structure. Preparatory work includes the following processes:
- The room where a floating ceiling with light lines made of plasterboard is created is freed from objects that interfere with work (furniture, curtains, chandeliers).
- If cracks are detected, reinforcement and puttying are required.
- The entire surface of the ceiling is covered with primer.
Preparing the ceiling and installing the guide profile
Unsealed cracks in the ceiling can subsequently negatively affect the plasterboard structure. If the ceiling is not primed and the house (apartment on the top floor) is cold, fungus will develop, which will also negatively affect the suspended plasterboard structure.
Options in the interior of the rooms
The design primarily depends on what this or that room is intended for.
Bath
Plain, single-level surfaces, without unnecessary details, in light colors, will add cleanliness and additional graphics to the bathroom or bathroom.
The photo shows a bathroom interior with a suspended single-level soaring ceiling.
Bedroom
Laconic and aesthetic models with dim lighting, located above the bed, ennoble the bedroom, making it very comfortable and beautiful.
Hall or living room
Floating ceilings, due to their expressiveness, in combination with the warm light of spotlights, will not only decorate the living room or hall, but also adjust the space, correct excessive angularity and make the room larger.
Corridor and hallway
A rather promising type of decoration that will update even the most ordinary hallway, transform it and create an exclusive interior ensemble in it.
Kitchen
One of the ways to create a stylish and original design in your own kitchen, the variety of which is presented in our selection of photos.
Children's
Unlimited color possibilities of LED lighting on a floating ceiling allow you to change the shade and level of lighting using the remote control, making it more intense in the evening or minimally dim at night. A large selection of textures and shapes will help bring any fantasy idea to life in the nursery.
The photo shows a wave-shaped soaring ceiling in the children's interior.
Balcony
This design will make the balcony more comfortable, significantly increase the space in it and turn the interior of the most ordinary loggia into an original design object.
Lighting methods
The LED strip used for floating structures can act as both the main and additional source of lighting, and thanks to its moisture-resistant varieties, it can be used in every room. For small rooms - for example, a tiny hallway, it will be quite enough, although if you wish, you can always add wall or spotlights mounted in the canvas.
For a large hall, in addition to lighting, you can also use central lighting in the form of an original chandelier, a series of spotlights or panels. A combination of backlighting and side lighting can also be suitable for the bedroom if you do not need bright light.
Backlighting can act as an analogue of daylight, which will be especially appropriate in rooms without windows. It can be controlled either from a regular switch or using a remote control.
LED lights can pulsate or create a traveling wave, and are a great way to set a festive atmosphere with the touch of a button. The light coming from under the ceiling can be warm or cold. If the stretch fabric is warm in color, the cold light will not be very noticeable, but any room will still be more comfortable with warm lighting. However, warm yellow light can be placed on one wall or part of the ceiling, and white light on the other, and this would be a good option for zoning a kitchen-living room or a spacious kitchen, where the heat from the stove can be reduced with cold lighting, and the dining area can be decorated in warmer light.
The soft, pleasant and muted glow of the soaring ceiling can act as a night light for your child. According to many parents, with such lighting, children go to bed faster and more willingly and fall asleep without fear of the dark. To decorate a nursery, the best solution would be a canvas with a photo print or a design reflecting the interests of your child and several types of lighting - from the brightest for successful concentration in class to dim, ensuring a restful sleep. Particularly impressive is the combination of a soaring ceiling with photo printing and ceiling lighting. Trees, sky, sun rays, butterflies, flowers or, for example, a vine will take you from your apartment to the bosom of nature.
You can purchase a strip with a larger (140-200) or smaller (30-60) number of diodes per linear meter, which will provide your room with the appropriate brightness, or create an invigorating or romantic atmosphere by choosing a strip with adjustable lighting power.
RGB strips built into the ceiling profile make it possible to choose the color of the stretch ceiling, offering from 4 to 20 different options. You will have all the colors of the rainbow at your disposal, which will allow you to set a new mood in the interior every day, completely changing its appearance. You can see how a floating stretch ceiling with colored lighting of one color or another transforms the same room in the following photos.
The mode of alternating flashing of different colors is simply ideal for lovers of home parties or discos, while you can control the light and music either automatically or manually using the remote control.
The lighting can move from the ceiling to the wall, because you can always cover the perimeter of a picture, TV, as well as a niche or staircase with LED strip and change not only the color of the ceiling, but also the entire room.