0
08.06.2018
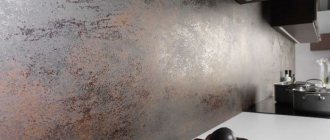
The production and appearance of ceramic tiles have now been refined, but the popularity of ceramics has remained the same over the centuries.
What is so good about ceramic tiles?
- versatility of application - from decorating a fireplace to a balcony, kitchen, building facades;
- choice of color, size and shape to suit every taste;
- resistance to various aggressive substances;
- moisture-resistant, heat-resistant;
- strength and durability;
- it is easy to care for;
- made from natural raw materials.
What tiles can be installed in the kitchen?
Any ceramic tile can be used in the kitchen to decorate walls and kitchen backsplashes. To avoid mistakes when choosing, follow the recommendations of professionals:
- tiles are chosen after you have decided on the style and color scheme of the kitchen set and other elements of the kitchen interior;
- buy tiles with a margin of 10-15% in case of damage during installation or cutting;
- The required number of tiles is calculated by the master who will lay them. The salesperson in the showroom does not see the walls and features of the space, the calculation will turn out to be inaccurate;
- The size of the tile is selected to match the size of the apron. Large format ceramics look like a loser in a small kitchen.
For an apron, tiles are often used:
- Size 10x10. Requires less trimming, easier to install if there are many corners and curves of the surface.
- Clinker tiles, or boar. Suitable for any style - loft, classic, country, art deco, minimalism and other styles.
- Real mosaic from 1x1 cm to 5x5 cm, or imitation with recesses that create the effect of seams between the mosaic pieces.
- Medium format tiles – 15x15, 20x20, 20x30, 25x30 cm.
If the interior features or the size of the room require other options, feel free to choose what suits you.
A bold decision, for example, would be to decorate the walls with photo tiles. This is a ceramic tile, made individually, with a printed photograph.
Material calculation
The required number of tiles is determined by the area of the wall or its fragment. The number of elements will be calculated by the sales consultant himself after the buyer has decided on the dimensions of the tile.
To avoid making unnecessary purchases, adhere to the following rules when choosing:
- Think about the tile laying scheme in advance by drawing up a drawing on paper. Remember that the diagonal version requires skill in cutting elements; it will be difficult to do without losses. Take this factor into account when choosing the amount of material. If you plan to use decor, then such elements are counted individually.
- If you are on a limited budget, do not plan to lay tiles in places that will be hidden by furniture and appliances. On such wall fragments, cheaper types of finishing are acceptable, for example, wallpaper or paint.
- Buy tiles with a reserve. Add 10% to the total quantity of tiles for possible defects or damage to elements.
If there is any material left after the repair, it may be useful during the operation of the apron to replace damaged fragments.
DIY technique options
Tile is laid on walls in various ways. Most often used:
- “seam to seam” - the tiles are laid in rows strictly one above the other, this is a classic method of laying;
- “in a run-up” - the second row of tiles is shifted in relation to the first so that the seams between the tiles of the second row are above the center of the tiles of the first row, this is repeated in each subsequent row;
- “diagonally” is a labor-intensive method that requires careful marking of diagonals and cutting of tiles;
- “chess” - combine tiles of two contrasting colors;
- “modular grid” - use three or more tiles of different shapes and sizes, distributing them randomly horizontally and vertically.
The tiles are laid using one of these methods; sometimes a combination of methods is used in one room, highlighting different zones with this design.
A certain method of laying tiles will help you visually adjust the size of the room.
Sealing joints
Grouting the seams gives the kitchen apron a neat appearance. The cracks between the tiles must be sealed, because it is in them that fat and dirt accumulate. Professional craftsmen recommend dismantling the old mixture from time to time and applying a new one in its place.
- You can use epoxy, cement or silicone composition, ideally if it matches the color of the tile.
- The mixture is applied diagonally with a rubberized spatula to 2/3 of the depth of the seam, all excess is removed.
- All stains are removed with a sponge soaked in water, and the joints are brought to perfect smoothness.
- After the mixture has hardened, switches and electrical sockets are installed, and a decorative plinth is installed to hide the gap between the table top and the wall. The seams are treated with an antiseptic.
How to glue ceramic tiles to a kitchen wall
Laying ceramic tiles for different rooms and surfaces has general principles:
- A laying plan is drawn up. The required number of tiles is calculated, taking into account trimming and breaking.
- Prepare the walls for laying.
- Remove old coatings. If necessary, the walls are leveled. Then they prime for better adhesion (adhesion) of the tiles to the wall.
- Next, we begin laying the tiles.
How to lay an apron
First, determine the height of the apron. This space from the countertop of the kitchen unit to the wall cabinets is 60-70 cm. To avoid unnecessary trimming, the height of the apron is adjusted, and a whole tile looks better than halves.
The first row of tiles is launched 2-3 cm below the level of the working surface. The last row is run under the wall cabinets at the same distance.
Laying technology:
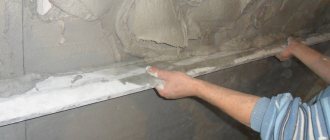
- On the prepared wall, using a level, draw a horizontal line for the beginning of the first row. Under this line, a metal profile or wooden block is attached to the wall. This support will not allow the tile to slide down under its own weight.
- Laying the tiles begins from the middle of the wall, from the most prominent central place, moving from the center to the edges.
- The adhesive solution is mixed immediately before installation. Follow the instructions on the packaging. Pour the dry component into the water and stir until smooth. Leave for 10-15 minutes. Mix again.
- Using a notched spatula, apply the adhesive solution to the wall or tile, whichever is more convenient. Place it on the wall, resting the bottom edge on the profile, and press evenly. Tap with a rubber mallet to release excess air.
- Mounting crosses are placed at the upper and lower corners of the tiles, which regulate the thickness of the seam.
Are tile joints necessary? Yes. When the tiles expand from elevated temperatures, they protect against cracking. They also compensate for inaccuracies in tile sizes.
- Apply glue to the next tile. Repeat the steps as with the first. The entire first row is laid out in this way. Don't forget about the crosses between the fragments.
- After gluing ten tiles, remove excess glue with a damp cloth. If this is not done, the dried solution will be difficult to remove.
- The second row begins after the first has completely dried. This is in a day.
- Having finished gluing all the rows, allow the masonry to dry. Then they tap it with a mallet, looking for a dull sound that speaks of emptiness. Such an element is removed and re-glued, carefully applying the adhesive composition to the tile.
- The next step is to wipe the tiles from any remaining adhesive and begin grouting the joints with a fugue. Don't forget to remove the crosses.
- Use a silicone spatula to fill vertical and horizontal joints with grout. An hour later, after the fugue has dried, the seams are trimmed.
- Having completed filling the joints, allow two hours for the grout to dry completely. Remains of the fugue are removed with sweeping movements using a kitchen sponge. Wipe with a dry cloth, only then wash. This will leave fewer grout marks.
Don't forget to unscrew the support profile.
How to stick on a flat wall
If tiling work is to be done on flat walls, then there are no special installation secrets. It is enough to prime the walls and then follow the instructions for laying the tiles.
How to properly glue to concrete without leveling
Concrete surfaces usually do not require leveling.
But it has low adhesion. For good adhesion, a metal plaster mesh is attached to the concrete surface. The second method is when laying ceramics on concrete, the surface is carefully primed with “Betonokontakt”. The product dries in 12-18 hours. Then they begin tiling work.
How to put on drywall
Plasterboard walls are primed before gluing the tiles.
The only difference between laying tiles on a gypsum plasterboard surface is that the layer of adhesive mortar should be as thin as possible. This is to reduce the stress on the drywall.
The second difference is that after gluing, the tile cannot be removed or adjusted. When dismantling, the ceramics will come off along with a piece of drywall. Glue the tiles immediately and carefully.
Instructions for laying tiles
Before starting the main work, it is necessary to check the availability of all necessary tools and materials. So, for the masonry itself you will need:
- container for glue, water;
- Master OK;
- comb;
- rubber spatula;
- a grater with removable soles made of different materials; sponges of different densities and rags for grouting and cleaning are suitable as a replacement;
- a rubber spatula for grouting, then a trowel is not needed;
- crosses;
- level;
- wooden or rubberized mallet;
- device for cutting porcelain;
- production mixer, you can manually mix the solution;
- an electric drill with attachments, in the case when it is necessary to make holes, for example, for a socket.
There are other devices that make laying easier, but these are for professional work; you can find out about them in stores. Another list of tools relates to the preparation of a wall or floor, it depends on many factors.
Surface preparation
Preparation of the plane has two purposes:
- elimination of irregularities;
- creating a solid foundation.
The unevenness left will interfere with the correct laying of the ceramics: in the depressions the tile will sink, on the rises, on the contrary, it will stick out, this will lead to a violation of the plane and distort the whole picture. In addition, additional glue will be required to fill the holes, which will lead to additional costs and unnecessary work.
You can, of course, use spot fixation, this is when glue is applied only at the corners and sometimes in the center, but then the quality of the entire masonry will be low. Even with a not very strong blow to an empty space, the porcelain will collapse, for example, if you drive a nail into the finished lining or try to drill it. There will also be an overuse of grouting material, because the grout will go under the tiles, making the seam of poor quality.
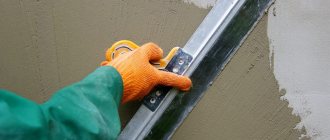
To level the plane, so-called beacons are installed; they can be made in the form of long sheets of aluminum profile. They are installed over the entire working surface at such a distance from each other that the cement mortar can be leveled as a rule.
Installation of beacons
The rule is the same profile, but more durable, its task is to create a flat surface, it also serves to straighten the tiles.
Using the rule for leveling the surface
Before preparing such a site, the walls or floor are cleared of everything that will interfere with the strong connection of the cement mortar. For example, it could be paint, whitewash or something loose and fragile. Bulk material, if it cannot be removed, is fixed with a primer.
How to lay tiles on the wall in the kitchen: tips on how to install quickly
High-quality tools and the use of a special adhesive solution will speed up the process of laying tiles.
If, when laying ceramics, the adhesive solution is applied to a wall with an area equal to 3-4 tiles, the process will speed up. All that remains is to take the fragments and press them against the wall one by one.
The Raimondi Levelling System special clamps help to fasten several tiles together, while aligning them in the same plane. With these wedges and clamps, the tiles do not need to be leveled.
When decorating your kitchen walls with ceramics, take care to combine them with other finishing materials, furniture, and accessories. Buy material from trusted suppliers, follow installation recommendations, and the result will be a cozy interior that pleases the eye and soul.
Tools and materials used
Intel Kerama - Marmol
This article uses Ukrainian-made kitchen wall tiles from Inter Cerama measuring 23*35 cm (MARMOL collection, light brown).
For installation we will use a trowel with 10 mm teeth. If you have chosen a smaller format of tiles, use a 6 or 8 mm trowel, and for the floor a 12 mm comb will do.
It doesn’t make much difference which company you use for tile adhesive or primer, so you don’t have to overpay for the brand.
To obtain uniform seams we will use 2 mm plastic crosses and wedges.
To check the flatness of the planes, we will use aluminum rules.
Criterias of choice
If you have firmly decided to tile the kitchen wall, before gluing the tiles to the wall, you should carefully select it. Good tiles for the kitchen must meet a number of criteria.
Mechanical strength
Cladding tiles produced at Russian enterprises must comply with GOST standards in terms of their strength.
There are several types of tile coverings, differing from each other in their technical characteristics.
The degree of mechanical resistance is indicated on the packaging with the corresponding symbol (A, AA, C) or GOST number with interpretation. There is also an international coding designed to simplify the classification of ceramic tiles from manufacturers from different countries of the world.
| № | Code | Decoding |
| 1 | P.E.I. | Intended only for finishing walls in rooms with simple operating conditions |
| 2 | PEI-II | Ceramics with low abrasion resistance |
| 3 | PEI-III | Tiles with average resistance to mechanical loads |
| 4 | PEI-IV | Highly durable tiles, can be used as flooring |
| 5 | PEI V | The most durable type of floor tile |
Price
In any case, decorating walls with tiles is not a cheap pleasure.
When choosing a material, special attention should be paid to its quality. An indirect indicator here is the cost of ceramics - a quality product cannot be cheap by definition.
However, good material does not have to be exorbitantly expensive. As practice shows, products in the mid-price segment are not inferior in durability and strength to premium products.
Designer tiles are the most expensive.
The fact is that if for average-priced materials the main pricing factor is their cost, then for elite tile models the main influence on the price is the aesthetics of their design, “brand fee”, etc., therefore, It is quite possible for a buyer to choose a tile that will meet his aesthetic needs, have high technical characteristics and maintain an affordable price.
Volume of material
Buy material with a reserve
To determine the required volumes of material, you should simply calculate the entire area of the wall sections where the tiles will need to be glued. To do this, a simple mathematical calculation is made - the height of the wall fragment is multiplied by its height.
At the same time, one should take into account the fact that during work various unforeseen incidents may arise: tiles that split when accidentally dropped as a result of unprofessional cutting, or simply an incorrectly measured wall area, so there is no need to buy tiles exactly the same according to the measurements taken. You should always take material with a margin of 10 - 15%. To learn how to install an apron in the kitchen, watch this video:
If there is any excess left, it can be removed for the time being and used in the future when repairing the cladding, and the need to glue a new fragment in place of the damaged one may arise at any time.
Design
Match the tiles to the color of the furniture.
Before gluing the tiles, you should develop a design project for the room. This will allow you to organically fit the decorative decoration of the walls into the overall interior of the apartment and kitchen.
Otherwise, you will have to look for the right tile model by trial and error. It is not uncommon for apartment owners to change the wall covering several times before achieving the desired result.
If apartment owners cannot independently decide on the choice of finishing material, you can turn to the services of an interior design studio, or read magazines or websites on this topic. In addition, there are a considerable number of computer programs with which you can simulate the future interior space of any room.
A bright accent will attract attention and refresh the interior.
The design of tiles in the kitchen can be made in several options. If the kitchen space has already been formed and you want to successfully fit wall tiles into it, you can use two different methods.
- Choose tiles to match existing interior items - kitchen units, dining tables, window curtains, etc. This method is recommended if you need to create an atmosphere of comfort and tranquility in the kitchen. Most often in this case, pastel, soothing colors are used - cream, blue, pale yellow, etc.
- If the owners of the apartment want to enliven the kitchen interior, in this case they can play with contrast. Sharp color transitions allow you to create a bright festive atmosphere. Rich colors are best for this – red, blue, purple, bright green. If combined skillfully, even a combination of black and white tones can give a wonderful decorative effect. To learn how to choose ceramics for your kitchen, watch this video:
Useful tips
You can see how to lay tiles on the wall in the kitchen with your own hands in the video. Some practical tips:
- It should not only be durable, but also beautiful, suitable for the interior of the kitchen.
- It is better to avoid bright colors and massive patterns in the kitchen.
- To make it fit more tightly to the concrete, you can attach a reinforced mesh underneath it.
- To ensure better adhesion to the wall, the adhesive should be applied in different directions.
These helpful tips will help you lay tiles yourself and make your kitchen beautiful.
Preparing the surface of walls and floors
The preparation of the walls largely determines how the tiles will lay and how durable the surface will be. Main stages of wall preparation:
- The old coating is removed.
- The wall must be leveled and all cracks and irregularities removed. The easiest way is to cover the wall with plasterboard. The second option is to fill the uneven areas with putty. The process will take longer, but as a result the wall will become much smoother, which is important when tiling.
- If the wall was initially flat and the old coating was not removed from it, applying regular plaster will be sufficient.
- The next stage of preparation is applying a deep penetration primer. It must dry thoroughly so that the glue does not “move off” upon contact.
Some experts recommend soaking it in water to ensure better adhesion to the adhesive solution.
Marking
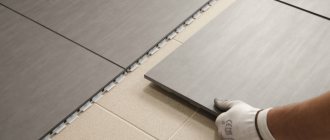
Before applying the glue, the wall is marked. Laying tiles should begin from the bottom. Using a level, pencil and tape measure, draw a horizontal line from wall to wall at the bottom of the wall. The height of the line should be measured using the tile itself.
Start laying along the marked line. This will form the first row. Place the remaining materials along the first row. The distance between them is adjusted using tiled crosses, which are installed at the site of future seams.
Design styling options
Wall cladding in the kitchen is not only protection, but also an element of aesthetics. Therefore, laying tiles can occur:
- traditional method;
- diagonal;
- with offset.
The traditional version of laying tiles in the kitchen is done in a simple way. All rows are parallel to the floor. With the diagonal method, the correct diagonal marking of the room is of great importance. The offset method is similar to brick laying. It allows you to hide some surface treatment defects.
In a large kitchen, these techniques can be combined and you can choose any method of laying tiles in the kitchen. This is especially important when dividing a room into separate zones. The choice of grout color will also add variety. It is mixed with a special drill attachment and applied to the seams with a rubber spatula.
Sometimes the kitchen floor is also tiled. Before this, the old coating is dismantled and the screed is leveled with cement-sand mortar. For a classic kitchen, you need to make the right choice of tiles for the floor. It is useful to first lay it out on the floor without glue. This will give you the opportunity to choose the best installation option. The cutting of elements is carried out after laying the entire parts. This will make the floor look more beautiful.
The adhesive has the same composition as for walls, but is applied in two layers. One layer is placed on the floor, the other on the tiles. Elements from the center of the kitchen are glued. To do this, the room is divided by lines drawn from corner to corner. To remove air, a hammer with a rubber tip is useful. The covering elements are laid in a circle. After 3-4 days you can walk on the surface. The composition of the grout mixture is the same as for walls.
Types and characteristics of tiles
Basically, kitchen walls are covered with ceramic tiles - they are sold at an affordable price, and also do not require special skills for installation.
An improved version of ceramic tiles is porcelain tiles, which are more wear-resistant and durable than conventional ceramics.
But ceramics still does not lose its leading position.
You can compare the pros and cons of each material in the table below.
| Characteristic | Ceramic tile | Porcelain tiles |
| Strength | High strength, however, in this parameter, ceramics are much inferior to porcelain stoneware | The material is much harder and not subject to mechanical stress |
| Appearance | Available in different colors, it allows you to create interesting compositions to diversify your look. | Looks rougher than regular ceramic |
| Waterproof | High level | High level |
| Wear resistance | Resistant to mechanical stress, but if used improperly, cracks may appear | Resistant to heavy objects, acids and chemical elements, cracks and chips are very rare |
You should choose which tile to put in the kitchen based on the principle of its use. It is better to lay porcelain tiles on the floor, and the kitchen apron looks more aesthetically pleasing if the laying is made of ceramic tiles.