Features of plastering bathroom walls
Old layers and materials are removed from the surface, and it is thoroughly cleaned. The surface is made clean, hard, durable in accordance with the Construction Standards. The presence of a window in the bathroom allows for construction work to be carried out in conjunction with the bathroom work. All surfaces are treated and carefully protected. Substances that affect low surface adhesion (fats, oils, cement pollen) are removed. Individual plastering of walls under tiles is done.
High-quality waterproof bathroom plaster is considered ideal; maximum adhesion of the solutions to the base is achieved. Adhesion with less adhesion, according to the Standards, will not last long. Peeling and shedding of layers will occur. Waterproof plaster is laid on top of the rough structure.
High-quality waterproof bathroom plaster is considered ideal; maximum adhesion of the solutions to the base is achieved.
Step-by-step work execution
Plastering the walls in the bathroom under the tiles should be done on masonry that has undergone shrinkage. Otherwise, cracks will appear and the plaster may fly off. If work is carried out on the old base, determine whether the coating needs to be removed. The walls are tapped with a hammer - a dull sound indicates peeling, the plaster in this place is knocked off. Where it is kept, it is left. Surfaces with traces of rust or mold covered with paint are treated. The plaster is removed, remaining traces of rust are removed with acid, mold - with antifungal drugs.
Technical characteristics and composition of gypsum plasters.
Various components are added to the mixture, depending on its purpose. These are mainly additives that improve specific target characteristics of the solution:
- Bleaching: additives that increase the level of whiteness. Metal salts (titanium white, zinc white) and lime are used. The advantages of ordinary gray gypsum plaster are the absence of additional components, lime and other substances.
- Strength. The composition of gypsum plaster is supplemented with substances that increase its strength characteristics.
- Technological period - the time from mixing the solution to the start of the setting process. Regulated with proprietary additives. Varies from 20 minutes to 2 hours.
- Curing speed.
The composition of gypsum plaster is indicated on the packaging. However, some branded supplements are kept secret.
Why do you need to plaster the walls in the bathroom?
Not only professional builders, but also novice repairmen know very well that the slightest irregularities in the wall under the paint are not just visible, but stick out. Therefore, plastering the walls in the bathroom before painting is mandatory - its necessity is not even discussed. But under the tiles, many, especially novice finishers, try not to carry out dirty and labor-intensive work on plastering surfaces. To level the plane of the walls, they use tile adhesive.
In principle, this is possible. But just what will the result be in the end? Firstly, with a thick layer of tile adhesive, the tile “floats” down the wall, carried away by the moving adhesive mass. Secondly, due to the shrinkage of the adhesive, the tiles either tear off the wall or are attracted to it, disrupting the plane of the finish, and most often, they simply crack. Thirdly, tile adhesive is much more expensive than plaster mixtures, which increases the cost of repairs. Fourthly, when gluing a wall in several layers, the repair time is delayed - the plaster dries much faster.
Do I need to plaster the walls under the tiles?
Developer wrote: You and someone else are just lucky, but others are unlucky whose tiles are cracked. And here it’s not 5 mm, but +-5 mm, i.e. in some places the adhesive layer can be up to 10 mm or more
Well, no one can convince me that NORMAL adhesives (even abnormal ones) can tear NORMAL tiles. There can be a lot of reasons for this: defective tiles, tiles damaged by storage, excessive impacts on the tiles during installation, shrinkage of the house, insufficient structural rigidity.
Developer wrote: I repeat: if a good result is not guaranteed, then this may result in damage to quality
Not guaranteed only because of the crookedness of the craftsmen.
Developer wrote: Yes, I don’t have cockroaches, much less favorite ones
Okay, let's not talk about cockroaches anymore. I think you will agree that with my and your method there are no problems in avoiding any voids.
Developer wrote: No contradiction! Let them work faster without any smoke breaks, etc., and if they don’t fit in, then let them start early and finish later, and you can come to an agreement with your neighbors... This is not a luxury and not a problem if you have good neighbors, real friends, parents or corresponding expense item in the renovation budget, then all the furniture is disassembled and, together with household appliances, is taken away either to the dacha or to people who have free space, i.e. through an acquaintance, for a symbolic reward or for a moderate fee, they will store it while repairs are underway
Well, as for furniture removal, it really is a luxury. Well, let’s say I find a person who will sit, but I prefer to personally control all the work that is done for me. So that, as they say, it won’t be excruciatingly painful later... I think you won’t argue that our respected forum is replete with topics like: “Help what to do! The masters screwed up!” But it’s too late, all the materials have been used up, the tiles and bathtub are damaged, and there is no way to get compensation from the “master.” Although I prefer to do everything myself, except for replacing radiators and taps on risers.
Developer wrote: Please tell us how you laid the tiles, creating an even vertical plane and right angles with glue.
It's simple. In any case, we determine the most protruding part of the wall. We glue the first tile. Vertical according to level. Squareness of the wall - apply a long rule and make sure that it is parallel to the wall. We align all subsequent tiles in the row according to those already laid using the same rule. The main thing is to have a fairly long rule (mine is 1.2 m). I apply the glue with the same notched trowel. There was no talk about correcting the trapezoidal shape of the room. I think there is a great need to remove it only if a corner bathtub, shower stall, or a very far angle from 90 degrees is installed. But that's a completely different story.
Developer wrote: Did I mention that I have cockroaches?? Indeed, it’s funny to read your “witty” passages...
about cockroaches we agreed above. Well, it’s better to have witty passages than to fanatically prove something with foam at the mouth (I’m not talking about you)…
The essence of the dilemma
Gypsum plaster is elastic, does not contain large sand grains, like cement-sand plaster, so it can be used to create a coating close to the finish. This base is well suited for painting or wallpapering. Plaster has a pleasant white color and dries quickly. At the same time, it is believed that such a coating is not very suitable for tiles and there are reasons for this:
- High hygroscopicity is a mysterious word that often arises in discussions related to gypsum. Hygroscopicity means the ability of a material to absorb water. In a humid environment, gypsum plaster can absorb the smallest particles of water, as a result of which it loses strength, and pathogenic flora (fungi and mold) can develop inside.
The main reason for the hygroscopicity of gypsum lies in its porous structure.
- Low strength - everyone who has dealt with gypsum knows that the material does not tolerate mechanical damage well. For this reason, heavy tiles should be laid on gypsum plaster with great care.
Gypsum plaster does not have a grainy texture, so it gives the walls a finished appearance.
- Promotes corrosion - this disadvantage of gypsum does not apply to tiles, but to metal fasteners in general, on which the material has a destructive effect.
If you intend to lay a heavy topcoat, then it is recommended to abandon gypsum plaster at the planning stage. If there is no choice, and the walls are already plastered, then you should use several tricks to mitigate the negative features of the gypsum base.
Advantages and disadvantages of technology
Gypsum plaster is one of the most popular materials for finishing premises. The prepared mass has a homogeneous structure and high plasticity. After drying, the wall has a white tint, which makes it easy to glue wallpaper.
During renovation, you have to make a difficult decision if you are going to install tiles on plaster plaster. This is possible in the following situations:
- if gypsum plaster has already been installed in a damp room, be it a new building or a secondary home;
- if the repair was carried out without agreeing on the material used with the customer;
- if gypsum plaster is chosen, to use a machine application method and speed up the work.
Without a detailed study of the characteristics, it is premature to start finishing. Assessment of qualities will prompt the correct choice of composition and technology.
Gypsum plaster has recently become widely used
Gypsum compositions are recommended for plaster and types of concrete (slag concrete, aerated concrete). It is possible to avoid the formation of cracks after shrinkage. There are negative aspects of using mixtures:
- A porous structure is formed, which affects the strength of the fastening. The absorbed moisture gradually softens the base, and mold and fungi form.
- It is difficult for tiles to last for a long time due to weight and loss of strength. Mechanical damage creates dents and chips.
- Difficult to combine with other materials (expansion coefficient mismatch). Metal components (screws, mesh, nails) are subject to premature corrosion.
It is not recommended to lay tiles in the bathroom or kitchen. Exceptions may apply if instructions are followed during preparation and finishing.
The optimal combination with gypsum occurs when wallpapering and painting. The positive qualities of the material are noted:
- plastic structure, speeding up the installation process;
- minimum thickness of the plaster layer;
- no shrinkage during operation;
- the ability to grind without putty;
- increased heat saving indicators;
- vapor permeability that does not interfere with air microcirculation.
Working with plaster is easy and pleasant. Drying takes a minimum of time if there are no disturbances during the preparation process.
The main feature of gypsum plaster is its hygroscopicity
Waterproofing compounds
By introducing water repellents into plaster compositions, 100% waterproof coatings are achieved.
The following types of plaster compositions are used as waterproofing for bathrooms:
- cement-sand;
- cement with liquid glass;
- cement-latex;
- asphalt.
Waterproofing coatings are especially good for covering gypsum tongue-and-groove boards (gypsum tongue-and-groove boards), from which partitions separating bathrooms are often made.
When do walls need to be plastered?
Master finishers know for sure that the base for the tiles should be level, without significant differences. Whereas to non-specialists any surface without noticeable defects may seem like this. You must understand that even if the walls are plastered or made of outwardly smooth concrete slabs, this does not mean that they are ready for cladding.
Mass construction with machine plastering does not involve leveling the surface. Beacons are not used here, which means that height differences can reach several tens of millimeters. This is a lot and will be very noticeable, for example, in corners where the cladding simply “does not fit” or at the junction of the edge of the bathtub and the wall.
Concrete slabs are rarely aligned strictly vertically. Often they are “filled up” by at least 10-20 mm. According to building regulations, this is a completely acceptable error, but for finishers it is too much. Thus, it turns out that alignment is necessary. To verify this, it is enough to take measurements by attaching a long rule to the base. If the differences are more than 2-3 mm per linear meter, you will have to level the surface before gluing tiles onto it.
Instagram shtukaturkarostov ru Machine plastering does not require perfect leveling, so the wall needs to be prepared for the tiles
Sometimes you can hear that unevenness in the base can be leveled out using tile adhesive. Indeed, by adjusting the thickness of the solution layer, you can level the base. But this should only be done for very minor differences. Firstly, leveling with glue increases its consumption, and this is not cheap. Secondly, the cladding laid on a thick layer of tile mixture will “float” and will not hold firmly enough. There is a high probability that it will fall off quickly.
Advantages
In an apartment whose walls and ceiling are plastered with this material, heat is better retained, which allows you to save on energy. The product also has excellent noise insulation properties. The material is fireproof.
The indoor microclimate becomes better due to the fact that excess moisture from the air is absorbed by the walls and returned back when the temperature begins to rise rapidly.
If your upstairs neighbors had a flood, then the usual finishing method will inevitably leave unsightly stains on your ceiling. On gypsum plaster, such a defect will disappear by itself after drying.
Surfaces finished with this material are completely finished and do not require any treatment, such as putty. The walls can be decorated immediately after drying, the maximum time of which is 5 days.
Gypsum plaster is economical. To treat walls, a significantly smaller amount of it is required than a cement composition. The thickness of its layer can reach 60 mm, while it will not crack or peel off.
Rotband in the bathroom - technology of Roman Sirozhkulov.
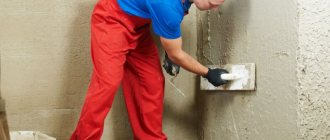
Greetings, dear readers! Today we will examine in detail such a topic as Rotband gypsum plaster in the bathroom (or MP-75 for machine application), using the example of everyday bathroom renovation - renovation of the IMPROVED category. The conversation will not be about bathroom renovation in general, but specifically about Rotband plaster ( or MP75) because manufacturers do not recommend other gypsum plasters for use in bathrooms. It contains additives that give (strength) so that it can easily serve as a base for tiles (or other finishing material) for at least 15 -25 years. This information is very useful for craftsmen and not only those who use Rotband in bathrooms. And so here we go. After dismantling the bathroom and toilet (making a combined one), it turned out that the walls were painted with oil paint (an option with such a base)
We begin to beat the paint away from the hammer with a wide spatula, holding it straight and gradually moving it to the side (the hammer is on the slotting function)
The base is concrete that doesn't absorb water well, if there are small pieces of unbroken paint that adheres well, it's okay - leave it as is.
We remove dust with any ordinary primer (from any brand) diluted by half with water (the point is only to remove dust, a film is not needed on concrete that does not absorb water.
Then, after 2-3 hours, we apply Betokontakt highly adhesive primer from this brand (tested, verified) Knauf rests, if there is no such thing in your region, look for one that says on the can for interior and exterior work - this will do.
Apply the primer with a brush and rub in horizontally
Apply the primer and wait 10-12 hours.
We begin the installation of beacons - read here carefully. Beacons should be installed below the ceiling (from the highest point) by 15 mm and not reach the floor by 15 mm - later you will find out why this is needed.
I didn’t specifically prime the cracks on the wall; the plaster will cover them tightly and make these places durable. We make patches from Rotband every 50-60 cm, press them down with a level rule and then cover the lighthouse completely with plaster (installing one lighthouse takes no more than 10 minutes )
When mixing into the plaster, add no more than 20 liters of water per bag - this is how it should be, it should not fall off the spatula quickly.
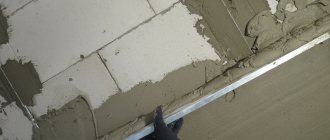
1 hour after installing all the beacons, we begin plastering, the minimum thickness of the plaster is 10 mm
Every other day, you can speed up the drying process using an electric fan or a gun (the process of hydrating the plaster takes only 2-3 hours), so artificial drying will not affect the plaster for the worse, unlike cement plaster.
A screed with a damper tape is added from below and these 15 mm will not allow moisture to be sucked out of the floor slab (we take care of the plaster from below)
after screeding, after three days you can plaster the lower part of the plaster (dries quickly)
Starting from the fourth row, we lay the tiles up to the top. The lower part (which will fit the bathtub (we also prime all junctions with the floor and around water sockets and sewer pipe outlets with this primer)
It is needed for good adhesion of acrylic waterproofing. Acrylic hydra adheres very poorly to gypsum plaster)
We use this waterproofing
We apply it to a height of 40-50 cm from the edge of the bathtub - this protection is enough for Rotband, prime other places with any primer (deep or regular, it doesn’t matter) If cheap grouts are used, then waterproof the entire wet area.
We also waterproof under the bathtub
After drying, we lay down the tiles and install the bathtub (you can also tile the entire floor, depending on the situation), it doesn’t really matter.
Now the main feature of protecting Rotband from leaks from above is that the tiles should not reach the top of the plaster by 0.5 cm -1 cm - we make a cast under the bevel with the same plaster, do not touch the gaps between the wall and the ceiling
After drying, the next day we apply waterproofing on top of the plaster (again, do not touch the joints - in case of flooding, water will flow along the path of least resistance, over the waterproofing and will go along the tiles (Rotband is completely protected)
We replace the standard corrugation for the drain with a pipe (by the way, the screen is made homemade from EPSSS and 5-5 mm fiberglass mesh with tile adhesive, it is absolutely not afraid of water)
hydra along the entire perimeter of the floor-wall using KILTO corner waterproofing tape
In addition to the fact that the hydra walked around the water outlets
After the tiles, we go through the silicone, again making an ebb - in any case, the water will go on top of the tiles.
Around the bathtub before laying the last row of tiles, go over the entire perimeter with silicone
The corners and all junctions are also silicone, the screen under the bathtub is made of silicone in the color of the tiles
With this we finish the final finishing, calmly and with confidence we leave this object. Later there will be examples on other types of bases (GAS AND FOAM BLOCKS, GYPSUM CONCRETE, OLD AND DURABLE CEMENT PLASTERS, PGP, BRICK, ETC.) and how to properly prepare them for tiles using Rotband. Good luck to everyone, bye everyone.
Making your own solution
Today there is a large selection of plaster mixtures on the construction market. Many masters prefer to make the compositions themselves. So the total cost of components is almost several times cheaper. Even a beginner can handle the preparation of simple cement compositions. To do this, you will need to prepare the components and follow the dosage, as well as the sequence of mixing the solution.
The volume ratio of the cement-sand mixture for cement grade 400 or 500 is taken to be 1:3 or 1:4 (respectively). Sand from a quarry is preferable. However, river sand is also suitable. To increase plasticity, detergent/liquid soap is added to the water used to prepare the composition.
If the solution is prepared in a mortar mixer, then most of the required water is poured into a rotating container. Then add liquid soap and add sand with a shovel. Then cement is poured. The rest of the water is added in small doses, monitoring the consistency of the plaster dough. As soon as the dough reaches the desired consistency, stop adding water.
If the solution is prepared manually, then sand and cement (dry components) are first mixed. After obtaining a homogeneous mixture, stirring and adding water (with a plasticizing additive) until the desired consistency is obtained. For mixing, use a trowel or mixer (depending on the volume).
Plastering station
What kind of design is this and what are its advantages? A plastering station is needed to prepare, mix, serve and apply mortar.
Using a plastering station will make your work easier
The station can be mobile or stationary:
- A stationary station is usually installed on a construction site. This is an insulated van, sometimes a change house, with a large receiving bunker. To move such a station, a manipulator will be required. For high volumes of work, this type of station is preferable.
- A mobile station is mobile and usually has wheels to move around the site. An excellent option for field work, you won’t find a better one.
When a mobile station is selected, the following criteria are taken into account: power, productivity, solution supply range, funnel volume, receiving hopper.
Priming walls before plastering
Before applying the plaster solution, it is necessary to prime the walls. It is better to use a primer from the same manufacturer as the plasters. The type of primer depends on the base:
- For concrete and cellular concrete, a deep penetration primer is mainly used, for example Ceresit CT17, Optimist G103. In the case of using gypsum plasters, soil compositions of the “concrete contact” type are used.
- For brick walls, the choice of priming method depends on the type of plaster used. If the future plaster is cement-based, then a special primer is not required; instead, the wall is generously moistened with water immediately before applying the plaster so that moisture from the mortar does not escape into the brick. If gypsum plaster is used, then use acrylic primers, for example Rotband Grund.
Types of primers
Before deciding what is best suited for gypsum plaster, let's understand the classification.
Types of soils for walls
Depending on the substance on which the soils are made, the following types are distinguished:
- alkyd containing polyurethane or polyvinyl chloride, used mainly for preparing wooden surfaces for painting. For concrete and plaster - not the best option;
- bituminous , used for flooring;
- acrylic , suitable for application to various surfaces, including plaster;
- latex , which contains an adhesive substance that allows you to effectively treat porous surfaces;
- mineral , made on the basis of cement;
- epoxy containing resin with various additives;
- phosphate , intended for processing metal structures;
- silicate , based on potassium dough. They are mainly used when performing facade work;
- silicone , which are astringent liquids, perfect for applying paint with a similar base;
- quartz , made on the basis of appropriate sand;
- shellac , used on wooden surfaces for subsequent painting.
Based on the degree of penetration, all primers are divided into two types:
- superficial, not absorbed deep into the material and forming only a protective film;
- deep penetration.
When choosing a primer for gypsum plaster, it is also important to consider whether the material will be used outside or indoors - not every composition is resistant to various environmental factors.
Based on their performance characteristics, there are several types of primers:
- antiseptic;
- water-repellent;
- anti-corrosion;
- strengthening, capable of penetrating deeply into the surface structure;
- adhesive;
- universal, combining several positive indicators at the same time.
The choice of composition for impregnating walls will depend on subsequent finishing and operating conditions.
Kinds
Manufacturers mainly divide the types of gypsum plaster compositions according to two parameters.
Depending on the location of the surface being treated:
- For interior work, cheap universal plaster mixtures are used.
- For exterior work and surfaces in rooms with high humidity, more expensive facade mixtures or moisture-resistant gypsum plaster are used.
Taking into account further processing of the finished area:
- Starting - is done to level the walls and then apply a decorative coating to them.
- Finishing – simultaneously performs the function of a leveler and a decorative layer.
When choosing plaster, you should carefully read the manufacturer's instructions. It usually indicates for which surfaces the use of this mixture is recommended, and which application method is best to use - manual or machine. Mechanized processing creates a more durable and even layer, but the work requires special, expensive equipment. If the plaster is waterproof, this will be indicated on the packaging.
Polymer and mineral fillers make the structure of the solution light and elastic, so almost all gypsum plasters are suitable for surfaces made of a wide variety of materials. They are designed for leveling ceilings, as well as wooden, clay and concrete walls. Perlite plaster based on gypsum will help to significantly reduce material consumption, improve its strength and thermal insulation properties. Gypsum cement plaster creates a durable layer of finished surface that will be thinner than conventional cement plaster and will dry much faster.
The largest selection of gypsum plasters is presented in the form of dry mixtures. But if you are not sure that you will be able to prepare a solution of the required consistency yourself, you can purchase a ready-made paste. To get started using this solution, you just need to open the container. This material is more expensive than dry mixtures and is only suitable for manual application. It cannot be diluted with water or plasticizers, otherwise it will lose its properties.
Types of plaster for the bathroom
When leveling walls, builders use a large number of types of plaster mixtures (see work: “Plastering wooden walls inside a house with your own hands”). Cement and gypsum mortars are suitable for the bathroom. This is due to the special microclimate in the room: higher humidity and sudden changes in temperature.
At first glance, in such conditions (high humidity) gypsum-based plaster cannot be used - it is afraid of dampness. But in practice everything is a little different. Therefore, in order to figure out which plaster to choose for the bathroom, we will consider the strengths and weaknesses of the solutions and the conditions of their use.
Stages of working with walls in the bathroom
Plastering a bathroom using a leveling gypsum mixture is carried out in several stages:
- Preparing surfaces for application of a layer.
- Securing beacons.
- Preparing the dough.
- Distribution of the plaster mixture.
- Grout.
- Drying.
To carry out the work, you will need to prepare a ladle, trowel, spatula, building level, hammer drill, container for diluting the mixture and personal protective equipment.
Surface cleaning
Before applying gypsum plaster to the walls, several preparatory procedures should be performed:
- Get rid of traces of old coatings and dismantle plastic, wooden or metal elements that protrude above the surface. If it is impossible to remove metal structures, they must be treated with anti-corrosion impregnation.
- Close cavities and deep cracks and smooth out all defects.
- Treat the wall with a primer mixture, which is selected taking into account the type of surface and the humidity and temperature conditions in the building.
Preparing the area
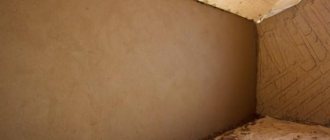
It is impossible to apply plaster for leveling over oil paint or whitewash. In addition, old and crumbling coating is not suitable for subsequent processing. Therefore, all traces of old layers are removed by cleaning down to the brick or concrete base.
Brickwork has better fixation of the plaster coating, especially if the seams are deepened by 1 cm and the surface is cleaned with a wire brush.
If there are various stains on the surface, such as grease, bitumen, traces of mold and rust, they must be removed using special compounds or chipped off to a clean material. It is also necessary to get rid of nails, staples, dowels and other metal objects.
The communication openings are completely cleared of old solution, and also thoroughly washed and cleaned of dust. Large gaps are filled with broken bricks mixed with cement mortar. All communication gaps can be covered with masking tape. Finally, the base is coated with a primer (sometimes 2 times) and dried thoroughly.
The quality of preparation of the treated area for leveling affects the durability and quality of the entire finish. Therefore, if you are not sure whether such procedures are necessary, take into account the described nuances.
Plaster application technology: sequence of work
The quality of the plastering finish will correspond to the properties declared by the manufacturer only if the work is carried out in strict sequence in compliance with the technology.
Preparation of the grounds
The surface of the wall in the bathroom must be carefully prepared. Before you begin plastering, you will have to complete the following steps.
- Carefully inspect the base: it should not crumble, have traces of grease and dirt. If necessary, clean the walls of old plaster, paint, dust and any dirt. Rinse the wall with water.
Tip: to remove old paint, you can use a blowtorch or a special chemical solution sold in hardware stores.
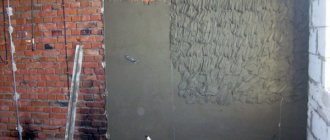
- If the wall in the bathroom is made of brick, it is necessary to widen and deepen the seams and clean off all efflorescence with a steel brush. If there is a lot of efflorescence, you can make your work easier by using an angle grinder with a brush attachment.
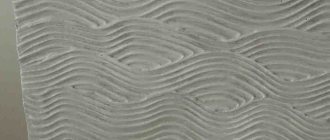
- If the walls are too smooth, make a notch to improve the adhesion of the mortar to the base. This is especially true for concrete walls.
- Treat the surface with a primer specially designed for this purpose.
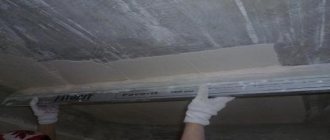
- Install beacon strips on the walls. They should be positioned strictly vertically, the outer ones should be at a distance of 30 cm from the adjacent wall. The rest are placed along them at a distance of approximately 1.2 m. The slats are attached to the wall using plaster mortar applied to the wall in 20 cm increments.
- Instead of beacons, you can use another method. Using a plumb line, determine the required thickness of the plaster layer. To indicate the required thickness, hammer nails into the corners of the walls under the ceiling so that their heads are located in the same plane.
The best manufacturers of gypsum plaster
Which plaster made from gypsum mixture is better? If you read reviews and analyze these reviews, you will get a kind of rating. Based on this data, you can also choose plaster.
In the ranking of the best gypsum plasters:
- Knauf;
- Bayramiks;
- Volma;
- Ceresite;
- Umka.
These brands have the largest number of positive reviews left. Most of them were collected by the Knauf company, which produces materials for both exterior work and interior decoration. It is difficult to find a better brand than this one, if you take the totality of all materials.
Slightly less positive reviews were found for the following brands: Optimist, Derufa, Caparol, Perfecta, Oikos, Prospectors, Yunis, Teplover.
Primer of gypsum plaster for tiling
Is it possible to lay tiles on gypsum plaster? In fact, this is not the best solution due to the low strength and high porosity of the material. This is allowed if you already have an apartment with plaster-plastered walls. There are also cases when the use of this type of plaster is advisable if the base of the wall is made of materials such as:
- foam concrete;
- aerated concrete;
- slag concrete;
- plaster;
- expanded clay concrete.
Walls made of these materials are not durable. During the process of hardening of the cement solution applied to them, cracking of the base occurs along with the plaster under the influence of the internal stresses created. Gypsum does not shrink, is light in weight and is characterized by reliable adhesion to weak bases.
Many people choose rotband and other types of gypsum mixtures only because of their plasticity and ease of application. If the base material allows, it may be worth taking a closer look at alternative options - plasters based on synthetic resins . One of the best is the cement-polymer composition Mapei Nivoplan Plus, characterized by high adhesive properties and elasticity. It is important to consider that this mixture cannot be used to level gypsum-containing surfaces without prior treatment with Primer G.
If you have to lay the tiles on gypsum plaster, it is important to strictly follow the technology. Before laying, the wall surfaces should be thoroughly cleaned and impregnated with a special compound in accordance with the manufacturer’s instructions. It is recommended to use deep pore-penetrating primers based on synthetic resins with quartz components. This allows you not only to fill the pores and strengthen the surface, but also to create a certain roughness for more reliable adhesion to the tile. It is recommended to apply the primer in 3 – 4 layers, giving it the opportunity to dry after each pass.
For wall cladding not with light tiles, but, for example, with porcelain stoneware, it is advisable to reinforce the layer of plaster with galvanized mesh, securely fixing it to the surface.
Whatever compositions the walls are treated with, it is important that they dry thoroughly before gluing the tiles. Even if the top layer has already dried outwardly, this does not mean that there is no wet material left under the crust. The essence of the problem is not that the tiles will prevent moisture from escaping and lead to the appearance of fungus. Dry gypsum is approximately twice as strong as wet gypsum. In this regard, the plaster should be allowed to dry completely. In this case, you should not resort to artificial ventilation or heating the surface. As a rule, it takes about 7 days for a 10 mm thick layer to completely dry - it all depends on the humidity and temperature in the room.
Popular manufacturers of gypsum mixtures in Russia
The main share of the Russian market in the supply of gypsum mixtures is occupied by the Knauf company. The products of this brand have been in demand in the domestic space since 1993. In total, there are over 250 Knauf enterprises in the world that produce high-quality building materials with a wide range of applications.
The next brand is Volma. Its assortment offers dozens of items of gypsum mixtures. The company has 5 factories and 3 gypsum quarries. The distinctive features of the Volma mixture include durability, reliability and relatively affordable cost.
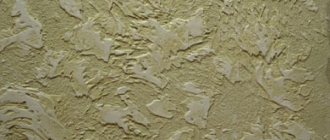
Features of applying decorative plaster
In the process of applying decorative plaster, it is worth considering some nuances. If, for example, Venetian plaster is planned, then the base for its application should be perfectly smooth, and if this is a structural type of application, then small unevenness will not become a problem.
Before applying decorative plaster, it is necessary to prime the wall in the bathroom. It is best to use an acrylic-based primer with high adhesion.
Decorative plaster is applied with a wide spatula and then distributed over the entire surface. Further actions depend on the application technique: “bark beetle”, “fur coat”, Venetian or textured.
Plaster mixture for wet rooms
Plastering walls in a bathroom or any other room with high humidity is done with cement-based plaster. This plaster, after application and smoothing, is porous and
a rough surface, which will ensure better adhesion of tiles and porcelain tiles to the wall. We must not forget about the weight of the porcelain tiles with which the bathroom will be faced; under the weight, gypsum plaster can move away from the walls in conditions of high humidity and with a large layer of plaster.
Is it possible to use gypsum-based plaster in the bathroom? Subject to certain rules and technologies, it is quite possible:
- The bathroom will be completely tiled, the seams will be grouted. The thickness of the plaster layer will not exceed 2 cm.
- After applying gypsum plaster there is no need to smooth it, the surface should be rough. Before applying tiles or porcelain stoneware, the surface must be thoroughly primed with Aquastop primer.
On her official website, in the description of the Rotband gypsum plaster mixture in the “application” section, she wrote the following: “Can be used for finishing rooms with normal humidity, as well as in kitchens and bathrooms.”
Plastering a bathroom requires a certain level of professionalism and knowledge of the properties of plaster mixtures. We do not claim that using gypsum plaster in the bathroom is correct, but if the above steps and requirements are followed, we can guarantee that the quality of the plaster work in the bathroom will not suffer!
After all, moisture-resistant drywall is also only theoretically moisture-resistant if certain conditions are met. It can be damaged by high humidity, moisture getting on its surface and poor installation.
So, plastering the bathroom is necessary; it can be done either with cement-based or gypsum-based plaster compositions, while observing the above conditions.
We also suggest that you familiarize yourself with important information about plastering work (current SNiP, installation of mesh, maximum permitted tolerances, removal of beacons, special primers, plastering on beacons, etc.).
You can order plastering work for laying tiles by phone; a specialist will visit you and prepare an estimate for free.
How to prepare gypsum solution?
Self-production of a solution from ready-made dry mixtures must be done strictly according to the manufacturer’s instructions.
There are also general recommendations that are suitable for almost all formulations:
- In a container with 1 liter of water, the temperature of which should be within 20-25°C, you need to pour 2 kg of dry mixture.
- Mix thoroughly with a construction mixer or drill with a special attachment. As a last resort, mixing small volumes of the mixture can be done with a spatula or trowel;
- Leave the solution for 3-4 minutes so that it gains strength and ductility. Stir it again. The resulting mixture should not flow from the instrument or have any lumps.
All manipulations for making the mixture must be done in a clean container and with clean tools. The amount of ingredients for each new portion must be carefully measured, since differences in the composition of the mixture can lead to poor-quality coating.
There are recipes for making your own gypsum-based plaster:
- To 4 parts gypsum add 1 part sawdust and 1 part tile adhesive.
- To 1 part of gypsum add 3 parts of chalk in the form of powder with small fractions and wood glue in an amount of 5% of the total mass of the mixture.
- One part of gypsum is pre-soaked in water and mixed with 1 part of lime paste.
In the first two recipes, the dry ingredients are first mixed, and only then they are diluted with water to the desired consistency. Stirring is carried out in two stages with a break of 3-4 minutes. Various plasticizers can be added to such mixtures. PVA glue is added in an amount of 1% of the total mass; the use of tartaric or citric acid and special plasticizers is allowed.
Lime also gives the mortar plasticity and increases its setting and drying time.
How to prepare a plaster surface for laying tiles
The main tasks when preparing a gypsum plaster layer for tiles, taking into account the requirements of joint ventures and manufacturers of dry mixes are:
- waterproofing the surface, at least in “wet” areas"
- minimal layer of tile adhesive;
- use of light tiles of small or medium format;
- ensuring waterproofness of the seams of the decorative coating.
Mandatory steps are to apply primer, then coating waterproofing based on latex, acrylic, cement or polyurethane in two layers (vertically and horizontally or vice versa).
Thus, gypsum-based plaster as a leveling layer on bathroom walls is suitable for tiling. But only if the above requirements are met, which is what the instructions of all manufacturers say.
Advice! If you need bathroom renovation specialists, there is a very convenient service for selecting specialists from PROFI.RU. Just fill out the order details, the experts will respond and you can choose who to collaborate with. Each specialist in the system has a rating, reviews and examples of work, which will help with the choice. Looks like a mini tender. Placing an application is FREE and does not oblige you to anything. Works in almost all cities of Russia.
If you are a master, follow this link, register in the system and be able to accept orders.
How to apply gypsum plaster to avoid cracks
There are several most likely reasons that can lead to the formation of cracks.
Possible causes of cracks:
- Uneven mixing of the composition . If there are lumps in the mixture, cracks and voids will certainly appear on the wall.
- Presence of dust . Dust and dirt impair adhesion, hence cracks.
- Excess water. The gypsum mixture is sensitive to excess water.
- Layer thickness . The gypsum mixture is not applied in a layer less than half a centimeter, otherwise the moisture from the solution will evaporate too quickly.
Again, add powder to the mixture, which will prevent the solution from thickening quickly.