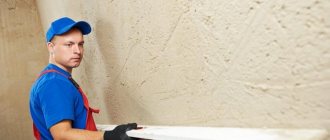
During the puttying process, mistakes can be made that can cause you not only to be nervous, but also to redo the entire job from the very beginning. If this is your first experience with puttying yourself, then this article is for you. First of all, it is necessary to understand how the processes of plastering and putty differ, since they are often confused. Putty is used on almost level surfaces that require finishing before wallpapering or painting. Plaster, in turn, will help get rid of crooked walls. Only after applying the plaster can you begin to putty. It is also worth remembering that there is no point in puttying if you are going to lay tiles or use other finishing materials.
Mistakes when plastering walls
Dirty tools
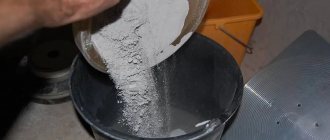
It is important to treat puttying with all the scrupulousness that you have. The solution can only be diluted in a clean, practically sterile bucket. Any foreign objects and contaminants must be removed, since a small thread or pebble will certainly stick to the spatula and remain on the walls. The first batch of solution is over - wash the bucket and mix a new one. It is advisable to acquire a special bucket only for these works. In general, make it a rule to keep all your tools clean!
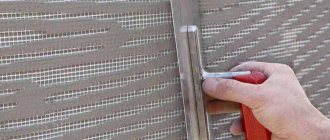
Incorrectly selected spatula
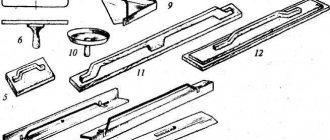
Many people come to the store and take the most expensive and “coolest” spatula, concluding that it is good, forming their opinion only on the basis of the high price. In fact, everything is much simpler. You need to take the tool that suits you, regardless of its price. It’s very easy to check your compatibility with a spatula. Take a wide spatula and apply it to the wall. We inspect the joint for gaps. If they exist, then we continue the search. We tilt the tool and check again, only slight deviations in the corners are acceptable. Try to use a soft weapon. Since you are a beginner, your movements are unclear. A hard putty knife will leave streaks behind because you press it too hard against the wall. A flexible tool will adapt to your movements. A tough tool is suitable for a master of his craft. Only a professional can handle such a tool. Since you need two spatulas for work, choose one wide up to forty centimeters, and the second up to twelve. A narrow spatula is needed to remove the putty. When working, material sticks to the tool and dries out, do not forget to clean it.
Incorrect putty solution
This is the problem of all novice puttyers. In comparison, a properly diluted solution is similar to rich sour cream. We stick a narrow spatula into the solution up to the handle. It stands and does not fall over - everything is fine. We collect the material and apply it to a wide spatula, turning it over in the air. A good solution will hold without any problems. However, it is worth remembering that the finishing layer is made with a more liquid solution. Dry putty simply will not stick to the first layer and will crumble. The solution may be to apply a thin layer of primer on top of the first coat.
Dry walls
It is important to know that the primer must be applied three to four hours before puttying. Otherwise, you will not putty the walls, but simply smooth them with a spatula, on which dried material will accumulate. If you have to putty on highly absorbent walls, then apply the primer in a couple of minutes and spray them with water.
Insufficient thickness of the putty layer
Due to uncertainty in their actions, many people press the spatula too hard onto the surface. Another common mistake made by beginners. The first layer should be about one millimeter thick. The second layer is the final one, with its help it is necessary to smooth out all remaining unevenness.
Puttying from wall corners
These are the places that are the most crooked. That is, starting the puttying process from this place will only worsen the curvature. It is more correct to start working by stepping back about five centimeters to the side. Start working on the corners when this layer of putty has dried. By focusing on it as a beacon, you will get an even angle. It is important to work gradually. We wait until one side dries and only then proceed to the other. If you become the owner of an apartment with round corners, then initially you will have to work as a hammer drill. You won't get straight corners using putty alone.
Irregularities in the first layer of putty
Before applying the second coat, be sure to go over the first with a dry spatula. This is done in order to eliminate shortcomings.
We recommend: Folk additives to concrete: eggs, clay, salt, liquid soap and others
Wrong type of putty
You need to buy putty with an exact plan of what you will do next. If your next step is wallpapering, then there is nothing complicated - any will do. Painting requires finishing putty with a fine fraction. In this case, it is necessary to approach the choice of putty very carefully, since wallpaper hides flaws in the form of stripes or dents, and paint, on the contrary, makes them more obvious. Even a small scratch will be noticeable. Therefore, when puttingtying a wall with the intention of applying paint to it later, do it with additional lighting.
Comments (2)
- Pavel 3 years ago Permalink
The article about puttying walls is interesting. It’s also not bad to know about errors in this process. The material is clearly useful.
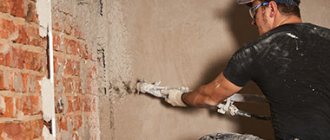
Purpose of plaster
Plaster is a layer of finishing of various surfaces. Depending on the surface material and purpose, different types of plaster are used.
Plaster performs the following functions:
- sanitary and technical;
- protective and constructive;
- decorative.
Sanitary functions mean obtaining a flat and smooth surface, preparation for painting and cladding.
Decorative plaster is a finishing coating
The protective-constructive function implies protection of surfaces from negative environmental influences, heat conservation, sound and noise insulation, protection from the action of chemically active substances.
The decorative function is to prepare or finish the surface.
Useful tips
To prevent defects from appearing on the walls, listen to the advice of professionals:
- It is not recommended to prepare the solution yourself - there is a possibility of making a mistake in the proportions;
- purchase plaster only from well-known manufacturers;
- when purchasing mixtures, look at the production time; plaster produced no earlier than two months ago will be considered fresh;
- remove efflorescence and mold thoroughly with chemicals; washing with water will not solve the problem;
- If even minor defects are discovered, they should be eliminated immediately - just put them on hold, which means doing a major overhaul in the near future.
It is recommended to purchase ready-made plaster mixture
The main thing is not to get upset, but to accept what happened as a given. Not everything is as tragic as it seems at first glance. Without losing composure, you need to painstakingly bring the walls to perfect condition.
Have you ever had problems with plaster on your walls? What kind of? How did you solve the problem? Share your experience in the comments.
Plaster inspection
After complete drying, it is necessary to visually inspect the quality of the surface.
A surface can be called ideal if:
- it is smooth and even;
- the plaster is tightly attached to the surface;
- no cracks or dents;
- it does not peel off or swell;
- the edges of the corners are clearly trimmed;
- no traces of grout;
- there are no mortar drips, stains or efflorescence;
- there are no tubercles.
In addition to visual inspection, it is necessary to tap the surface with a hammer to identify problem areas and check the evenness of the surface. If an empty sound is heard when tapping with a hammer, then in this area the solution does not adhere well to the surface .
If cracks appear on the walls after plastering, then using a spatula or screwdriver, you should pick up the layers of plaster to the point where it stops crumbling. It is recommended to continue tapping with a hammer. Plaster that is not very strong will fall off on its own after a few blows. Cracks in well-fixed plaster should be widened using a screwdriver, cleaned of dust, and sealed .
To check the evenness of the plastered surface, you need to apply a rule or bubble level to it. These tools will show even small deviations.
Permissible technical deviations to the quality of plaster can be viewed in the table:
| Defects | Permissible deviations from the requirements for the quality of plaster | ||
| simple | improved | high quality | |
| Uneven surface (easy to detect if you apply a rule or a rod at least 2 m long) | No more than three (depth or height up to 5 mm) | No more than two (depth or height up to 3 mm) | No more than two (depth or height up to 2 mm) |
| Vertical surface deviation | 15 mm for the entire height of the room | 2 mm per 1 m height, but not more than 10 mm over the entire height of the room | 1 mm per 1 m height, but not more than 5 mm over the entire height of the room |
| Horizontal surface deflection | 15 mm for all rooms | 2 mm per 1 m of length, but not more than 10 mm for the entire length of the room or a limited part of it | 1 mm per 1 m of length, but not more than 7 mm for the entire length of the room or a limited part of it |
| Horizontal and vertical deviation of husks, appendages, window and door slopes | 10 mm for the entire element | 2 mm per 1 m of length or height, but not more than 5 mm for the entire element | 1 mm per 1 m of length or height, but not more than 3 mm for the entire element |
| Deviation in the width of the plastered slope | Not checked | 3 mm | 2 mm |
What should the plastered surface be like and how to identify defects
The following factors indicate that the plastering work was carried out correctly:
- the plaster layer does not peel off from the wall;
- there are completely no smudges, stains, traces of grout, etc.;
- there are no irregularities, bumps, cracks (except for those that are characteristic of this decorative texture).
To identify the indicated defects, a visual inspection is sufficient. You can also lightly tap with a hammer or the handle of a trowel (a ringing sound indicates poor adhesion of the solution to the surface) or measure the evenness with a bubble level.
Defects in plaster
The resulting plaster defects may vary in appearance and reasons for their appearance.
A common source of defects is the use of homemade mixtures with incorrect proportions of components.
The reasons for the occurrence of defects can be:
- technological;
- operational.
Technological defects are formed due to violations of the technology for preparing the mixture and its incorrect application to the surface.
Among the most common technological defects of this type are:
- dutik;
- cracks;
- peeling;
- efflorescence;
- swelling
Main types of plaster defects
The causes of defects arise as a result of non-compliance with technology when diluting and laying plaster, incorrect choice of mixture for wet rooms and facades, and expiration of the service life.
The causes of plaster defects are divided into technological and operational
Technological
To control the quality of plastering work, SP (code of rules) 71.13330.2017 and SNiP (building codes and regulations) 3.04.01-87 for insulating and finishing coatings are used. These documents indicate the maximum volume and magnitude of defects. There are two groups of possible damage: defects on the surface and the quality of the layer, distortion and unevenness of the walls.
Operational
They focus on the following causes of operational problems:
- use of plaster for purposes other than its intended purpose - gypsum or polymer latex mixture was used in wet rooms, to decorate facades or open verandas;
- mechanical impact - shocks, pollution, abrasion;
- exposure to natural phenomena - rain, other precipitation, frost, direct rays of the sun, winds;
- shrinkage of structures;
- wear.
Operational defects in plaster occur as a result of wear and tear.
In order to prevent operational defects, before using the plaster, familiarize yourself with the area of its application and repair it in a timely manner.
Prevention and repair
Dutiki
Due to the use of quicklime, there is a risk of the formation of small swollen tubercles (dummies) , which consist of unslaked particles. To eliminate swelling of this kind, it is necessary to remove this area by cutting and re-plaster the surface.
Cracks
Using too much greasy or poorly mixed solution may cause the surface to crack. To avoid this kind of problem, when preparing the solution, you should pay attention to the dosage and the thoroughness of mixing all components. If plastering work is carried out in the hot season, attention should be paid to the fact that the applied layer can dry out very quickly. Therefore, it is recommended to moisten the surface or cover it with a damp cloth.
Cracks on the plastered surface can appear in the summer also with a strong draft, which causes it to dry out more quickly. Cracks may also appear from a large amount of binders or fillers in the mixture. Minor defects in the form of cracks can be leveled out by grinding .
If the brickwork of the house wall was done in winter, then it must dry before plastering work, since after the plaster has completely dried, cracks may appear.
Peeling
Peeling can occur when plastering a very dry surface. To eliminate this defect, it is necessary to dismantle the plaster on the damaged area and reapply it to the surface. It is necessary to ensure that when applying the layer a second time, the strength of the solution decreases , i.e. the layer on the base should hold tighter.
Swelling
Excessive moisture causes swelling. To eliminate this defect, it is necessary to dry the base and then apply the layer again.
Efflorescence (efflorescence)
The appearance of efflorescence is a signal of increased humidity in the room. It is worthwhile to improve ventilation
Due to high humidity, efflorescence often appears on the plaster. Fungus and mold may be added to them over time. The first thing to do is try to dissolve the deposits on the walls in water. It is necessary to remove efflorescence, fungus and mold, because... they can cause corrosion.
To remove efflorescence, it is recommended to purchase special products. The range of such products is varied, so it is recommended to consult with the seller which one will be most effective. For work it is better to use soft rollers or brushes, because... metal scrapers may damage the surface. After treatment with special means, water repellents must be applied to the damaged and cleaned area .
Operational defects
They are cracks and flaking that occur over time as a result of wear and tear. To prevent them, it is necessary to regularly carry out preventive inspections with subsequent repairs.
The main defects and methods for eliminating them can be seen in the table:
| Defects | Reasons for appearance | Remedies |
| Ducts on the surface of the plaster | Presence of small particles of unslaked lime in solutions | Moisten the surface to fully open the odors, clean the damaged areas and re-plaster with a solution of good lime |
| Cracks on the surface | The use of greasy solutions, quick drying of plaster in drafts, the use of thick layers of solutions | Open up the cracks and cracks, moisten them well, coat them with solution and wipe them down |
| Swelling, scratching | Plastering wet surfaces or constant moistening after plastering | Beat the plaster with a hammer in areas of swelling, clean these areas, dry and plaster again |
| Rough plaster surface | Unscreened, coarse aggregate used | Moisten the surface, rub the plaster with a solution based on fine sand |
| Peeling plaster | The mixture is applied to an unprepared, dry surface | Knock off the peeling plaster and apply a new layer, observing all technological processes |
It is not difficult to eliminate the resulting defects, but it is better to prevent them by following all the instructions.
More details about plaster defects can be seen in the video:
Defect table
To find out the essence of the occurrence of defects, a table is provided with possible problems and the reasons for their occurrence, as well as methods of elimination.
| № | Defects | Possible reason | Remedies |
| 1 | Cracks |
|
|
| 2 | Swelling, peeling (flaking) |
| The peeling plaster is chipped off, the walls are dried, and the mixture is applied again. |
| 3 | Dutiki | Using quicklime | Areas are wetted, scraped and reapplied with plaster. |
| 4 | Peeling |
| After peeling, the areas are chipped off, the base is prepared and replastered |
| 5 | Efflorescence | Adding salt to the solution or from groundwater | If rinsing with water does not help, then treat the stains with an efflorescence cleaner purchased at a hardware store. |
| 6 | spotting | Protruding greasy stains or unevenly dried surface | Remove with solvents, dry with a hairdryer or naturally |
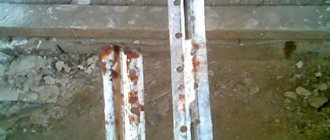
| 7 | Rust |
| The wall is being tapped, the beacons are removed, the pipes are replaced, the caps are painted, the painted plaster is removed |
| 8 | Surface roughness | Incorrect installation of beacons, levels were not used - it was done “by eye” | Bring the work to perfection using bubble and laser levels |
| 9 | Curvature of corners, slopes, openings, pilasters | Alignment occurred without the use of perforated corners and a plumb line | Install the corners and level the surface under them |
| 10 | Insufficient strength | Lack of binders in the solution, contaminated sand |
|
Patient No. 1 - deviation according to the two-meter rule is indecently more than 2 mm
What's wrong
The gap between the wall and the two-meter rule should not exceed 2 mm according to SNIP and 1.5 mm according to TU (technical conditions).
How to fix
The situation could be corrected by using putty after the plaster has completely dried, but this is only if the gap exceeds the norm by a couple of mm.
Our patient has a gap of more than 1 cm in places - putty will not do here.
You will have to either dismantle the old plaster and do it all over again or make a new leveling layer of plaster on top of the old one.
What if you don't fix it?
- It may turn out that you won’t be able to glue it exactly in this corner.
- If you try to put a cabinet or other furniture here, it will end up crooked. A trifle, but unpleasant. Although for lovers of Feng Shui and other fun things, it’s not a trifle at all.
- The curvature of the wall will be noticeable when using overhead lighting.
- Meticulous friends will notice this and say that “the repair is so-so.”
- The wife will be in a bad mood for a couple of weeks, or a couple of years. Who's so lucky?
How to restore the integrity of plaster
Grinding the old layer will extend its shelf life. It is necessary to perform this technical action regularly. It can be combined with changing wallpaper, for example, or with complete plastering of the walls. The process involves grouting the old layer with the preliminary removal of old paint or wallpaper. The new plaster mortar is prepared using cement and sand with small fractions.
Finally
Knowing about the problems, you can effectively deal with them. But repairs should not be taken to extremes or delayed. It is important to regularly inspect the condition of the plaster and respond promptly, remember this.
Dampness in walls and its causes
The largest scale of this phenomenon can be observed on the ground floors and basements, which were built in violation of the technology that describes the rules of horizontal and/or vertical waterproofing. Currently, precipitation often contains acids, as well as a lot of carbon dioxide, which can cause changes in the structure of concrete.
The microclimate in the room is affected by the moisture that is absorbed by the walls, which is why an unpleasant odor appears and mold forms. But before you start fighting all this, you need to accurately establish the reasons for what is happening. To find the causes, it is necessary to conduct a qualified examination of all affected structures. If the case is very complex and there are no obvious reasons, then it is impossible to do without the help of qualified specialists, since you can simply waste money.
It is quite common for home owners to listen to the advice of people who have absolutely no knowledge of waterproofing. At first glance, these tips may seem logical, but in reality they are often wrong. In this article this topic will be expanded quite widely.
Sources that moisten building structures:
- condensation that forms on freezing structures;
- with insufficient ventilation, hygroscopic moisture is formed;
- flood waters that damage the base of the building;
- drainage and drainage systems that have become leaky;
- precipitation penetrating the foundation and washing the walls;
- groundwater, which affects the enclosing structures and that part of the building that is located underground.
It will not be possible to ignore all these defects, since moisture not only causes efflorescence and darkening, but also causes destruction and also forms mold, which is very dangerous to health.
If you eliminate the consequences and do not address the causes themselves, this will only bring short-term improvement. After some time, dampness and efflorescence will return and continue their destructive effects. If the finish is restored, then it will still suffer the same fate as the old one, since for this it is necessary to use a special drying (sanitizing) plaster, which is marked WTA.
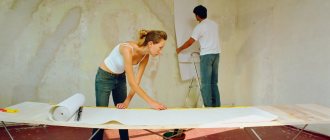
Necessary means for leveling: plaster and putty
To level the surfaces, not only plaster is needed, but also putty. To use both materials correctly, you need to know the difference between plaster and putty. Plaster is nothing more than a building mixture used to level the surface. It is coarse-grained, so it is suitable for surfaces with uneven surfaces of 1-5 cm. Putty is a plastic mass that eliminates surface imperfections, such as depressions or scratches. Unlike plaster, putty is fine-grained, so it can be used to smooth out small imperfections up to one and a half centimeters. Another difference between plaster and putty is that the latter has viscosity, so it does not change in volume when filling voids, and does not produce bubbles or cracks.
Therefore, when deciding what will help to repair cracks or other defects on the surface: plaster or putty, it is necessary to take into account the size of the defect, and also remember that putty is applied before the finishing coating (wallpaper, painting, finishing plaster), and plaster is an intermediate leveling layer.
That is why it is so important to apply the plaster evenly and without defects for the successful continuation of finishing work.
Teplon, plaster from UNIS
Types of arched roofs and construction technology
"Stroy MD" - professional repair of facades of apartment buildings
You can order façade repairs finished using decorative plaster by contacting the Stroy MD . We restore exterior finishes with various textures and repair facades made of colored decorative plaster, during the work strictly following construction technologies and standards for working with a certain type of plaster composition.
The full list of services provided includes:
- Thermal imaging inspection of walls of apartment buildings .
- Repair of facades , finishing work using various technologies and types of coatings.
- Insulation and repair of interpanel seams.
- Painting facades.
- Restoration of facade slabs.
- Work on maintaining facades and maintaining their operational suitability: hydrophobization , cleaning, etc.
High-quality restoration of decorative plaster is not only an attractive appearance of the facade, but also a long service life of other layers of finishing, so such repair work should be entrusted to leading specialists. Contact Stroy MD to order a visit from an expert who will determine the scope of work and calculate an estimate for repairs.
Patient No. 6 - was the plaster crooked? Okay, let's putty.
What's wrong
- №1 - They puttyed it very well. By eye, hills of putty 1-2 mm high are randomly smeared all over the wall. Nonhumans worked. Moreover, judging by how generously the craftsmen smeared the wall with putty, they plastered it very badly and tried to hide the traces of the crime.
How to fix
Sand it thoroughly to level the wall as much as possible. After this it is NORMAL to putty. Normally this is with a deviation of 0.0 - 0.1 mm per two-meter rule.
What if you don't fix it?
It is impossible not to correct it. It is impossible to properly paste wallpaper on such a wall. I'm not even talking about more capricious wall coverings.
The owner of a house under construction or renovation should become familiar with possible defects in the plaster coating, known as plaster defects, in advance in order to prevent their occurrence when plastering the property. The information provided in this article will help you recognize and correct existing defects.
Ways to change
As you know, there is a color palette according to which all artists work. It is she who sets the rules for painting, from which you cannot deviate. For example, if a person wants to change the color of the plaster from green to yellow, then they will need to add more light colors. The exact same action will not work with a black base tone.
Therefore, before correcting the color of the material applied to the walls, you need to choose the appropriate method:
- Apply a new layer of plaster, first waiting for the old one to dry completely and remove it. This option is suitable when the decision to change the key came too late or when it is impossible to act in any other way.
- Apply a new layer over the old one without removing it. Suitable when the second layer is a darker color.
- Mix the decorative plaster while applying it to the walls. An excellent method for those who have not yet completely painted over the walls and decided to change the color while the old layer has not yet dried.
- Apply special white paint over the old layer. This is a special composition that does not change the texture of the plaster, but at the same time makes the color softer.
An alternative to solving the problem is to update the decor with wallpaper, tiles and other finishing materials, which will completely cover the work created. This option may be useful for those who want to correct the color of multi-layer relief plaster.