Putty for wallpaper - how to check the quality?
Good afternoon
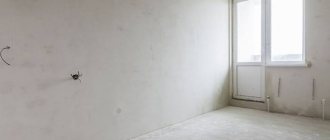
They putty on my walls under the wallpaper, I shined a flashlight and was horrified - sagging, traces of a spatula, etc. But at the same time, without a flashlight, it seems to be just fine. How to check the quality of putty specifically for wallpaper and argue with the master? Good afternoon, Pavel. If the putty is visually smooth, then this will be enough for the wallpaper, but running after the technician with a flashlight is stupid.
Those. Do you think that visual evenness is enough for puttying “under wallpaper”?
It’s smooth under thin delicate wallpaper, but under embossed wallpaper it’s not visible. They’ll do it just as they ordered. The end result will judge everyone. And I’m out of harm’s way, I always polish it under oblique light to avoid empty questions. I did it and forgot.
For painting, it is sanded to match the light bulb, and for wallpaper, usually without the light bulb. It is carefully sanded for thin wallpaper.
So that’s the question: what are the evaluation criteria? How can I see how thoroughly polished it is? Does your hand feel good? Is everything subjective?
A plastered and sanded wall should not have any differences or layers that may appear under the wallpaper. If the wallpaper is paper, then the slightest grain of sand will be visible. But if you don’t have experience, it’s difficult to check. You'll find out when you hang the wallpaper.
so that you sand it again on the vernik)))
Running with a flashlight? )))))))))))))))))))))))))))))))))))))))))))))))) )))))))))))) After puttying, no matter how ideal it is, there are almost always slivers left. Moreover, sagging is not always an unevenness, but a reflection of the structures of the layers.. You can check the quality of the evenness of the surface, but not with a flashlight. A rule or pattern. But I absolutely don’t understand why you need an ideal surface? Are you going to paint it? In 90% of cases, under wallpaper, simple puttying is enough. The most important thing here is that the overall surface is flat, so that there are no large bends, otherwise the wallpaper pattern may not match, but this is, excuse me, plastering work.
When accepting work from builders, it turns out that everyone around is an expert and knows everything about construction.
Checking flatness over a large area of the wall
This technique is convenient to use when determining the volume of plastering work, but can also be used at the time of completion of painting and plastering work to assess the quality of the completed process. Basically, before plastering, you can visually determine differences on the wall, which are already noticeable.
How to check the evenness of a wall after plastering over a large area:
- We prepare a laser linear level (plane builder) and turn on the vertical plane.
- We install the laser level near the edge of the wall, while the vertical laser plane should be located parallel to the wall surface.
- We make marks on the floor along the entire wall, which should be at the same distance from wall surfaces A and B.
Important! The builder builds a plane that is parallel to the planned surface of the wall treated with plaster (not the plastered surface itself, but a plane that is parallel to it).
- We evaluate the work. If a wall fragment that does not have a laser beam appears on the wall opposite the level, this indicates that the beam is interrupted due to the presence of a bulge on the wall.
- We move the laser level from the wall surface and mark new points A and B.
- To check differences on the wall surface in one vertical section (from the floor surface to the ceiling), we take a wooden or steel meter with a millimeter scale. The instrument must have no moving parts.
Important! Almost every tape measure is equipped with a movable hook, so the tape measure is not suitable.
- On a selected vertical section of 1-2 cm, install the meter parallel to the wall surface. In this case, the free end of the meter should rest against the wall at right angles to the wall surface, and the laser line should appear on the plane of the meter. In this way, the first value is found, corresponding to the distance from the base laser plane to the wall surface.
- Then, on the same vertical segment, we rearrange the meter a little lower and determine a new value.
- We measure as many times as necessary.
- Now we compare the obtained dimensions along the vertical line with the data on the vertical segment of the wall surface after 40-50 cm, thus determining the curvature of the wall relative to the base vertical.
How can an amateur check the quality of plastered walls?
When undertaking renovations in a room, the owner must understand that gluing wallpaper on the wall, painting the wall covering or laying tiles on it is inappropriate until the putty has been completed. This is a necessary event to help level the wall to perfect condition. Naturally, carrying out such work on your own is difficult, sometimes impossible, so you have to involve specialized specialists, craftsmen who are not always conscientious and often do the work in haste.
Sometimes the work is simply done by amateurs who are not able to perform the putty efficiently. Naturally, after completing the wall finishing work, the owner must independently check the quality of the coating. Well, how can this be done if there are no special, professional skills in this area?
Construction level and paper bill
There is an elementary way for a person who understands little about construction activities to check the quality of putty without the participation of professionals. To do this, you need to take a building level in one hand and a 100 dollar bill in the other. The level is applied to the wall with a narrow end. No paper bill should fit between the wall and the level. If the bill slips through the gap formed (between the tool and the wall), it is 100% that the work was performed poorly. You can safely make claims to the builders, forcing them to redo the work at the proper, high level.
This method is very simple. It allows you to check the evenness of the wall. Ideally, there should be no differences, humps, or tubercles. High-quality putty walls:
- Smooth.
- Smooth to the touch.
- Fits tightly to the building level.
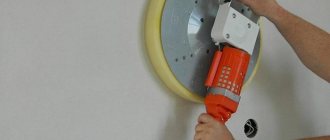
Using a flashlight
This is also a very simple method that allows you to instantly check the quality of the work performed. To do this, you need to take a light bulb and turn off the lights in the room. The lamp is brought to the wall so that the light is parallel to the wall surface. With such side lighting, almost all defects are visible. Ideally, there should be no shadows on the surface from tubercles or level differences.
What to look for?
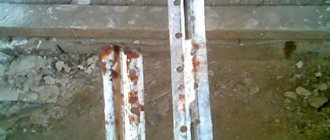
A person who does not have experience in construction and accepts putty work from workers must clearly understand that they need to look at the places where the beacons were located. Usually there are bumps left there that shouldn't be there. You can also move both hands along the center of the wall, without lifting your palms from the surface, move them in one direction and the other, up and down. The wall should be smooth to the touch, without gaps, without bumps. Naturally, there should be no scratches, scuffs, or even cracks on the wall.
New publications are published daily on our Yandex.Zen channel
Assessing the flatness of a wall using a rule
Without using a laser level, you can check the evenness of the wall surface after finishing using the rule.
How to check walls for evenness after plastering using the rule:
- We apply the device to the wall surface and determine whether there is a gap between the wall and the rule.
- Using a ruler, measure the amount of clearance. Basically, the unevenness of the finished wall corresponds to several millimeters, so it is very difficult to determine the value with a ruler.
- We use a laser level, thanks to which we can make more accurate measurements.
- When determining vertical evenness, turn on the mode for constructing the vertical axis. If it is necessary to determine horizontal evenness, then we use the horizontal axis.
- For convenience, draw a corresponding line on the surface of the wall.
- We place the level at an angle of 45 degrees to the wall surface.
- The resulting laser line looks straight only if the wall surface is perfectly flat:
- If there is a bubble on the wall, then in this area the line will deviate towards the level.
- If there is a concavity, then in this place there is a deviation of the beam from the vertical line away from the device.
- When installing the tool at an angle of 45 degrees, the size of the unevenness is determined, which corresponds to the distance from the drawn beam to the bent line.
Important! The level can also be used to determine the evenness of corners. In this case, we direct the beam at the junction of the walls and thus check its verticality. If there is an even angle, then the beam will be strictly located. Otherwise, the unevenness of the corner is immediately visible when it is tilted in any direction.
Currently, the level is a very convenient tool. In the old days, they used old-fashioned methods and somehow managed without this device, but now using a level saves a lot of time and effort, and facilitates the repair process, so it is worth using the latest technologies and not giving up modern developments.
How to check the quality of wall putty before painting
The exact cost depends on the specific case. Puttying walls for painting in an unheated room? Leave a request or check by phone.
How independent experts can help you check the quality of putty.
In order to carry out such common repair and finishing work as plastering, including decorative plastering, wallpapering, painting, finishing and other works, you must first prepare the surfaces for their production. And such preparation always includes puttying as the main part. Creation of smooth surfaces, homogeneous in material and ready for continued repair, finishing, processing or installation on walls or other surfaces.
And for all those who are engaged in repairs, who order it from one or another contractor, in most cases, if they do not have their own professional experience, the question arises of how to check the quality of the putty.
Plastering walls for painting. High-quality repair
The video shows one of the options for high-quality and quick puttying of walls for painting, which we use in ours.
Putty is made by covering walls and other surfaces with special materials for leveling, and can be lighthouse, finishing, starting and other types, depending on what and how it is done. Repairs are now becoming more and more complex in terms of types and requirements that were not imposed on them before. Therefore, in many cases, with the question of how to check the quality of putty, customers are forced to turn to independent and fairly experienced professionals in order to receive advice and accurate assessments in unusual situations.
How to correctly determine vertical deviations
First of all, you should look around the room and identify the most uneven areas. You need to start by determining vertical deviations. There are two ways to do this:
- Building level. To check the condition of the surface, you should apply a long (ideally, the entire height of the room) level to the surface and find an exactly vertical position. The angle by which one edge of the device will have to be moved is the amount of vertical deviation of the wall. If there is no such a long level, you can use a long rule, which is applied in a vertical position to the wall, and the level is already applied to it. If there is neither one nor the other, then another option will help.
- Plumb. This option is the simplest and most affordable. A thread or thin cord, length to the floor, is attached to the upper part of the wall, and a small weight (nut or something similar) is attached to the free end. The position of the thread is an ideal vertical line by which you can check the condition of the wall.
The main thing here is not to overdo it and not fall into excessive perfectionism. According to SNiP, permissible horizontal deviations for plastered surfaces are 5-15 mm for the entire height of the room. These are old standards, still Soviet, but they reflect the builders’ approach quite correctly. Because the vertical is not as important as a flat plane.
How to level the walls if they do not make it possible to determine the degree of verticality? This situation occurs with a wavy surface. In these cases, they are guided by the highest points in relation to the surface, creating a line along which the vertical is determined.
Ideally, the premises of the apartment are made in exact accordance with the project, which implies the correctness of the geometric shapes and sizes. So, the room, unless otherwise provided by the designer’s imagination, should have the shape of a parallelepiped with even right angles and the same dimensions of opposite walls, as well as the ceiling and floor. Life makes its own adjustments to this ideal picture. Therefore, we start by measuring the sides and diagonals of the walls. If the corresponding dimensions coincide with an accuracy of 1 - 2 cm, we move on to the next stage. Otherwise, we correct the “jambs” of the builders. Depending on the size of the identified deviations, plaster and the use of drywall are applicable. Both methods allow you to align walls with wallpaper. The choice of specifics depends on circumstances, including:
- the magnitude of geometric deviations;
- availability of necessary skills among performers;
- time allotted for repairs;
- customer preferences.
How to check the quality of painting work
You don't need to be an expert to evaluate the results. It is enough to know where and how to look.
Repairs not only require a lot of money, but are also very exhausting. I don't want the next one to be needed soon. The fulfillment of this desire directly depends on the quality of work performed now.
The peculiarity of “painting” is that the final result depends entirely on the quality of work performed at each stage. Therefore, you have no choice but to control each stage. It will be a good help to be sure that correctly performed painting work gives a long-lasting result. Next time you won’t have to level the walls and putty again. Or you can simply re-glue the wallpaper or refresh the paint.
Of course, there are a lot of subtleties in this work. But it’s impossible to do without understanding the big picture. Let's see what result you need to get at each stage.
Stage 1. Removing old coatings
If you have started the initial finishing of a new building, this stage will be quick and easy. In older homes it can take several days or even weeks.
At this stage, all old and weak coatings that interfere with the new finish and/or threaten its durability should be removed.
Please note: we are talking not only about old finishing materials (wallpaper, whitewash and chalk putty, tiles, etc.), but also about plaster that has lost its strength. It definitely needs to be removed. You cannot build a house on a dilapidated foundation. New plaster applied over worn old plaster will simply fall off.
As a result of the work at this stage, only solid foundations should remain; they are primed and dried.
How to check
Feel the walls and ceilings in different places. The palm should remain clean and dry.
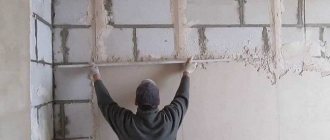
Stage 2. Plastering the walls
Plastering is the most difficult and time-consuming stage of all. Its goal is to obtain smooth, flat surfaces. Ideally, the ceilings should be strictly horizontal, the walls should be vertical, and the angle between adjacent planes should be 90 degrees.
First, craftsmen install beacons - special metal guides. If we are talking about walls, the beacons must stand strictly vertically and be in the same plane. From the very beginning, you need to discuss what kind of accuracy you want to achieve. It is almost impossible to do all the work perfectly, so indicate which deviations are considered acceptable. For example, smooth unevenness of walls no more than two millimeters high is a very good quality.
The plaster should be thoroughly dried and then primed.
How to check
Using rules and levels. Apply the rule to the wall in several places, evaluate the unevenness. If the result is worse than you asked for, ask for improvements.
Dried plaster should be a uniform light gray color. Run your hand over it - it should remain dry and clean.
Ways to check the 90 degree angle between the walls inside and outside
There are several ways to check how straight the angle is. So:
- A square is the easiest way.
- The second method is to create a corner from a profile. Measure 30,60,90 cm from the corner along one wall. The length of one side of the profile will be equal to 90. To the other side on the adjacent wall, set aside 30,60,90,120 cm. The length of the second side of the profile corner will be equal to 120 cm. From one point where set aside 90 to another point 120 there should be a distance of 150 cm. The sides of the profile are connected with screws at 90 degrees. The edges are connected with another piece of profile equal to 150 cm. With this corner, the internal corner in the room is measured in several places.
- The outer corner is measured according to the same scheme, only all marks are marked on the floor. That is. From the outer corner on the floor you need to set aside a length that is a multiple of 4. Let’s say 1.6 meters. It is laid along one wall. Next, along the other wall you need to set aside 1.2 meters. There should be a distance of 2 meters between the end points. If so, then the angle is 90 degrees. If not, then alignment should be applied.
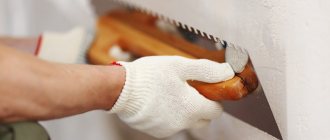
Before you start aligning the joints of the walls, you need to find out how much deviation or curvature they have. For leveling, drywall, plywood, conventional putty, and perforated corners are used. To derive an exact beautiful angle, you need to stock up on materials, tools and a little mathematical knowledge - the Pythagorean theorem.
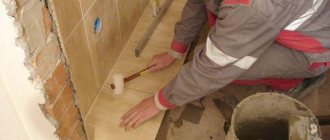
Stage 3. Putty
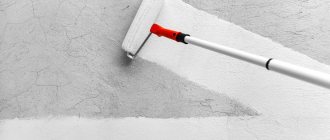
Plastering made the wall surfaces smooth, puttying should make them smooth. As a rule, putty is applied in at least two layers. Each layer is dried. Then the surface is sanded and primed again.
The thoroughness of this work depends on what finishing coating will be used for the final finish:
- Before painting you need to get a perfectly smooth surface.
- Thick vinyl wallpaper hides minor unevenness, so you don’t have to putty under it so carefully.
- Under ceramic tiles and similar finishing materials, as well as under some types of decorative plasters, there is no need to putty at all.
How to check
Take a good lamp and direct its light along the puttied surface. In oblique rays, all irregularities will be clearly visible. The surface should be clean and dry to the touch.
Stage 4. Finishing
If all previous work has been done efficiently, finishing will not take much time. If shortcomings of the previous stage appear, they will have to be eliminated, and this is a slow process.
It is stupid to examine the surface “under a microscope”: there will always be defects. It is quite enough that a person with normal visual acuity in good lighting does not see obvious deficiencies.
How to check the paint
Make sure that at least two layers of paint are applied. After complete drying (no earlier than the next day), check:
- Is the entire surface uniform in color and gloss (texture).
- Are there any paint drips or unpainted areas?
- Are there any noticeable marks from a brush or roller, fluff, grains of sand, etc.?
How to check wallpapering
Typically, wallpaper dries completely in no less than two to three days. Sometimes pasting defects may appear even later. Make sure there is good lighting and check if the result meets these criteria:
- The wallpaper should lie flat on the wall, without bubbles or unevenness.
- The joints of the panels should not diverge, and the edges should not peel off.
- Wrinkles in the corners of the room are not allowed.
- If the wallpaper has a pattern, it must be combined correctly.
Checking flatness in a small area
After finishing the plastering work and preparing the wall surface for painting or wallpapering, as a rule, there are irregularities on the wall of 1-3 mm, which are inconvenient to find with a ruler. Defects are especially obvious on walls prepared for painting and painted in dark colors, on which direct sunlight falls at an angle. There is a simple technique that is used to determine the evenness of the wall after final finishing before wallpapering or painting.
How to check the verticality of a wall in a small area:
- At the beginning of the wall being measured, on the floor surface, we visually mark a square, which can be marked with some objects or drawn with chalk. This figure is needed in order to subsequently place the builder at the angle to the wall that you need.
- We make marks: point A corresponds to the laser plane perpendicular to the wall, point B defines the laser plane at an angle of 45° to the wall surface.
- Then we find points C, D, E, which are determined by dividing the corresponding segment between the wall and the previously selected mark. As a result, the angle values are obtained: 45/2 = 22.5, 22.5/2 = 11.25, 11.25/2 = 5.62.
- When the plane falls on the wall, it is level at any angle of inclination only if the wall is characterized by a perfectly flat surface. The presence of irregularities bends the beam, and the sharper the angle, the greater the curvature observed.
- In areas of unevenness, the beam will bend relative to the central point of the measured fragment:
- If the beam is bent away from the builder, that is, point A1, there is a hole in this place on the wall.
- If the beam is bent in the direction of the builder, which corresponds to point A2, then the wall is characterized by convexity.
- When the horizontal beam is tilted at an angle to the wall (in this case, the builder must be inclined relative to the horizontal plane), an unevenness will be detected on the wall from left to right, which corresponds to a horizontal curvature, and not from top to bottom, which is observed with vertical curvature.
Important! The dip or convexity can be calculated in millimeters. To do this, you will have to remember the trigonometric formula from the high school course. We will use the cotangent, which is defined as the ratio of the side adjacent to the corner (which corresponds to the distance A1) to the opposite side (which is the desired value, that is, the roughness X).
By changing the angle of incidence of the beam on the wall surface, the ratio of A1 to the desired value X changes. The smaller the angle of incidence, the greater will be the value of A1 or A2, which means the greater will be the coefficient: A1 / ctg “angle of incidence of the beam on the wall” = X.