How to fill cracks on a wall
Quite often, after renovations in a house, cracks form on the walls, which were previously leveled with putty. Many newcomers to the construction business wonder why putty cracks. There may be many reasons for this; to avoid this, you must adhere to certain recommendations and rules. In this article we will study in more detail the causes of such defects and consider the procedure for eliminating them.
Causes of cracks in walls
To effectively combat any negative processes, you first need to find out the reason for their occurrence. Numerous cracks or crevices on walls treated with putty may appear due to the following errors:
- incorrect procedure for preparing and processing the putty mixture;
- insufficient preliminary preparation of the treated surface.
Fortunately, negative consequences can be easily avoided if each stage is carried out according to the rules.
Preparation of the solution
Before each use of any building mixture, we recommend that you carefully study the instructions written on the packaging. This will avoid possible unpleasant situations in the future.
Before work, you must carefully study the instructions on the putty packaging, where the procedure for preparing and using the solution will be discussed in detail. Basic recommendations for preparing putty include:
- Please note that the container for preparing the solution must be clean. It must not contain any contamination or residues of other mixtures.
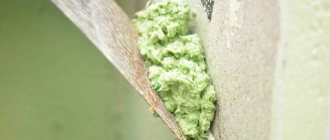
A good putty should resemble thick sour cream
- To mix the cladding, we recommend using only clean drinking water without unnecessary additives or impurities.
- When mixing the mixture using special devices, the procedure must be performed at low speeds. Do not allow foam to form on the solution.
- The optimal viscosity of the finished putty should resemble thick sour cream.
- Water emulsion based paints can be washed off with hot water and a sponge. If the paint cannot be removed, you can use a wire brush;
- To clean walls from oil dyes, special removers are used. For a thick layer it will be easier to use an attachment on a drill or grinder;
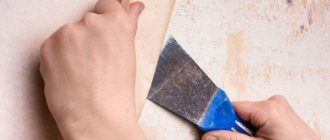
- Wallpaper can be easily removed using a metal spatula, but first you need to soak it with warm water. If they stick strongly to the wall, they can be ironed through a rag with an iron. The strong steam will cause them to peel off the wall;
- You can get rid of greasy or rusty stains on walls using a solvent.
If you don’t want to dilute the solution yourself, you can purchase a ready-made mixture that is suitable for processing without preliminary preparation. Keep in mind that the cost of such a solution will be significantly higher than a semi-finished product.
An extremely important condition when making a solution is that the powder is added to the water, and not vice versa.
Surface preparation
An extremely important condition for high-quality wall finishing is preliminary surface preparation.
Sometimes this work may seem difficult and time-consuming, especially when processing the walls of old houses, but the service life and quality of the cladding depend on it.
The first step is to get rid of the old coating:
The primer will improve the adhesion of the mixture to the wall.
After cleaning, the wall is treated with a primer.
It is applied using a paint roller or brush in one layer.
This treatment will increase the level of adhesion and protect the surface from the formation of mold or mildew.
Before continuing work, you need to give the primer time so that it has time to dry completely.
Application of the solution
To prepare the surface for subsequent cladding, two types of putty are used: starting and finishing.
Starter finishing is used to repair major surface damage. It is applied in a thick layer and takes quite a long time to dry completely.
Many newcomers to the construction trade neglect the starting finishing and immediately proceed to the finishing. This mistake is one of the most common reasons why the putty on the wall is cracked.
To avoid possible cracking, you must adhere to the following procedure:
- The first step is to fill up the cracks, cracks or dents on the walls.
Irregularities are removed after drying with sandpaper.
After this, having made sure that all procedures were carried out efficiently, you can begin finishing the walls, such as wallpapering.
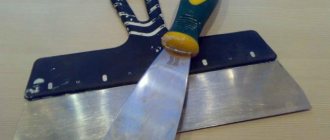
How to remove cracks from walls
But what to do if the putty walls do crack? It all depends on the size of the crack formed. The treatment of small and large cracks will differ significantly.
Sealing small cracks
Small cracks must be repaired using grout or putty.
This work is quite simple and does not require any special skills. It is best to use acrylic-based mixtures for sealing cracks. This putty has good elasticity and hiding power, which will perfectly fill small cracks.
To make a high-quality putty seal, it will need to be treated with a weak detergent solution. It is applied with a finger or a narrow spatula. Before further processing, the damaged area of the wall will need to be sanded and primed. For more information about sealing cracks, watch this video:
If wallpapering is planned in the future, small cracks are additionally treated with self-adhesive tape. Then the area is leveled with putty.
Repairing large cracks
Large chips cannot be repaired using simple crack putty. Here you will need to use a newer method.
The procedure in such cases is as follows:
- Using a hammer and chisel, we widen the crack. This will create a surface for the putty mass to adhere to.
Use reinforcement tape to seal large cracks
You can see the procedure for sealing a large crack in the following diagram.
To prevent the wall covering from cracking, we recommend following the rules and recommendations during processing. But if cracking does occur, do not panic. Such a defect can be quite easily corrected with the help of special compounds.
Expert advice
In order for the process of sealing cracks to be as successful as possible, you must:
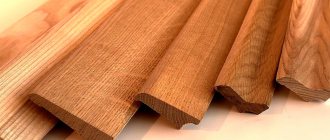
- Assess the scale of the damage - if possible, it is better to replace the board or part of it with a new piece of wood, since major damage will sooner or later lead to active rot and collapse of the entire floor.
- Choose the most suitable sealing method - if the gap is narrow and shallow, then wood putty is sufficient. There is no point in using foam or cord that is suitable for filling deep and wide crevices.
- Be sure to prepare the gap before sealing, without ignoring the disinfection step . It helps suppress the activity of pathogenic bacteria that destroy wood and lead to the formation of large cracks.
- Paint over the sealed areas - regardless of the chosen product, the surface must be opened with varnish or paint. This is necessary to protect the surface from possible premature cracking.
- Do not rush to complete the work in one day - haste is the main enemy. A gap that is poorly dried after treatment does not provide the necessary adhesion between two surfaces, which guarantees the futility of the work performed.
Have you ever had to seal cracks in the floor?
It happened, it didn't happen
How to eliminate wall defects
When starting a cosmetic renovation in an apartment, first of all, you should take care of the condition of the walls and partitions. It is necessary to eliminate defects such as small and large cracks, potholes, and cavities. The appearance of the final finish directly depends on how the preliminary preparation of the walls was carried out and on the quality of the materials used.
In anticipation of the renovation, you removed the furniture, pictures, lamps, and decorative elements from the walls. The craftsmen removed the old wallpaper - and it turned out that the wall was a sad sight. Plaster cracks, dowel holes, various irregularities.
What if your renovation plan calls for finishing with an elite finish: Venetian plaster or artistic painting? The wall must be perfectly smooth and even. This means that all defects need to be repaired with putty and repair mixture.
Repairing cracks in walls and corners
You've decided that your home needs a little renovation, and you have no idea where to start. First we need to repair the cracks in the wall. If you decide to make repairs and see that there are chips in the plaster and cracks on the wall, then you need to strengthen and putty the surface of the wall before gluing the wallpaper. In these cases, of course, it will be better if you use reinforced tape.
To do this, you must first clean the area that is damaged, get rid of any remaining plaster, and then vacuum it. The putty must be diluted in a ratio of 1 to 2, that is, one part water to two parts powder. The resulting mass must be applied in a layer of one or two millimeters with a trowel or spatula.
If there are deep cracks, you need to moisten them a little with water first. In addition to the crack itself, it is necessary to putty the nearest part of the plaster for greater reliability. We put reinforced tape into the gap and putty thoroughly until it is completely closed. After some time, about an hour and a half, the putty will dry. It needs to be cleaned a little and the wall needs to be vacuumed to remove any dust that has formed. Only after this can the wall be further processed - wallpapered, painted or sheathed with any other material.
The tools you will need for this procedure are a scraper, a brush, a sanding block, scissors or a sander.
Now let's look at how to repair cracks in the corners. Very often we find this kind of defects. First, you need to putty the damaged area, and then apply reinforced tape, which will then also need to be puttied.
The outer edges or cardboard partitions covered with plaster are very sensitive to impacts. However, you don't need to make any special efforts to repair the damage that has occurred. When furniture is moved in the house, and if the furniture is huge and heavy, and does not fit into turns, the corners of the walls are often damaged: pieces of plaster may fall off, or small scratches and chips may simply remain.
To repair damaged corners, there is a special set of accessories, which contains a metallized tape that is glued to the corner, a spatula and a special filler. First, let's prepare the putty in a 1:2 ratio - two parts putty powder to one part water. Apply putty to the damaged area with a layer of one or two millimeters. Then we cut out the reinforced strip to the required length, fold it in half so that a ninety-degree angle is formed, and then glue it to the corner. Press the tape firmly against the corner and let it dry for an hour and a half. Next, apply a layer of putty to the paper side of the reinforced tape. Then we level it and smooth it out so that there are no traces of the transition from the wall that was repaired to the rest of the wall. Once the putty has dried, you need to sand the wall. And if you then decide to glue wallpaper or cover it with any other material, traces of repair, of course, will not be visible.
What does elastic putty consist of?
Elastic putty consists of a number of components. These are mainly polymer resins and fiberglass. Acrylic elastic putty retains all the properties of standard putty. The difference is increased adhesive abilities. The elasticity of this material practically eliminates shrinkage of the material and the formation of cracks. On the market you can see elastic putty based on silicone. A different composition from the previous one allows you to create a grainy surface. The first option makes the surface smooth.
The elastic putty is white with a milky tint. The consistency is viscous and resembles a paste. For some manufacturers, the color of elastic putty may be gray.
How to repair a crack in a wall
How and with what to correct a crack in the wall correctly.
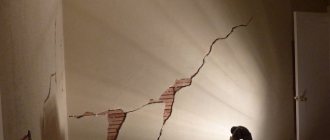
One of the most important problems in apartment buildings and private buildings is cracks in the walls. Because of such cracks, paint very often begins to crack and crumble, wallpaper peels off, and other troubles occur that I would like to get rid of. But cracks occur not only due to builders - this can also happen due to many natural phenomena, such as earthquakes, subsidence of the earth and others. You just need to understand that nothing lasts forever, and the problem should be solved as it arises. But cracks can be very different - be it the initial stage or quite serious damage. But one conclusion should be drawn - it is necessary to repair the crack in the wall as early as possible, so that later you do not have to invest more effort and money in eliminating this problem. It’s better to caulk and seal it “in the first place” than to renovate the apartment later.
How and with what to fix a crack in the wall
You may encounter cracks of completely different sizes and origins.
Perhaps your plaster or putty is simply cracked, but if the brickwork itself has cracked, then this is a more serious problem. But still, you can cope with the first and second options, you just need to know how to do everything correctly, that’s all. Let's try to learn some methods that will help you get rid of existing wall cracks or holes in the wall. The putty mesh will help eliminate the crack in the wall.
If small cracks have formed on your wall that resemble cobwebs , then in order to cover it up, you may need a primer (see which primer to choose) and a putty mesh. But remember, this option may only be suitable if the cracks do not diverge and the wall has only minor damage. So let's get down to business. First of all, it is necessary to clean off all old building materials and all kinds of debris that is on the surface from the wall. It is important that the wall is perfectly clean. Now that you have done this work, you need to prime the wall with deep penetration soil. After this, glue the reinforced putty mesh over the entire area of the wall. Remember that the mesh should cover the entire area of the cracked wall. After you have applied the mesh, you need to coat the surface with a small layer of putty on top. After complete drying, you need to sand the wall, after which you can start painting or wallpapering. This makes repairing a crack in the wall quick and easy.
If you are faced with such a problem when small cracks appear on the outside of the wall , then you should do the same work as in the previous option for getting rid of cracks, but there is still one caveat - choose Ceresit CT29 for putty.
This putty is designed specifically for outdoor use and does not require sanding, since it itself is reinforced. Moreover, this putty is very resistant to atmospheric influences, as it contains special adhesive additives. Metal mesh for plaster photo.
If your wall has significant cracks not only in the plaster, but also in the brickwork , then you should resort to another option on how to repair a crack in the wall, since this problem is already more serious than in previous options. First of all, you need to completely remove all the old plaster from the wall. After you have cleaned the wall, you need to screw a special metal mesh for plaster onto it, and after that apply a new layer of cement-sand plaster. But it is very important to remember that the mesh must be screwed over the entire surface area, thereby preventing the new plaster from spreading, after which it will be possible to putty, paint, and so on.
But it’s worth starting to take drastic measures if the crack in the wall has already begun to spread a little . In this case, you will have to pull the wall together so that it does not begin to diverge further. You need to tighten the crack with special metal plates. But before that, knock off all the old plaster from the wall. You can knock down the plaster not from the entire surface area, but only half a meter on both sides of the crack, since the metal plate is usually attached to one meter. After you have knocked down the plaster, you need to clean the crack from mortars and other debris, then fill it with polyurethane foam. Now you can attach the plate. But there is an important point - when choosing a plate, you should definitely pay attention to the fact that it cannot bend easily, especially since it should not bend by hand - this is important. It is worth choosing a plate that is made of thick and high-quality metal.
The crack in the wall should be tightened in three places, and this is only the minimum. If possible, you can make four or five ties. But if you chose the first option, then the required tie points are:
1. From above, while leaving a little space from the ceiling. 2. From below, slightly away from the floor. 3. In the middle.
You can screw the plates onto the most ordinary self-tapping screws, having previously driven in the dowels, or you can put them on bolts with a nut, punching through the plate. After you have made the screed, you can screw on a special metal mesh and watch how to properly plaster walls with your own hands with a video example, and if you are familiar with this, then get down to business accordingly, because now you will not say that you do not know how to repair a crack in the wall. Good luck!
How to work with elastic putty
Elastic putty is sold ready-made. It is applied with specialized tools. If elastic putty is used in hard-to-reach places or corners, use reinforcing mesh. When applying, a certain temperature must be maintained. From 4 to 32 degrees Celsius.
If something doesn’t work out for you, you can wash off the putty layer with water. This should be done until it dries. After drying, the surface can also be adjusted. Dried putty can be sanded. This way you will get rid of roughness and excess.
How to repair a crack in a wall
When starting repair work, dismantling and removing old wallpaper from the walls, you can find cracks in the walls . This phenomenon is frequent and quite unpleasant. Cracks can be of various shapes and sizes; it happens that one minor crack forms a whole web of small defects in the wall. There are also through cracks (holes). Of course, it is impossible to cover such a wall or cover it with plasterboard if the problem is not immediately eliminated - cracks in the walls, the wall will continue to deform and slowly collapse. How to properly deal with cracks and how to fix them with your own hands will be discussed in the article.
What to do if cracks appear on walls covered with plaster?
Before you start repairing cracks in the wall, you need to know exactly the coating of the wall. Let's take a closer look at the walls covered with plaster. When starting to seal cracks, you need to clean the surface. Using tools (chisels, hammer or hammer) remove the plaster. Then, using a brush, the wall is cleaned of any dust and dirt that has formed, in order to finally remove the debris, the area around the crack is washed with a damp washcloth.
Once the wall is clean, you should begin repairing the crack. A special solution is used for this. Builders recommend using gypsum mixtures, which can be purchased at a hardware store. Having carefully studied the instructions, combine the plaster with water, stir so that there are no lumps, and fill the crack with the solution.
The solution is applied using a spatula. Gypsum tends to expand after drying, so it is necessary to ensure that there is no excess solution in the cracks. If you overdo it with the amount of gypsum, the crack will deepen and a new deformation of the wall will begin. After the cracks are eliminated, it is necessary to let the plaster dry completely, this takes 5-6 hours. After this, use sandpaper to remove the remaining plaster. And enjoy a smooth wall without cracks.