general description
This material is otherwise called extruded polystyrene foam.
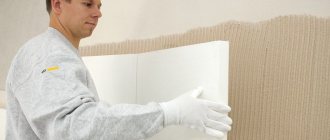
The way to obtain an insulating product is by foaming polystyrene foam, and then pressing it through an extruder. Gradually, the gas displaces air (95%). In the finished mass there are many small voids that are evenly distributed. At the end of production, a material is produced that is lightweight and durable. The package includes 8 pieces, and the total weight is 15 kilograms. There are several types of this heat insulator. The name of each variety characterizes the area of application. For example, in order to thermally insulate walls made of concrete or brick, a material called “Penoplex Wall” is used. The heat capacity of this thermal insulator, which has a thickness of 100 millimeters, is equal to the heat capacity of a one-and-a-half brick.
Advantages:
- Small mass of slabs.
- High level of strength.
- It is allowed to use and install the product where the humidity level is high.
- The heat insulator is environmentally friendly and contains no chemical elements. You can without a doubt insulate a children's room.
- Insulation together with penoplex is carried out from the inside and outside. Also areas of application are floors, ceilings and much more. The surface of the blind area is also insulated with penoplex.
- Wide range of material thickness depending on needs (20-100 millimeters).
The downside is the cost.
Soil thermal insulation technology
Thermal insulation of the soil significantly reduces the estimated depth of the foundation, and therefore reduces the overall costs of its construction. It is produced by insulating the blind area.
Insulation of the blind area
Thermal insulation of soil is most often carried out after vertical thermal insulation of the foundation. To do this, near the lower edge of the slabs, backfill with sand or gravel is done 15-20 cm below the ground level. Next, plank formwork about 30 cm high is placed at a distance of a meter from the walls.
The bottom of the blind area is carefully compacted and leveled, and foam tiles are laid on it along the perimeter of the base. A polyethylene film is laid over the penoplex and concrete is poured.
So, insulating the foundation with penoplex prevents freezing of the foundation, does not allow temperature changes and, consequently, the formation of condensation. After the penoplex insulation procedure, which you can easily do yourself, the microclimate in the house improves significantly, which increases the service life of the entire structure.
What determines the choice of adhesive composition?
The store will offer the buyer a large selection of glue for penoplex. The differences will not only be in the manufacturer. On the shelves you will definitely find:
- dry and ready-made mixtures;
- formulations with different flow rates;
- mixtures for work on various substrates;
- polyurethane, polymer and other compounds;
- adhesives with varying degrees of adhesion.
Construction stores offer a wide range of foam adhesives.
are given below
If we talk about the consistency of the sold compositions, then this is a matter of personal preference; some people dilute the required amount of glue from dry powder without any problems, while others prefer to apply the mass prepared in production.
There is only one piece of advice for beginners - take enough foam glue, because if you have no experience, you can significantly exceed the consumption indicated by the manufacturer on the packaging. Beginners should also not glue penoplex to fast-curing compounds. They need to be applied from a spray can and have time to level the slabs; without the proper experience, there is a risk of ruining part of the insulation. Such compositions include Titan glue.
For work on each type of surface there are specially developed adhesives for penoplex. You can easily find compounds that can be used to attach insulation:
- to concrete and other mineral bases: plaster, gypsum blocks, brickwork, asbestos-cement sheets (for example, dry mix “Atlas Stopter K 20”);
- for bases that require waterproofing treatment, that is, for external work, you can choose the polymer mixture “T-Avangard K” for these purposes;
- to reinforced concrete slabs (for example, polyurethane adhesive “Titan”).
Polyurethane adhesive of the “Titan” brand is popular
. Universal compositions also exist; among the popular brands are “Moment”.
First of all, it should be noted that there is a branded polyurethane adhesive for Penoplex insulation, and there are other types of adhesives from different manufacturers, but they need to be selected depending on the type of base and installation conditions, we will talk about these compounds further.
designed specifically for the installation of slabs.
Mineral compositions are dry mixtures developed on the basis of cement or alabaster (gypsum). It is believed that gypsum mixtures are more suitable for interior work, and cement mixtures for exterior work, but personally, I use cement mixtures both outside and inside; they are easier to work with.
Mineral mixtures have undeniable advantages:
- When dry, they can be stored for quite a long time;
- The composition is diluted as needed and exactly as much as needed;
- The final setting time reaches 4 hours, so the work can be done carefully and carefully, which is very good for beginners;
- Quite simple instructions: take glue, add a certain amount of water to it and stir with a mixer.
But at the same time, there are also limitations, so before gluing penoplex to concrete or to a brick wall using a mineral composition, the base must be carefully primed and wait until the soil dries, otherwise the concrete will “suck” the water out of the glue and the connection will not be strong.
| Illustrations | Recommendations |
Ceresit CT83 - developed specifically for extruded polystyrene foam.
| |
Atlas Stopter K-20 is cheaper than Ceresit. The glue contains reinforcing fibers, which allows it to be used as a rough putty.
|
Polymer compositions are usually sold in cans and are immediately ready for use. If you need to glue insulation boards to metal, then this is an ideal option. But this glue sets very quickly, so installation requires experience.
| Illustrations | Recommendations |
Insta-Stic – sold in 750 ml cans.
| |
Titanium Styro-753 – Sold in 750 ml cans, more designed for concrete products.
|
For waterproofing, penoplex slabs are glued to bitumen, acrylic or rubber mastics, but ordinary mastics are not suitable here, they can corrode the insulation. We need formulations without solvents, benzenes and other similar petroleum products.
| Illustrations | Recommendations |
Bitumast XPS - is made on a bitumen basis, but does not contain solvents. When applied, it heats up to 90 ºС.
| |
| Acrylic adhesive - this adhesive is universal, it is suitable for external and internal work. Low consumption, plus it works on any surface, including wood and glass, but due to the high price it is not popular. |
Penoplex is an improved type of foam with polystyrene as a base. In fact, penoplex is the trade name for extruded polystyrene foam. The characteristics of this material allow it to be used for thermal insulation - warming a room. It is used for interior work and exterior decoration.
The choice of expanded polystyrene by professionals is due to its excellent properties and favorable price. The material is attached to the walls with glue. It is important to choose the right glue for penoplex and apply it strictly according to the instructions.
Types of adhesives
What composition is used to glue penoplex to the surface of a wall or ceiling? There are many options, but you need to choose the product carefully. This glue will hold not only the material itself, but also the entire insulating structure. If the quality of the glue is poor, it will not hold the insulation.
There are several types of adhesives depending on the composition:
- mineral;
- polyurethane;
- polymeric;
- waterproofing.
The first type is used to work with a dry surface, because at high humidity the mineral components immediately harden. It is better to carefully study the advice of the glue manufacturer before purchasing. This will allow you to choose the appropriate composition. It should not contain caustic, aggressive components, because penoplex is a capricious material, its structure is easy to destroy.
For the installation of penoplex such products are often used. Most are sold in cylinders, so they are convenient and easy to use even for a beginner. The products are ready for use, they do not need to be mixed, and the consumption is economical.
The most popular composition of the series is “Insta-Stik”. It is sold in 750 ml cylinders, the consumption when gluing is 12-15 sq. m, setting time - 20 minutes. Pull-off force – up to 400 kPa.
The disadvantage is that it is not frost-resistant - you cannot glue penoplex to walls at temperatures below 0 degrees.
Another well-known glue is Titan Stiro-753. Its consumption is approximately the same (about 14 sq. m). The product has a high peeling force (600 kPa), and the setting time is even shorter (15 minutes).
Penosil Fix{amp}amp;Go Montage is frost-resistant; it is used at -65... 130 degrees.
Using the described means, it is easy to connect foam sheets together, stick them on wood, attach them to a brick wall, or to concrete.
This foam with adhesive properties is widely used for attaching thermal insulation made of extruded polystyrene foam to all kinds of substrates - ceramic tiles, concrete ceilings, floors and walls, plasterboard, aerated concrete, brick. Adhesive foam Penoplex Fastfix (“Penoplex Fastfix”) is produced in 750 ml cylinders, the product itself is light blue.
If necessary, the adhesive will provide adhesion to most building materials. Among them are plaster, stone, wood, expanded clay concrete blocks, metal, cork, cellulose. If the material had to be foiled, this product is incompatible with it. Foam is also not suitable for polyethylene, silicone, and Teflon. Here are the main characteristics of the material:
- drying – 10-12 minutes;
- complete hardening – 24 hours;
- possibility of cutting – within 30-40 minutes.
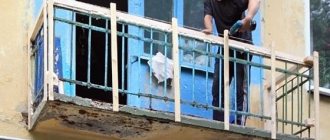
The product is used both for external work and for internal thermal insulation indoors; it is suitable for insulating loggias and balconies.
Mineral adhesives
Mineral-based adhesives contain cement, gypsum, and alabaster. They harden very quickly and must be applied immediately. The adhesives are mixed in small portions. Only cement compositions are usually used outside the room; products with gypsum components are suitable for interior work. The setting time is long, up to 1.5-4 hours, so it is possible to correct flaws.
The disadvantage of the compositions is that the base must first be well primed and wait until it dries completely, otherwise the connection will not be strong. Another disadvantage is the need for dilution; to obtain a high-quality homogeneous mixture, you need a construction mixer.
The most popular brands of mineral adhesives:
- Ceresit CT 83 - used directly for gluing penoplex, suitable for any substrate, pull-off force - 500 kPa, high frost resistance class.
- “Atlas Stopter K-20” – has an increased tearing force (600 kPa), is viable for 4 hours, consumption – 4.4 kg/sq.m. m, contains special reinforcing fibers.
Products of this type are sold in bags of 5-25 kg and cost about 300-500 rubles. for 25 kg. If the frost resistance class F50 is indicated on the bag, the product is suitable for interior work. Class F100 means that the boards can be glued outside.
Polymer adhesives
Is it possible to fix penoplex with adhesives in small cans? Typically, polymer adhesives are sold in such containers; they are ready for use on any surface. Bonding by this method is practiced if it is necessary to attach penoplex to metal. It is better for beginners not to buy such compositions - they set instantly, and it will be impossible to correct defects.
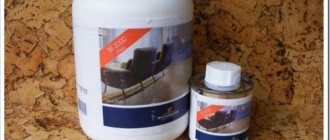
A good product for slabs is Moment glue. It is resistant to humidity and temperature changes, and is produced in convenient packaging of 0.25-1 liters. Consumption is low, even a small pack is enough for 4-5 square meters.
m. Another product is “Emphikol 225”, its technical characteristics are similar. After use, you should ventilate the room well for 2-3 days, but it is ideal to work with it in the air.
Instructions for gluing insulation
Before gluing penoplex with the selected composition, you should carefully study the instructions for use and adhere to the manufacturer’s recommendations. In addition, there are a number of general tips that should be taken into account when installing extruded polystyrene foam so that the insulation result is effective.
Preparing the surface for installation
In order for the penoplex fixation to be strong and reliable, the base should be carefully treated, since the fastening is carried out on a flat surface without defects. The preparatory stage includes the following procedures:
- Removing the remnants of the old coating, cleaning the base with a metal brush.
- Treating areas affected by mold or mildew with a special mixture of copper sulfate.
- Uneven areas are plastered or covered with pads or an additional layer of slabs during installation.
- Metal surfaces are coated with an anti-corrosion compound.
- Secure additional elements, if provided, for example, brackets for mounting an air conditioner, etc.
Apply a uniform layer of primer to the leveled surface. This improves adhesion and reduces the consumption of the adhesive mixture.
How to properly attach penoplex to concrete
Professionals prefer the combined method of attaching penoplex. Boards glued with a mixture and fixed with dowels are characterized by higher strength qualities, and therefore a longer service life. The smooth surface of extruded polystyrene foam sheets is treated with a stiff brush to improve adhesion. The adhesive mixture is applied to the foam board according to the instructions. There are 3 key application methods:
- Striped means applying the mixture in even stripes around the perimeter. When fastening, it is important to press the slabs tightly to prevent the appearance of spaces filled with air.
- The beacon method involves treating the perimeter of the foam sheet with glue, as well as partially filling the center.
- The continuous method requires processing the sheet completely. The mixture is applied with a notched trowel in an even layer.
Carrying out preparatory procedures
At the very beginning, you need to get rid of the old layer of paint, wallpaper and putty. If the old layer has excellent adhesion to the surface, then it does not need to be eliminated. Next, level the surface; this can be done using putty. Cover all bumps and depressions. This must be done, because if you install penoplex, they will break over time. The maximum error is one and a half centimeters per linear meter.
It is necessary to prime the unplastered surface. Metal structures that will be covered with a heat insulator need to be painted. You can coat it with an anti-corrosion mixture. Before starting the procedures, you need to hammer in the brackets for mounting drains, air conditioners, distribution boxes, and so on. Plates of insulation material are rolled using a needle roller.
Features of the work
After installing penoplex slabs along the entire perimeter of the building, the issue of drainage system should be resolved so that the water that will drain from the roof of the building does not seep to the very bottom of the foundation. To learn how to properly drain drainage, watch this video:
Reinforcing mesh will protect the insulation from damage
After all the foam boards have been installed, the foundation should be covered with a thin reinforcing polymer or metal mesh with a fine pattern, onto which a thin layer of adhesive or plaster should be applied. This will protect the surface of the penoplex from mechanical damage when backfilling with soil.
If it was decided to thermally insulate the surface from the inside with penoplex, then the list and sequence of work performed remains the same. Simply, after all the work has been completed, the surface of the insulation is puttied for painting or wallpapering.
Carrying out foundation insulation work with your own hands is not particularly difficult and can even be carried out by the developer himself.
What should I use to glue penoplex?
When choosing a particular adhesive for fastening, it is necessary to take into account the composition and chemical properties of the heat-insulating product.
The most effective adhesives are:
- Atlas Stopter K-20. This material has a high level of quality, so it is very often used for gluing slabs. The adhesive composition is used to restore facades. The product is also used for reinforcement. Has a high level of resistance to low temperatures and humidity. Significantly saves money.
Atlas Stopter K-20
Main article: how and with what to paint polystyrene foam?
- Atlas Plus. It is a universal adhesive. The main distinctive features of this product are elasticity, as well as excellent adhesion (adhesion to the surface). You can use glue on a wet surface.
- Mineral glue. You can find quite a lot of similar compositions on the construction market; among others, “Sarmat” stands out, which has a reasonable price.
- Polyurethane adhesive composition "Titan". The mixture does an excellent job of installing polystyrene foam boards. The composition has a fairly high price on the market.
- Compositions intended for waterproofing. A popular product is one that is widely used among builders and installation workers. One such material is bitumen mastic.
- Glue "Moment". This is a composite composition. Also often used for working with foam boards.
When choosing an adhesive, it is necessary to take into account that it should not contain some components in its composition. Such components include benzene, formaldehyde, formaldehyde, diesel fuel, and solvents.
When purchasing an adhesive composition, you need to take into account the stock. The base is not always smooth, so the consumption of the product becomes significantly greater. Choose a high-quality product to ensure excellent fastening of the plates to each other.
Gluing wallpaper onto polystyrene foam is necessary in those places where the walls are thermally insulated from the inside.
This type of thermal insulation visually makes the room area much smaller. The technology of such penoplex insulation is carried out in the event that it is impossible to carry out this procedure from the outside.
There are several ways to wallpaper insulating material.
When performing finishing procedures in various rooms that are associated with seasonal residence of people, you can glue wallpaper onto the surface of the insulation without preliminary preparatory work. You can use ordinary wallpaper glue.
To carry out the work more efficiently and reliably, it is necessary to carry out additional treatment of the surface of the heat-insulating layer. This is done so that irregularities, seams and much more are not noticeable.
The procedure looks like this:
- First, the thermal insulator is puttyed so that the surface can be made smooth.
- As soon as the putty layer is dry, apply the treatment. For this treatment, use sandpaper.
- Prime the surface. The primer composition must contain antifungal elements. Thanks to this, mold will not appear on the walls.
- After the primer layer has dried, use wallpaper glue to apply the backing. Thin paper is used as such a substrate.
- The final stage is wallpapering.
This is the whole algorithm.
How to glue penoplex to a surface such as concrete? There are several options:
- Liquid nails are used to fasten the heat-insulating product. There is no need to apply the product to the entire surface.
- Use of specially designed foam. This product is best used when working on the floor, because this substance has average adhesion to the surface.
These tools will help you attach penoplex to the concrete surface. There is no need to use any additional fastening components. Before starting the procedure, it is necessary to clean, plaster and treat the surface with a primer.
It is necessary to use fiberglass mesh. It needs to be glued to the insulating material. For this purpose, ordinary cement adhesives are used. Once the surface is dry, sand and level the final putty.
Reinforcement process
Required materials for putty:
- Glue for this heat insulator. There is no need to save your money, so it is better to purchase a product from a well-known brand.
- The next product is a primer designed to provide a high level of adhesion (adhesion to the surface).
- Reinforcement mesh.
(Net)
- Final putty. Used for interior decoration.
- Perforated corners.
Perforated corner
Remember that when purchasing all these materials necessary for putty, you need to take into account their supply.
Let's consider the detailed algorithm of action:
- The surface is prepared before applying the primary facade putty on the insulation. That is, debris and dust are removed. Damaged components are being replaced.
Surface cleaning
- According to the manufacturer's instructions, putty is prepared from dry matter. For this procedure, use a drill or construction mixer.
- To create a reinforcing layer of penoplex, use a building substance intended for leveling the surface of walls, as well as a plaster mesh for facades.
- Glue the plaster mesh from the corners of the structure.
- Part of the fiberglass mesh, which is 30 centimeters wide, must be folded halfway along its length. There should be a so-called “rib” left.
- Next, apply the working mixture to the corner. The layer thickness should be 3 millimeters. When applying the plaster mesh, remember that the “edge” should be at the corner of the structure.
- The mesh must be pressed into the layer of working mixture using a spatula. Then it is smoothed from the corner upwards.
- After you have cut the mesh into pieces (1.5-2 meters in length), it is glued to the putty. A plastering tool will help press it in.
- As soon as one strip is glued, the putty is applied to our heat insulator.
- If the mixture extends beyond the mesh, smooth it out to make it smooth. Remove depressions and bumps.
This is the whole procedure that concerns penoplex. The entire process can be completed independently without the help of specialists. You do not need to have specific knowledge or extensive experience. After this, you can glue tiles and other materials onto the penoplex.
July 23, 2016February 9, 2018
Penoplex is a material that resembles foam plastic in appearance and structure. For its production, granules of a substance called polystyrene are used. Under the influence of special reagents, they foam, turning into a homogeneous mass.
Penoplex is sold in slabs of different sizes. When choosing this material, you need to know for what work it will be used: external or internal.
Penoplex is designed for insulation:
- the inside of the walls;
- facade;
- roofs;
- foundation.
Interesting!!! Some types of this material are also used in the construction of highways, heating mains, and sometimes runways.
Distinctive features of penoplex:
- resistance to moisture and evaporation;
- low thermal conductivity;
- long service life;
- resistance to deformation even under significant force;
- ease of installation and subsequent processing;
- slight chemical activity;
- high environmental friendliness;
- acceptable cost.
For installation of penoplex during repair and construction work, special glue is used. His choice should be given special attention for two reasons.
- The service life of the insulation depends on the quality of the adhesive mass. In order for the figure stated by the manufacturer to correspond to reality, it is necessary to select an adhesive with a high adhesion rate.
- The health of people who will live in houses and apartments insulated with penoplex depends on the composition of the glue.
Based on composition characteristics, installation adhesive materials for penoplex are divided into four groups.
- Polyurethane.
- Mineral, cement.
- Polymer.
- Waterproofing.
Adhesives from the fourth group are not recommended for interior use. They contain various solvents and petroleum derivatives, which are very harmful to humans.
Penoplex adhesive for exterior use.
To insulate walls from the outside, cement-mineral compositions should be used. They are characterized by a high rate of adhesion (gluing, adhesion) to concrete surfaces.
For penoplex for interior work.
Installation of insulation on the ceiling and walls inside the building is carried out using glue from the polyurethane or polymer group. This is explained by their technical characteristics and safety for humans.
Atlas Stopter K-20. Characteristics:
- for external work, including for insulation of facades;
- sold in 25 kg containers;
- consumption 4 kg per 1 m2;
- preparation time for the mixture is at least 4 hours.
Insta-stick. Characteristics:
- ready mix;
- Sold in a 750 ml bottle;
- there is a special nozzle for application;
- consumption – one bottle per 2 m2.
Atlas Plus. Characteristics:
- versatility;
- good adhesion and elasticity;
- suitable for wet surfaces;
- sold in bags of 5, 10 and 25 kg;
- consumption – 1.5 kg per 1 m2.
"Moment". Characteristics:
- from the group of polymer adhesives;
- Drying time – 24 hours;
- resistance to humidity and low temperature;
- Available in 250, 500 and 1000 ml cans;
- consumption – 250 ml per 5 m2.
"Titanium". Characteristics:
- suitable for external and internal work;
- comes in aerosol form;
- prevents the appearance and spread of fungus;
- no noticeable odor, safe to use;
- consumption – one cylinder per 10 m2.
Glue price range
| Name | Volume | Packing | Average cost, rub |
| AtlasStopterK-20 | 25 kg | Bag | 320 |
| Insta-stick | 750 ml | Balloon | 550 |
| AtlasPlus | 25 kg | Bag | 600 |
| CeresitCT83 | 25 kg | Bag | 400 |
| Titanium | 750 ml | Balloon | 270 |
| Moment | 1000 ml | Jar | 300 |
Before starting work, prepare the necessary tools and materials:
- foam boards;
- primer;
- roller or brush;
- degreaser;
- spray;
Use step-by-step instructions for gluing insulation.
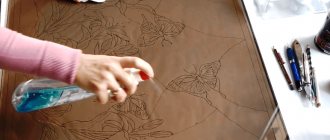
- Clean the working surface from paint and varnish materials, primer, and dirt. Use a spray bottle to degrease the surface.
- Apply an even layer of primer to the walls/floor/ceiling and allow it to dry completely.
- Prepare glue if required by the instructions. Apply it to the surface, as well as to the insulation board.
- Apply the penoplex to the surface: from bottom to top if it is a wall, or from left to right if it is a floor or ceiling. Hold the stove for so long until it no longer lags behind the work surface at random.
- Proceed to gluing the next slab.
Foundation insulation
Insulation of the foundation. It can be performed both in a building under construction and in an already constructed one.
Despite the fact that the foundation is the underground part of the building and is closed from cold air, the soil can freeze quite deeply. In addition, the cold rises to the wall (cold bridges).
This type of work consists of three stages:
- Insulation of the foundation (vertical and horizontal).
- Base insulation (vertical).
- Insulation of the blind area (horizontal).
This is important: for maximum efficiency of the process of insulating the foundation of a building, none of the above stages should be neglected. The process of insulating the foundation with penoplex slabs is as follows:
The process of insulating the foundation with penoplex slabs is as follows:
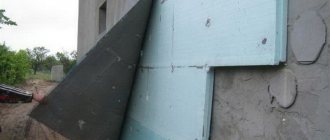
- Before installing Penoplex slabs, it is necessary to apply a waterproofing layer.
- Using an adhesive mixture, which is applied to the surface with a notched trowel, thermal insulation boards are mounted. The device is performed starting from the bottom row.
- If necessary, a second layer of heat insulation is installed using the same glue.
- Insulation is carried out up to and including the base.
- The soil is being backfilled.
- To avoid soil freezing, it is necessary to provide horizontal thermal insulation under the blind area along the entire perimeter of the building.
- A fiberglass mesh is laid on the base part and the finishing of the structure is carried out.
Scheme of foundation insulation with penoplex
How to choose adhesive for penoplex
Installation of extruded foam polystyrene on walls is understandable, but before starting or during the work, the master may have some doubts and questions. Answers to the most common ones are given below.
| Does air temperature matter? | Of course, before starting facade work, you need to make sure that the air temperature is acceptable. Many compounds, if not completely, then partially lose their fastening and adhesive properties when the thermometer drops below zero. |
| Is it possible to use liquid nails to glue penoplex? | If the budget is not limited, then you can spend a significant amount and attach the slabs with liquid nails. They will cope with the task, but the consumption of adhesive composition will be significant, its use is simply irrational. |
| Which compounds harden faster than others? | If you need to glue insulation boards onto polymer compounds, then it is important to take into account the short hardening time of the mixture. Within three or five minutes it firmly adheres to the penoplex. It is recommended to lay the slabs as evenly as possible from the first go - there may be no time left for adjustments. |
| Is it possible to use polyurethane foam? | The use of polyurethane foam as an alternative to glue is possible. But we are not talking about all types of work. If the floor is insulated, it is more convenient to use polyurethane foam. There is a limitation - the base must be self-leveling, for example, a concrete screed. |
| How can you fasten foam boards together? | Penoplex is not only glued to the wall, sometimes you need to connect two slabs together. If there is no desire or opportunity to use dowel-nails, then any type of glue will be suitable for such work. These can be all of the above mixtures, and others that do not contain solvents. |
Question No. 1
What should I use to glue penoplex to a wall or ceiling?
Depends on the wall:
- To install penoplex on wooden walls, it is better to use acrylic glue;
- Mineral dry mixtures are more suitable for a brick wall or concrete;
- Penoplex is glued to metal using polymer mixtures in cans;
Bituminous mastic works well on bitumen waterproofing, for example, a foundation.
Question No. 2
Is it possible to glue with polyurethane foam?
Theoretically yes. But:
- firstly, it will be quite expensive;
- secondly, the polyurethane foam expands greatly when it hardens, so you will have to press the slabs against the wall every 5 minutes and so on until the expansion process ends.
By the way, umbrella dowels do not save you; they can simply be torn off.
Question No. 3
Is it possible to glue with Liquid Nails?
It’s possible, but liquid nails are even more expensive than polyurethane foam, plus you need to spread the glue, wait until it dries slightly (5-7 minutes) and only then glue it, which takes all the time.
Question No. 4
Is it possible to glue in the cold?
Some compounds with frost resistance F100 allow such work, but in general it is undesirable. The instructions will help you.
Question No. 5
How to glue foam boards together?
In the same way as you glue them to the wall, only here you can do without primer and it is advisable to apply the glue in a continuous layer.
Question No. 6
Is it possible to do without fixing with dowels when installing slabs on a wall or ceiling?
Absolutely not, such savings can backfire, especially when it comes to exterior work or insulation under plaster.
Question No. 7
What is Penoplex “afraid of”?
- Petrol;
- Kerosene;
- Solara;
- Solvents;
- Toluene;
- Benzene;
- Coal tar;
- Polyester resin;
- Formalin;
- Formaldehyde;
- Ultra-violet rays.
Penoplex is a brand, trade name of one of the types of extruded polystyrene. Extrusion is called pushing out from a special apparatus. It's called an extruder and has a head. A foamed mass of plastic is pushed through it. This is how the material takes shape.
It remains to freeze. Due to being driven through an extruder, penoplex is an improved version of conventional polystyrene foam. In addition to enhanced molecular bonds that provide compressive strength, consumers benefit from the addition of fire retardants that prevent the material from burning. At the same time, about 80% of the gas remains in it, making penoplex an excellent insulation. The slabs are secured with glue. Which to choose?
The mass of penoplex is small. A pack of wall blocks, for example, weighs about 9 kilograms. The package contains 8 sheets with a total area of 5.5 squares. It would seem that a weak glue is enough. However, you need to take into account the weight of the entire insulation system along with dowels, corners, fiberglass mesh, and plaster. The glue should hold all the thermal insulation.
Adhesive for penoplex can have a different base. Hence the division by composition. Happens:
- Mineral. Often these are silicate compounds. They require a silicon-oxygen radical. Silicon in the periodic table is called silicium. Hence the name of the connections. In everyday life, glass is silicate. There are also wallpapers made of silicon fiber and mineral wool for insulation.
Mineral adhesive is only suitable for dry surfaces. High humidity leads to instant hardening of the compositions.
- Polyurethane. Urethane elastomer consists of an ether complex. The first polyurethane was obtained in 1937 from complex ones. Simple ones began to be used in the 50s of the last century. Then polyurethane became popular and available.
An example of polyurethane adhesive is polyurethane foam. It is one-component and immediately ready for use. There are also two-component options. They require mixing before use.
Adhesive for penoplex ceresit
Mixing different polymers in different proportions and under excellent conditions makes it possible to make multifaceted adhesives. Among them there are workers at sub-zero and only positive temperatures, fastening all kinds of surfaces, shrinking and non-shrinking.
- Polymeric. The concept is expanded, since polyurethane is also a polymer, since the atoms in the substance are arranged in a long chain. Its links are repeated. However, polyurethane glue takes time to harden. Most polymer compounds set instantly. Hence, for example, the brand name “Moment”. The brand's adhesives are odorous. Therefore, polymer compositions are used mainly outdoors.
There are also bitumen-based adhesives. They are waterproofing. Hence the division of compositions according to purpose. It’s not enough to fix the penoplex. Sometimes it is necessary to prevent water penetration or molding of the base. Conventional adhesives cannot cope with these tasks.
Based on their intended purpose, trains are also divided into outdoor and indoor. This is due to the areas of application of penoplex itself. They insulate both indoor and façade walls. The material is also suitable for roofs and foundations. Sometimes raw materials are used to insulate heating mains and elements of highways.
Penoplex adhesive for exterior use is usually mineral. In addition to compositions based on silicon oxide, by the way, there are cement ones. They also belong to the mineral category, since cement is made from crushed crushed stone. Choose one consisting of alite, belit, aluminates. These are all minerals and rocks.
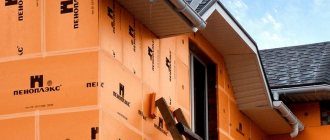
Penoplex is used for external insulation of houses
For external insulation, mineral mixtures are preferable, since penoplex is often attached to concrete bases. With them, adhesives of this category provide maximum adhesion - penetration into the materials being bonded.
Accordingly, a good coupling is obtained. This is ideal. In fact, a pore-closing primer base is required. Without it, concrete will “suck” moisture from a mineral mixture diluted with water. Once it becomes dry again, the glue will not be able to properly secure the penoplex.
Indoors, penoplex is placed on polymer adhesive. Accordingly, the mixtures are based on artificial and natural rubbers, acrylic, and polyvinyl chloride. They ideally adhere to metal surfaces, plastics, glass and other low-porous materials.
Some polymer adhesives, for example acrylic, are universal. These are suitable for both interior and exterior work. Acrylic also waterproofs.
Taking into account the difference in adhesive compositions, their strengths and weaknesses, insulation manufacturers have released Fastfix adhesive. Penoplex is attached to it within 7 minutes. After the first 2 slabs are pressed to the base. The remaining 5 minutes are spent on final fixation of the insulation.
Each type of penoplex glue has its own advantages and disadvantages. Bitumen options, for example, provide excellent waterproofing, but are odorous and often contain solvents. The latter are chemically aggressive and corrode penoplex. Therefore, the list of bitumen adhesives for it is limited. Usually they take Bitumast XPS without additives. It doesn't contain:
- diesel fuel
- gasoline
- kerosene
- benzene
- toluene
- polyester
- coal tar
- formaldehyde
- formaldehyde
Penoplex is “afraid” of all this. It is also not advisable for the insulation to be exposed to ultraviolet rays. Therefore, penoplex must be closed and does not serve as a final finish.
Acrylic compounds are harmless, odorless, but expensive. Expenses cannot be avoided if you need to attach penoplex to wood. Mineral mixtures work on concrete and brick, and polyurethane mixtures work on metal and other smooth, dense substrates. They will not attach insulation to wood.
Of the polymer adhesives, most people know polyurethane foam. However, it is expanding. Theoretically, the foam will secure the penoplex. True, you will have to press the insulation slabs to the base every 5 minutes, waiting for the end of expansion.
The most universal is the branded Fastfix. It fixes penoplex on any surfaces with the exception of Teflon, polyethylene, foil, silicone and bitumen. You have to pay extra for the wide spectrum of action and narrow specialization of the glue.
But Fastfix is easy to use, can withstand up to 130 degrees Celsius in short periods and 90 degrees of constant heating. Additionally, the glue “boasts” of no shrinkage and minimal thermal conductivity.
The consumption of glue depends not only on its type, but also on the application pattern. In addition to the point one, there is also:
- Solid. The latter involves applying glue to the entire surface of the base. Naturally, the consumption is maximum. The pattern is suitable for any surface.
- Stripe. The glue is applied along the contour of the foam board and in several lines in its center. The internal filling can be done in a zigzag or cross pattern. It’s so convenient to work with polymer adhesives in cylinders. The consumption of the compounds is average.
Types of adhesives
External mounting technology
It is quite possible to insulate the facade of a house with your own hands. The main condition is to follow the technology of laying penoplex. First, let's look at how to cover a “wet” façade with penoplex.
First, you should install a ready-made profile along the perimeter of the facade (at the bottom). Thanks to this detail, it will be more convenient for you to align the bottom row of insulation. It is recommended to install the profile using dowel nails
It is very important to position the guide correctly, so it is recommended to use a building level during all work. Next, the adhesive foam needs to be applied to the insulation around the perimeter and at the central point. It is advisable to leave several strips of adhesive in the center. After this, you should attach the penoplex to the wall
It is worth starting such work starting from the corner. Insert the slab into the guide profile and then press it against the wall. Be sure to check the position of the penoplex using a level.
- Then you can proceed to installing the second row of insulation:
- It should be installed with a slight offset (like a checkerboard layout).
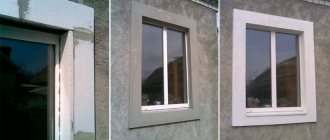
- When all the floors are covered with insulation, you need to install penoplex on the slopes. To do this, cut the slabs into the required dimensions. Next, you need to seal the window and door openings with cut materials.
- Then you need to additionally fix the penoplex on the walls. To do this, you can use special dowels, which are popularly called “fungi” or “umbrellas”.
- To install the dowel, you need to drill a hole in the ceiling, breaking through the insulating material. The hole must correspond to the dowel (its diameter). As for the length, it should be a little longer - 5–10 mm.
- Insulation materials located on slopes do not need to be additionally secured with dowels. This completes the process of laying insulation on the “wet” façade.
When insulating a suspended facade, you should also adhere to a certain technology.
- First of all, as in other cases, the floors should be prepared.
- It is necessary to mark the floors for the correct location of the racks in the form of vertical stripes. The ideal step between these parts would be 50 cm.
- On the indicated lines on the walls you need to attach brackets with a similar vertical distance of 50 cm. To fix these elements, you can use dowel nails.
After this, you can begin covering the walls with penoplex:
It is simply strung on brackets. With this method it is not necessary to use glue at all.
It is only important to ensure that each tile is captured by at least one dowel. If you are insulating a wooden house, then it is not necessary to foam the cracks: these elements will provide good vapor permeability characteristics of the insulation, which are especially important for wood floors. If the walls in the house are made of brick or other similar material, then it is recommended to cover all cracks and joints with polyurethane foam. It is recommended to cover the surface of the penoplex with a vapor barrier material if you are insulating a wooden building. In this case, the additional film should be secured to the umbrella dowel. Next, you need to fix metal racks or wooden blocks in the brackets.
At this point, the insulation of the suspended facade can be considered complete. After this, it is permissible to proceed to the installation of decorative finishing materials. For this purpose, profile structures are most often used, on which the sheathing itself is installed, for example, lining.
What is the best way to cut penoplex?
During various procedures, the insulating product must be divided into certain parts that have certain dimensions. If the material simply breaks, you will get uneven edges, and it is not possible to achieve the exact size.
Based on the above, we can conclude that the best solution is cutting. You can use various tools:
- Using a utility knife. The advantages of using this tool: accessibility, no noise, speed of the process. The sharper the tool, the higher the cutting quality.
Stationery knife
How can you paint penoplex?
This thermal insulating agent “hates” organic solvents. The physical characteristics of the material become worse if it is exposed to such substances. Paints and varnishes mainly have such compositions. Take this into account when choosing on the construction market.
The components that must be absent from painting mixtures have already been mentioned above. You can also add ethers, polyesters and tar to this list.
There is no need to use oil-based compounds for painting polystyrene foam boards. Substances that cannot cause any harm:
- paraffin;
- cement mortar;
- water-based paint;
- acid.
Choose paint that has the RS mark.
Manufacturers and reviews
The modern building materials market offers a variety of adhesive compositions for penoplex. We invite you to familiarize yourself with the most popular and high-quality products from different manufacturers.
Tytan
The Polish company Selena quickly gained popularity in our market. And all thanks to the high quality of products and loyal pricing policy. Almost the entire range of products is presented in the form of adhesives and sealants, one of which is the Tytan universal adhesive.
, which is resistant to precipitation, temperature changes, and moisture, is most suitable for working with penoplex This glue does not require shrinkage and ensures a tight fit of the material to the surface.
Cerisit
The popular company Cerisit, known as one of the best manufacturers of building materials, offers a whole line for working with penoplex.
Experienced specialists select high-quality compounds.
- Cerisit ST84 is a special foam for penoplex used in facade cladding. Tolerates high and low temperatures well (from -10°C to +40°C). It is characterized by fast drying - in the warm season, the composition hardens within 2-3 hours. The work can be carried out using a mounting gun. This composition is loved by consumers for its harmonious ratio of affordable cost and excellent quality.
- Cerisit ST83 is a dry mixture for laying slabs. The drying time is much longer than the previous material - three whole days at above-zero temperatures. The composition is applied using a notched trowel. The approximate consumption of the mixture is 6 kg per m2. The only negative is that the material does not tolerate cold well, so if the temperature is below zero, work cannot be carried out.
- Cerisit CT85 is a reinforcing adhesive used for gluing and subsequent reinforcement of tile material. The product can only be used at positive temperatures – from +5 to +30°C. The mixture must be used within two hours after mixing. Approximate mixture consumption: 6 kg/m2 – when gluing; 5 kg/m2 – with reinforcement.