Living in a cold climate requires you to make every effort to keep your home warm and cozy. One effective way to do this is insulation. It can be both external and internal, depending on the design features. Accordingly, a variety of materials are used for it. However, polystyrene foam remains one of the most popular options. We offer you a detailed step-by-step guide that will give you all the answers about how best to insulate walls with polystyrene foam from the outside.
- Pros and cons of using polystyrene foam;
- Wall preparation;
- Primer and putty;
- Preparation of insulation;
- Wall cladding;
- Installation of reinforcing mesh;
- Application of finishing coating;
- Conclusion.
Pros and cons of using polystyrene foam
One of the main advantages of external insulation in general is the long-term retention of heat in the walls even in the coldest weather. At the same time, you do not reduce the usable area of the room in any way, as happens in the case of internal operations. And if you choose the right material, then even the internal walls will be reliably protected from any manifestations of dampness. What does this mean? Probably about the fact that you don’t have to endlessly fight mold and fear the seasonal loss of pathogenic flora.
Extruded polystyrene foam is exactly the material that perfectly covers all the questions raised just above.
- modest water absorption rate
- high thermal insulation parameters;
- lightweight and stable;
- absolutely not afraid of low temperatures;
- inexpensive and extremely easy to cover.
- frankly poor sound insulation;
- exposed to ultraviolet rays;
- very afraid of fire;
- modest vapor permeability.
In general, the use of polystyrene foam is a common practice, especially if you are faced with the task of the most effective, but inexpensive insulation.
Features of facade panels made of polystyrene foam
Polystyrene facade panels are ready-made thermal insulation products that are available in various sizes and thicknesses. The material consists of foam and cladding sides. The elements are firmly fixed to each other, thus forming a strong single structure. Panels of this type are available in various variations, so there will be no difficulties with the choice. Cladding with facade panels made of polystyrene foam can be done using various materials: metal, acrylic putty, clinker, porcelain stoneware. Panels are often used in private construction. A popular option is a plaster facade with polystyrene foam insulation. This material allows you to create a cozy and comfortable atmosphere in the premises during the winter period. It is also worth noting that polypropylene panels do not require specific care and maintenance.
Facade cladding with expanded polystyrene can be done with your own hands or with the help of professional craftsmen. In addition to thermal insulation, facade panels also perform decorative functions. On sale you can find and purchase products with a variety of textures that effectively imitate other materials. Particularly popular are panels imitating brickwork, which are visually impossible to distinguish from the real thing. Products imitated with marble and granite will look elegant. You can also find panels for textured plaster. Each coating option is durable and attractive in appearance. Thanks to air circulation, facade panels are not afraid of dampness. For a modern home this is one of the best solutions.
Preparing the walls
It has already been said a lot that without high-quality preparation of the walls it makes no sense to talk about normal insulation - and now we repeat: in order for expanded polystyrene to really fulfill its function, make sure that the main walls are extremely smooth and carefully processed with appropriate materials.
- carefully inspect the wall, find all the bulges and depressions;
- remove them or level the difference between the levels to several centimeters;
- If the surface of the wall is painted and in many places the paint is already “successfully” peeling off, then it is best to carefully clean such paint from A to Z.
It’s easy to check the success of sanding: just run your hand over the wall - if it remains clean and the pores do not cling to knots and irregularities, then the process can be considered completed.
Preparatory work
Before you start insulating walls with extruded polystyrene foam, it is advisable to level the surface. It doesn't have to be perfectly smooth, but you shouldn't leave too many differences in height. Deviations of 1-2 cm are acceptable, but potholes and bulging areas must be leveled using plaster and a hammer drill. They do this in order to increase the strength of the coating: if deep and extensive voids remain under the EPS, the slab can be broken during operation.
Previously painted and plastered walls should be inspected for peeling layers of coating. It is better to remove everything that may fall off during installation of insulation, and fill the recesses with cement mortar. If the plastered wall crumbles in the form of small crumbs, then it is also advisable to remove the latter completely or putty the damaged areas with cement mortar with the addition of PVA glue (100-150 ml per 10 liters of putty). Dry the leveled wall and prime it with a compound for tile adhesive or plaster (deep penetration primer with quartz filler).
It is better not to skimp on this material, since the adhesion of the adhesive mass to the wall of the house depends on the quality of the soil, which will affect the strength of the insulating layer.
Even lightweight EPS boards, under the influence of gravity, can slide down the wall by about 10 cm until the adhesive sets. For support you need to install a starting profile.
This is a metal part that is attached to the very bottom of the insulated wall. We fasten it with dowels when finishing a stone building, or with nails (screws) if it is wooden.
Priming and puttying
with a deep penetration effect
is perfect for this operation.
. It should be applied to the prepared wall no earlier than 24 hours after thorough cleaning and drying. Primer is applied to the wall in two ways:
- brush;
- spray.
It is generally accepted that the first option is more thorough. It helps to achieve ideal and, most importantly, deep distribution of material into the façade. However, it also takes a fair amount of time - when priming with a spray bottle, you can do it 3 times faster
. After this, you can start puttingty. Use cement putty on concrete: it is economical, easy to use and will do the job perfectly, preparing a perfectly flat wall for subsequent insulation.
Selection of façade plaster for polystyrene foam
Insulating a facade with polystyrene foam under plaster requires not only the installation of insulation, but also subsequent cladding. Often, property owners prefer decorative plaster. Before insulating the facade of a house with polystyrene foam, it is worth choosing the optimal type of plaster. This is a special composition that can eliminate unevenness and give the facade an unusual and neat appearance. Plaster for expanded polystyrene is a dry mixture, the ingredients of which can penetrate into the structure of expanded polystyrene. Plaster is used in a number of cases for both internal and external finishing work. To choose the right plaster mixture, you should familiarize yourself in detail with the varieties:
- Mineral. Shows resistance to environmental influences, resistant to frost and ultraviolet radiation. The mineral plaster mixture is also vapor permeable and fireproof and does not require special care. Among the disadvantages of this solution: a short operational period, which does not exceed ten years. This is not a very elastic material, so cracks may appear on the walls during use.
- Acrylic. Unlike the previous version, this plaster mixture has excellent elasticity and copes well with temperature changes and frost. Acrylic plaster is resistant to mechanical loads and has high adhesion. The operational period is up to twenty-five years. The disadvantages include the relatively high price. The material can also absorb dust and dirt.
You can insulate the exterior of the house facade with polystyrene foam yourself, following the installation procedure.
Preparing insulation
Another advantage of using polystyrene foam for insulation is its practical readiness for use at any time. Especially if you purchased material with corrugated embossing, which ensures ideal adhesion with the adhesive composition. If you have ordinary polystyrene foam, then before you start sheathing, you should treat it with a needle roller
. Both sides of the sheet are subjected to this operation. After this, you can prepare fragments of insulation for gluing the cornice and slopes. Extruded polystyrene foam can be easily cut with a jigsaw or a regular hacksaw.
Cost of materials
If you are already quite fed up with end freezing, it’s time to start insulation work. But first you need to ask about the price of the material. For example, Rockwool mineral wool will cost 495 rubles. per package. The parameters of each sheet will be 50 x 600 x 800 mm. The material is presented in slabs, and its density is D35. There are 12 canvases in the package. Knowing the area of each of them, you can calculate how many will be needed for the work.
Prices for polystyrene foam are slightly lower compared to expanded polystyrene. Thus, you can purchase extruded polystyrene foam "TechnoNIKOL" for 1,174 rubles. for one package. The length, width and thickness of the material are 1180 x 580 x 50 mm. The panels are connected to each other using an H-shaped profile, which eliminates cold bridges and reduces installation time. The package contains 8 sheets per 5,475 m2.
Wall cladding
The most difficult stage due to the scale of the work being carried out, so we have divided it into several points. There are plenty of reasons for this - first, work is done in the area of the cornice, then the slopes are sheathed, and only then do they begin to fix full-size polystyrene foam boards to the façade.
Working with the cornice
- fragments prepared using a jigsaw or hacksaw need to be glued from the wall - after the final installation, the entire slabs will securely support them;
- First, the vertical strips are glued - they need to be glued end-to-end, without any protrusions or blemishes.
Making slopes
- the voids under the window sill are filled with material and filled with polyurethane foam to avoid the appearance of dampness;
- expanded polystyrene is glued with some removal, which is safely removed after the glue has completely dried;
- the glued strips will eventually be securely pressed by large slabs, adding greater reliability to the insulation.
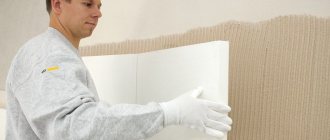
Glue the slabs to the wall
- special glue is applied to each polystyrene foam board; it is best to do this around the perimeter and draw an additional vertical line in the center;
- attach the slab to the wall;
- Fill the resulting cracks either with polyurethane foam, or simply with small pieces of the same polystyrene foam;
- Additionally, we secure the slab with mushroom-type dowels: we drill the required hole in the wall with a hammer drill and carefully drive the dowel in with a hammer.
Insulation of house walls with expanded polystyrene from the outside
External insulation with polystyrene foam is most preferable for thermal insulation of walls. The usable area of the room does not decrease; the insulation layer can be increased to 20 cm. When finishing a thermally insulated building, you can use ordinary siding or corrugated sheets.
Preliminary wall preparation
The insulation process always begins with surface preparation. It is necessary not only to clean the wall of dust and foreign objects, but also to seal all the irregularities, cracks, and prepare the material.
Attention! The plane for this insulation should be flat and smooth, the difference should not be more than 3-5 mm.
So, the algorithm for performing the work is as follows:
- it is impossible to install expanded polystyrene on an uneven wall with significant differences, since a void will form in the depressions, which will greatly reduce the quality of thermal insulation;
- if the walls are smooth, then you need to evaluate the structure of the facade; for example, if the facade was previously painted, then the surface needs to be thoroughly cleaned. Over time, the paint will begin to fall off, along with the heat insulator;
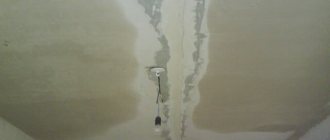
- As soon as the old coating is removed from the walls, cracks, chips and other defects may appear that need to be eliminated. Before filling the cracks, they should be opened with a hammer drill with a spatula attachment and primed. For masking, you can use cement mortar, gypsum plaster or construction foam. The cracks are foamed, and after drying the foam is cut off. Cover the chips with plaster.
Attention! The wall will be ready for insulation when you run your hand over it and it comes out clean.
We insulate slopes
Windows are the main source of heat loss, and the quality of insulation will depend on how well the slopes are insulated.
Work on slope insulation is carried out in several stages:
- the surface is well cleaned from dirt and dust. Remove dried foam that may stick out after installing windows;
- prime the slopes in two layers for better adhesion of the surface and the plaster mixture;
- Level the surface after the soil has dried. It is better to plaster the slopes with cement mortar. They need to be made as even as possible so that the polystyrene foam fits tightly to the surface. To do this, use a perforated corner, which is leveled using plaster.
As soon as the preparation is completed and the solution on the slopes has completely dried, you can begin insulation. The algorithm is like this:
- cut the insulation for the walls to the required size;
- apply glue to it and press it tightly to the slope;
- If cracks have formed during installation of the material, they should be foamed or sealed with mortar.
At this point, the preparation of the slopes can be considered completed; it will be possible to return to them when the turn comes for the final finishing of the insulated walls of the house.
Pasting the cornice
Before insulating the walls, you need to first paste over the cornice, for this:
- to paste the cornice, you need to take the thinnest material that will stick to one glue;
- strips are glued strictly from the wall;
- First, you should fix the vertical elements, and only then lay the horizontal ones on them.
The material must be installed in such a way that it does not protrude. If necessary, it should be trimmed with a sharp knife.
Vapor barrier and waterproofing when insulated with polystyrene foam
Despite the fact that polystyrene foam is one of the best materials for wall insulation, and is also a vapor-permeable material, before installing it you need to install a vapor barrier so that condensation does not form between the wall and the insulation. In this case, membrane films are perfect.
Vapor insulation is installed on fully prepared, dry walls. If the walls are insulated with polystyrene foam made of wood, then the vapor barrier material can be installed on the brackets using a construction stapler.
The material is laid on the walls with an overlap of 10 cm, and the joints must be taped with construction tape. This will prevent the appearance of cold bridges.
The condensation insulator is installed on a concrete or brick wall using glue with additional fastening to dowel nails.
After this, you can safely begin preparing the material.
The process of preparing insulation when using extruded polystyrene foam
Since expanded polystyrene differs from polystyrene foam in its smooth surface, the boards must be carefully prepared before gluing.
Might be interesting
Thermal insulation
Self-adhesive thermal insulation: how to choose and apply?
Thermal insulation
What are thermal insulation materials: comparative…
Thermal insulation
How to insulate a roof from the inside and not make mistakes?
Thermal insulation
Roofing and drainage: heating rules
Manufacturers care about their customers, and took this shortcoming into account in production. In this regard, a material with slight corrugation has appeared on the market, but it may not be available for sale.
The main task of preparing the material is to make the slabs rough so that the glue adheres well to the surface. Expanded polystyrene sheet is rolled with a needle roller, which is used to create curved structures from polystyrene foam.
All the slabs that are planned to be installed on the wall are rolled at once.
If there is no roller, you can use an iron brush. The material should be processed on both sides.
Primer of walls
The primer is selected based on the wall material. But the main requirement for the soil is that it must have deep penetration.
Before applying primer, the walls should be washed to remove street dust and soot.
In this case, the primer can be applied after 24 hours.
If islands of white plaque are observed on the wall (the release of minerals when moisture evaporates), it must be removed with a wire brush.
Only after careful preparation can priming begin. If the surface area is large, for speed, you can use a regular spray gun to apply the composition.
Installation of foam boards to the wall
Once all the preparatory work is completed, you can begin installing the material on the walls:
- Installation starts from the bottom from the corner, and is carried out in rows, going up. The material is attached to the wall horizontally, while the vertical seams should be staggered. To do this, the corner layers on every second layer are cut in half.
- Apply a layer of adhesive to the wall using a notched trowel. The composition should completely cover the entire surface of the wall. Then apply a little adhesive diluted to a net state on the sides of the material, install the slab and level it with light rocking.
- It is worth considering that high-quality insulation of a house with polystyrene foam cannot be achieved in one layer, so when calculating the material, you need to take this into account. The second row of slabs is glued with a shift, so that the joints of the previous layer, when insulating the house from the outside with polystyrene foam, are covered with a whole slab. The second layer of thermal insulation is glued to the sour cream.
Plates for the first and second layers of external wall insulation should be purchased in the same thickness, for example, if you plan to lay 10 cm of thermal insulation, then buy slabs 50 mm thick.
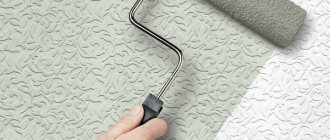
Installation of mesh on insulation
The mesh begins to be mounted on the wall a day after the heat insulator is laid. You need to prepare the solution by milking the mesh and apply it to the polystyrene foam with a notched trowel over the entire surface.
They begin gluing the mesh from the corner, but only from the top, straightening it to the bottom with a spatula until the reinforcement is completely pressed into the composition. After the first strip has been laid, the second one begins to be glued with an overlap of 5 cm.
A perforated element with reinforced serpyanka is installed on the corners to make the corner even and protected from impacts.
If laying it on the mortar doesn’t work out, you can do it differently: first stick the serpyanka, and then go over it with the mortar using a wide spatula.
Further work can be continued only after the mortar with reinforcement has completely dried.
Preparation before plastering insulation
If you decide to plaster the house after insulation, then it is better to lay PVC mesh for reinforcement. It will last a long time as it is not subject to corrosion.
This mesh is mounted according to the same principle as the serpyanka. They cut off the layer according to the height of the wall, fix it on top from the corner, and begin to fill the cells with plaster, 0.5 cm thick. It is worth doing the work so that the mesh does not stick out from under the plaster, and fits well to the surface of the insulation.
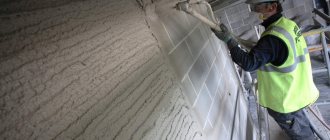
Applying the final layer of plaster
As soon as the layer of plaster with the built-in mesh has dried, you can begin plastering the surface, having previously primed it.
You need to buy facade plaster in dry form and dilute it according to the manufacturer’s instructions.
Plastering is done using a wide spatula, applying the solution to it with a small spatula.
For a good result, the plaster is applied in two layers, with each subsequent layer being applied to a dry surface.
After the plaster layers have dried, the walls need to be puttied, and after cleaning, painted, or applied decorative plaster to the walls.
Siding finishing
It is much easier to decorate an insulated building with siding. The material is not expensive, easy to use, and has a huge range of colors and imitation of various materials.
Before attaching the siding, a metal profile frame is mounted on it.
The work is carried out as follows:
- attach a guide profile to the dowel nails, which is installed at the bottom - on the foundation, at the top - under the roof;
- Standing profiles are screwed to the guides, which are additionally attached to the walls using direct hangers. It is important to remember that there must be a gap of 5 cm between the insulation and the facing material. The hangers are attached to the wall directly on the dowels directly through the insulation;
- after this you need to install jumpers in increments of 60 cm.
The result should be a lattice of profiles around the perimeter of the entire building.
As soon as the structure for the siding is ready, its installation can begin. Regardless of the type of siding, installation of panels starts from the corner and is carried out in rows from bottom to top.
Installation of reinforcing mesh
Only after approximately 24 hours have passed can you begin sanding the polystyrene foam surface and then gluing the reinforcing mesh to the wall. Here is the sequence in this case:
- the adhesive composition is applied to the prepared insulation surface;
- mesh is glued;
- then another layer of glue is applied, closing the glass mesh between two layers of the applied composition.
It is better to start gluing the mesh to the wall from the corners, but you should not sound the alarm if the edges of the fragments overlap one another. Ideally, they should generally extend to about 2 thirds, which helps to better strengthen the mesh and perform its direct function.
Which foam to choose
It has been proven that density does not have a significant effect on thermal conductivity, so preference should be given to a material with a low density, for example, PSB-S-15.
This material has the following characteristics:
- It weighs little.
- Compressive strength is up to 10% and 0.05 MPa when deformed. This means that the insulation will be resistant to fractures.
- Thermal conductivity is no higher than 0.042 W/mK, which is not much more than that of other materials, the density of which is higher.
- Affordable price.
This material will be an acceptable option for insulating the outside of a house with polystyrene foam.
Applying the finishing coat
plaster
acts as the finishing material.
(plaster consumption calculator).
It performs not only a protective, but also a decorative function. True, before applying it to the already dried surface of the insulation, you should very seriously treat it with a primer
.
You did this at the very beginning in order to make the surface of the facade smooth. Now a primer is needed to ensure optimal adhesion with the final decorative finishing material.
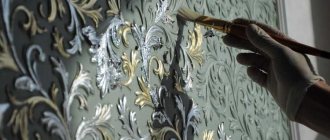
If desired, the plaster can be given one or another texture that meets your aesthetic needs. Only after this can the insulation of the walls be considered a completed operation.
[media=
https://youtu.be/449ctrLa-2Q
]
Calculation of the thermal insulation layer formulas and examples
To be able to accurately calculate the amount of insulation, it is necessary to find the heat transfer resistance coefficient of all materials in a wall or other area of the house. It depends on the climatic indicators of the area, therefore it is calculated individually using the formula:
tв - indoor temperature indicator, usually 18-22ºC;
tot is the average temperature value;
zot — duration of the heating season, days.
Values for calculation can be found in SNiP 01/23/99.
When calculating the thermal resistance of a structure, it is necessary to add up the indicators of each layer: R=R1+R2+R3, etc. Based on the average indicators for private and multi-storey buildings, approximate values of the coefficients are determined:
- walls - at least 3.5;
- ceiling - from 6.
The thickness of the insulation depends on the building material and its size; the lower the thermal resistance of the wall or roof, the larger the insulation layer should be.
Example: a wall made of sand-lime brick 0.5 m thick, which is insulated with foam plastic.
Rst.=0.5/0.7=0.71 - thermal resistance of the wall
R- Rst.=3.5-0.71=2.79 - value for foam plastic
Having all the data, you can calculate the required insulation layer using the formula: d=Rxk
For foam plastic, thermal conductivity k=0.038
d=2.79×0.038=0.10 m - foam boards 10 cm thick will be required
Using this algorithm, it is easy to calculate the optimal amount of thermal insulation for all areas of the house except the floor. When making calculations regarding base insulation, you must refer to the soil temperature table in your region of residence. It is from this that the data is taken to calculate the GSOP, and then the resistance of each layer and the required value of insulation are calculated.
How to attach the mesh to the foam?
Fastening the mesh to polystyrene foam - 1 The mesh is fixed with glue.
The same one on which the foam was attached. There is a special marking on the mesh. The red stripe shows how much fabric should be overlapped. This is approximately 100 mm. If there are no markings, try to maintain an even overlap along the entire length of the strip.
Attaching the mesh to polystyrene foam-2. Procedure for attaching the mesh: cut a strip of mesh of the required length, plus 250-200 mm.
Glue is applied to the upper part of the wall. The area of the adhesive strip is approximately 100x10 mm. The mesh is placed on it and pressed. Roughly speaking, the mesh should sink into the glue.
Trimming excess mesh Tip: make sure that the mesh does not bunch up into an accordion. Level it with a spatula. But don't overdo it, otherwise you'll pull the entire strip down.
At the bottom, the excess mesh is cut off. In order for the putty to cover the mesh over the entire surface of the wall, it must be applied in two layers. One thick layer will be covered with microcracks. This will not cause any harm, but the defect will be visually noticeable. Please note that the previous layer must dry completely. Tip: do not work with putty in windy weather. Otherwise, the layer will dry out quickly, which will also lead to the appearance of microcracks.
The thickness of the foam sheet depends on:
- the desired effect; the region (the temperature in the cold month, the strength and direction of the wind are taken into account); the material from which the wall is made.
A nuance: insulating a brick wall from the outside with polystyrene foam puts even more demands on the accuracy of calculating the thickness of the sheet. Because a thin layer will ensure that the dew point does not shift towards the foam, but remains in the wall.
Then, the moisture that will collect in the brick will increase the rate of its destruction. And if the foam layer is too thin, then in winter the moisture will turn into ice. As a result, bubbles form on the wall, and the sheet simply
will vomit.
Advice: if the required sheet thickness is 100 mm, it is better to buy two 50 mm each. and mount them overlapping. This will eliminate cold bridges in places
joint of sheets.