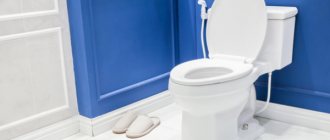
There are many ways to decorate a bathroom, some expensive and some not so expensive. The simplest and most cost-effective option is painting, and if you use your imagination, it is also the most decorative. With just one paint you can completely change the style of the interior, make the room bright, exclusive, or vice versa, give it a strict but elegant look. No special skills are required for this, the main thing is to choose the right coloring technique. The process itself is also simple, but much depends on the quality of surface preparation and the choice of material.
Painting the walls in the bathroom
Benefits of coloring
So, why is painting better than other finishing options?
Inexpensive. Tiles, decorative plaster, plastic panels are still more expensive than paint. In addition to the main finishing, you will need related materials (tile adhesive, grout, slats for lathing under panels, etc.), as well as additional tools. To paint a bathroom, you will need paint, a primer, putty for leveling and painting supplies, which will cost several times less. Of course, tiles last longer, but even taking into account repainting after a few years, such repairs remain the most budget option.
Painted walls in the bathroom - an economical finishing option
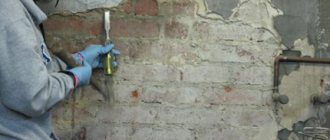
Just. Tiling requires skill and a certain amount of skill. Without experience, it is difficult to lay it neatly and beautifully, especially in the corners. Sheathing with panels is simpler, but even there it is necessary to take accurate measurements, install the sheathing, and know how to properly attach the slats. When painting, the most crucial and difficult moment is preparing the surface and leveling it. To level the walls well, you need to try a lot, and not everyone succeeds perfectly the first time. But this is only if the surfaces are too uneven; with minor defects, everything works out perfectly even for beginners. Well, applying paint to even, smooth walls is no longer difficult.
Painting walls is the simplest and least labor-intensive process
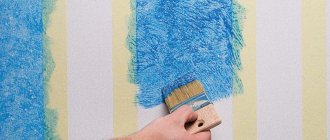
Creative. Modern paints are distinguished not only by improved properties, but also by a huge variety of colors. Designers offer a lot of interesting combinations and methods of applying paint, which are much more decorative than any cladding. Combining colors and shades allows you to transform your interior beyond recognition at minimal cost. Various stencils and special rollers with textured patterns further simplify the painting process.
Stencils for decoration! Creating a unique interior
Textured rollers
Homemade textured roller
Practical. High-quality paints do not fade for a long time, are easy to clean from dirt, and if the application technology is followed, they do not crack or peel for years. Of course, such a coating can be easily damaged, for example, by catching something sharp or hitting a wall with a heavy object. But these defects can easily be eliminated with putty and tinting the damaged area; the main thing is to choose the paint according to the tone.
Touching up paint is much easier than replacing broken tiles
Debunking myths
Many people shy away from the idea of painting their bathroom walls because they believe common misconceptions about this design option. However, myths do not stand up to criticism, because they contradict reality.
- If there is high humidity in the bathroom, the paint will poison the air with toxins. This is an absolute lie. Materials from trusted manufacturers do not contain chemical compounds hazardous to human life. But if the housewife is worried about the health of the family, it is recommended to buy hypoallergenic paint or one that states that it is safe for children. The technology for synthesizing such products has been further improved.
- Fungus and mold develop faster on walls coated with paint. This cannot be true, since the reason for the damaged walls does not lie in the material. Mold and fungal spores appear on the surface due to malfunctions in room ventilation, high humidity and general disorder. Painted walls will not be affected by mold, provided the housewife is tidy and the room is regularly ventilated.
Bright wallsSource remoo.ru
Getting rid of fungus on bathroom wallsSource potolok-exp.ru
Painting bathroom walls is expensive and difficult
Many people think that using paint when designing a bathroom is unwise and expensive. Indeed, many materials are highly expensive. The better the paint characteristics, the more expensive it will cost. But you shouldn’t refuse to paint the bathroom because of the price, because this option wins in comparison with other methods of finishing the room.
High-quality tiles with a pattern will cost much more. In addition, if the standard sizes of the tiles and the length of the walls do not match, additional effort will have to be spent on sawing. There will be mistakes and damaged shards here, which means you need to buy more material than required.
Deep blue in the bathroomSource ciscoexpo.ru
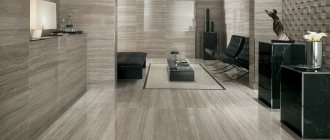
Bathroom design in loft styleSource remoo.ru
Compared to plastic panels, paint is also preferable. Even with regular contact with water, you don’t have to worry about the walls rotting. Thanks to special materials synthesis technologies, they reliably protect surfaces from the penetration of moisture or fungal spores. On the contrary, liquid can get into the cracks between the panels. Its accumulation will lead to more serious problems. Mold or rot will only be discovered during subsequent repairs, since the panels will not visually change.
As for the complexity of painting walls, this process cannot be called labor-intensive. It has its pitfalls, which a beginner without work experience is not ready for. But, like any construction work, applying paint requires pedantic adherence to the sequence and completion of all steps. To ensure that the technology is not disrupted, intervals must be observed. Preliminary familiarization with the most common mistakes will protect a person from further mistakes.
Painting walls in a loft interiorSource shkolazhizni.ru
Unusual wall paintingSource ciscoexpo.ru
The paint on the walls will definitely crack
Many people think that the paint in the bathroom will quickly crack. Such troubles only occur if the surface of the walls is not level.
Before painting, it is important to make sure that the material is ready for further color application. You can't skip such an important step as priming.
The plaster should lie in an even layer, it should be dried for 30 - 40 hours. If all requirements are met, the paint will not crack.
Sand-colored wallsSource vannadecor.ru
Plain light green wallsSource gazeta-pravo.ru
The paint on the walls is afraid of water
An equally common myth is that water or humidity will cause paint to wash off quickly. This myth is only partially true. On the building materials market you can find latex or acrylic paints that are intended for bathroom design. Production technologies make it possible to synthesize moisture-resistant chemical compounds. Good ventilation and cleaning using gentle household chemicals will maintain the beauty of the walls. It is recommended to avoid cleaning products that contain aggressive components. They will affect the brightness of the color and glossy tints on the surface. Budget paint options may lose their original appearance if regularly exposed to moisture.
Modern design optionSource remoo.ru
Places where walls are at risk of prolonged contact with water are recommended to be protected with glass, plastic or ceramic tiles. Designers do not view this as a drawback, but as an opportunity to show their imagination and create an original version of the bathroom decoration.
Coating walls with paintSource tk-konstruktor.ru
Which paint to choose
The bathroom differs from other rooms in the apartment primarily due to its high humidity. This implies the use of finishing materials, including paint, with certain characteristics:
- moisture resistance;
- hygiene;
- antibacterial properties;
- ability to pass air;
- absence of harmful substances.
In addition, such paint must be resistant to abrasion, since the walls in the bathroom have to be washed and wiped very often. These requirements are partially met by oil paint and alkyd enamel, but water-soluble paint is most suitable. Let's consider the characteristics of each type separately.
How and what to paint bathroom walls with: 6 important recommendations
Oil paint
Now oil paints are not at all as popular as they were 10-15 years ago, but they still have a certain demand. Their main advantage is high adhesion and durability combined with a low price. Few modern paints can last this long without losing their visual appeal. The painted surface does not get wet, withstands repeated washing, and does not react with household chemicals.
Oil bath paint
The main components of oil paints are drying oil and pigments. Depending on the scope of application, various fillers are added to the composition: manganese and cobalt salts, talc, barite, mica. The paint is available for sale in two forms: liquid and paste (thickly rubbed). The first type is immediately ready for use, and the paint just needs to be thoroughly mixed until smooth. The second type requires diluting the composition with drying oil to the desired consistency. To thin the paint, you can also use kerosene, turpentine, and white spirit, but in small proportions - no more than 5% of the total mass.
Oil paints have a high density, which increases composition consumption. At the same time, this property helps to increase hiding power, and often one coat of paint is sufficient to obtain an even coating. Additionally, this structure allows you to mask minor flaws on the walls. It is recommended to apply it with a hard brush, rubbing it forcefully into the surface to be painted. To achieve the highest quality result, you need not only to carefully prepare the walls, but also to select the right paint for its intended purpose. Each type of surface (metal, wood, concrete, plaster, etc.) has its own composition, so carefully study the information on the packaging.
Oil paint Ditex MA-15
The disadvantage of oil paints is the long drying time. As a rule, this period is 5-7 days at a temperature of +20 degrees. At lower temperatures, paint takes even longer to dry. Some manufacturers are now adding special fillers to the composition, reducing drying time to 2-3 days. This information is also indicated on the packaging.
Alkyd enamel
Alkyd enamel
The water-repellent properties of the enamel allow this paint to be widely used in bathrooms. Painted surfaces do not become damp, can be easily cleaned with a variety of cleaning solutions, and do not fade or wear off for a long time. Two layers of paint, applied according to all the rules, retain their protective effect for 4 years. The enamel contains a solvent, so if necessary, the paint is diluted with turpentine, solvent, or white spirit in a ratio of 1:10 to the enamel weight.
For a high-quality coating, the application temperature range should be from 5 to 35°C, otherwise the adhesive properties are reduced. Each layer dries for 24 hours at 20°C; if the room is hot, the drying time is reduced. Typically, concrete, plaster and brick walls require 2-3 coats of paint to ensure the finish is as even as possible. Unlike oil paint, enamel is less viscous and therefore practically does not hide minor defects on the surface being painted.
Enamel is divided into glossy and matte. The main color spectrum is quite wide, in addition, the paint is perfectly mixed and tinted, and therefore choosing the desired shade will not be difficult. The pigments that make up modern enamels have increased resistance to ultraviolet radiation, and painted surfaces retain their rich color for a long time. When choosing, be sure to pay attention to the markings - universal enamel PF 115 is best suited for internal use.
Alkyd enamel PF-115
The main disadvantage of alkyd enamel is toxicity. The pungent, pungent odor takes a long time to dissipate from the room; a respirator is required during work. It is worth noting that only fresh paints are toxic; after drying and the smell disappears, there is no danger to human health. Another disadvantage is the flammability of paint, but many manufacturers add fire retardants to the composition, which reduce the risk of ignition to a minimum.
Main technical characteristics of PF-115
Consumption of PF-115 enamel for 1 and 2-layer coating
| Color PF-115 | Amount of enamel to obtain a coating of 1 micron, in g/m² | Thickness, 1 layer, microns | Thickness of 2 layers, microns | Approximate consumption, 2 layers, brush/roller, g/m2 |
| White | 3,75-3,17 | 18-23 | 40 | 130 |
| Black | 3,14,-2,65 | 13-18 | 30 | 80 |
| Green | 3,49-2,96 | 18-23 | 36 | 110 |
Enamel PF-115
Water-dispersion paint
The basis of this type of paint is an aqueous dispersion of polymers, mainly acrylic and vinyl acetate. They contain virtually no volatile organic solvents, making the paint non-toxic. After drying, a thin, very durable and elastic film is formed on the surface, which allows air to pass freely, but does not allow water to pass through. Depending on the composition, water-dispersion paints are divided into acrylic, silicone and PVA dispersions. PVA-based paints are rarely used for bathrooms, and only for ceilings, since they are not waterproof enough and cannot be washed.
Water-dispersion paint
Acrylic paint is the most popular:
- widest range of colors;
- high water-repellent properties;
- resistance to burnout;
- the ability to tighten small cracks and smooth out irregularities;
- Dries within an hour after application;
- good covering ability.
Antifungal components are often added to such paints, so the painted surface does not become moldy. Acrylic paint has a smell, but it is very weak and dissipates quickly.
Moisture-resistant paint for walls and ceilings
Silicone and silicate paints are superior to acrylic paints in many ways. They repel water and dirt better, are easier to clean, and are more resistant to abrasion. The film formed after application easily covers cracks up to 2 mm wide. Even after repeated washing, the surface retains its glossy shine, the colors remain as rich as on the first day. There is only one downside to such paints - high cost, although, compared to tiles, this option is still considered a budget option.
Silicone paint for walls and ceilings
Glossy or matte – which is better?
When choosing a paint, its dullness plays an important role. As you know, paints are divided into glossy, semi-matte and matte, which affects the appearance of the painted surface. Glossy ones perfectly reflect light, add shine to the surface and visually increase the space.
Which paint to choose – matte or glossy?
If you cover the ceiling with glossy paint, the bathroom will seem larger and lighter. In addition, the glossy finish is very smooth, which means it is much easier to clean. The disadvantage of these paints is that even the smallest flaws are clearly visible under the gloss. That is why glossy compounds are best used on perfectly smooth walls, for example, covered with plasterboard.
The combination of matte and glossy surfaces can become a design element
Combination of matte and glossy paint stripes
Matte paint, on the contrary, masks defects well, has a high covering ability, and can be applied even in one layer. Its surface is more porous, and therefore it is more difficult to remove dirt. In all other respects, it is in no way inferior to glossy. Semi-matte reflects light slightly and looks great on both ceilings and walls.
Matte painted walls
Textured paints
Textured paints differ from ordinary ones in their greater thickness and viscosity, due to the admixture of a large amount of filler. Such paints are applied in a thick layer, forming a relief surface. Depending on the application method, the relief layer may look completely different. The standard composition is white, so to make the walls colored, you need to additionally purchase a color scheme. The paint is tinted by simply mixing it with the selected pigment. It can be applied with a roller, brush, spatula and other tools convenient for you.
Textured paint for walls
Textured paints are water-soluble, so if necessary they can be diluted with water. They cannot be made too liquid, otherwise the composition will lose its decorative properties. The relief structure makes it possible to perfectly hide minor defects, but irregularities larger than 3-4 mm will already be visible. If the painting technology is followed, it lasts for several years, almost does not fade, and is not afraid of moisture and temperature changes.
Original pattern on green texture paint
It is worth noting that for textured wall decoration you will need a significant consumption of structural paint - about 500-1500 g/m2
As for the downsides: textured paint is more expensive than regular paint, it consumes a lot, and requires skill to apply. To learn how to evenly distribute the composition over the surface, you first need to practice a little on a separate piece of plywood. The easiest way is to use a wide roller.
How to buy quality paint
All efforts to paint a bathroom can be ruined by poor quality paint. Cracks, peeling, foreign impurities, swelling in the paint after drying - all this is the result of poor-quality composition or violation of storage conditions. Small manufacturers often produce paint and varnish products not in accordance with GOST, using cheap fillers and carcinogens. Trying to save money will only increase your costs since everything will have to be repainted.
Wall paints - how to choose and what to pay attention to
But even if the paint is of high quality, a lot depends on how it was stored. In stores and warehouses without heating, paint freezes in winter and almost completely loses its properties. This is especially true for water-based paints. To avoid such mistakes, you should buy paint exclusively in large hardware stores and supermarkets. All products there are certified, storage conditions are strictly observed, and there are no expired goods.
How to paint bathroom walls
To increase the durability of the coating, bathroom walls should be painted twice.
- All hard-to-reach places are painted with brushes.
- Using a paint roller, paint is applied to the remaining surface.
- After the paint has dried, a second layer is applied.
In places where colors change, it is necessary to stick masking tape, which will prevent paint from getting on them. Where the floor and ceiling meet the walls, it is recommended to apply protective paper tape. A properly and beautifully decorated bathroom will allow you to enjoy comfort and warmth in it.
Source
What is better to paint
As you know, you can paint with a brush, roller or using a spray gun. If you have never had to make repairs yourself, it’s worth becoming more familiar with the pros and cons of each method in order to choose the best one.
| Tool | pros | Minuses |
Paint brushes | The brushes are inexpensive, a large assortment allows you to choose the most convenient width and stiffness of the bristles. The brush is convenient for painting corners and all hard-to-reach places | A lot of paint is consumed, hands get very tired during the work, painting speed is slow. Often traces of brush strokes remain on the surface |
Rollers | Affordable price, large selection of roller sizes and density, comfortable ergonomic shape. Paint consumption is significantly less than when using brushes. When working with a roller, much less time and physical effort is required; the paint is applied in an even thin layer over the entire surface. Special telescopic handles that are attached to the roller make it easy to paint walls under the ceiling | For painting, the surface must be as smooth as possible; the presence of flaws contributes to the low quality of the coating. Rollers are not suitable for painting in hard-to-reach places |
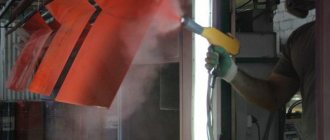
Spray guns | Quickly and very efficiently paints any surface, regardless of configuration. Uses paint very economically and does not require much physical effort | High cost, the need for thorough rinsing after each use. When using low-quality paint, the nozzle becomes clogged, and you have to disassemble and clean everything |
If you only need to paint the bathroom, and it has modest dimensions, it is not advisable to spend money on a spray gun. It is better to buy a roller and 1-2 narrow brushes to paint the corners.
Painting mistakes
To ensure a high-quality bathroom renovation, you need to avoid the following mistakes:
- Painting unprepared walls. The surface must be smooth, free of dust and lint, clean and level.
- Applying paint without a primer. This preparatory layer is necessary as it improves adhesion and paint consumption. In addition, the primer, if it contains an antiseptic, prevents the formation of fungus.
- Incorrect paint preparation. It is not made thick or too runny. There should be no lumps; the composition is mixed before application.
- Chaotic coloring. The direction of movement of the roller is either strictly vertical or horizontal. This way the surface will be painted evenly.
- Do not let the layer dry. This is incorrect; the paint will peel off the surface, sticking to the roller.
All that remains is to follow all the advice, choose the right paint and start applying it in the bathroom. Thanks to step-by-step instructions, everyone can do this quickly with their own hands.
Consumption of paint and additional materials
Before you begin the repair, you need to calculate the scope of work in advance and determine how much of which materials will be needed. The main cost item is paint; you will also need putty for leveling and a primer. In order not to overpay and run to the store if something is missing, calculate in advance the approximate consumption of these materials.
Putty is used to eliminate all irregularities greater than 2 mm. A few small defects are puttied separately, but if there are too many irregularities, a continuous application of at least 2 layers is required. For calculations, you need to know the rate of putty consumption per square meter, the area of all leveled surfaces and the thickness of the layer. The consumption rate is always indicated by the manufacturer on the packaging, and on average is 0.9-1.8 kg/m2. By multiplying the initial data, you will find out how much material you need to buy.
Putty walls for painting
Calculation example: the area of one wall is 3 × 4 m = 12 m2. The thickness of the leveling layer is 3 mm. The consumption rate is 1.2 kg/m2. Multiply 1.2 kg x 12 m2 x 3 mm = 43.2 kg. That is, for one wall you will need about 45 kg of putty (you need to buy with a small margin). The quantities for the remaining walls are calculated in the same way and then summed up.
The surfaces are primed twice - before applying putty and after leveling. This helps to increase water-repellent properties and more uniform paint application. The average consumption rate of the primer mixture is 0.1-0.15 kg/m2. The amount of primer is calculated in the same way as putty: multiply the area by the consumption rate and the number of layers.
Primer for walls
Paint consumption rates differ depending on its composition and covering ability.
| Type of paint | Consumption rate g/m2 | Number of layers |
| Oily | 140-250 | 1-2 |
| Alkyd enamel | 110-130 | 2 |
| Acrylic | 115-250 | 2-3 |
| Latex | 500-600 | 2 |
| Silicone | 250-300 | 2 |
| Silicate | 350-400 | 2 |
| Textured | 800-1000 | 1 |
The data given in the table may differ slightly from actual consumption rates. This depends on the porosity of the substrate and the method of applying the paint. As in previous cases, the calculations use the area of the surface to be painted and the number of layers, which are multiplied by the specified consumption rate.
Consumption also depends on color
Matte surface or gloss?
The gloss on the walls of the bathroom will be beautiful only on perfectly leveled surfaces. But the matte finish is much more versatile, because it masks the shortcomings of the repair.
The choice of the type of dye - glossy or matte - depends on the expectations of the interior and the dimensions of the room. Gloss is good in a modern bathroom. In a small room it creates a feeling of spaciousness, especially due to the correct lighting.
On a glossy wall, dirt of any nature is more noticeable. For imperfect surfaces, gloss is not the best choice.
A spacious room will benefit from a matte wall surface, especially since it will hide the shortcomings of the renovation. This is a good choice for most stylistic trends.
Preparing the bathroom for painting
The preparatory process includes two stages - removing the old finish and leveling the surfaces. In some cases, it is not necessary to remove the coating to the base, for example, if the walls have already been painted and have no defects. Then the surface is simply cleaned of dust and dirt, primed and dried before applying new paint. But this happens very rarely, and you can almost always find peeling areas, cracks, potholes, and areas infected with fungus.
Step 1. First, take out everything unnecessary from the bathroom, remove the baseboards and old lining (if any). Peeled paint can be easily removed with a scraper or spatula by prying up its edges. Where the paint sits tightly, it is best to use a grinder with a flexible disc for sanding.
How to remove paint from a wall
Video: Removing, removing old paint from walls.
Step 2. Small potholes and cracks are rubbed with sandpaper.
Sanding walls
Large cracks are expanded for subsequent sealing with mortar.
Joining cracks
The whitewash is simply washed off with water to a solid base.
You can wash off whitewash from walls using a regular sponge and water.
Step 3. Areas blackened by mold are treated separately: thoroughly cleaned with a scraper, wiped and any antiseptic composition is applied. Particularly carefully inspect the places behind the pipes, where dirt most often accumulates and fungus develops.
Means for eliminating fungus and mold
Step 4. After the walls are cleaned, you need to remove all debris, dust and dirt. Large cracks in the walls are filled with plaster mortar and allowed to dry.
Sealing cracks and crevices in walls
Step 5. Next, prime the surfaces, starting from the top. In dry rooms, you can prime it once, directly before painting, but for the bathroom more reliable protection is needed. Be sure to use a deep-penetrating, water-resistant primer. To apply the primer, use a fine-nap roller. Foam rubber is not quite a suitable option for these purposes.
Deep penetration primer
The primer composition is poured into a paint bath, the roller is dipped and rolled evenly over the surface. Where the roller does not reach, prime with a brush. Make sure there are no dry areas or drips. Depending on the composition, the primer dries from 4 to 12 hours. If the base of the walls is quite porous, it is advisable to prime again after the first layer has completely dried. For a strong concrete surface, once is enough.
Wall primer
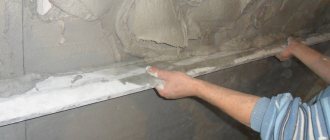
Step 6. According to the instructions indicated on the package, dilute the putty mixture with water and fill all the uneven areas. The mixture is applied with a spatula and excess putty is removed with it. If you need to level the surface with a continuous layer, take a wide spatula, apply the solution along the entire length of the blade and, holding the spatula at an angle to the wall, apply the putty with an even movement. There is no need to press hard on the spatula, the main thing is that the blade fits snugly to the surface. Movements are performed from the bottom up, making sure that there are no sagging or voids left.
Wall putty - photo
Step 7. When the putty has dried, the walls are thoroughly sanded with fine-grained sandpaper. This will help give the surface the required smoothness. Since a lot of dust is generated during the grinding process, upon completion of the work, wipe everything with a damp, clean cloth.
Step 8. The prepared surface is primed a second time, again starting from the top. After this, all that remains is to wait for the composition to dry.
What and how to paint bathroom walls
How to prepare walls for painting in a bathroom? The use of paint when decorating bathroom walls is accessible and inexpensive to every owner.
You can do this yourself without doing too much work. However, if the walls in the room were previously painted, then before applying a new coating you should clearly know how to remove paint from the wall in the bathroom, which is what this article will tell you.
Painting the bathroom
The easiest way to paint a bathroom is one color. To avoid accidentally staining the ceiling and other areas that are not to be painted, apply masking tape along the boundaries of these areas. This must be done carefully, checking the evenness of the lines, otherwise you will have to eliminate errors later.
Step 1. Mix the paint thoroughly until smooth. If a film has formed on the surface of the paint, it must be removed very carefully, otherwise small pieces of film will fall on the walls and the whole look will be ruined.
Mixing paint with color
Step 2. As a rule, colored compounds are used for walls, not white, so you need to tint the paint correctly. This applies mainly to water-dispersion paints, since enamels and oil paints are sold already tinted. Pour a little color from a bottle into a bucket of paint in a thin stream and mix with a mixer at the lowest speed. When the composition acquires a uniform color, add a little more color and stir. This way you can more accurately select the desired shade. If you immediately pour out all the color from the bottle, the color of the paint may turn out to be darker than required.
Color for paint
Advice. To ensure that the walls do not differ in tone, a volume of paint is tinted that is enough for the entire area. If you dilute the composition for each wall separately, it is unlikely that you will be able to choose exactly the same color.
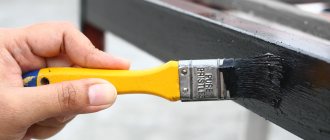
Step 3. First paint the joints in the corners, at the doorway and hard-to-reach areas using a narrow brush. Rub the paint thoroughly, removing drips and sagging. Brush movements should be in one direction.
Step 4. Take a wide brush or roller and start painting the walls themselves. Do not dip the tool into the paint too much, as this will cause drips and splashes. If a roller is used, roll it well over the embossed surface of the tray so that the paint evenly saturates the material. Paint the walls in parallel stripes, from top to bottom, rolling the roller until the base stops showing through. In this way, paint the entire area and leave the walls to dry.
How to paint walls correctly
Advice. While the walls are drying, the roller should be placed in a plastic bag and wrapped tightly. This will keep it from drying out and you can use it to apply a second coat. Do the same with a paint brush.
Step 5. After drying, the entire procedure is repeated again in the same sequence. When the walls are completely painted, very carefully remove the masking tape. This can be done after some time, but preferably before the second layer of paint has completely dried.
Usually two layers are enough, but sometimes one more is needed. This can be determined visually: if the walls have an uneven tone, certain areas are visible, traces of brush strokes are visible, then a third layer is necessary. If the color of the walls is deep and even, there are no visible flaws, there is no need to paint anymore.
Applying the first and second coats of paint
What color to paint a cast iron radiator
White.
Classics of the genre. A classic color that will fit into absolutely any interior, especially if the batteries are traditionally located under white metal-plastic windows and window sills.
Black.
A color that is suitable for interiors decorated in dark colors. Batteries painted black will not stand out as brightly against dark walls as white ones. There is an opinion that black batteries heat better. But experts say there is virtually no difference. Therefore, black color is more about design than about increasing heat transfer.
The color of the wall.
An excellent solution for disguising the battery against the background of bright walls. You can choose a paint shade to match the wall or choose a couple of tones lighter or darker.
Contrasting color.
A bold solution that is suitable for modern interiors decorated in minimalist, modern, eclectic and related styles
Such a battery will undoubtedly attract attention, so it is important to correctly place bright accents in the room. Otherwise, it may turn out that radiators will become the center of the visual composition
Decorative painting methods
Unfortunately, not everyone knows how to draw, so only a few can decorate bathroom walls with hand-painted paintings. Hiring a specialist for this is too expensive, which means you need to look for simpler ways. A wide palette of modern colors provides a wonderful opportunity to decorate the interior without much effort.
Using stencils
This is one of the most popular methods. Nowadays there are many ready-made stencils for painting that are inexpensive and easy to use. Disposable stencils are made of vinyl film on an adhesive base; acrylic and durable plastic are used to make reusable templates. Such stencils are tightly fixed to the wall, which makes applying the design as simple as possible.
Step 1. Paint the walls as described above, wait until completely dry. Select a suitable pattern and determine its location.
Step 2 . Remove the protective film from the stencil and carefully attach it to the wall surface. If there is no self-adhesive layer, the stencil is secured with masking tape on all sides.
Attach the stencil to the wall
Step 3. The roller is dipped in paint, rolled first over the tray to remove excess, then over the surface of the stencil. All cutouts must be evenly covered with paint, otherwise the pattern will not be clear.
Paint over the stencil. Use a roller or brush
Move the stencil and continue applying the design to the walls
Step 4. Carefully unfasten the template from the wall and allow the pattern to dry.
Stencil painting
The color of the pattern should go well with the main color and stand out against the background of the walls. Incorrectly selected shades can ruin everything, and the original idea will lose all its charm.
Video: Drawings on walls using stencils
Striped walls
With the help of a simple multi-colored strip on the walls, you can give the bathroom a special charm and visually expand the boundaries of the interior. There are a huge number of options here, so it all depends on your imagination. You can experiment with the width and location of the stripes, the number of colors and shades. Stripes of the same color, but with different surfaces - matte and glossy - look interesting.
Paint the walls striped
Bathroom interior with striped walls
Design project for a bathroom with striped walls
To choose the best option, it is best to draw a diagram of the stripes on paper and color them to your liking.
Next, all that remains is to buy the paint of the desired color and several rolls of masking tape. The walls should already be painted in the base color.
Step 1. Work begins from one of the corners of the bathroom. Using a building level, draw a vertical line along the wall from ceiling to floor with a simple pencil. Measure the selected strip width and draw a second line. The remaining stripes are marked in the same way up to the corner.
Step 2. Apply masking tape strictly along the lines. In this case, the tape should be inside those stripes that will remain in the base color. Lines drawn with a pencil cannot be glued, because this way they will be visible on the painted surface.
The adhesive tape is smoothed well so that there is no air left under it, otherwise the paint will get inside and the stripes will be sloppy. Additionally, the joints between the ceiling and walls are covered.
Step 3. Pour paint into the tray, dip the roller into it and begin to roll it along the first stripe. The layer should be applied evenly, without smudges. Having painted one strip, move on to the next, observing the alternation of stripes by color. If necessary, apply a second coat of paint, waiting for the first to dry.
Apply masking tape
Striped wall painting scheme
Painting a wall with a roller
Step 4 . After painting is completed, carefully remove the tape from the wall. This should be done slowly, with smooth movements, as a sharp tear can lead to peeling of the paint.
Peel off the tape
In the same way, you can make horizontal and diagonal stripes, as well as more complex patterns. If you apply masking tape in perpendicular lines and then paint over individual areas, you will get colored squares.
Creative on the walls
The most important thing in this type of painting is extreme accuracy at every stage. Paint easily penetrates under poorly secured tape, smears lines, and leaves smudges. All this will have to be wiped off and re-painted.
Rollers for applications
This is probably the fastest and most convenient way to decorate. A special patterned roller has two attachments - a foam rubber one, which absorbs paint, and a rubber one, with an embossed pattern for imprinting.
Patterned roller with animal images
First, the walls are prepared in the standard way and painted in the base color. To apply the pattern, choose a paint that is contrasting in color and harmonizes with the main one. Next, paint is poured, the roller is dipped so that the foam nozzle is well saturated, and both nozzles are rolled out together over the tray.
How to paint a wall with a pattern roller
The most crucial moment here is applying the pattern. The roller must be guided evenly, from top to bottom, strictly vertically. The next strip should run parallel to the first, exactly along the border of the pattern. If the edges of the strips overlap each other, it will look sloppy, and to fix this, you need to completely repaint the wall.
Style and design
Buyers have access to many shades of paint with which they can create an individual interior in their bathroom or toilet.
Designers offer many different design ideas.
- Recently, it has been fashionable to apply paint with designs and patterns. Homogeneous application is considered boring, so experts recommend using the material in a combination of several shades, textures, patterns, etc.
- Painting the walls with stripes looks interesting. Choose colors carefully so that the shades combine with each other and do not look pretentious. Using stripes you can decorate a room in different styles. Playing with the color palette can significantly transform any room.
- Ornaments on the walls will look creative. Samples of patterns can be bought at the store or made yourself. Stencils allow you to create unique designs that have a strong personality.
- Using paints you can divide the space and emphasize different functional areas. By wisely using color schemes, you can create a cozy bathroom in a high-tech or art deco style.
Adviсe
Competent advice from professionals will help you create an interesting bathroom design using paints.
Certain subtleties should be taken into account in the work.
An original effect is obtained by alternating tiles with paint. With this solution, the design of the room becomes unusual and interesting. Painting can be done in rooms with good ventilation. Only if this rule is followed will the interior retain its attractiveness for a long time
Periodically, you need to open the door and ventilate the room so that drier air masses enter the room. Before the painting process, pay attention to the corners of the room. They must not contain any defects or blemishes.
Any imperfections will be visible to the naked eye under a layer of paint.
- Before purchasing paint, you need to make sure that it is intended for painting a bathroom. If such information is not present on the product packaging, most likely the paint is not suitable. Specialized formulations contain mold inhibitors, thanks to which the coating will not be affected by dampness.
- Washable paints are the best option for such premises. Information about this should also be present on the packaging. Such materials are easy to care for. Using ordinary detergents, you can remove yellowness and other dirt from the surface of the walls.
- When painting, you should cover the sink, the corners of the bathroom, and the floor surface with tape or newspapers so as not to stain it.
- Designers do not recommend painting the entire room with paint. Places where water often gets in (the floor surface, the area near the shower stall, sink) are best lined with tiles or plastic panels.
Painting walls with a roller with a pattern
To decorate a wall with an individual repeating pattern, you will need a special roller. It can be purchased at a hardware store or made by hand using a clipper (artistic skill required). Simply dip the tool in the paint coating and run it along the wall. Make sure that the layer is sufficient, otherwise the pattern will gradually fade.
Decorating a wall with images using a double rollerSource dekordelisi.com
Rollers with such attachments are sold separately.
Different attachments for the roller with a patternSource oshtukaturke.ru
Selecting one wall with “honeycombs”
Honeycomb painting will help highlight the interior and make it unique. It can be done using a pre-drawn template. Many people first prepare the surface: create a pattern using adhesive tape, and then start painting. It is better to make such patterns multi-colored, alternating light with dark tones. Amber from top to bottom is allowed.
Painting walls with a picture of honeycombSource etsy.com
Complex geometry
Geometric shapes with many shapes are best used for one wall. Since very often mistakes are made during the continuation of patterns on partitions: the seams are deformed, the size is distorted. To organize a colorful ornament, you need to paint one by one. Draw figures and wait for them to dry. Next, apply the next part of the composition.
Geometric multi-colored pattern on the entire wallSource pinterest.ru
Paint drips
To imitate long drops, you will need a thick syringe and paint that matches the color of the interior. Start your composition from the ceiling. Fill the syringe with paint and release it onto the wall using gentle pressure. There is no need to adhere to symmetry here. You can dilute a certain amount of smudges with a color of the opposite shade.
Imitation of paint drips in a modern interiorSource obzor-review.blogspot.com
Circles in the interior
A dark background and bright multi-colored circles will add grace and contrast to the room. Usually this design is carried out in the sofa area
This makes it possible to concentrate attention on the recreation area. The design turns out interesting if the circles are designed in the form of connected rings
Circles on a gray wall backgroundSource prueba.negociostec.org
Immerse yourself in a nautical theme
Decorating a bathroom requires attention. It is not enough to simply paint the walls in a room. They can be diversified with marine life and algae. If it is not possible to make the drawing yourself, use cardboard templates. It is advisable to create sketches in the sink or bathroom area. It is also acceptable on the side wall near the toilet.
A marine theme is a good idea for painting bathroom walls. Source bringly.ru
Painting in different colors
Walls are often painted in several colors. Usually two close shades are used, but abstract motifs are also used. Broken lines along the wall create the illusion of volume.
Painting walls in different colorsSource gr-lepnina.ru
Rainbow bright shades are also welcome. They are usually used to decorate halls and living rooms.
Painting walls that matches the interior style of the room Source sovetproraba.com
Various decorative painting effects
The effect of marble, bark beetle and other design options look good in corridors, large bedrooms and living rooms. Brown or gray shades are often used for such rooms.
Variations of textured surface paintingSource ro.decoratex.biz
A decorative paint coating can be applied over the finished pattern created by templates. Such effects look great in rooms with high ceilings.
Plain painting of a textured wallSource lumetri.ru
Wall decoration
A solid color looks neat and advantageous. You can make your bathroom more interesting and give it an unusual look with additional decoration.
Coloring with stencils
Light patterns, ornaments, images of animals or objects can simply be applied with a stencil.
Blanks can be purchased ready-made, ordered, or made on your own.
Stripes on the walls
Horizontal stripes will visually expand the room, vertical stripes will save you with low ceilings.
Contrasting colors and similar shades look interesting.
To ensure that the lines are straight, markings are applied using a plumb line or a building level. Apply masking tape along the marked lines.
It is removed when the paint has set slightly, before it begins to dry, so as not to damage the integrity of the coating.
Applications using rollers
There are rollers with convex patterns.
First apply the base color, then dip the roller into the paint. It needs to be rolled out well before application.
It is important to ensure that the drawings do not overlap each other, otherwise the wall will look sloppy