Often, the balconies of multi-storey buildings, although they retain functionality, look rather unsightly. This is especially true for buildings erected in the 20th century, when more attention was paid to utilitarianism than to the aesthetics of the exterior (the so-called Khrushchev and Stalin buildings). To make your balcony more aesthetically pleasing and elegant without spending too much money, you can use siding as the main material for the exterior cladding.
Finishing the balcony with siding from the outside
Balcony siding
Stage 2. Selection of tools and building materials
To prepare for covering your balcony with siding, you will need:
- screwdriver;
- hammer drill or drill;
- knife for installation work;
- fishing line or twine;
- metal brush;
- nozzle for screwing in self-tapping screws;
- yardstick;
- level.
Required Tools
Calculation of siding for a balcony
It is also necessary to select the actual siding and fittings for it:
- adjacent and end strips;
- corner elements;
- starting strips;
- profile in the shape of the letter “G” (for window sills);
- sheathing beam (50x50 or 60x60 mm);
- corners of the required size;
- galvanized self-tapping screws;
- if necessary, use a primer for metal surfaces.
Additional elements for installing vinyl siding
Dry planed timber 50x50 mm
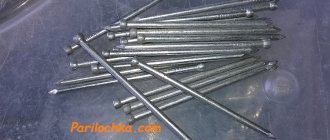
Fasteners for timber
Galvanized metal screws
Primer for metal surfaces Alpina Grundierung für Metall
You need to carefully approach the preparation, especially when the work is carried out on the second, third floor or higher. By properly preparing the balcony for finishing, you can get a good result and avoid any risks. The tool must be of high quality and proven.
On a note! It is better to purchase consumables from a trusted supplier, leaving a reserve of about 10% just in case (if the work is being carried out for the first time, then you can leave 20%).
Important! You can independently sheathe only those balconies whose fencing is made of metal gratings. In this case, all work is carried out from the inside, which increases the safety of installation. To cover balconies with concrete walls, it is better to hire specialists who have the appropriate equipment.
Metal balcony frame
Prices for popular hammer drill models
Hammers
Decorative design
Externally, the panels can imitate natural materials:
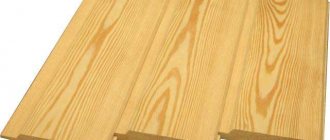
- Tree
a) “Ship plank”. These are long narrow strips, available in a wide range of colors;
b) “Christmas tree”. Such panels resemble natural raw materials in appearance. They are much thicker and stronger than “ship planks”;
c) "Blockhouse". They look like a log. Single- and double-fracture panels are available. They can have different lengths and widths. A fairly wide selection of textures and shades is available;
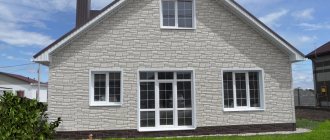
- Stone or brickwork. The panels can come in a variety of sizes, but they are often taller and shorter than standard siding.
All varieties and colors are suitable for cladding the outside of a balcony. Therefore, you can choose any option that suits you in terms of aesthetics and price. So, a profile for stone and brick will cost a little more than a “ship plank”.
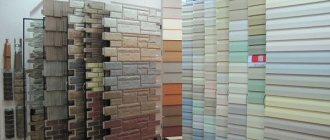
The most popular siding colors for cladding a balcony are white and various shades:
- gray (cotton, linen, poppy seeds);
- beige (wheat, mimosa, peanuts, almonds, walnuts, cocoa);
- brown (caramel, dark beige);
- yellow (vanilla);
- pink (peach);
- green (fern, light green, gray-green);
- blue.
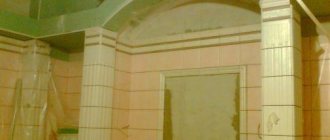
Stage 3. Preparing the balcony for covering
Before you start covering the balcony with siding, you need to carefully prepare the balcony.
Step 1. Clear the balcony of any personal items taking up space. Clean up, sweep away debris and dust.
Step 2. Remove old trim, windows and window frames, and any decor.
Removing the paneling on the balcony
Step 3. Inspect the balcony covering and main structures for damage and wear to assess the scale of the work.
Step 4. Check the condition of the fence. If it is worn out or damaged, it is better to dismantle it and replace it with a new one (to do this, just take a grinder and cut down the rusted metal structures). If it is a metal grille that is in acceptable condition, then it is enough to use a channel and strengthen it.
The parapet needs to be strengthened and painted
Step 5. Clean the metal fence with a brush and then apply an anti-corrosion coating to it.
Preparatory work
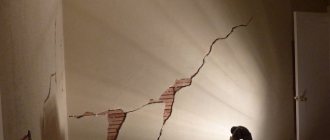
Step 6. Clean the concrete base of the balcony from cracked cement.
Step 7. Fill the cracks in the concrete with fresh mortar. If the damage is severe, place the sheathing around the perimeter to strengthen the structure.
Some operations should be given additional attention so that the result does not disappoint and does not lead to the need for a quick re-repair in the future. Let's take a closer look at the installation of the sheathing, the lower and upper tiers of beams, the corners of the sheathing and your own siding. These are operations that most often cause difficulties when doing the work yourself.
Prices for timber
timber
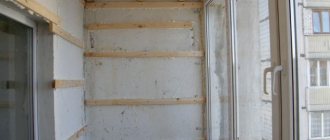
Stage 4. Installation of sheathing
Step 1. The sheathing is made of wooden planks, between which there should be a small distance - no more than 30–40 cm. Before using the timber for sheathing, it is necessary to treat it with an antiseptic that protects it from rot, fungus, and mold.
Cutting bars
Antiseptic for wood Woodmaster Biosept-ultra
Mixtures must be selected taking into account that they are suitable for work in a residential area and do not pose a threat to human life and domestic animals
Step 2. Particular attention should be paid to the top of the sheathing - the place where it is attached to the wall. Metal rods are best suited for reliable fastening. They need to be attached to the wall surface and to the timber with self-tapping screws. Fasteners must be of high quality so that the sheathing does not lose its strength due to static load.
Installing sheathing for lining the balcony with siding
The sheathing should be thinner than the insulating material used on the balcony.
Balcony sheathing for siding
Step 3. Plates of insulating material are laid under the frame, and electrical wiring is installed as necessary. It is necessary to ensure that communications are not damaged during installation.
Balcony cladding with insulated siding
The frame can be metal, but in this case an additional insulating layer will be required. The owner of the balcony decides which insulation is best to choose, based on financial capabilities and technical characteristics of the insulating material. The simplest option is mineral wool, but there are also more modern solutions.
insulation of the balcony with polystyrene foam when covering it with siding (option with a metal frame)
Step 4. Place a protective membrane on top of the insulation and secure it with self-tapping screws around the perimeter.
Balcony insulation scheme
Step 5. If the balcony has a concrete base, then you need to fix the bottom of the sheathing with construction glue and connect it to the rods using clamps. When selecting an adhesive composition, temperature conditions in the region are taken into account.
It is important that the joints between the panels must be at least 5 mm - then even when expanding under the influence of temperature, the panels will not deform.
It is better to turn the screws back ¼ turn, also to prevent deformation.
Installation of the lower tier
Preparation of the lower tier begins with the timber being laid on the balcony, and the side beams being nailed to the façade surface. If you have a woodworking tool, you can use a tenon joint.
The beam must be attached to the concrete base with silicate glue, and then foamed into the void from the inside of the balcony. The timber is additionally secured with dowels if there is any doubt about the strength of the balcony structure.
Installation of the lower horizontal belt
Important! The lower tier of the beams must have a height of at least 7.6 cm.
When installing the lower horizontal tier, one or two rows of beams are nailed to the lower beam - the total height is 8–9 cm, and this is quite enough.
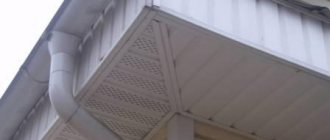
Next, you need to calculate how many strips of siding will be required for installation. Then you need to attach from one to three rows of beams to the enclosing railing so that their upper edge is higher than the edge of the sheathing by about 1 cm. The first beam is best fastened with self-tapping screws, the remaining beams can be nailed from above. Typically, installation of the upper tier takes less time than installation of the lower one.
Decoration of cladding corners
Typically, accessories for siding are sold along with the coating itself, so there are no difficulties with its selection. To mount the corner parts, it is enough to cut triangular shaped bearings from the casing. The thrust bearings need to be heated and bent at an angle of 90° so that the short sides form shelves under the lower edges of the corners.
Installation of corners
The thrust bearings are secured with screws, and the corner element is installed on the shelves. Using screws, you need to screw the thrust bearing to both tiers of beams - top and bottom.
Decoration of cladding corners
Material consumption
Calculating the required number of panels, timber and additional elements allows you to purchase exactly as much material as needed. The footage of the timber frame is summed up from the length of the vertical and horizontal elements. We must remember that the pitch of the racks is 600 mm. The amount of timber is equal to the perimeter of the railings multiplied by two, plus the number of posts multiplied by the length of one.
The footage of the starting and finishing strips is calculated according to the length of the perimeter of the balcony railing. The number of panels is determined by dividing the total area of the balcony railing by the area of one.
Additional elements
NamePurpose
| Starting bar | Used as the basis of the cladding fabric. It has a length of 3.66 m, is mounted to the base above the lower border of the finish strictly horizontally |
| Outside corner | A profile designed to connect panels at the junction of external walls. Has a length of 3.05 m |
| Internal corner | Profile for joining panels between the load-bearing wall and the balcony railing. Length 3.05 m |
| Finish bar | Used as the final cladding element. Designed to mask a cut edge or perforation on a panel. Has a length of 3.66 m |
| Platband | Designed for edging window openings, giving the trim a finished look. Length 3.66 m |
In order not to overpay, the amount of material should be calculated in advance. To do this, you need to carefully measure the part of the balcony that will be sheathed. As a rule, its area corresponds to the area of the balcony railings. The sheathing consists of an upper and lower frame, as well as vertical posts located in increments of no more than 60 cm. The length of one frame is equal to the perimeter of the railing, and the length of the posts is equal to the height of the fence. A standard balcony requires about 10 posts.
Siding calculation technology
When calculating siding, the area of the parapet must be divided by the area of one panel - this way you will find out how many panels will be needed for the cladding. For trimming, add 10-15% of the total amount of material. You can calculate it another way: divide the height of the parapet by the width of one panel to find out the quantity, and then select the panels according to their length for the front and side parts of the balcony.
Example calculations for a balcony with dimensions 3100x900 mm and a fence height of 1.10 m:
- First, we calculate the perimeter: 3100 + 900 + 900 = 4900 mm;
- Next, we multiply the perimeter by 2 and find out the footage of the beams for the strapping: 4900 x 2 = 9800 mm. This means that 10 meters of timber will be needed for the lower and upper trim;
- Now let’s calculate the footage of 10 racks: 10 x 1.10 = 11 m. In total, 21 meters of timber will be required for the sheathing;
- then we find out the number of panels with a width of 250 mm - 1100: 250 = 4.4. Round up, it turns out to be 5 pieces. This means that for the cladding you will need 5 panels 3.10 m long and 10 pieces of 90 cm each.
Stage 5. Installation of siding
Step 1. First you need to install the starting bar, attaching it to the lower tier of the bars with the lock facing down.
Siding accessories
This can be done using screws or nails. Thanks to the elongated grooves in the parts, the siding will remain elastic, not rigid, and therefore will not swell or fall off the fasteners. Using a nail or a metal marking pencil, you need to make a recess in the middle of the groove for the screw, and then screw it in using a drill or screwdriver. Then the screw should be unscrewed ¼ turn and slightly loosened. Although there is another option.
Instructions for installing starting profiles
Correct installation of nails or screws in siding mounting holes
Attaching the starting profile
Step 2. Once the starting bar is secured, you need to lower the bottom panel until the lock clicks, and then pull it up so that the hook fits into the lock. On the railing bars you need to mark where the top edge of the panel is. After this, the siding strip will need to be unhooked and removed, and the second tier of sheathing beams will need to be attached along the marks.
Types of siding fastening
Scheme of correct and incorrect siding fastening
Siding cutting
Step 3. You need to make holes in the railing rods in order to then secure the beams using bolts or self-tapping screws. Having completed the installation of the second tier of beams, you need to lower the siding strip again along the grooves of the corner parts and snap the lock onto the initial strip. Since there are already holes for the screws, it will be easier to fix it: just screw in the screws and then unscrew them about ¼ turn.
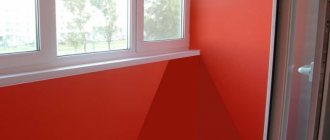
Balcony siding
Finishing the balcony with siding
Step 4. The remaining tiers of sheathing beams and siding strips should be secured in the same way. The upper tier should be located on the same level as the casing. To make the structure stronger, you can supplement the horizontal beams with vertical ones, thereby strengthening the entire sheathing.
Installation of siding strips
By comparison, vinyl siding, like metal siding, can be used right away. Wooden siding must be pre-treated with an antiseptic and auxiliary impregnations.
The gaps between the siding panels must be measured to the nearest millimeter so that they fit together as tightly as possible, without deforming due to temperature changes. According to GOST and other parameters, siding must be fixed based on the following standards.
Table. The required gap width depends on the air temperature.
| Air temperature during installation, °C | Gap width, mm |
| Below +5 | 11–12 |
| +5…+10 | 10 |
| +10…+15 | 9 |
| +15…+20 | 8 |
| +20…+25 | 7 |
| +25…+30 | 6 |
| Above +30 | 5 |
Balcony with siding
Is it possible to install siding vertically?
Traditionally, siding is installed horizontally, but you can see examples of vertical fastening of the material. There are no downsides to this solution; it will be enough to take the necessary measurements of the width and height of each surface in order to select panels with the appropriate dimensional parameters.
Fastening vertical siding
When installing vertically, the strength and correctness of the fasteners comes first. Otherwise, if allowances remain, strong winds will create an increased load on the sheathing, blowing into the cracks, and also drive rain moisture into them and damage the insulation.
Note! Specially produced vertical siding does not require additional perforation for condensate drainage, unlike horizontal siding.
Balcony covered with vertical siding
Additional professional recommendations
It is recommended to leave the panels outside before installation. This way the siding will take dimensions corresponding to the current temperature, which will make it easier to fasten and eliminate the deformation of the material after installation.
You can reduce the cost of material and money by carefully taking measurements. Every millimeter is critical.
If strong winds prevail in the area, it is recommended to reduce the spacing between fasteners. You can reduce the distance between fasteners to five centimeters.
It is better to start work from the sides of the balcony. The panels here are shorter and easier to install, which will serve as training before facing the façade.
The panel should be positioned freely, avoiding tension. This prevents damage caused by expansion or contraction due to temperature changes.
The maximum permissible height for self-cladding in the absence of experience is the third floor. If the balcony is located higher, it is better to call professionals. Be sure to wear a climbing belt.
Before working under the balcony, you need to install warnings - signs or flags to warn passersby from falling construction debris or accidentally falling tools.
What mistakes should you avoid?
In any work carried out independently, you can make a number of mistakes that can affect the result in the most detrimental way. The most common and, moreover, fatal mistakes for plating are given below.
An example of poor-quality finishing of a balcony
- Fasteners are not installed strictly in the center of the holes intended for this purpose, or, even worse, not in the holes at all. This can cause the panel to become deformed and damaged, so only use the holes provided for fasteners.
- The siding is fastened too tightly, leaving no gap between the panels. Because of this, deformation is also possible during thermal expansion. Therefore, be sure to leave a 1mm gap between the panels.
- They do not leave a gap between the end part of the panel and the fasteners, or they leave it, but it is too small, less than 7 mm. It is recommended to leave a gap between 7 and 10 mm thick - this will also avoid deformation.
Siding fastening
If you avoid the listed mistakes, the siding will hold quite firmly and retain its technical properties for a long period. The result will please you for a very long time; you will not need to carry out repeated repairs or spend money on hiring specialists.
Useful tips
Decorative elements required when installing siding
In order for the structure to serve for a long period, you must adhere to some advice given by experts:
- the wood sheathing must be treated with special antiseptic agents;
- Before thermal insulation is installed, you can install utilities: electrical wiring, computer or telephone network;
- taking into account the wind loads acting on the cladding, the pitch of the racks should be chosen at least 60 cm inside and 40 cm outside;
- after attaching all the strips, various decorative elements are installed: sides and corners;
- installation work is carried out after glazing the balcony;
- before starting the process, the strips should be left in the cold so that they take on their natural size to avoid deformation;
- for reliability, it is advisable to make connections with self-tapping screws in increments of no more than 5 cm;
- When fastening the panels, you should not fasten the material under tension;
- It is better to start cladding from the side, and then from the front side;
- take measurements with great accuracy;
- For safe work, you should purchase a climbing belt;
- Place special flags under the balcony to warn people about the work being carried out.