Types of siding
At the moment, the following types of siding for facade cladding are distinguished:
- Vinyl. PVC-based panels are resistant to harmful environmental influences, frost-resistant and durable. They give the building an attractive decorative appearance due to a wide color palette and textures.
- Metal. This option is an excellent alternative to the previous one. Has increased resistance to mechanical stress and UV radiation. Metal siding very reliably imitates the structure of wood.
- Wood fiber or wood polymer. These options differ in the components they contain, but both are an excellent replacement for natural material. Such products do not require additional processing or complex care.
- Fiber cement. Made from a mixture of cement and cellulose. The cladding is visually attractive and durable. Disadvantages include significant weight and high cost.
Naturally, there are other varieties: polymer (acrylic), aluminum, ceramic, but they are used extremely rarely.
On a note! When choosing siding, take into account that PVC products are a budget option that combines price and quality. Vinyl is great for covering the outside of a country house or cottage.
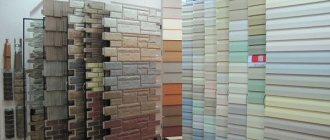
What siding to use for cladding
The modern market offers a huge selection of panels in a wide variety of colors and textures. Siding can successfully imitate wood, brick and stone surfaces.
What siding to use for cladding
The standard thickness of the facing panel is 1 mm. Width and length indicators are not subject to standardization and depend on the preferences of a particular manufacturer. The most common cladding panels are about 3-4 m long and about 20-25 cm wide. A large dimensional grid will allow you to choose the panels that will be most convenient to use for cladding your home.
Choice of insulation
In most cases, the surface of houses must be additionally insulated. The following materials can be used for this:
- Mineral wool. It has a soft structure, so it is easily damaged. Available in slabs and rolls. It has a high level of moisture absorption, which requires installation in clear weather with mandatory waterproofing. The plates contain components harmful to the respiratory system, so work is carried out in a respirator, goggles and gloves.
- Styrofoam. A significant advantage of the material is its price: it is inexpensive, so it is an excellent replacement for mineral insulation. The thermal insulation properties of the product are not as high as those of more modern options, but if necessary, it is laid in two layers or sheets with a thickness of 10 cm or more are selected.
- Extruded polystyrene foam. An excellent solution if you need high-quality insulation of a residential building. The most popular and well-known variety is penoplex, which has an affordable price and good performance characteristics.
- Polyurethane foam. A modern option with excellent covering ability. It is applied by spraying, thereby achieving high density and a uniform structure. The disadvantage of this method is that its installation requires special equipment and materials. Also a significant disadvantage is the high price.
The optimal solution for DIY work is penoplex and mineral wool. Both varieties have an affordable price and do not require special skills for installation.
Preparatory work
The technology requires careful preparation of the base. The work may vary depending on the material from which the walls of the house are made.
Wooden base
To qualitatively sheathe such a structure, you need to perform the following steps:
- The general condition of the coating and foundation is assessed. This must be taken responsibly, because problems can only be eliminated by disassembling the casing and removing the insulation.
- The surface is cleared of all unnecessary elements and decorative elements are removed.
- Cracks and crevices are opened and cleaned well.
- The wood is carefully treated with antiseptic compounds. It is also recommended to impregnate with fire retardants.
- After drying, the damage is covered with a special wood putty.
- All cracks are carefully sealed.
- As additional protection, the basement part (foundation) is waterproofed.
Before cladding a wooden house, all cracks and cracks must be sealed with a special putty or sealant.
Similar measures are carried out with a frame or panel house, provided that the outside is completely covered with slabs.
Important! Work is resumed only after the facade has been thoroughly dried, in dry and sunny weather.
Brick base
Preparing brick surfaces yourself usually does not take much time. Work algorithm:
- The masonry is inspected for deformations. If destruction of the seam composition and loosening of elements is detected, the problem is eliminated. For this purpose, prepared cement mixture or polyurethane foam is used.
- The joints are checked for mold and mildew. Such trouble most often occurs in these places. If a defect is present, the areas are thoroughly cleaned and treated with special chemicals.
- If the technology for pouring the foundation and laying bricks is violated, long cracks can form on the surface; they are eliminated using putty. To do this, the gap is widened, cleaned, treated with an antiseptic and primer, sealed and rubbed. A reinforcing tape is smeared into the applied mixture on top, which will avoid the appearance of “cold bridges”.
- The base is treated with an antiseptic, the foundation is waterproofed.
- If the thermal insulation is laid on glue, the surface is primed.
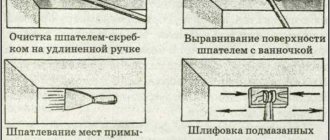
Preparing a brick wall for cladding: 1 - cleaning the masonry from dirt and mold;
2 - sealing cracks; 3 - treatment with antiseptic primer Such procedures are carried out not only for brick, but also for concrete and block bases.
Siding of a wooden house with insulation
Siding of a wooden house with insulation (photo No. 8)
Before installing siding on a wooden house, it is necessary to carefully prepare the surface of the walls - because under the panels it will be difficult to assess their condition.
Therefore, you need to inspect the surface of the walls. If there is even the tiniest area contaminated with mold or mildew, it must be thoroughly cleaned. Treat the entire surface of the walls with an antiseptic.
It would also be a good idea to apply special agents that prevent fire.
Frame production and vapor barrier
The lathing is needed to fix the siding and create a ventilation gap that prevents condensation. For its construction, a wooden beam or metal profile is used.
A vapor barrier is first stretched onto the base; this is especially true for wooden and frame (panel) houses. The material is laid as follows:
- The canvas is fixed to the surface in increments of 30–40 cm. A slight sagging is allowed.
- Adjacent strips are laid overlapping and taped with adhesive tape.
- All connections and fasteners are sealed.
- Particular attention is paid to the corners: they are covered in solid pieces, without joints at the convergence of the walls.
Laying a vapor barrier
The vapor barrier film must be laid with the rough side facing the surface of the facade, otherwise the desired effect will not be obtained.
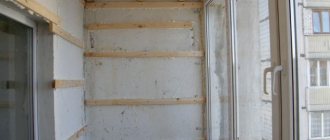
Wooden frame
The design goes like this:
- The base is marked in increments of 50–60 cm (40–50 cm for base panels). The lines should be perpendicular to the siding being installed.
- Timber with a cross section of 50*40 or 50*50 is treated with protective and fire-resistant compounds. Holes for fasteners are drilled on its surface.
- The rail is aligned according to the markings, and the fixation points are transferred to the wall. Holes are drilled and dowels are driven in (not necessary for wooden bases).
- All fastening areas are prepared. The beam is placed at a given place according to the level. Substrates are used to ensure accurate and reliable alignment.
- Self-tapping screws are screwed in.
Scheme of a wooden sheathing arrangement
It is necessary to obtain a rigid structure with a single plane between the posts.
Metal sheathing
Installation is carried out using U-shaped profiles and hangers. The technology is as follows:
- Marking in progress.
- The locations of the hangers are marked on the line in increments of 40–50 cm.
- The holes are drilled and the rack fasteners are installed. To do this, dowels are driven in and screws are screwed in.
- The hanger is bent in the shape of a P.
- The racks are leveled and screwed.
Fastening metal profiles to the wall
To increase rigidity after insulating the house, you can install jumpers.
Attention! Regardless of the method of constructing the frame, window and door openings must be finished: a beam or profile is fixed along their perimeter.
Lathing
To carry out high-quality installation of siding on the walls of a brick, frame or wooden house with your own hands, you need to create a frame, and there are good reasons for this:
- You can make imperfections in the walls outside the building invisible.
- It is possible to install insulation and waterproofing, which will help save on heating residential premises.
- A ventilated facade appears, eliminating condensation and moisture.
Types of lathing
Lathing is assembled from wooden material or a metal corner, which is preferred in the case of protruding parts, although it costs more and is more difficult to install. Metal lathing does not swell from moisture, does not deform, does not rot, which allows it to serve for a very long time. When starting to install the frame on the walls of a wooden house with your own hands, do not forget to treat them with antiseptics, as required by technology.
The choice of fastening elements with which the frame will be installed directly depends on the material of the sheathing. The technological gap between the wall and the sheathing strips can be 15 cm, and it depends on what kind of insulation will be installed. If additionally only waterproofing is installed, only a couple of centimeters may be enough, while the insulation will cover more space (up to 15 cm).
The step between the elements of the vertical sheathing is usually 50 cm, and the installation of the frame itself is carried out under strict level control using guides.
If you plan to create a sheathing from wooden material, carry out the work in dry weather, otherwise the timber may begin to weaken.
Laying insulation
Before covering the building with siding, thermal insulation is carried out. There are several ways you can do this.
Wall insulation with mineral wool
Mineral wool for siding is well suited for a wooden frame. For greater reliability, you can lay two layers.
Laying mineral wool
Scheme of work:
- Thermal insulation is placed tightly between the racks at the same level. It is necessary to ensure that the corners are not damaged.
- The next row of slats is placed. They are placed perpendicular to the previous ones, observing the established step.
- The space is filled again with mineral wool.
- A layer of wind protection is stretched on top.
- The last frame beam required for installation of the cladding is installed. The location exactly corresponds to the first slats.
This complex method not only achieves reliable insulation, eliminating “cold bridges,” but also creates a ventilation gap.
To better understand the whole process, watch this video:
Installation of penoplex
To achieve the best result, it is recommended to attach penoplex together with a metal frame. Step-by-step installation instructions:
- The sheathing is installed, after which it is necessary to secure and bend the hangers.
- According to the size of the insulation boards, conditional markings are carried out.
- The material is laid in rows, strung on the fasteners of the frame posts.
- For additional fixation of the slabs, a special dowel with a wide head is used.
- The rows are placed offset to prevent the joints from matching. The corners are overlapped and staggered.
- The cracks are additionally treated with polyurethane foam, taking into account its expansion.
- The windbreak is tightened.
When all the layers are in place, metal racks and jumpers are installed.
Insulation of walls with penoplex
You should know! During further work with panels (especially plastic ones), a compensation gap must be left to prevent deformation due to thermal expansion.
Who can you trust to cover a brick (and not only) house with insulation with siding?
Certified installer "Alta-Profile" at work (photo No. 10)
There are many hacks in the construction market who will get down to business without a clear understanding of the characteristics of materials and the intricacies of their installation. Their services are cheap, but expensive for the home and owner. A typical situation: the panels are reupholstered, and after a couple of months or even weeks the entire facade is covered with waves.
How to distinguish such a homemade product from a professional? Ask the installer a few questions:
- How should you screw in the screws?
- What gap should be left for thermal expansion of the panels?
- What kind of studs will he use to cover a log house with siding and insulation?
- Does it use windproof film, starter strip and j-trim? If yes, how and where?
If installers cannot answer any of these questions, refuse their services. It is better to pay a little more so that the facade pleases you much longer.
!
To distinguish a professional from a hack, ask a few professional questions. If the installer cannot answer them, refuse his services.
In order not to take risks, you can order facade cladding from a certified Alta-Profile team. The quality of the work they perform is guaranteed by the manufacturer. All installers undergo professional training, so they not only know, but also understand the process and procedure for covering a house with siding and insulation.
Fastening the guide elements
After the installation of insulation under the siding is completed, the main work begins:
- If required, a drainage system is installed along the entire perimeter of the wall along the base. It is set exactly level and attached to the frame. It will ensure uniform flow of liquid and reliable fixation of the following elements. A starting profile is attached to the previously installed drainage system.
- Without low tide, the process is performed differently. 5–6 mm are measured from the ground or blind area, markings are made, and 40 mm are moved upward from it. If the external and internal corners have a complex profile into which the edge of the panel is inserted, then they are measured and the location is noted. The starting bar is screwed along the drawn line, taking into account the distance from the corners.
Installation of the starting strip and corner profile - The corners are set slightly below the initial profile, creating a kind of edging.
- The joint profile should be installed at the ends of the panels between the corners.
- Window openings are framed with platbands, and a J-bar is installed along the inside. If there is no room for slopes, then the window can only be finished with platbands.
Window frame
All elements must be fastened securely, without bending or sagging. If the initial bar is not enough, then the next one is placed at a distance of 6–10 mm. When the mounting hole does not coincide with the place of fixation, you need to make it yourself using a drill or grinder.
Installing starter siding strip
Before you begin laying the main siding sheets, you must install a starting strip. To do this, you need to determine its location.
The starting bar should be 40 centimeters higher from the bottom horizontal line of the building . To secure the starting strip evenly, you should draw a line along the entire perimeter of the building on which the starting strip will be attached.
To attach the plank, you should attach it to the marked line with the upper edge and secure it with self-tapping screws in the wall. This option is suitable for a wooden wall.
If the walls are concrete or brick, then, having attached the plank to the intended line, you should mark the fastening points and drill holes for the dowels, and then fasten the plank with self-tapping screws by screwing them into the dowel .
IMPORTANT! When attaching the starting strip, a gap of several millimeters should be left between the ends to prevent deformation of the coating.
The pitch of fastening the starting strip should be up to 40 mm.
Installing the starting bar
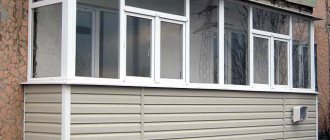
Installation of siding panels
Facade parts are most often laid horizontally: the panel is inserted at both corners or at the corner and the connecting strip and lowered until it clicks. From above, the part is screwed to the frame through the existing holes with a gap. The following fragments are mounted to the protruding part of the roof in a similar way.
Siding installation
To do everything correctly and avoid distortion, the panels are checked for level.
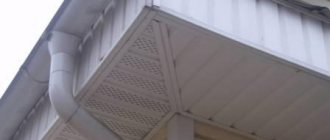
Finishing work
The final stage of finishing is the installation of the finishing strip under the protruding section of the roof. If required, the last panel is trimmed and placed under the tail of the slats. More complex options (especially when working with metal siding) require the creation of notches along the edge of the panels, with which the element will cling to the final profile.
As a finishing touch, J-rails are installed and a soffit is installed to cover the gable or roof overhang.
Working with siding and laying insulation is a rather labor-intensive undertaking that requires care and compliance with the rules. The result will be a house that has a presentable and noble appearance.
Setting internal and external corners
Any angles must be set in strict accordance with the vertical line. If the angle deviates even by a few degrees, the entire structure will be uneven and incorrect.
When installing a corner (internal or external), you should step back from the top edge of the facade about six millimeters and down from the starting strip - about 8 mm.
In order to evenly fasten the corner strip, it should be applied to the fastening point, fixed in a strictly vertical position, first on the two upper screws (not tightly), and then screw in the remaining fasteners sequentially from below.
The corner elements should not be fastened tightly enough with self-tapping screws (leaving a gap of 1-2 mm).
If you screw the screws in very tightly, the metal sheet may subsequently become deformed.
If it is necessary to lengthen the corner element, then an overlap of 2.5 centimeters is made by placing the upper part on the lower one. The peculiarity of the joining for all corner parts is the execution of the joining seam at the same level .
Setting obtuse angles