Published on October 26, 2018 by Stroitel
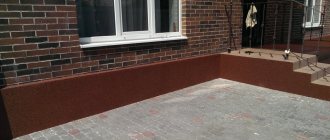
A relatively inexpensive and practical way to protect the foundation is to plaster the base under the stone with your own hands.
The selection of patterns and colors will allow you to create a unified architectural ensemble of the entire building. At this stage, it is easy to achieve a combination of wall style with the lower chord of the house by using the same materials.
Conditions to be observed
If a finish with a stone pattern is chosen as the outer covering of the plinth, the general requirements for such a coating must be observed:
- Mechanical strength (important when installing it yourself);
- Moisture resistance;
- Frost resistance;
- Biological resistance (fungus, mold, microorganisms);
- Neutral to ultraviolet radiation.
Based on this, dry ready-made facade mixtures with the specified properties are purchased, designed for a large number of weather cycles in a given climatic zone. There is another option - prepare the solution for finishing the base yourself, choosing additives, plasticizers and chemical additives.
If there is a layer of thermal insulation for the foundation of a house made of polymer materials, the reliability of its external protection should not raise doubts. Seepage will lead to loss of specified properties and premature failure.
Decorating the base with various materials
Stone finishing
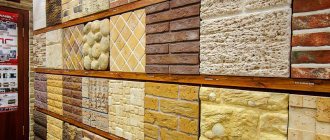
One of the popular materials for finishing the base is natural or artificial stone. The first option (sandstone, marble, granite and others) has higher strength, environmental friendliness, durability, and moisture resistance, but its installation is more labor-intensive and requires certain skills. And the price of some stones is sometimes not affordable for everyone.
Requirements for the solution
Preparation of the solution
A decorative (finishing) layer of mortar, prepared with your own hands and consisting of:
- cement (preferably M400 grade in a proportion of 1/3. M500 - ¼);
- sand (quarry sand, sifted on a fine mesh, washed to remove clay and organic inclusions);
- water (the amount varies until a thick, plastic mass is obtained, convenient for application, leveling, and shaping);
- additives (plasticizer, hydrophobic component, polymer dispersion. The simplest options could be PVA glue, a small amount of washing powder (increases plasticity);
- color, mineral filler in the form of stone chips with decorative properties (marble, quartz, granite).
The hardening of the plaster cannot be accelerated by force (blowing, heating, IR emitters). The main layer of foundation plaster dries under the covering film material for 2-3 weeks (depending on the thickness) with regular wetting for the first 4 days. Only after complete drying does the covering of the base begin. The thickness will depend on the depth of cutting of the relief and ranges from 0.5-1 cm (for shallow impressions) to 2-3 cm (plausible, volumetric masonry).
What is a base and why is it protected?
The basement part of the building is the lower, foot part of the walls, lying on the foundation . Often the basement part protrudes beyond the walls of the building. It happens that the base is located level with the wall line.
The basement of any building is the most vulnerable part in relation to dirt, mechanical stress, and moisture . A kind of transitional part from the foundation to the wall should prevent cold and water from entering the façade of the building, so it must be carefully protected and insulated.
A waterproofing barrier is used to protect against moisture. If there is a need to insulate the basement, install insulation. To prevent the influence of external factors, including mechanical stress, the basement of the building is protected with cladding materials.
Plinth panels provide reliable protection for the plinth. In addition, they are able to improve the basement part in terms of decorative design: the building will look neat and stylish.
Stone jointing
Joining the plinth under the stone
The advantage of plaster is that any design can be reproduced on a non-dried solution. The most typical types:
- Masonry. Imitates brick, cut stone of different sizes;
- Blocks. Masonry option with larger pieces, palace blocks;
- Torn boot. Large/medium/small-sized boulders of different sizes, fitted end-to-end;
- Small stone. Many rows of unprocessed small elements;
- Pebble. Round small pebbles.
Avoid noticeable distortions, unnatural transition angles, frequent repetitions, and precise adjustment of the depicted elements. Also, do not level out small roughnesses and chips. The transitions of hillocks into depressions look more natural than a strict plane, which is not required when plastering the lower belt of the house.
Facing with boulders or small cobblestones
It is not necessary to buy a boulder or cobblestone. You can collect it on a river or on a pebble beach at sea. Rolled stones are chosen to be flatter - round ones are more difficult to “mount”. The procedure and all other subtleties are almost the same as in the case of finishing with natural stone. The only difference is that these stones must be washed in water and detergent before use. Firstly, the water in our ponds may have oils in it and need to be removed, and secondly, there may be clay or algae in it which can cause the finish to fall off.
To make everything look organic, you can first lay out a “picture” of cobblestone cladding on the path next to the place where you will cladding the base. They have different shades and their random combinations are not always attractive. By laying everything out side by side you will have an idea of what the end result will be.
Watch the video about the features of finishing the plinth with cobblestones.
Creation methods
The process of plastering according to the chosen texture with your own hands can be done in two ways:
- Stamping. Stencils of several contours are made, which are applied to freshly applied plaster and tapped. The resulting print is embroidered. Rollers are also used for shallow relief. The decorative pattern is rolled in even rows.
- Cutting. Recesses in the solution are made with a sharp tool (a fragment of a sheet of metal or tin, cut to resemble a characteristic groove). The lines are expanded by inserting a metal ruler, tapping until the required clearance and angle are obtained. Complex transitions in the cladding can be formed from a notch made with a spatula using a rubber-gloved hand. The hardened solution is amenable to the action of a circular saw, but the shape is already limited. A wide seam requires two cuts with the middle removed.
The plausibility of large details of the image on the finishing of the foundation of the house is achieved using a combined method. A characteristic pattern of the material is applied to the block formed by cutting using a metal impact stamp with protruding parts measuring 15x15 cm.
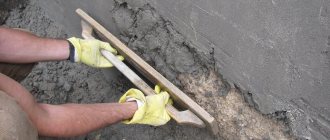
The surface is leveled by wet grouting the plaster, for example, with a tarpaulin mitt. The roughness of natural stone is created with soft metal brushes.
How to choose the right one
It is sometimes quite difficult for a non-professional to decide on the choice of material. Having a superficial understanding of the material, it is difficult to immediately understand what points to pay attention to. Only during installation or operation can you notice the deficiencies of the coating.
Here are some tips to help you avoid mistakes when choosing a basement covering:
- during inspection, it is recommended to inspect the joints of the parts : they should not have gaps and have a tight connection;
- you should check the locking parts : easy latching will free you from problems during installation;
- the material must be thick enough and have rigidity due to the specific purpose;
- the front surface of a separate sheet must be evenly painted , must not have chips or scratches, parts of the same batch must not differ in color;
- You should be wary of inexpensive types : they may be of poor quality, which will affect the performance characteristics of the coating.
In addition, it is recommended to choose products from reliable manufacturers; when purchasing, it is advisable to familiarize yourself with the certificates of conformity of the purchased materials and quality certificates.
Treatment
In order for the base to be beautiful and reliable for many years, it is not enough to simply plaster it. In addition to introducing various additives into the solution, after the base has dried, etching and waterproofing are carried out. Disinfection of the outer layer is achieved by treatment with an acid suspension. They work with a paint roller, sprayer, with the obligatory use of skin and respiratory protection.
We recommend watching a video on how to properly treat a basement floor with a specialized protective solution.
After drying, the solution is washed off with water, the effluent of which must be drained away from the house into prepared depressions in the ground.
Tools and conditions for painting the base
When painting the foundation surface, you will need the following tools and tools:
- Bayonet and shovel shovels for removing soil from the surface of the base.
- A brush made of hard material and a water hose with a container to remove dirt.
- A trowel or spatula for leveling the surface to be treated.
- Primer and brush for applying it.
- A roller or brush used to apply paint.
By contacting our company, you can find out what the price is for plastering and painting the basement of a house.
It should be remembered that painting work on basement floors should be carried out in the summer, since the cold increases the drying time of protective coatings.
Painting
The most successful color scheme for finishing is to choose a base color that does not contrast with the main tone of the house. It’s even better if the shade of the resulting stone looks a little darker, “heavier” than the wall material. However, the choice of color depends only on your desire, and the base can be painted or plastered:
- in one tone (the plaster is not painted or a continuous coating is done with one composition);
- two tones (the stone differs from the seam cut);
- several tones (color transitions imitate real material. This is the most expensive, effective and labor-intensive execution of finishing the foundation).
Covering a pile foundation with plinth panels
Houses on stilts do not have a basement. To prevent the building from looking ugly, an artificial plinth is created underneath it. It is made either from brickwork or sandwich panels. The technology for covering a pile-screw foundation with plastic panels is practically no different from covering a standard base. The frame is attached to the piles from the outside or placed in the space between them (under the house).
What types of stone-like plasters are there?
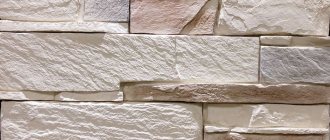
Stone plinth plaster imitates masonry of various textures, character and colors. The most common and accessible for repetition are the following:
- Smooth blocks of the same shape. Imitation of block masonry.
- Hewn stone of various shapes. Even “bricks” of different sizes.
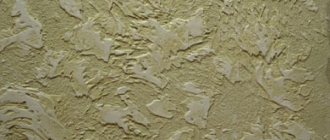
- Uneven large stone (torn rubble). The most popular and simplest base “stone” plaster. Stones with polygonal shapes are “laid” in 1-2 rows. The most convenient drawing in situations where it is not possible to do the work painstakingly.
- Medium sized stone. Small equal rubble, limestone. The most harmonious: it has a believable drawing full of details, but is relatively simple and quick to implement.
- Small elements. Not cladding, but masonry with sandstone (“plaster”). Many rows of untreated small stones.
- Pebble. “Facing” with sea, river stone, “ground” by waves, rounded.
All these forms are available for amateurs to repeat on their own. The nature of the drawing requires only a certain sense of harmony, which is inherent in most people, even those who are not capable of drawing. Plastering a plinth to resemble a stone with your own hands is no more difficult than conventional finishing.
The main thing is to achieve believability, to avoid clearly noticeable repetitions of the design, its distortions, unusual chips, and their too precise fitting to each other.
How to create a relief on the plaster of a plinth under a stone without tools with your own hands.
Decorating concrete “to look like stone” can be done using special devices (impressions, manually, homemade tools.
First, ordinary cement-sand plaster (spray, primer) is applied. Then, without waiting for it to dry and set, they begin to imitate masonry. The thicker the plaster, the more voluminous the relief will be.
The prepared plaster is leveled so that it does not have small dents or roughness. But the general plane can be left uneven so that the wall has “bumps” and “hollows”.
For a symbolic relief design, a plaster thickness of 1 cm is sufficient. For volumetric, believable “masonry”, it is necessary to apply at least 2.5-3 cm of solution.
Work by hand.
A drawing of the future masonry is applied to the finished fresh plaster with a thin sharp object (a piece of wire, an awl, a nail).
Then the given line deepens to the entire (or almost the entire) depth of the plaster layer. A spatula, a corner of a trowel, or a piece of tin are used. An object is selected experimentally that leaves the furrow that is most characteristic of the chosen technique. When the new basement plaster dries (almost completely dry), it is cleaned of small pellets of mortar, tiny fragments that have come off but have not fallen off. The edges of the convexities are smoothed with a wet painting glove.
Application of molds (patterns).
The process can be accelerated and simplified by using patterns.
To do this, a form heavily moistened with water is applied to the working surface of the base, pressing it into the solution. To make the impression as clear as possible, the form is recessed as much as possible by tapping it with the edge of the palm.
One pattern can have 2 patterns depending on the angle of its rotation.
“Masonry” made using several forms of the same type, having different patterns, looks more natural.
How to paint the plaster of a plinth finished to look like stone.
Based on color, the finish of the plinth can be divided into:
- Plain bases. Unpainted (having the original color of the plaster) or painted in one tone.
- Two-color plinths are painted, and then a different color is given to the seams of their masonry.
- Plausible stonework. They have many shades and tones. This imitation is the most complex and time-consuming, but more effective than others.
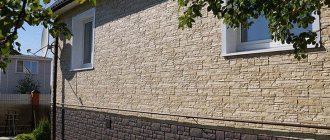
Painting methods are simple and applicable to builders of any level. It is only important to remember that it is better not to “combine” some colors and their shades on one building, within the overall design concept. The shade of the foundation should be a tone or two different from the walls. In terms of color, the base can “echo” the roof and small elements (shutters, windows, doors, corners of the building).
Combination of shades of the “stone” plinth with the color of the walls.
The plaster of the base of the house is painted in a tone that matches the color of the walls:
- Light blue walls. The most “pleasant” combination is with a stone of a grayish-blue, chocolate-brown tone.
Orange, red and greenish stones are not suitable for such walls.
- Turquoise. Against such a background, you can harmoniously place dark, warm bluish stones. Red and orange will look contradictory and tasteless.
- Light green – grayish-green and cold green (close to “green”). An unsuccessful combination is warm, bright colors (orange, red) and related ones (blue).
- Yellow. For warm shades - brown pebbles, for cool shades (lemon) - dark green warm (chrome).
- Beige. Brown chocolate. But not green, blue.
- White. Achromatic tones (white, gray) can be combined with any color. For example, a dark gray stone “fits” harmoniously into any color scheme.
You can't combine blue with red. These are opposite colors that are not in harmony with each other (the exception is pastel shades). Red and green don't go well together either.
The main rule is to combine related shades of different color saturation and warmth: lemon - dark green, pink - cherry, yellow - cold brown, blue - so-called blue.
Sandstone cladding technology
As an example, let’s consider the process of finishing the foundation with light sandstone, since it is not necessary to construct formwork to cover it with this stone. Finishing should begin from the corner of the base. When doing work with your own hands, you first need to divide the surface into separate sectors with a pencil. After this, the bottom rows of sandstone are laid. Glue should also be applied to the ends of the stones to completely fill the gaps between the stones. The stone, lubricated with glue or mortar, is laid almost flush against the base and the previous stone. In this case, you need to leave a small seam. To correct the position, the stone is lightly pressed and shifted with a vibrating movement of the hand.
Remember! All vertical seams between the stones of each next row should be shifted relative to the seams of the bottom row by at least a few centimeters. If the adhesive mixture gets on the front surface of artificial or natural stone, it must be immediately removed with a damp cloth.
The seams between the stones must be filled before the cement or adhesive mixture has completely dried. In this case, the seams should be filled equally. In places where the compound protrudes outward from the seams, it must be carefully removed and the seams themselves smoothed out. To fill the seams, depending on the design, a special grout, the same adhesive solution or putty can be used. To ensure increased resistance to moisture, the stone can be coated with a special varnish, and a small canopy can be installed on top of the base.
Methods of painting “stone”.
Basement plaster needs protection and decoration.
There are several standard approaches to tinting plasters: the use of colored solutions, their additional tinting on the wall, “sprinkling” fresh plasters with pigment, painting.
Tinting plaster mortar.
Ready-made finishing mixtures can be tinted. When made independently, pigment can be added to them. For this, both acrylic coloring liquids and dry powders are used.
A variety of shades and believability can be achieved by mixing several colors:
- The concrete solution in the trough is divided into 3-4 sections.
- Each is carefully mixed with a pigment of a specific color (such as light grey, yellowish, pale green and brown).
- The finished parts are slightly mixed so that they do not merge into one tone, but only lose their boundaries.
When using such concrete to decorate plaster “like stone”, an element of randomness of tone arises. This gives the finish exclusivity.
The easiest way of painting is concrete tinting. But it can also be supplemented by subsequent painting of individual elements.
Tinting the decorative plaster of the base and walls of the house with paints.
Produced on both fresh and dried plaster. Even if the solution initially has a suitable shade, its color can be enriched with additional tones.
They do this in the following ways:
- “ Pigmentation” of wet plaster. The freshly applied solution is “painted” with a brush, which is “dipped” into the powder pigment. Then the moistened mold is “embedded” in the plaster.
This is the most economical coloring - pigment consumption is minimal.
After drying, the plaster is coated with acrylic varnish.
- Painting dried concrete. Appropriate paints for exterior concrete work are used to coat the plaster.
- First, the general tone is applied.
- Then darker (for example, for golden - brown), but not over the entire area, but only in the deepest depressions and seams.
- When the paint dries, the most convex parts of the “stones” are covered with light paint (for golden ones - whitish-yellow).
The edges of the color inserts should be blurred with a piece of sponge or foam rubber.
To apply the last (light) tone, use a short-haired roller.
Any paint (including pigments) requires protection with varnish. And the semi-matte shine will only add naturalness to the relief.
Ways to imitate a stone wall
So, let's look at what you can use to make a wall in your house or apartment like in an ancient castle. If we do not take into account the cladding made from natural prepared material, then there are several popular methods of imitation:
- From tiles . This does not mean tiles, but relief tiles made from gypsum or cement-sand mortar. Artificial stone is sold ready-to-use, already painted, and is used for interior decoration and on facades. Most often this is an imitation of torn slate, limestone (travertine), dolomite, sandstone or rock. You can make such tiles yourself by pouring the solution into rubber molds. But this is a labor-intensive process that requires special equipment (vibrating table) and painting materials for high quality.
- Stone-effect hinged panels . Plastic panels are often used for cladding the facade of a building. The advantages of this method: speed of work, practicality, attractive appearance, reasonable price. The textures are the same as those of stone made from gypsum slabs - slate, limestone, etc.
- Made from polystyrene foam . This cheap way to create artificial stone requires creativity and certain skills. The essence of the decorating process is to cut out masonry on a sheet of polystyrene foam (foam plastic, penoplex, etc.). The surface is roughened using hard brushes or other available tools. After the finished panel is glued to the wall, it is painted in a suitable color.
- Made from plaster . This is no less simple, but more practical and, perhaps, the most common type of stone finishing. Plastic mortar provides enormous opportunities for simulating any stone surface. For decoration, I will use gypsum, cement-sand (on the facade) or polymer plasters (acrylic, silicate, silicone). They may contain mineral fillers: sand, marble chips, rounded granules, etc., which help emphasize the created effect of the stone texture. Below we will look at this finishing method in detail.
Preparing the base for plastering.
Finishing the base with decorative plaster is carried out in the same way as regular plastering of walls and requires surface preparation.
New plinth
A fresh basement wall does not require special preparation. Before applying the coating, just moisten it with water and wait until it drains and is partially absorbed.
Preparing the old base for repairs.
The old basement wall requires more attention:
- Removing old coatings. Anything that does not hold well, wobbles or moves when pressed (old concrete coverings) must be removed and cleaned.
Concrete cannot be thrown onto unstable surfaces (anything that “shakes”) and onto weaker layers (chalk whitewash, clay and lime plasters). Its connection with such a surface will not be reliable.
- Sealing cracks, lunges. Deep depressions in the wall must be repaired:
If possible, cracks and crevices are widened, a reinforcing mesh is strengthened here and “clogged” with mortar, working with energetic “slaps”.
Crevices.- Notches. Deep (more than 1-2 cm) depressions in the hay are usually sealed and leveled. Plastering a plinth under a stone in a certain sense “needs” some curvature of the walls, so it looks more believable.
- Loss of masonry. Drops of stone or brick must be replenished. To do this, throw a solution into the opening and place a pebble of suitable size.
- Primer. Before applying plaster, the wall should be covered with primer. This will increase adhesion and fill the pores so that they do not “pull” water out of the solution, weakening it, and the base “stone” plaster will not fall off over time.
The prepared surface must be hard, stable and clean.
Surface preparation
To know how to properly plaster a base, you should take into account what it is made of, preparation will be based on this.
Preparing the brick base
When preparing this surface, it is necessary to clean and eliminate all cracks and depressions that could appear after some time, because there is a seam space in this base. For cleaning, use a wire brush, hammer or chisel.
First, poorly adhering plaster is removed with a hammer or chisel. It is necessary to get rid of all loose plaster. A wire brush will help remove any excess residue; imperfections in the brickwork should be dampened before repairs. The voids that appear are covered with bricks of the required size, they are fixed with masonry mortar. Before starting work, this part of the base should be thoroughly wetted.
Preparing a rubble concrete base
Preparation of this base requires the removal of poorly adhering and very damaged areas of the cladding, and their subsequent replacement. A poorly secured part must be removed, cleaned and reinstalled; it should be secured with sand-cement mortar.
Preparation of concrete-cement base
First, you should check whether large cracks have appeared in this base of the base; if they are found, you need to make sure that the edge is strong, and then get rid of the crumbling and crumbling parts. If during inspection even a slight displacement of the base of the foundation was noticed, then it must be strengthened. After cleaning, small depressions are leveled with a cement mixture.
Composition of the solution for decorative plaster of the base.
Self-cooking.
The standard plaster solution is cement and sand in a ratio equal to 1/100th grade of cement (for m500 - 1:5). Plastering the plinth to look like stone is carried out using standard technology adopted for ordinary plaster coatings.
Ready-made plasters.
The use of ready-made mixtures increases the cost of finishing, but significantly simplifies it.
Many ready-made compounds are produced. The most popular plaster for plinths is Knauf, although many domestic mixtures are of decent quality.
How to save money when finishing a basement with plaster.
Involvement of construction crews.
Ordering work from specialists is the most convenient option. But professionals will charge a higher price for the work, which will significantly increase the overall cost of finishing the basement. At the same time, plasterers take into account not only the fee per square meter. m. walls, but also the number of slopes, features of the workplace and plastering of right angles.
Do-it-yourself plastering of a plinth under a stone
A more economical approach is to do it yourself. The total price per m2 is reduced significantly, even if you buy ready-made plaster mixture.
The base finishing will become even cheaper if you make the mixture yourself. So its price will be reduced only to the cost of concrete plaster per square meter.
High humidity, heavy precipitation and various mechanical damages negatively affect the basement of the house. As a rule, this reduces the service life of the entire structure as a whole, especially the foundation.
In order to maintain its attractiveness and make the basement of the house durable for many years, it is necessary to protect the base with finishing materials.
For example, the surfaces are plastered, which will make it better and increase resistance to moisture and other influences.
When thinking about how to plaster the base of a house with your own hands, it is worth adding polymer impurities to the plaster, which will significantly increase the strength characteristics of the wall material.
Internal waterproofing treatment of the basement can also be carried out using liquid glass, for example, or its analogues. The best way to make the foundation reliable is to comprehensively waterproof cellars and basements.
Advantages and disadvantages of plaster
When choosing which type of material to use, you can choose plaster, but you need to study its advantages and, importantly, disadvantages.
The advantages will be the following parameters:
- Effective protection and reliability of the cladding will preserve the surface for many years, without requiring repair and restoration work;
- Easy to apply and does not require the use of special tools or special skills;
- Affordable pricing compared to other finishes;
- Ease of repair in case of damage to part of the facade of the house.
You should know the disadvantages of plaster in order to have an idea of the lifespan of both the base and the entire house.
The main disadvantages are:
- Significantly lower durability of the finish than stone or tile cladding;
- Relatively low level of protection;
- Short service life of the finishing layer;
- Low thermal insulation.
When finishing work, you cannot use the wet method if it is raining or the hot sun is shining with direct rays on the finishing area. It is better to refrain from this kind of work even in winter during frosts.
Requirements for plinth plaster
To increase the protective properties of plaster, it must be properly prepared and applied in a certain way. In addition, a number of other conditions must be met:
- High resistance to moisture, since all the water accumulates at the foundation of the house, often containing chemical impurities. Basement plaster should provide a barrier to moisture so that the foundation of the house does not collapse;
- High strength, since in addition to water there are a number of other types of impact on the base;
- Resistance to severe frosts, when, with regular freezing and thawing, the plinth plaster should not lose its decorative and protective properties;
- UV protection, especially in summer when the sun is hot;
- The plaster applied to the base must be resistant to the formation of mold and mildew on surfaces that can cause biological corrosion.
Choosing a mixture for plastering
The plinth belongs to the external part of the house, therefore the plastering solution should be intended specifically for these purposes. The solution is made from a mixture of sand and cement, to which impurities are added in the form of plasticizers and waterproofing components.
Sand and cement are selected in proportions according to special parameters. The optimal ratio is considered to be one part of M400 cement to three parts of pre-screened sand.
The water added to the mixture should be enough so that the plaster has the consistency of thick sour cream.
One of the varieties of material, mosaic plaster, is a mixture of acrylic resins and other binders with natural stone chips. Mosaic plaster is based on natural stones - marble, quartz, malachite, granite, lapis lazuli and others.
Of the disadvantages that mosaic finishing of the base with decorative plaster has, the most basic is its high cost; in addition, the help of professionals will be needed to apply it to the surface.
Mosaic plaster is not applied to surfaces with thermal insulation materials made of mineral wool and its analogues.
Stages of applying the plaster mixture to the surface of the plinth
Applying a plaster layer consists of several stages, each of which must be performed carefully and in compliance with all rules.
Surface preparation
The surface is inspected, problem areas and possible defects are identified. For brickwork or block construction, all joints are carefully cleaned.
Cracks in the tape monolith are deepened and widened to remove weak and vulnerable spots. After all such work, go over the metal surface with a stiff brush.
The base is coated with a single layer of primer, and preference should be given to the penetrating type. This will strengthen the base, strengthening the surface with residual dust and mortar, which will significantly increase the adhesion coefficient of the finishing material to the surface.
In some cases, the primer is replaced with a cement solution in liquid form, just do not smear it, but spray it with a brush. The surface must be left until dry.
Plastering the surface
- All seams are filled with plaster mortar. Also available with defects and cracks;
- Reinforcement is made with metal mesh, which will strengthen the plaster. Fixation along the grid is done with dowels with wide heads, with at least 20 dowels per square meter;
- Beacons are placed, retreating from the corners by 0.3 m on each side. Screws are screwed in and connected horizontally with a thread. The distance to the wall should be at least 2 centimeters. These threads are used to mark beacons, placing them on cement mortar until completely dry;
- The surfaces between the beacons are covered with plaster solution and evenly distributed over the surface with a roller or rule;
- After 6 hours, the beacons are removed and all holes are filled, covering them with plaster.
Beacons cannot be left without removing them, as rust stains will form on the surface over time. The plastered surface is left until completely dry.
Final stage
All subsequent cladding work depends on the method, since it is necessary to dry the surface. The base is covered with polyethylene to prevent the negative effects of precipitation or sun, and left for several weeks.
While the surface dries, it must be moistened with water to prevent cracks from occurring.
As soon as the layers have hardened, they need to be covered with a layer of primer and a facing material should be applied. The most beautiful way would be to apply decorative plaster to the base under the stone with your own hands.
Decorative plaster of the base under the stone
To finish the façade of the plinth, you can use stone cladding that imitates the surfaces of natural materials. This method is the best in terms of natural appearance.
Even a novice builder can do this, since all the work is simple and can be done without assistance.
A mixture of sand and cement is used, where one part is M400 cement, and three parts are sifted sand. The mixture is diluted with water to a thick sour cream, since it is convenient to apply it to the walls.
The thickness of the layer of decorative material is calculated based on the masonry of the wall. For bricks or blocks it will be 0.5-1 centimeter.
To imitate the surface of torn stone or pebble, natural or artificial stone, you need up to 3 centimeters.
The sequence of work is as follows:
- Stencil application, for which the blanks are applied to the surface by lightly tapping them. The screen mesh is removed and the seams are unstitched. Then you get even rows of patterns;
- Cutting, when the shape of stones is cut into the mortar with sharp objects, and large elements and the roundness of their shape are made by hand. The resulting surface will not be similar to the work of Titian, but externally it will be practically indistinguishable from stone cladding, especially if a mosaic is made.
Once the drawing is completed, the surface is left for some time, allowing it to dry. Then layers of primer and paint are applied.
Any paint for the base can be used for outdoor work. You can paint the base within a couple of hours.
Wet plastering
Finishing the basement of a private house with plaster with imitation stone by wet application to the facade is done for simple ventilated facades. As a rule, it contains a special mixture that is diluted with water.
The technology for performing the work, if it is necessary to plaster the base in this way, is as follows:
- The base is prepared, for which it is cleaned and leveled, eliminating defects. Before properly plastering the base of the house, it is covered with layers of primer;
- A base profile is made at a height of 0.3 m from the ground surface using self-tapping screws and a metal base profile. This is necessary for additional support of the thermal insulation layers, as well as to protect it from moisture;
- The insulation is fixed onto the glue. The layer is left to dry for three days, after which it can be further strengthened with dowels;
- Apply a reinforcing layer of glue on top of the insulation, place a reinforcing mesh and again cover it with glue directly over the mesh. The speed of work allows you to make a two-layer monolithic protective layer that dries for about a week;
- The final finishing consists of applying a layer of plaster to the glue.
If you use decorative plaster for the basement of a house with your own hands, the base of the house will be protected from the negative influence of precipitation, will look attractive in appearance and is aesthetically harmonious with the overall appearance of the house.
Natural stone plaster
How to put plaster on a plinth under a stone?
Peter Kravets
Similar articles:
There are no similar articles.
With your own hands
Prices for materials and installation work
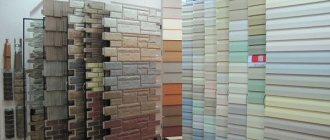
The average price for plinth panels ranges from 250 to 750 rubles per square meter. The price depends on the popularity of the brand, the type of material from which they are made and the complexity of the pattern. The cheapest panels are made of plastic, the most expensive ones are made of natural stone. A galvanized profile of standard length will cost 100 rubles per piece.
Installation costs per square meter vary by region. The cost may also be affected by the qualifications of the workers. On average, the price can vary from several to several hundred to several thousand rubles. High-quality work by a team of workers will cost at least 5 thousand rubles per square meter. The team carries out all the necessary work, from measuring to installing the canopy and drainage system. After the measurements, the foreman calculates the full amount for the entire work. You can do the installation of basement panels yourself, or you can hire a team of workers. The first option is suitable for those who have enough free time and skills in working with basic construction and installation tools: grinder, drill, level, etc. The second is suitable for those who want to get a high-quality result quickly, effortlessly and for those who can afford it financially.