Wood has always been considered one of the best materials in construction. Our ancestors have always used it and it still occupies a leading position among environmentally friendly materials. However, high-quality and dry wood may not always be available. In addition, it has a number of negative characteristics, such as susceptibility to rotting, instability to moisture and biological influence. For those who love this natural material, there is a good alternative - decorative wood plaster.
Plastering has always been considered the simplest finishing option. But decorative plaster with an imitation of a wooden surface is original and will save money. What are its features and how to do all the work correctly with your own hands?
Benefits of wood finishes
The main competitor of wood plaster is the original. If compared with it, the creation of an artificial finish will have the following advantages:
- does not require careful care;
- long maintenance-free service life;
- frost resistance;
- with the addition of a special plasticizer, it will withstand temperature changes and slight soil displacements;
- fireproof;
- high strength;
- moisture resistant;
- low cost;
- if you add lime, there will never be any bugs or mold.
In turn, the tree will require annual care and large investments. If the rules of care and fastening technology are not followed, wooden building materials will quickly rot.
Composition of wood-look decorative plaster
Like a regular solution, these mixtures consist of three main elements:
- binder;
- filler;
- solvent;
- additives and plasticizers.
White or gray cement, gypsum, lime or polymers can be used as a binder. The substances ensure the adhesion of all particles. Cement-based materials have the greatest strength and can be used indoors and outdoors. Gypsum is used only for interior work in dry rooms. Lime is rarely added in its pure form. More often, these components are combined with each other to create the most versatile formulations.
Acrylic, silicone or silicates can be used as a polymer binder. Not so long ago, polyurethane compositions appeared, which have unique properties.
Filler is the particles that hold the binder together. For it, quartz sand of a fraction equal to 0.2 - 3.5 mm is often used, depending on the type of plaster. Less commonly used is crumbs formed as a result of the extraction of marble, granite and other stone. Some manufacturers add artificially derived crystals.
Important! The solvent is always water. It is recommended to use distillate. It triggers an alkaline hydration reaction that turns the mixture into stone.
Additives and plasticizers are mineral-based and are added to pigment the solution or improve its characteristics. For example, when performing façade work in winter, you cannot do without a plasticizer, which accelerates the initial setting. And to prevent mold and mildew, fungicides or slaked lime are added to the mixture.
Wood-like facade plaster
Classification of plasters
Many types of wood-like plasters have been developed, which differ in texture and technology for creating a relief pattern.
The following types of finishes are distinguished by texture:
- under the bark of a tree;
- bark beetle;
- imitation of tightly laid boards;
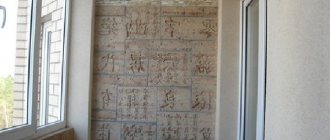
- creation of areas imitating wooden surfaces (panels);
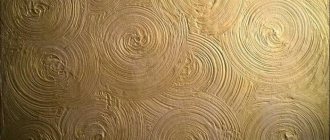
- pattern of wooden rings and fibers.
According to the technology for creating relief, there are:
- textured;
- structural plasters.
Structural mixture
The structural mixture is used for finishing interior and exterior walls. It differs in the technology of performing the work. To create a wooden relief, a larger fraction of filler is added to the composition compared to the rest of the mass.
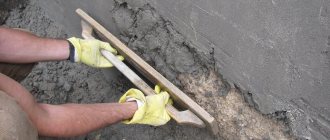
Application of such mixtures is usually carried out in two stages. At the first stage, the solution is poured onto the base with a thickness equal to the largest grain and leveled. At the second stage, simple movements create a relief.
The most popular example of such wood-look plaster is the bark beetle.
Plaster bark beetle
The main advantage of decorative mixtures is ease of application. A disadvantage is the small selection of textures.
Textured mixture
Textured solutions differ from structural ones. They contain filler, the fraction of which should not be more than 0.6 mm. The thinner the layer of solution is planned, the smaller the grains of sand used.
To create a beautiful drawing, you need to have the appropriate experience and skills. Without this, the desired result may not be achieved.
The application technology consists of one stage. The mixture is spread on the wall in a small thickness, and before it sets with special tools, the selected texture is created.
Wood textured plaster
There are options when the solution is applied in several layers, with each ball needed to create a special relief. Often in this case the mixture is divided into parts. Their number is equal to the number of layers. In this case, each part is tinted in advance in its own color or shade.
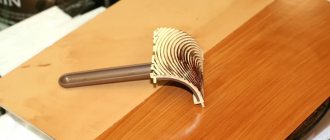
Rollers
There are rollers with a pattern or a relief surface, which, when rolled over the surface of freshly applied plaster, create a relief. Rollers with a wood texture are also available for sale. Ordinary paint rollers made of different materials can also come in handy. Additional improvements - wrapping the roller with cord, tape, plastic film, leather and others, make it possible to create various decorative effects.
Main and auxiliary tools
To complete the work you will need equipment. Depending on the type of plaster, it is worth preparing the following tools:
- capacity;
- mixer or drill with a special attachment;
- trowel or trowel;
- scales or additional containers for compiling the correct proportions of the mixture;
- gloves;
- spatula of a convenient width for application
- respirator.
Plastering tools
To apply structural mixtures, you will additionally need a spatula-smoother. It can be made of plastic or polystyrene.
To work with textured compositions you need to use more equipment:
- notched spatula;
- decorative roller to create the necessary relief;
- rubber or silicone stamps;
- brush;
- brush;
- sponge and rag.
Depending on the application technology, not all tools may be used. However, they must be “at hand”.
Note! For layer-by-layer or partial (panel) application you will need masking tape.
Algorithm of actions
Necessary tool
To work with this type of coating you need to prepare:
- trowel;
- spatulas of various sizes and shapes;
- mixer for mixing the solution and giving it the desired consistency;
- mixing container;
- masking tape;
- ruler;
- level.
To simulate the required pattern, you need to have the following accessories:
- spatula with a serrated base;
- decorative roller for wood;
- rubber and silicone stamps;
- hard brush;
- flute brush;
- clean rags;
- sponge
Tools must be new and washed. It is important to have several rags to wipe up spills. You need to wear protective clothing and cover your hands and eyes.
Important
It is important to cover the floor and interior items with polyethylene or other covering material to prevent paint from getting on them.
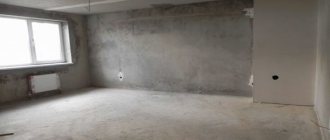
Surface preparation and materials
Under textured plaster, you can use compositions based on mineral, silicone or acrylic chips. Mixtures for a smooth structure usually contain fine-grained fillers . Bark beetle is obtained by using the structural composition. An ordinary wooden coating can be obtained from ordinary putty, which is prepared using technology.
Painted mixtures are not necessary, since the coatings are well protected by varnish or wax. Decorative plaster looks like valuable or aged wood, selected to suit the interior and the owner’s preferences. This type of coating can perfectly hide all flaws and irregularities. But the base for such finishing still needs to be prepared in order to achieve better application and durability of the coating.
- The base must be thoroughly cleaned of any remaining construction debris, dirt, and dust.
- Existing cracks and remnants of plaster from the previous layer are cleaned off, the recesses are increased in width in order to completely get rid of protruding elements and particles.
- The base is leveled with ordinary gypsum-based plaster mortar.
- When the wall dries, it will need to be primed. The primer must have good adhesive properties. Sometimes the surface is covered with several layers.
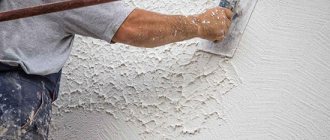
Application technology
The viscous plaster composite is spread in a neat, even layer with a spatula over the entire surface of the wall so that the result is a smooth surface without noticeable pits or protrusions. A sufficient layer thickness for this base coat option is 4–5 mm.
Application technology:
- A fluffy grater with a noticeable bend creates a horizontal or vertical line. The degree of bending depends entirely on the skills of the master.
- The dried plaster layer is rubbed with a spatula. The texture of the drawing should have a glossy appearance with a smooth surface without flaws.
- Color is applied to the prepared surface. The direction of the grooves is determined by a brush, swab or roller. The final smoothing of the lining is performed using a spatula.
- The final part of the work is treating the dried surface with varnish or wax. These coatings protect the wall from fungal infections resulting from moisture on the surface. Varnish and wax transform and refresh the color of a wood-imitating surface.
Advice
You can paint the finished plaster coating after hardening with simple water-based acrylate.
A cozy atmosphere will be recreated in the form of a natural environment. Modern materials, tinting and additional coating make the composite layer bright and durable.
Adding different effects
You can imitate the following patterns on plaster:
- Bark of tree. It is performed with a solution of gypsum plaster. The dry mixture is diluted in water, and a layer of no more than 3 mm in thickness is leveled with a trowel on the base, previously prepared for application.
The initial relief is formed with a roller slightly moistened with water. After the plaster has dried (after about 30–40 minutes), spray it with water from a spray bottle. The moistened base is smoothed with a spatula until the protrusions disappear.Each smoothing movement with this tool creates the effect of potholes, or rather, peculiar depressions under the effect of bark. Each smoothed layer is wiped with a damp cloth so that any lumps of solution remaining on it do not spoil the appearance.
- Rubberized stamp .
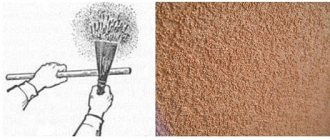
A layer of the mixture is applied with a trowel no more than 2–2.5 mm. The stamp moves horizontally and vertically along the top of the layer without strong pressure. The tool needs to be rocked from one face to the other. With this movement it is possible to obtain lines of wood texture, reminiscent of tree bark. After the applied layer has completely dried, the surface is treated with sandpaper with grain No. 240–320. They are painted and coated with wax or varnish. - The brush creates the effect of a textured pattern . The pile should be directed along the main direction of the wooden lines. No pressure is applied, but the adhering solution is constantly removed from the bristles. The dried surface must be smoothed out with a spatula to avoid sharp protrusions and unnecessary fragments of the pattern.
- Drawing with a figured spatula . A tool with a serrated blade can produce different lines. Hold the instrument straight, performing sinuous movements with light pressure. You can make a spatula yourself. To do this, use a knife to cut teeth on a previously prepared spatula made of wood or plastic. Instead of all this, you can take half a nylon lid for jars.
- Silicone matrix .
Using the imprint method you can obtain the texture of wood. You will need an ordinary roller to roll the silicone tape to the surface. After treating the wall with plaster, a matrix tape slightly moistened with water is applied to it. It is rolled with a roller - a clear impression is obtained. Using a wooden stick or other convenient device, grooves are drawn along the tape, simulating joints between the boards. Use a hard, narrow brush to smooth out the seams between the boards. And after drying, the layer is treated with sandpaper.
Coloring
The final stage of finishing is painting the plaster pattern. A thin layer of primer is applied along the wood lines. It is pre-painted. The dye is taken on a water-soluble basis.
The depth of natural wood color is well conveyed by compositions of translucent consistency. To obtain such a universal coloring substance, dilute:
- primer;
- desired color tone;
- white water-based paint;
- dry PVA glue.
Attention
The mixture should be applied with a brush only along the grain. Excess paint is removed with a rubber spatula.
Only after the first layer has completely dried can the following ones be applied one by one. It is important to wait for the base and each individual one to dry completely. Only then can you get the desired effect, without correcting the work done with additional methods.
The base layer is covered with a different tint color. Subsequent layers are made without adding wallpaper glue or primer. Only a water-based mixture with dye is used. Types of painting depend on the owner’s imagination.
Materials used and preparation for application
Structural mixtures for creating a wooden texture can be purchased at the store or made independently.
On the shelves of construction supermarkets you can see the dry construction mixture “Bark Beetle”. It has a low price. Initially it may be white or gray. These compositions are not tinted in advance, because after finishing the work they are painted on top. There are also ready-made solutions made from silicone, acrylic or silicates. Combined solutions are available. They cost an order of magnitude more, but can be tinted in advance and do not require painting.
The choice of texture mixtures is much more diverse. But mixtures are made from the same materials as structural ones. Similarly, ready-made or dry mixtures can be found on sale.
If you have the skills, a relief texture like wood can be created from ordinary putty.
Relief wood texture made from putty
Regardless of the mixture chosen, the base must be prepared before application.
Decorative plaster is applied in a thin layer, so the wall must be level and have no holes, depressions or bulges. If there is old, weak and uneven plaster, it is dismantled, because its destruction can cause similar processes in the new layer. After dismantling, the walls are leveled with a new regular mortar.
When the old plaster is strong and does not crumble, it can be spot repaired.
Before application, the base is prepared:
- The surface is cleaned of dust and grease stains.
- The wall is leveled and local repairs are carried out (if necessary).
- Primer is applied. For textured mixtures, a regular acrylic primer is suitable, and for structural mixtures, only quartz primer.
- 4 hours after priming, you can begin applying decorative wood-look plaster.
Peculiarities
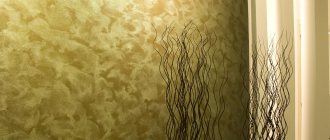
The highly durable, natural-looking finish reproduces the natural appearance of wood so convincingly that it is difficult to distinguish from real wood. Naturally, this effect occurs if all the work is done by a master at the proper professional level. As for the price, such plaster is much cheaper than wooden panels.
This design can be done to create the effect of tree bark by simulating a surface with natural damage or in the form of the effect of boards laid closely. A transverse pattern in the form of a cut or a panel reproducing wood texture is also possible.
Each of these cases requires the use of different techniques, tools and decorative plaster, so you should make a choice in advance in favor of the option you like. In addition to working directly with the solution, you should also choose the right color to obtain the desired color.
The gel or dye in the bucket may have the desired shade, but after application to the walls, the color may lose the desired saturation, showing a completely different result.
Surface painting
If the decor was created from a dry building mixture, then before painting the surface must be primed with an acrylic primer. In this case, it is necessary to ensure that the soil fits well between the fibers.
To apply paint and varnish you will need:
- roller;
- poplar or brush;
- paint based on silicone or silicates.
- pigment, if the composition was not tinted in the studio.
Before use, the paint must be mixed well. After this, the required amount of pigment is added. The well-mixed composition is applied to the surface of the bark beetle with a roller using movements from top to bottom and bottom to top. At the end of the work, the grooves of the bark beetle are painted with a brush.
When the second coat of paint is applied, the work on the wood-effect plaster can be considered complete.
Painting decorative plaster to look like wood
Varieties
The composition of the plaster mortar includes solid components, which, when rubbed, form characteristic grooves. The color and type of cladding obtained are indicated on the packaging. Structural and textured varieties, which are divided into subtypes, are popular.
Bark beetle
This is a structural composition that requires skill in application. Not suitable for restoration, there are seasonality restrictions. The advantage of this type is the light weight of the coating due to the mineral chips in the composition. Does not load the wall, the surface after application of the coating is without deformation.
The mixture is environmentally friendly, safe for health, resistant to sudden changes in climatic conditions , direct sunlight, high humidity, and mechanical damage. The plaster is impervious to the formation of mold and mildew and is durable. You can create different color combinations.
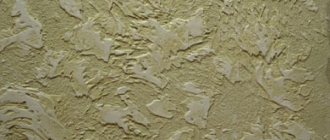
Wood panel
Volumetric plaster looks like modeling patterns based on wall finishing materials. Advantages: strength, lightness, resistance of the material to damage and temperature changes. You can create unique compositions to enhance the beauty of your interior.
Advice
Wood panels easily mask serious defects and surface imperfections.
But this mixture is not used for exterior decoration, as it takes a long time to dry and reacts to changes in external weather conditions.
Oak bark effect
Durable cladding looks great in a gazebo, on a loggia, it can be used to create designs on fences and decorate facades. Advantages: durability, resistance to precipitation and temperature changes. Amenable to restoration, masks base defects. Has the ability to “breathe”. This is an environmentally friendly, safe material that is completely harmless to health.
Imitation of cross cut
A very unusual way to imitate wood.
Important
The finishing is expensive, it looks very rich in appearance.
In addition to all the previous advantages, the coating ideally hides unevenness and masks imperfections. But there is also a minus: the transverse cut of wood cannot be restored.
Where can I order work and buy materials?
Unfortunately, not all home craftsmen are capable of performing such complex work. Because it requires skills and experience. Therefore, you need to order the work from specialists who will make a wonderful wood decor indistinguishable from the original.
You can purchase all the materials yourself at a construction supermarket or order this service from a team that will carry out the finishing work.
If you do not have any construction experience, it is recommended to first practice on an easel to acquire the necessary skills or order everything from professional craftsmen.
Photos in the interior
Advice from the experts
Often when performing construction work, beginners can do something wrong due to inexperience. Since plastering a wall under wood is a creative and complex process, mistakes cannot be avoided.
Finishing experts recommend the following:
- In order for the mixture to be strong and not crumble in the first year, you must strictly follow the proportions indicated on the label.
- Any mixture is mixed twice with a break of five minutes. In this way, plasticization enters into the hydration reaction faster.
- Only clean tools should be used.
- When working on decor, equipment must be cleaned after each pass.
- Dry compounds can be used as putty, but ready-made ones are preferable. They are more convenient to work with and are elastic after drying.
- When creating a drawing, you do not need to press hard on the surface. In a plastic mixture, grooves will appear when touched by a tool.
- When painting, to ensure uniform color coverage, the paint for the first layer can be diluted with water.
- When providing work, you need to be attentive and concentrated.
You can do wood-look plaster with your own hands, if you are not afraid and are careful. For this, materials and tools are used that can be purchased at any store. At the same time, the cost of materials will not exceed 2000 rubles for finishing a small room. Therefore, this is an attractive way for many to create a decorative surface and decorate the walls of their home.
Did you manage to learn something new? Share it in the comments!
How to do it on the walls inside or outside the house with your own hands?
- The first stage is surface preparation. This is necessary for better fixation of the plaster on the base.
The instructions are as follows: - Remove old wallpaper, paint, varnish, fasteners.
- Fill existing holes, cracks, and crevices with putty. After drying, vacuum the surface.
- Prime the walls in two layers. Choose a primer with deep penetration. Don't forget to wait for each layer to dry before applying the next.
Use a spatula to clean off any stubborn remnants of the old coating.
Apply using the following technology:
- Scoop the solution onto a wide spatula and apply it onto the wall with smooth movements.
Level the mixture with a trowel, leaving a layer of 5 mm for later adding texture, 3 mm for thickening the new coating.
Mineral mixtures dry out quickly. It is important to decide in advance on the scope of work. Otherwise, the layer will harden, and the master will have to do the work again.