Tips for choosing material
Before decorating the walls of the hallway, kitchen, living room or any other room in your home with wood-like material, you need to select the material.
These can be antique panels with the appropriate texture, which will make the house truly cozy and the interior design unusual. The cladding can be based on completely different materials. For example, if these are 3-D panels, then they can even be made of aluminum. This cladding is perfect for a corridor, and you will get an unusual idea for your home in the form of cladding, which is perforated at the manufacturing stage. Using a decorative film, an imitation of any type of wood is applied to the surface. If you want to make the interior of your apartment not only attractive, but also environmentally friendly, you should choose fiberboard panels that are also not afraid of moisture. But for dry living rooms, chipboard products are suitable. The most durable panels today are MDF panels. Color in the interior is very important. If you want to decorate a room in an unusual shade, you should choose PVC panels, which have the added advantage of being moisture resistant. Their outer surface can be designed in absolutely any design.
Before decorating the walls with natural wood, you need to choose the type of wood and the quality of processing. For example, hardwoods cope well with temperature changes. They provide good thermal insulation and are characterized by durability. When choosing wall decor, you also need to take into account what kind of furniture will be in the room. Its style should be combined with the cladding. When using wallpaper for decoration, you can choose the canvas from a wide variety of choices. Wallpaper today is a universal decoration. They can be presented in imitation of absolutely any materials.
In the hallway, however, it is better to install wood-look panels, as they will be ready to last longer. You can also install slabs under such cladding that will provide additional heat. This recommendation partially applies to kitchen walls, where panels will hide utility lines. But before you start installing the finishing, it is recommended to watch a video describing the algorithm for carrying out the work.
Tree
The need to paint a wooden surface “like wood” arises if you want to change the shade or refresh the design on an old item. The process includes the following steps:
- The cleaned and prepared surface is coated with a primer (sometimes drying oil is used).
Source pinimg.com
- Additionally, you can treat the coating with a stiff brush; this will improve the resemblance to natural texture.
- Powder painting technology is preferred. A colorless varnish that is easy to apply by hand has proven itself well.
Wood as a finishing material
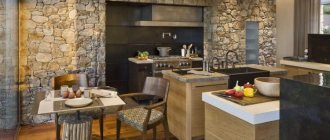
Interior wooden decoration is more typical for country houses; a block house for wall cladding turns the room into a wooden cottage. The warm color of the wood and the natural pattern give peace and comfort, and it seems that when we look out the window we will see the greenery of the nearby forest, a flower bed and the greenery of the lawn. If the block house seems too aggressive and clumsy, you should opt for a more classic finish using boards.
The walls in the room can be decorated with wood-like tiles
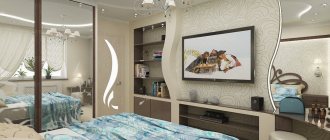
Wallpaper with imitation wood will harmoniously complement the bedroom interior
Wood-effect tiles will perfectly complement the interior
Some people like the tree, others it resembles a sauna or a balcony. Maybe the lining is too aggressive for rooms, but in hallways and corridors finishing with solid wood boards is the best option. If possible, offices or administrative premises are decorated with this material.
Another option is to decorate one wall with wood. Nowadays, zoning and different wall colors are in fashion, and wood is a more beautiful material than artificial stone or brick. A good option would be either natural wood with its indescribable texture or laminate. The latter already has such a huge selection of colors and patterns that you can choose the one that best suits your interior. An interesting solution would be to decorate one wall with the same material as the floor. Decorating the walls with laminate with your own hands will allow you to make the interior match your taste without regard to other people's norms and rules.
You can stick wallpaper with wood imitation on the wall
The wall decoration is made with wood-like tiles
Plastic
For anyone who has decided to paint wood-like plastic with their own hands, it is useful to remember the following subtleties:
- For painting it is best to use acrylic or oil paint. But the water-based composition is a bad idea. It is too liquid for such coatings, and will flow even from a properly prepared surface.
- Avoid formulations containing solvent; they can damage the plastic coating. It is also useful to know that not all types of plastic can be painted.
- Preparation of plastic consists of sanding and priming.
- The roller will not be able to properly paint the plastic; use a wide, medium-hard brush.
Source expo-sib.ru
Create a tree pattern on the wall yourself
Having decided to use such a newfangled wall decoration as an image of a tree in the design of a room, you must first decide on its type. The fact is that it can be simply drawn, or it can be made voluminous. What he should do in your situation will help you decide:
- Wall color.
- Decor style.
- The degree of illumination of the room.
- Type of furniture.
large branchy tree in the interior of a girl’s room
Based on the available information, imagine what shape and size your tree will become.
If you have certain abilities, you can approach the solution of the issue from a professional point of view, but people who are not particularly gifted creatively will have to think about how to create the desired image of a plant on one of the walls without any special frills and artistry.
It's probably easiest to create the outline of a tree using real dead branches. Draw a schematic outline of the crown and trunk and glue the collected branches along it.
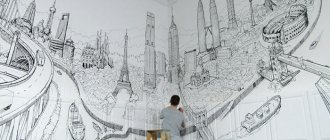
a drawing on the wall is an excellent decorative element that will give the room some zest
The trunk of such a tree pattern on the wall can be made prefabricated, that is, several branches can be connected together to give the desired thickness, or it can be laid out with pieces of bark.
In the crown area, large branches can be alternated with small ones. As for foliage, you can:
- Imitate with appliqué made of colored film or paper.
- Paint with acrylic paints.
- Make it as a stencil.
- Print from real leaves.
drawing of a tree on the wall in the interior of the dining room
The last option is very interesting. Collect a variety of leaves and use them as stamps, that is, paint their surface with paint and simply stamp it on the wall. It is easy to assemble a decorative tree from parts cut from self-adhesive film of the appropriate colors.
You can create a drawing of a tree on the wall not only with paints, but also with chalk or a simple pencil. However, in this case, if you are not strong in art, you need to practice with a sketch on paper. The thoughtful image is displayed on the album sheet in all details, then the flaws are corrected, additions are made, and the already finalized picture is transferred to scale onto the wall surface.
dark brown bamboo breaks up the sterility of a white bathroom
A decorative element such as a tree can be completely cut out of paper. Most often, the consumable material is old wallpaper or rolled paper. An outline of the future tree is created on them, which is subsequently painted with pencils or watercolors. The finished creation is pasted onto the designated area. Self-adhesive materials will significantly speed up and facilitate the task. Do you have a number of glossy magazines accumulated at home? Great! This is an excellent raw material for creating a wall tree. You will get an extraordinary and incredibly colorful option without spending a single extra penny on its production! Take scissors and start creating a tree design on a free wall. You can make themed branches, that is, decorate them with leaves with pictures of a certain theme. For example, in the kitchen a culinary theme will be relevant, in a child’s room – a toy or cartoon theme.
Not only film and paper are suitable for working on wood; fabric can also be a consumable material. The principle of working with it is the same as with paper, that is, the desired image is drawn on a piece of fabric, which is then cut out and attached to the wall. For such an applique, it is worth taking dense materials such as burlap, canvas, upholstery fabric, and linen. Using scraps of different colors, you can create a rather creative composition.
wood on the wall is a bright accent in the interior of the bedroom
A stencil greatly simplifies the work of creating decorative wood. It's easy to make it yourself. The required element can be cut out of thick cardboard. For non-professionals, working with a stencil may seem cumbersome at first: the workpiece will slip out of your hands or shift during use. To ensure that the wood pattern on the wall is clear, try fixing the stencil with tape, then you will not experience any unpleasant incidents during the work.
Methods for simulating natural texture
The most accessible methods are:
- Using a trowel for plastering work (with a rubber sponge imitating a wood pattern) . The easiest option to implement. You apply a layer of light paint and leave it to dry completely. Then apply the dark composition, wait for it to dry a little, and stamp the pattern with a sponge. When everything is dry, cover the decor with two or three layers of varnish.
Source rubankom.com
- Liquid mixing . The method is used to form a pattern on objects with a large area of painting (for example, on doors or furniture facades). The first layer of light paint is slightly dried, after which the second dye is applied with a brush. As a result, the shades blend slightly to create a realistic textured pattern. After drying, the coating is varnished.
- With application of soot . The object is painted and the paint is allowed to dry. Then set fire to a piece of plastic (it is convenient to use a disposable spoon or, for example, a straw). When soot appears, lines are drawn with it, trying to reproduce the wood texture. It is better to choose darker paint, it will look more believable. The resulting pattern is varnished.
Source: amazon.com
About one of the wood decor techniques in the following video:
Where to start assembling wood
Assembling a topiary must begin with planning the appearance of the future tree of happiness and finding the necessary parts. The appearance of topiary is determined by the style of the interior for which it is made. First, find the materials necessary to construct the base of the tree. In any case, you will need tape, glue, colored paper, polystyrene foam, polyurethane foam, etc. The list of parts is limited only by the imagination of the creator. After collecting the necessary things, you can start creating a topiary. First, the barrel is assembled, because it is the basis of topiary. Moreover, it must not only be strengthened, but also covered with varnish or paint. Then one end of the trunk is attached to a pot, stone or shell, and a ball is hung on the other, which will later become the crown of the tree of happiness. It is best to use glue to hold all the parts of the topiary together.
The basis
To construct the basis of the tree of happiness, whatever is at hand at that moment will do. To make a base from newspapers, you first need to crumple them thoroughly, and only then form a sphere according to the given parameters. Newspapers are crumpled and pressed tightly, after which they are wrapped with tape. The base can also be made from newspaper clippings, but in this case they should be placed in a plastic bag. If you need to make a small base from padding polyester, you first need to compact it into a sock or stocking, then give it the required shape and wind it tightly with sewing thread. It’s even better to make this base from polystyrene foam, using ordinary packaging from household appliances. But polystyrene foam crumbles and is inconvenient to roll into a ball, so this base is not very popular. In addition to those mentioned above, the following materials can become the basis of topiary:
- polyurethane foam;
- Knitting thread;
- papier-mâché, etc.
Trunk
The trunk of the tree of happiness connects the base with the crown, so it must be strong and stable. Its role can be ordinary wire, secured with artistic tape, twine or plastic. To make the product more realistic, this trunk can be made from a wooden branch or wood chips. But first this branch must be cleared of bark, covered with varnish and stain. If you are making a low topiary, then as a trunk you can take a popsicle stick, sushi sticks or wooden skewers fastened together. The color and type of trunk depends on the material of the base and crown. For topiary with coffee beans, white or brown colors are suitable. A curved trunk for a European tree can only be made from wire. You can also take any material that is approximately suitable for the trunk of a topiary, shape it and fill it with plaster.
Crown
To make a topiary crown, absolutely any materials that are currently at hand are suitable. To do this, you can take paper napkins, corrugated paper, folded origami, nylon tapes, etc. Then the crown needs to be decorated. To do this, take fir cones, real seashells, coffee beans, artificial flowers, etc. The crown is the main accent of the tree of happiness, so its design must be approached very seriously. The trunk and stand only emphasize the overall theme of the topiary, so it is advisable to first decide on the material for the crown, and only then design the remaining parts of the tree. But the topiary trunk may not be able to withstand a crown that is too large, so it should not be overloaded. Only the stand of the tree of happiness can be decorated with some elements.
Stand
As a stand for topiary, you can take an ordinary flower pot, a large flat stone or an iron bucket, decorate them beautifully and place them under the crown. The decor of the tree of happiness stand can be anything. It is decorated using the decoupage technique, decorated with lace or bright unusual shreds. You can stick stones, shells and artificial flowers on the stand. This topiary element is a semantic continuation of the crown, so its design must be based on the existing elements of the decorative product. If the tree is decorated in a marine style, then shells and multi-colored pebbles will be appropriate, and for a topiary in a romantic style you will need lace and hearts made of colored paper. The size of the tree's crown should be larger than its stand in order for the composition to look harmonious.
Advantages and disadvantages of wood-look wall decoration
If you like the idea of such a renovation, then first you need to decide on the materials that you will use. Each of them has its own pros and cons. For example, plastic panels are the cheapest, but do not have the most presentable appearance. Realism also leaves much to be desired.
Having chosen to decorate the walls with wood panels, you may prefer laminate. This option is one of the most popular, and its main advantage is its high realism. But laminate is quite expensive. MDF panels also look attractive, but are more expensive than plywood. By preferring the latter, you do not choose natural wood, but in the end you get the natural cut pattern of a natural material.
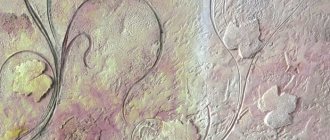
Decorative plaster perfectly imitates wood. Among its advantages, one should highlight its attractive appearance, but the main disadvantage is its high cost. You are unlikely to be able to apply the mixture yourself unless you have the appropriate construction skills. But if plaster was chosen for interior wall decoration, then you can end up with the look of wood in different textures, styles and structures. This can be wood of various types, cuts and designs. Some choose the stylized bark, while others prefer the texture of the fossilized material. You might like the woodworm-eaten structure.
As for wood-look panels for interior decoration, they can be made from different materials, for example:
- Fiberboard;
- chipboard;
- PVC;
- bamboo;
- gypsum;
- glass.
Fiberboard and chipboard are budget solutions that have advantages in the form of the ability to retain heat and stop sound waves. But such products are susceptible to deformation due to temperature changes, exposure to vapor and moisture.
Wood-effect bamboo panels can consist of several layers. The advantages of this material are expressed in the fact that with the help of such finishing you can hide large defects and unevenness of the walls by gluing seven-layer slabs. The disadvantage of such cladding is the same high cost.
Decorative panels can be made of glass, stone veneer and even metal. The base can be cork, plaster and PVC. Glass panels are resistant to temperature changes and moisture. They are ready to last for quite a long time, and the design can be as unusual as you like, imitating any type of wood. The disadvantage of this type of wall decoration is the impossibility of self-installation.
Wood imitation in interior design
Any specialist without hesitation lists the areas in which the use of such a simple, affordable, but also reliable, safe and beautiful material as imitation wood: interior decoration of houses and cladding of facades are the most popular. Indeed, wood is mainly associated with urban and suburban interiors, but it is most often found in the most ordinary apartments. Imitation larch timber is unique and makes it easy to create the warm atmosphere of characterful timber homes on a budget. This material has enormous potential, which should appeal to both supporters of environmentally friendly and traditional styles and lovers of modern design solutions.
Imitation larch timber in a modern bedroom Imitation lumber/wood forms the internal and external shell of buildings. This cladding perfectly hides “dark” walls made of concrete blocks and bricks. Imitation wood looks impressive, noble, adds light and warmth, it can be used when decorating new buildings or updating old ones.
Interior decorative wood looks very beautiful and noble. This type of cladding has recently replaced the usual one. Imitation timber is much more attractive from a design point of view, has impressive potential, and even the narrowest planks create the effect of solid wood
Benefits The main benefits of simulated wood include: The inherent strength and durability of wood. But unlike standard wood, thin slabs are much easier to dry. Also, at the production stage, the panel is coated with special impregnations, due to which the wood becomes more resistant to moisture, fungus, and mold. Beautiful and practical finishing materials for the bathroom. No shrinkage - the design has special grooves that prevent deformation. Resistant to UV rays - the surface does not fade in the sun, it does not change color over time. Resistance to temperature changes - can be safely used for finishing “cold” areas (attics, verandas, summer rooms, loggias). The simulated beam does not fade in the sun, so the color is stable for many years. Safety for human health due to the use of environmentally friendly materials. High heat and sound insulation. Simple installation that does not require special skills, thereby finishing the premises can be completed as quickly as possible. No special skills are required to install the simulation beam. Efficiency - The cost of material and installation is quite low compared to a conventional beam. Aesthetic appearance.
Advice! The color and texture of wood in the interior have a beneficial effect on the overall psychological state, so imitation wood is optimal for decorating any room in the house.
Disadvantages The disadvantages of imitation timber are the same as other lumber: Low fire safety. The need for timely prevention of the application of preservatives, varnish or tinting compositions.
Finishing walls with saw cut
Pine cut
One of the most unusual and popular interior design options today is saw-cut finishing. A transverse section of a trunk of small thickness is used as the main decorative element. This finishing method is so popular that by now manufacturers have already begun to produce wallpaper and tiles that imitate this pattern. Decorating the log walls in a room is very simple.
Finishing walls with saw cut
First of all, you need to decide how much area you want to occupy with cross sections. Experts do not recommend overdoing it, since an unusual type of decoration on a large scale can only spoil the interior. The best option is one wall, preferably the one located at the head of the bed.
It is necessary to prepare the wall, paint it a calm color, and then apply the logs using a special high-quality glue. They can be attached close to each other or you can come up with an interesting fragmentary pattern. It all depends on the imagination of the performer.
Self-production of coating
If you do the finishing of the walls with wood cuts yourself, then its cost will be minimal. Finding a dried tree is not a problem, nor is cutting it into unique pancakes. They will need to remove the existing bark and, if necessary, sand the outside. The planes must be sanded in any case to avoid splinters and other similar injuries appearing on the hands.
In some cases, it is not necessary to free the resulting parts from the bark - if the decoration of the walls with wood cuts should look as original and natural as possible. In this case, all circles are varnished to avoid peeling of the bark. After all the necessary parts have been prepared in the required quantity, all that remains is to secure them in the chosen location. There are several ways to do this:
- On vertically fixed slats or sheathing.
- Directly onto the wall surface using glue.
- Assemble a hanging composition.
The last option is used when it is intended to decorate only a small section of the wall. At the same time, individual fragments of the composition must be carefully fastened together with glue or another type of fastening. You can use a plywood base to glue the individual components of the structure onto it, and then secure the resulting structure to the wall.
It is easy to fix the cuts on a vertical plane using lathing. First, the sheathing itself is assembled, and all other decorative components are attached to it using glue, nails or another method. In this case, if necessary, the structure can be disassembled without any special consequences.
Finishing with wood cuts is carried out in exactly the same way when fixing them directly to the walls, with the only difference being that the parts will be fixed without lathing and it will not need to be assembled. However, fixing the elements directly to the base with glue will not make it possible to easily remove everything, and a large number of holes will remain from the nails.
Tree on the wall as an idea for interior decoration
Using the image of a tree, you can transform the interior. Moreover, there are different execution techniques. And this allows you to fit such decoration into any style, from ultra-modern high-tech and minimalism to classic modern.
Using the image of a tree, you can transform the interior.
In what rooms can it be used?
Regardless of the method of implementation, a composition with wood looks elegant in the following rooms:
- Living room;
- Bedroom;
- In the kitchen - where you need to fill an empty corner. A simplified Asian-style version looks good in the dining room;
- Corridor - provided there is a free corner or section of the wall not filled with furniture;
- Loggias - if the image is not filled with interior objects.
This image looks harmonious in any part of the apartment, perhaps with the exception of the bathroom or bathroom.
This image looks harmonious in any part of the apartment.
Laminate
In their design, such planks are very similar to MDF. A base made of pressed shavings and sawdust is also used here, and the outer decorative layer can be either film or made of real veneer. When decorative finishing of vertically located planes is carried out using laminate, you can choose the thinnest plates, which will reduce the overall repair budget.
Another advantage of such panels will be their resistance to moisture and abrasion. The coating will last for many years if you do not wet it too much and do not install it in rooms with high humidity. These include only the bathroom, since the moisture present in kitchens is relatively resistant to laminate. You just need to choose a moisture-resistant type.
Not only aestheticism, but also functionality
Actually, branches don’t have to be just decorative – with the right approach, they can be used, without any exaggeration! Let's say you need to hang several shelves - so let them become branches in the overall structure of the tree! And it is not necessary that they be strictly horizontal - at least if they have side walls. You can store various small things there, such as books, toys or feminine accessories. A very unusual solution would be a family tree, where portraits of family members, arranged in the appropriate order, will be placed on shelves, or simply fixed on top of the picture.
A family tree can be a useful way to decorate a wall.
If real tree branches were used in creation, they can be used as a hanger for various small items. Please note! If the branches themselves are small and fragile, then they will not support heavy objects, however, say, small jewelry can be hung on them. This is especially true for ladies who have a lot of different rings, pendants, chains and other small jewelry.
Don’t limit the flight of your own creativity - try to create something unusual, and let your tree on the wall be unique!
Photo gallery: creative ideas for wood on the wall
- Interior decoration Ceiling
- Walls
- Doors, arches
- Window
- Stove, fireplace
- Kitchen decoration
- Bathroom, toilet
- Corridor, hallway
- Balcony, loggia
- Other rooms
- Finishing of buildings Country and private houses
- Wooden houses
- Baths, saunas
- Finishing materials Drywall
- Cladding panels
- Wallpaper, cork
- Tile
- Laminate, linoleum
- Decorative plaster
- Finishing work Plaster
- Primer
- putty
- Painting, whitewashing
Marble plaster is a type of finishing material that contains natural marble chips. After drying.
Most people think that plastering wooden walls is not the best idea as it is now.
DIY liquid wallpaper is an affordable alternative to expensive finishing. To make them you will need materials.
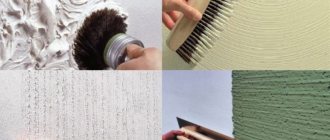
Create a wood effect with your own hands
In the end, I would like to consider at least one of the options for creating decorative wood-like plaster in more detail. Otherwise the topic would not have been fully developed. Although there is an option with the video above, this was work at a professional level. We are interested in showing how anyone can achieve the wood effect with their own hands. Let's look at the procedure step by step.
- Apply textured plaster to the wall using a stainless steel spatula. We carefully level everything so that the surface is smooth (not ideal, but we don’t need any holes or hills). The layer of applied solution should be 3-5 mm.
- We take a regular clothes brush and run it smoothly across the surface from top to bottom, with light pressure. This is how we create grooves. You can draw both straight vertical lines and wavy ones with a brush. It is advisable to combine both options. You can also make lines by holding the brush perpendicular to the floor. In this case, the drawing will not be of the same type. After each application, the brush should be cleaned of any remaining solution on it. Leave to dry for 10-20 minutes.
- The dried mass on the wall with the grooves that we recently made should be rubbed off with a smooth spatula. The spatula itself must be wiped regularly during grouting. The movements are again vertical - from top to bottom or from bottom to top. This is done in order to give the picture a glossy surface. Let it dry.
- We tint the gel base in a wood shade. Apply it to the wall with a brush (you can use a roller or swab). The movements should again be vertical so that the brush moves along the veins. In this case, the gel fits best into the grooves. Let it dry.
- Using a Japanese spatula, we smooth the surface using longitudinal movements from top to bottom. That's all.
Choosing paint
When choosing paints and varnishes, the first thing you need to focus on is the nature of the surface on which the effect of natural wood will be created. The dye should match the type of substrate, but in most cases, water-based acrylic is the best choice. Its consistency is ideal for brush work.
It is equally important to determine the colors (you need two of them) that represent the shades of the wood as realistically as possible. They try to choose the combination so that the surface appears to be made of a certain type of wood. You will need a light tone (shades of beige, golden, light gray, sand) and dark (dark brown, black, burgundy). Also remember the following rules:
- Buy paints from one manufacturer.
- The shades are applied in layers: first light, then dark. Therefore, the dark composition should be more liquid; this will make it easier to spread over the bottom layer.
Source materialexpert.ru
- The colors should form a natural combination and suit each other. Too much contrast will look unnatural.
- When choosing, consider the palette of the interior, furniture or decoration. This will help fit the updated item into the decor.
Application options
Each room has a separate purpose and its design must be appropriate. Thus, the use of wood trim varies depending on the space.
Kitchen
The amount of wood in the decoration of this room is very variable, from highlighting the dining area with an accent wall to completely covering the walls.
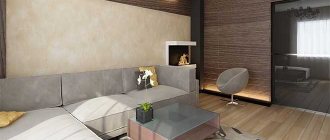
Living room
In a living room or office, wooden decoration is always appropriate and effective, and in addition, it emphasizes the status of the owner in front of his guests. This can be either a classic style - boards covered with dark varnish with carvings in combination with parquet, or a Scandinavian style with powerful beams in light colors, emphasizing the connection with nature. If you choose Provence, then it is better to complement the wooden finish with wooden furniture in pastel colors.
When using minimalism or hi-tech to decorate the living room, it is better to use thin, calibrated boards so as not to create a massive effect, but to emphasize the features of the style. Eco-style can use untreated boards that preserve bark, stumps instead of bedside tables and coffee tables, a mount for a large TV in the form of a branch, and others. Separately, it is worth highlighting a wall made of saw cuts; there are a huge number of design options: saw cuts of boards that protrude unevenly and form various functional or decorative protrusions, saw cuts of round timber that cover the wall like fish scales, and others.
Bedroom
The best choice is light-colored breeds that create a soft, cozy and relaxed atmosphere. To emphasize naturalness, you can use matte varnish. Based on the number of wooden panels, this can be either a complete covering of the walls or a single wall, floor or ceiling, depending on the specifics and richness of the interior. The more minimalistic the design, the less often wooden inserts are used.
Paint can be used both to emphasize the texture and to completely cover the color and paint wooden elements to match the color of other decorative objects and decorations. It is worth painting in the same soft colors: beige, pistachio, mustard and wood.
Children's
It’s worth noting right away that the absolute naturalness of the material is more appropriate in a child’s room. It is possible not only to decorate the walls and ceiling, but also completely wooden furniture and other decorative elements. For a child's room, calm, soft shades of wood or painting their surfaces in bright, expressive colors, symbolizing the youth and energy of the baby, are perfect.
Bathroom
The first thing to do is to choose moisture-resistant types of wood and be sure to be impregnated with a hydrophobic mixture. The walls, floor and ceiling can be completely covered with wood, so the bathroom will look like a bathhouse.
It looks great to highlight a snow-white bathtub with a strip of dark wood equal in length from floor to ceiling against the background of a white tiled floor and the same white walls. Also in the bathroom, the combination of wood-clad walls and stone floors looks good.
What tools are needed
Any paint and varnish composition is applied to the prepared surface, and for preparation you will need the following tools:
- Screwdrivers. You cannot do without them if there are parts on things that you do not plan to paint (for example, handles on the facade or on doors).
- Devices for cleaning: sandpaper of various grains, wire brushes, metal sponges.
In the process of applying “wooden” decor, the following items are used:
- Painting tool. Depending on your preferences and the amount of work, this could be a set of brushes, a roller with a removable attachment, or a spray gun.
Source okuzove.ru
- Paint and varnish products. Paint in two shades (possibly aerosol), primer, transparent (colorless) varnish.
- For some types of decoration, additional tools are needed, for example, a trowel for plastering work (with a rubber sponge).
Difficulties in laying out a modular floor
This type is quite complex, so it is better to be patient and get to work. Choose thick trunks to avoid the formation of large voids when laying out circles. Hardwood logs are selected to make the floor, because the floor is exposed to impact every day.
There are two reasons that will make you sweat:
- Solution. If you put all the parts on glue, then the floor will not last long, even if you cover it all with varnish. Modules will begin to fall off due to constant pressure. You will have to use a solution, possibly cement-based.
- Leveling the surface. If the thickness of each element does not play a big role in the design of the vertical plane, then for the floor this is the main condition. It is necessary to adjust all the modules to the overall thickness, and start grinding after installation. The procedure will take quite a long time, because achieving a smooth surface is not easy.
Next, start covering the finished surface with varnish. It will protect it from pests and external influences. The floor is easier to clean, and it will last longer in a “protected” state. An unprotected surface can be attacked by pests or it will simply begin to rot due to excessive moisture.
How to do it yourself?
It is best for beginning artists to choose paintings and subjects that are not too complex. And in this case, wood would be a good choice. This bas-relief can be placed on the wall. It can be a large spreading tree or its individual branches.
The first step is to process the wall. The surface must be absolutely flat and clean. When the wall is completely dry, it should be primed for better adhesion and then move on to the work itself.
For beginners, the best option would be not to use a large canvas at once, but to select a small part of the wall or ceiling and place the tree there. It’s even better for your first experiment to build a frame and place a plaster painting on it that can be hung. This will allow the beginner to practice, and if he fails, the wall will not be damaged.
The next step is to mix the mixture. All instructions are on the package. It should be thick, in no case spread, and resemble a paste in consistency.
Then you can move on to creating the tree itself. First, the drawing must be reproduced on the wall using a simple pencil. If you are not confident in your artistic abilities, there is always the option of using a ready-made template. To do this, just attach it to the wall with masking tape, fill the slots with paste, and after drying, remove the template.
While the plaster is still wet, you can correct some inaccuracies. After complete drying, cover with finishing solution and then paint.
How to prepare a surface for painting
The following procedure is suitable for all types of surfaces (with some adjustments):
- All small parts that may interfere with the work are removed and they are not planned to be painted. Everything that cannot be dismantled and cannot be painted is carefully packaged in masking tape.
- The field of activity is cleaned of dirt and old finishes (if any), and then leveled using sandpaper with different grain sizes (first coarse, then fine). If the area allows and you have the skill, it is more convenient to use a grinding machine.
Source gotrangtri.vn
- The previous point is skipped if plastic is being prepared for painting. It is better to leave it rough to increase adhesion (adhesion to paint). This is where a wire brush comes in handy.
- Metal products are checked for rust (corrosion). If it is detected, the affected area is cleaned and treated with a rust remover.
- Using putty, fill unevenness and defects; After drying, sand it again.
- The surface is degreased using acetone and white spirit. For metal, an alkaline agent is suitable; for plastic, the best choice is an antistatic agent (you can use either a spray or a concentrated liquid).
Source kraska.guru
How to choose quality materials for interior wall cladding
You can choose different wood: aged, classic panels or recycled wood. However, you should be careful with its use. The simultaneous use of a large number of different types of wood creates a feeling of chaos in the space. It is much better to use one type of wood with detailing on another type that complements it. For example, the interior could be clad in light spruce paneling with larch trim.
By following simple design ideas, you can give the interior a certain stylistic direction.
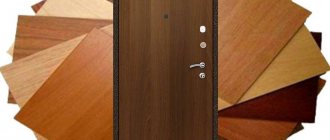
Possible materials for the manufacture of wood wall panels:
- Natural wood panels. Most often made of oak, cedar, maple or alder.
- Chipboard. The manufacturing process is based on the method of hot pressing of chips and sawdust.
- Fiberboard panels. Also made by hot pressing, but using wood and other plant fibers.
- MDF panels. This is a relatively new material based on MDF boards using dry pressing at high temperature and pressure.
Natural wood is combined with modern elements: metal or glass panels and inserts.
What is disguised as a tree?
Imitation of a wooden surface is relevant for many materials; the characteristic texture is reproduced on metal, plastic, ceramics, glass, chipboard and MDF. I would like to note that technologically there is not much difference on what basis the desired pattern is created. Different textures are obtained by mixing different colors and using additional tools.
Most often furniture, doors and windows are treated as wood. Sometimes it is necessary to make auxiliary metal products aesthetically attractive, for example, corners, load-bearing structures, shelving shelves, joints of different flooring materials, metal thresholds used to seal joints when laying laminate or boards.
Imitation wood can add a stylish look to your car's interior, dashboard or doors. With the correct selection of dyes, they create the texture of different types of natural wood (oak, ash), imitation of bark, roughly processed or polished boards.
Source journal.homemania.ru