Puttying walls is a mandatory step when renovating any room, regardless of whether you wallpaper or paint the walls. It must be remembered that the final result will depend on the quality of the work. But no matter how difficult this work may seem to you, it is quite possible to do it yourself.
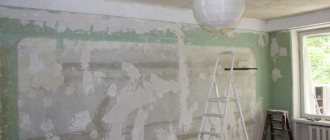
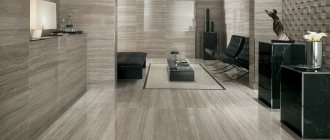
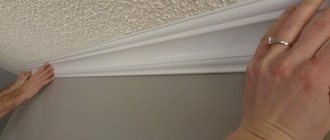
Applying the final coat of putty in the bathroom.
So let's get started.
What properties should bathroom putty have?
First of all, let's figure out what putty is? This is the finishing layer that is applied before final finishing to create a perfectly flat and smooth surface. The main purpose of applying putty is to eliminate minor defects and cracks.
More serious unevenness must first be corrected using plaster or drywall.
Regardless of what you use to finish the bathroom in the future, the leveling layer should have the following characteristics:
- Moisture resistance. The bathroom is a room with high humidity. The coating should not deteriorate or peel off under the influence of moisture, even over time.
- Durability. The service life of such a coating without loss of quality should be long.
- Resistant to temperature changes. Temperature changes should not lead to deformation of the putty layer, otherwise the lining will not stick to it.
These are the main criteria by which you need to choose a composition. All other characteristics depend on your individual needs and further cladding.
Putty process
Leveling the walls
- First of all, it is necessary to inspect the room for the presence of fungus and mold, which are often found in the bathroom. This “vegetation” must be carefully removed. Before priming, you need to treat the affected areas with an antiseptic or bleach.
- Also, before you start puttingty, check the ventilation. If there is a malfunction, it should be repaired to prevent further mold formation.
Fungus in the bathroom.
- We remove the old layer of finishing, and it is necessary to remove the old putty from the seams.
Remove the old finish with a spatula and hammer.
- Using a level and plumb line, we determine the unevenness and angle of inclination of all walls.
We use a level to control.
- If the deviation exceeds 5 mm, then it cannot be eliminated using putty. In this case, plaster is required. To maintain the level, it is convenient to use beacons.
We put beacons on the walls.
Preparing the putty mixture
The instructions for preparing the putty mixture are as follows:
- Fill a large container with water. Approximately 1/4 of its volume
- Pour the mixture into it and thoroughly stir the resulting mass with a construction mixer.
- Leave it for 3 – 5 minutes and mix everything well again.
Mix the thick solution.
This completes the preparation of the solution.
Important! It is worth noting that there is no need to make the solution liquid, as it will be extremely inconvenient to work with it, because it will constantly drain from the tool and surface, but it is also difficult to apply the mixture evenly if it is too thick.
Surface preparation
Bathroom putty for painting must be moisture resistant. For example, latex.
Ceilings in rooms with high humidity are prepared for painting in the following way:
- We prime the surface with a deep penetration acrylic primer.
Acrylic primer.
- We are waiting for the first layer to dry.
- We sand it and wipe away any remaining dust and dirt.
We sand the ceiling.
- Primer for finishing.
We prime with a roller.
Wall decoration
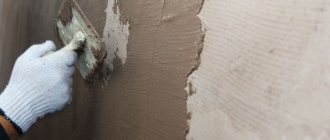
- We putty any unevenness that appears after cleaning, having previously treated the surface with a primer.
Let's start filling the walls.
- We wait for the walls to dry, after which we sand them and wipe them from dust.
Sand with sandpaper.
- Then we apply a layer of primer and level the walls with putty.
We putty the walls.
To prevent the painted surface from cracking, it is advisable to use reinforced putty. There are several varieties that are ideal for bathroom renovations. This can be a mineral putty with reinforcing fibers or a moisture-resistant putty with a reinforcing polymer mesh to strengthen the walls.
Putty corners
To putty internal and external corners you will need a special corner spatula (photo). The putty method is similar to the method described above.
At the same time, do not forget about the thickness of the layer, which should not exceed more than 5 mm. Otherwise, cracks may form.
You need to prepare such an angled spatula.
Ceiling finishing
Puttying the ceiling in the bathroom is similar to puttingtying the walls. After the ceiling in the bathroom is puttied, we apply water-based, vapor-permeable, moisture-resistant paint to it. Do not forget that it is towards the ceiling that hot, humid air will rise.
The peculiarity of this paint is that it absorbs excess moisture and releases it at normal humidity levels without the effect of dew, preventing the appearance of mold. In addition, if necessary, the ceiling can be washed.
Tip: it is recommended to use acrylic paint containing fungicides to finish the ceiling in the bathroom. This will help prevent the appearance of fungus and mold.
We paint the ceiling with moisture-resistant paint.
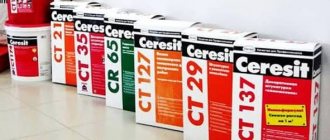
Types of putty based on raw materials
Depending on the type of main component and purpose, bathroom putty for painting comes in the following types.
Cement
One of the main advantages of this type of mixture is its high resistance to moisture. Therefore they are recommended for use in the bathroom. The cost of such material is within reasonable limits, and the characteristics are quite high.
Important! When exposed to moisture, the putty becomes even stronger. But this composition dries slowly and shrinks.
Polymer
At the moment, these are the most advanced developments, which, of course, affects the price. The surface is very even and smooth. This putty is flexible and easy to work with, and does not shrink.
There are 2 types of polymer-based putty:
- Acrylic - has a high level of plasticization, so it can fill small irregularities and defects. The composition is odorless and has a high degree of adhesion to surfaces made of wood or concrete.
- Latex composition - allows you to get a mirror surface that is not prone to cracking and shedding.
Plaster
Gypsum mixtures are not suitable for the bathroom, as they are not able to resist the concentration of hot steam, not to mention possible leaks from above.
Oil-adhesive
One of the first putty powders, which is considered obsolete. How to beautifully paint walls with wallpaper for painting? The quality of work with such a composition is very low.
Therefore, it is mainly used for utility rooms that do not require high-quality finishing.
Preparatory work
When puttying, like no other type of work, not only the finishing process itself depends on the correct preparation of the surface, but also the final result, material consumption, and durability of the repair. Conclusion: before you putty the ceiling in the bathroom, the surface of the base must be prepared in the most careful way. The following work is required:
- removing the old layer of plaster;
- paint removal;
- whitewash removal.
Most putty mixtures have poor adhesion to chalk or paint (see Painting the ceiling in the bathroom: selection of materials and work algorithm). If the old coating is firmly adhered to the base, then you can leave it alone. It is quite simple to check the delamination - you need to tap the surface with a hard object. A loud knock indicates that the coating is solid, while a dull and rattling sound indicates that the coating is weak and must be removed. The internal surfaces of cracks or deep joints of concrete floor slabs, if any, must also be cleaned. For better coverage and adhesion to the putty, the edges of the cracks are cut to create inclined walls from the surface to the bottom of the crack.
After cleaning, the entire surface must be treated with a deep penetration primer with antifungal and antiseptic impregnation. Such additives prevent the formation of mold and mildew, which love high humidity and temperature (see Fighting mold on the ceiling in the bathroom). If the fungus is already present, then the old plaster in this place must be completely removed, down to the base. All subsequent work is carried out only after the primer has completely dried.
Types of putties by purpose
What bathroom putty is suitable for painting? We are looking for special markings on the packaging that the mixture is suitable for use in a bathroom. Next, we select one of the options, since depending on the purpose, putties are divided into:
- finishing putty, which is most often sold in ready-made form and is used for final finishing of walls;
- leveling putty, which is used for the initial leveling of walls or ceilings;
- A universal putty composition allows for both leveling and final finishing.
Important! Before applying any mixture, regardless of its composition, you need to coat the walls with a primer, which ensures adhesion of the surface to the material. In addition, it performs an antiseptic function.
Advice from professionals
To ensure quality work, professionals advise:
- Before puttying, the ceiling must be cleaned of the old coating. If you have old putty, you need to make sure that it holds firmly and does not crumble over time.
- To increase adhesive properties and protect the ceiling from mold, it must be re-primed. If the composition is strongly absorbed, the primer is applied in 2 layers.
- It is recommended to start work from the corner of the room.
- Wet the rule in water during puttying. Due to this, the tool will glide better over the surface and level the ceiling efficiently.
- Ceiling sanding does not begin unless the putty is completely dry. If there are no longer wet spots on the surface, then you can proceed to the next stage of work.
- To determine the presence of cracks before sanding, you can use a portable light. The light is directed to the ceiling and possible defects are carefully examined. If necessary, possible cracks are covered with putty. If you also need to sand the walls, read the article How to sand walls after puttying
To properly apply putty to the ceiling, you can use the video instructions. The main secrets of correctly applying the mixture to the ceiling are presented.
Puttying a ceiling for painting is not a very simple task, because it requires certain skills. But after a certain time, you can perfectly putty the ceiling even without using the rule and diligently grouting the surface. Therefore, these simple recommendations will help in this matter.
Mixture release form
Depending on the readiness of the material for use, there are two types of putties:
- Dry mixture - water is required for dilution. Such mixtures harden quickly, so they need to be prepared in small portions.
- The finished composition is more expensive, but at the same time more convenient to apply. The shelf life of this composition is quite long; over time, it does not lose its quality characteristics.
Important! If you have not yet had experience in repair work, but in this case you want to do everything yourself, choose ready-made mixtures. This way there will be less risk that you will do something wrong.
Types of putty composition
To finish the bathroom you need to calculate the material consumption. This indicator will depend not only on the base of the walls, but also on the type of substance we will use. All compositions can be conditionally distinguished by the level of readiness and the substance from which they consist. Some mixtures require preparation and are sold dry, while others can be used immediately. Taking into account the characteristics of the microclimate, compositions based on cement or polymers are most often used. The material is not afraid of mold, mildew, is not subject to corrosion, and cracks are unlikely. In total, several types of materials are used for work:
- The most common compositions are cement-based. It is not exposed to moisture or temperature. Even for painting work, the substance will show good quality. An additional advantage of the budget cost. The surface has a grainy appearance and is gray in color. Not suitable for light paint tones. Another disadvantage is the possibility of shrinkage. The mixture will have to be applied in several layers and sanded. Long drying time, which takes a lot of time;
- A more flexible, lighter gypsum composition. It can be safely used for any tones. Does not tolerate temperature fluctuations well;
- Previously, oil-adhesive compositions were used. It is of low quality, which is why it is increasingly being abandoned;
- Recent developments have produced polymer-based mixtures. When in contact with air it will acquire special qualities. It has high ductility, strength, durability, creating a perfectly smooth surface. Requires work using protection.
Plastering and painting the bathroom
If you have decided how to putty the walls in the bathroom before painting, you can’t just apply the compound and level the walls. First the surface needs to be prepared.
Surface preparation
In order for the coating to hold firmly and not deform over time, the surface must be cleaned and primed. For this:
- First you need to remove the old coating layer from the surface. If there are irregularities, they are knocked down with an ax or cut off with a grinder. After this, the walls are cleaned with a solvent to remove grease stains and with a damp cloth to remove dust and dirt.
- If the surface is severely damaged, then it must be treated with cement plaster, which will fill all large cracks and defects.
- Then you need to treat the walls with an antiseptic to prevent fungus from appearing.
Important! If the surface is wet, it must first be dried. If there are traces of mold or mildew, they should be cleaned with a wire brush and burned with a blowtorch.
- Now the walls can be treated with a primer, which will fill all the pores and microcracks, strengthen the surface and ensure its adhesion to the subsequent layer of putty.
At this point, the preparatory stage can be considered complete; all that remains is to wait until the primer layer dries.
Ceiling preparation
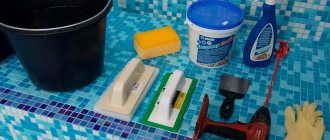
Before puttying, it is imperative to prepare the surface for work. For this you will need:
- bucket
- sponge
- putty knife
- sanding paper
- short nap roller
- cloth napkin
Preparation consists of several stages:
- Removal of old coating. Unnecessary wallpaper is removed, paint or old whitewash is removed;
- Cleaning. All dust and dirt are removed from the surface;
- Treatment with antifungal solutions. If there is rot or mold on the ceiling, the surface is impregnated with special protective mixtures;
- Primer. A layer of primer is applied to the entire working area to improve the adhesion of the putty to the surface. Experts advise applying this base in two layers. After each application, allow the primer to dry completely.
Subsequent surface finishing work should be carried out only after the primer solution has completely dried. If there are significant unevenness on the ceiling, the surface should first be leveled using plaster.
Bathroom putty: destroying myths about the requirements for finishing damp rooms
It is generally accepted that only moisture-resistant materials can be used for interior decoration of a bathroom. I am going to prove to the dear reader that this rule is far from necessary, and to confirm my arguments with my own experience.
Cement mortars are traditionally used to putty walls in the bathroom.
Brief summary
Cement moisture-resistant putty for the bathroom is not the only material that can be used to level walls. Gypsum mixtures can also be used for puttying.
Gypsum-based building mixtures.
In this case, two conditions must be met:
- The final coating of the walls must be waterproof . I provided a list of possible solutions a few paragraphs above;
- The room must be equipped with effective exhaust ventilation . With constant dampness, any mineral-based material will inevitably be affected by fungus.
Low ventilation performance will quickly lead to the appearance of fungus.
In a typical city apartment, for normal ventilation operation, it is enough to install an exhaust hood in the ventilation duct. You should not connect the fan in parallel with the lighting: the bathroom needs ventilation around the clock, but it is used for its intended purpose only one or two hours a day.
Exhaust hood in the bathroom ventilation duct.
To fill minor defects in walls and ceilings, you can use façade acrylic putty. After setting, it tolerates short-term contact with water even without protective painting.
Facade acrylic putty is sold completely ready for use.
On thematic forums you can come across an interesting question: who coated a metal bathtub with noise-reducing putty? I appreciated the mindset of its author, who was inclined to look for non-standard solutions; however, it is much easier to foam the bottom of the bathtub or stick thick microporous rubber on it.
Polyurethane foam applied to the bottom will turn a noisy bathtub into a quiet one.
In order not to be unfounded, I will tell you how and with what I finished the combined bathroom when building the attic of my own house.
The frame is a galvanized profile 50 mm thick (guide and rack).
The wall frame is assembled from galvanized profile.
Sheathing - wall plasterboard. Due to a small error in the calculations, there was not enough moisture-resistant plasterboard, so part of the wall and ceiling cladding was made of ordinary, white plasterboard.
From left to right: regular, moisture-resistant and fire-resistant gypsum plasterboard.
Puttying
How to putty plasterboard in the bathroom along the seams and fastener heads? After a brief reflection, I boldly used gypsum mixtures - HP Start to fill the joints and ABS Saten to level the surface.
Finishing gypsum putty ABS Saten.
I really liked ABS putty because of its long (at least 45 minutes) lifespan after mixing and the fact that it almost never clumps when mixed, even if it does not have time to be completely saturated with water.
The putty for painting for the bathroom was sanded using an oscillating sander and mesh No. 80 and No. 120. The first was used for rough grinding, the second for final smoothing of the surface. After sanding, the walls were vacuumed to remove fine plaster dust and primed with acrylic primer.
For small amounts of sanding, you can get by with a hand grater.
I already wrote about which paint to choose. My choice was the notorious “Rezel+”. Due to the small area of the walls and the abundance of corners, I painted with a brush; In total, I had to apply 4 layers of paint, since with less, the coloring remained uneven. The drying time of one layer did not exceed 60 minutes.
Wonderful paint made in Sevastopol.
If you are tinting the paint, mix it with pigment with a reserve. The instructions are due to the fact that sooner or later the walls will require minor repairs; It is basically impossible to get exactly the same shade again when mixing with your own hands.
When tinting by hand, mix the paint with reserve for future repairs.
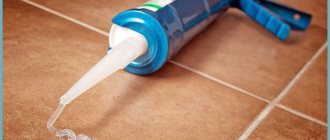
A tiled splashback was glued to the wall above the bathtub. The tiles were glued in a somewhat unusual way - with silicone sealant applied in spots. It was also used to fill seams.
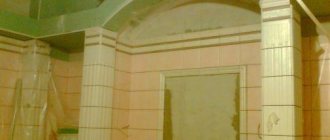
The finish is durable and completely waterproof.
The apron tiles above the bathtub are glued with silicone sealant.
Ventilation
A duct fan with a capacity of 105 m3/hour is installed in the exhaust grille of the ventilation duct. Its power supply circuit is dimmable. The dimmer allows you to choose between ventilation performance and silence.
Next to the switch is a dimmer that controls the speed of the exhaust fan.
Operation report
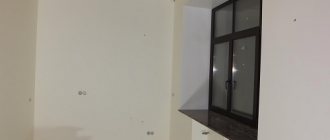
Almost three years have passed since the finishing work was completed, and the interior of the room has retained its impeccable appearance and has no visible signs of damage to the finish.
The photo shows a wall finished with gypsum putty in the bathroom of my attic.
From the article you learned that there are no restrictions on the type of binder for putties and plasters used in the bathroom. With the right choice of finishing, you can safely use building mixtures intended for dry rooms. You can learn more about finishing bathrooms from the video in this article.
Bathroom putty: destroying myths about the requirements for finishing damp rooms
Prerequisites
The conditions of the bathroom really suggest that only wear- and moisture-resistant materials with minimal hygroscopicity should be used in it. In particular, waterproof putty for the bathroom should be made with a cement binder and nothing else.
Cement waterproof putty.
- Bathrooms are characterized by high humidity. More precisely, humidity fluctuations in a wide range of values: after taking a hot shower, the atmosphere in it will be saturated with steam, but after half an hour of ventilation operation, the humidity will stabilize at the same level as in living rooms;
Where there is a shower, there is high humidity.
- The walls and, to a lesser extent, the ceiling of the bathroom are susceptible to dirt. They are exposed to splashes of shampoo, soap and detergents that are used to clean the bathtub, shower stall and washbasin.
Even splashes of clean water can leave marks that need cleaning. Water contains a large amount of lime and salts, which, after it dries, settle on the previously wetted surface. If in doubt, look at the bottom of your own kettle.
Scale consists of lime dissolved in water.
Comrades, what do you think: will you get very wet in the rain if you wear a raincoat made of waterproof material?
Stupid question, right? You are protected from water by a reliable barrier, so you will probably get home in a dry suit.
Why did I ask this question? You see, finishing walls does the same thing to plaster and putty that a cloak does to your dress suit. What difference does it make to putty on walls before painting if the paint is impermeable to water?
Yes, but where can I get such paint? - the reader will ask, perplexed.
As they say in Odessa, I have them. Meet: rubber water-dispersion paint.
Rubber water-dispersion paint of domestic production.
I will give its characteristics using the example of a dye that I have repeatedly used when decorating my own home - Rezel + produced by the Sevastopol Accent LLC.