MesterulManole
24697 0 2
MesterulManole June 22, 2017Specialization: many years of experience in finishing works of residential and office premises, dachas, country cottages, etc. Hobby: cycling in all its forms
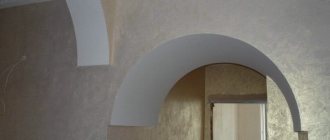
An arch is an opening in which there are no doors, and that is why the quality of the finish is so important, because any flaw will be noticeable
Are you going to finish the arch in your apartment and don’t know where to start? I'll tell you about 10 simple ways to finish an opening, and you can choose the option that suits you. I will also offer three simple instructions for finishing wall openings yourself.
How to putty a plasterboard arch
How to putty a plasterboard arch
(to seal all gypsum board joints and places where screws are screwed in).
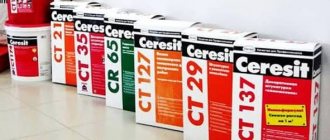
Finishing putty Vetonit LR +
(for puttying gypsum boards).
Primer KNAUF – Tiefengrund
(for priming all gypsum board sheets before each new layer of putty).
(self-adhesive fiberglass tape).
- Container for mixing putty.
- Perforated corner.
You can find out more about the profile for drywall by clicking on the linkWe also need the following tool:
- Narrow and wide spatulas.
Wide brush.
- Roller with telescopic handle.
- Grater and mesh for grinding.
- Phillips screwdriver or screwdriver.
- Scissors.
- Staples and construction stapler.
- Mixer and drill.
- Roller tray.
You can view all photographs of materials and tools by clicking on the link below.
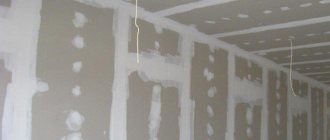
Let's start puttingtying the plasterboard arch
It is necessary to inspect and check the entire plane of the drywall before starting work, check the integrity of the sheets, and use any spatula in the places where the screws are screwed in to secure the drywall to the guides. The screw should not interfere, but if the spatula gets stuck on one of them, then it should be screwed inward by about 1 or 2 mm relative to the plane of the drywall. There may be other defects, if possible, eliminate them!
I. Apply primer to the arch
- Take the KNAUF - Tiefengrund primer without opening the lid, mix by shaking the container.
- Take the roller tray and pour the primer into it, after opening the lid.
- Next, take a roller with a telescopic handle and a brush, coat all joints and places where the plasterboard is attached.
- After applying the primer to the drywall sheets, you should wait a little for absorption.
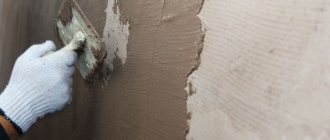
II. We putty all the joints of the gypsum boards and the places where the screws are screwed in using Knauf - uniflot
- After this, take a small container for mixing, pour Knauf-uniflot putty into it (do not stir a large amount of the mixture at once, as it sets quickly! Practice with a small amount first). Stir using a narrow spatula by adding water until a homogeneous mass without lumps is obtained. The mass should not be liquid or watery, it should be easily applied to drywall and not fall off!
- Apply the putty, inserting it as deep as possible into the joint of the gypsum board, coat it on top and then apply self-adhesive fiberglass tape, pressing it into the putty and then leveling it using a 15 cm wide spatula.
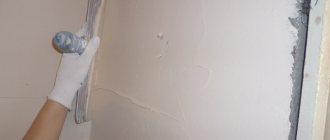
III. Putty using Vetonit LR +, first layer
- We take a larger container for mixing, pour Vetonit LR+ finishing putty into it (do not stir a large amount of the mixture at once! Practice with a small amount first). Stir using a drill with a mixer attachment by adding water until a homogeneous mass without lumps is obtained. The mass should not be liquid or watery, it should be easily applied to drywall and not fall off!
Now you can apply it to the gypsum board. For best results when puttingtying the surface, use a bright light bulb.
IV. Apply the primer to the arch (the stages of applying the primer are described above).
V. We putty using Vetonit LR +, the second layer (the putty method is described above).
VI. Apply the primer to the arch (the stages of applying the primer are described above).
How to do the job correctly with your own hands?
Required materials and tools
To give drywall an arched shape, use the wet method of applying putty. You should prepare in advance:
- the right amount of water;
- roller for spraying the composition;
- the sprayer itself;
- a brush or sponge for wiping away smudges and smoothing out sharp corners;
- Screws may be required to secure the corners.
For the dry method you need:
If you need to bend a metal profile, the following will be useful:
- metal scissors;
- self-tapping screws;
- screwdriver;
- gloves that are necessary to protect your hands.
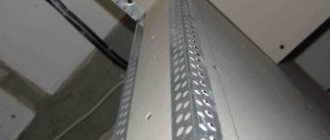
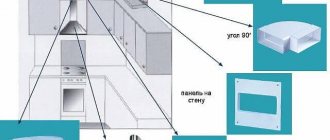
To make straight lines along which the putty will be applied, plastic perforated corners or metal elements are used. For arches it is customary to use curved profiles. It is necessary that there is one solid shelf, and the second row is made in the form of petals or cloves. These elements should be purchased in advance according to the required and calculated sizes.
Step-by-step instruction
Setting up a profile
- Before lubricating the arch with putty solution, the surface should be thoroughly cleaned of construction debris and dust. To do this, pass along the wall with a damp cloth, or even better, with a vacuum cleaner.
- If there are dents or protrusions, they must be plastered. You should get a smooth surface on which you can install the profile.
- In order for the work to be successful, and for the final layer to lie flat and last a long time, you need to wait until the base ball of putty dries and level the surface with sandpaper.
- Then you need to apply a thick layer of primer and wait until the liquid is absorbed into the pores of the base.
The faster the primer is absorbed into the arched structure, the less securely the putty layer will adhere. In this case, priming is carried out several times in a row. Only after the primer layer has completely dried do they begin to install the profiles.
A perforated profile is purchased in advance, and its quantity must strictly coincide with the previously announced option.
When the opening is made in a plasterboard partition, it is necessary to secure the linings on the sides:
- The area that requires fastening with edges is determined in advance.
- A perforated corner is placed on it and secured along its entire length at equal intervals.
- After attaching the corner, this operation is repeated on the other side of the arched arc.
Profile finishing and fixation with mortar
The finished composition is added to the container, which is prepared strictly according to the instructions. You can purchase an already formed mixture, sold at any hardware store, or mix the putty solution yourself. You need to add a small amount of solution to a dry and clean construction container.
The procedure for finishing the profile consists of the following points:
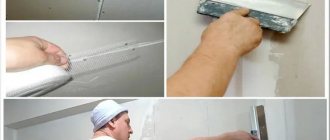
- Using a small trowel, mix the solution well, scoop out a small amount of putty, and place it on a spatula. You can immediately perform this procedure with a spatula, but this is a less convenient option: a lot of excess composition spreads along the edges of the tool, and the putty layer is placed crookedly.
- Thick strokes are applied to the arch with a spatula. First you need to pay attention to the space between the screws. Carefully smooth out the first layer to ensure uniformity.
- Press the solution into the existing perforation holes. This will ensure sufficient adhesion to the base.
- The putty is applied until the main decisive layer is completed. As soon as the desired pattern is obtained, the application of the solution is completed.
Removing Fasteners
After complete drying, apply a thin layer of putty to the corner to secure all fasteners completely. This final ball will dry out very quickly since the portions are small. You can check the complete hardening of the applied layer by inspection. There should be no traces of wet solution on the surface. As soon as the arch dries, you can remove the fasteners.
The screws are unscrewed very carefully so as not to damage the structure. The profile should not cause concern. Due to the applied putty layer, it is neatly and reliably fixed in the thickness of the wall. The spatula is also used to remove excess mortar and drops that have frozen as a result of hasty movements with the tool when filling defects.
Protrusions that are too obvious will have to be sealed separately with a solution, after which you will again have to wait some time for it to dry. You need to carefully go over the putty strokes with fine sandpaper to smooth out the entire base of the opening. You cannot perform active movements on a weakly fixed mixture, so as not to move the solution from its place.
In order not to weaken the fixation of the profile, you need to wait until the putty has completely dried and only then continue working with the arch.
Decorative finishing stage
When the preparatory stage is completed, the decorative finishing of the plasterboard arch with putty mixture begins. The composition must be prepared according to the instructions to avoid cracking. A wide spatula is required for this work.
Its length should be slightly greater than the length of the arched portal. The solution is captured in small portions to form the correct arch configuration and not to apply too large putty layers, which will be very difficult to remove. It is better to apply a finishing plaster solution, which in its composition is ideal for the final formation of a decorative pattern and can be easily corrected in case of incorrect planning.
To do this, first apply the starting putty, and then the finishing putty. These layers are superimposed on each other only after the first layer has completely dried.
How to putty drywall - tips and videos
Interior decoration of premises with plasterboard is often accompanied by the problem of how to putty plasterboard. After all, in fact, it is absolutely flat and there is nothing to level on it. However, if you delve into the intricacies of the process, the characteristics of the material are revealed that force the master to carry out this process. You have to putty the ceiling, walls and all additional structures such as boxes, arches and columns.
How to putty plasterboard walls
Before answering the question of how to putty plasterboard walls, you need to determine what is required for this. First of all, you will need putty. There are several types of it, which are selected depending on the purpose of the room. For rooms with high humidity, a composition based on cement or polymers is selected; for the rest, a mixture based on gypsum is suitable. Vetonit putties are a good finishing material. They all dry quickly, so preparing a large volume of the mixture is not recommended. The preparation recipe and proportions are usually given on the packaging of the dry mixture, but a ready-made solution, which is sold in plastic containers, can also be used.
Before puttying, the walls are treated with primer. Its drying time is about 12 hours. It is not necessary to completely treat the entire surface. The process depends on the subsequent decorative treatment of the walls. It is important to carefully process the edges of gypsum boards (plasterboard sheets), especially if they are cut. Such joints require additional preparation.
Before priming, the edges are cut at an angle of 45 degrees to ultimately form a joint with a rectangular gutter. It is this that is filled with putty, which is leveled with a wide spatula. Also, the joints of the gypsum boards are subject to putty using screws. Their cap should not protrude beyond the gypsum board plane. If it is deeply recessed, the screw will need to be replaced. The screw heads are puttied in two layers. The first is applied from top to bottom, the second - from right to left or vice versa.
Wooden arch kits
If interior doors are always made of wood or imitate its texture, it is not surprising that the opening in which there is no door is also finished with the same material. The specific option is selected, again, depending on the style, and can be something like this:
Italian country
... like this:
Classic arch design
Classic arches are the most popular, and the cladding elements for them are produced completely. They are made not only from natural wood, but also from laminated chipboard, MDF and plywood covered with veneer, so there is an option to suit any budget. You can check the completeness only before starting installation, and in the store you will only be given a complete package.
For the most part, the elements have a reserve length, so they are universal and do not need to be selected according to size. Usually, from one such kit you can assemble several variations of arches, for which a product specification and assembly instructions are attached to it. Here are the parts included in such a kit:
- 4 platbands (2 on each side);
- 4 vaults;
- 2 arch dilators;
- elements of the “banquet” base;
- side and top squares;
- intermediate plates;
- joining and end strips;
- dowels (elements for nailless connections);
- decorative self-adhesive plugs.
Arch cladding kit
Assembly principle
Before starting installation, you need to accurately measure the parameters of the opening and compare them with the maximum tolerances specified in the arch manufacturer's instructions. Tolerances are always given with a margin: for the height of the opening up to 240 cm, for the width up to 150 cm, and for the wall thickness of 185 cm. If the wall thickness is greater, which only happens inside in ancient stone houses, you will have to use extensions or place an order for the arch individually.
- Usually the height of the flat part of the opening does not exceed 210 cm. Yours is 240 cm, so in order to fit a purchased arch into it, it is enough to cut the platbands to length. The cuts will not be visible, even if they turn out uneven, since they are covered from the outside by banquettes.
- The platband is attached to the banquettes by means of dowels installed in two holes drilled at the ends. The arch can be mounted either with glue or with mechanical fasteners. In the second case, holes are also drilled for the screws.
- Arch expanders are intermediate parts and are needed to connect two curved parts of the arch into a single contour. As a rule, the manufacturer offers three length options for this part so that openings of different widths can be framed. These parts are also connected using dowels.
- When the front part of the slope is lined, they begin to cover the side part, for which intermediate plates are used. If you had to shorten the platbands, then the size of the plate is reduced by the same height. In the same way, but only by cutting the plates in width, the size of the cladding is adjusted according to the thickness of the wall.
Finished arch
After the inner part of the arch is lined, you can move on to the front part from the opposite side. The procedure is exactly the same: first the first casing, then parts of the vault and the second casing. The platbands are connected to the intermediate plates using the tongue-and-groove method. All that remains is to cover the fastening points with plugs, and the cladding of the arch can be considered complete.
How to putty a plasterboard ceiling
The ceiling is puttied if it is to be covered with plaster or painted. If a suspended ceiling is being installed, this procedure is not necessary. The preparation process is similar to working with walls. In this case, the putty is applied in two layers. First, the joint is filled with putty, leveled, then a second one is applied and re-leveled. It is also recommended to use serpyanka mesh. This painting mesh comes in two types: regular and adhesive.
Video on how to properly putty a plasterboard ceiling
The second is glued to the prepared surface at the joint of the plasterboard, after which it is treated with putty. The first one is attached after applying the first layer of the mixture. The mesh is pressed down with the flat surface of the spatula, while simultaneously leveling the putty underneath. After this, the next layer is applied, which masks the fiberglass mesh itself and smoothes the transition between it and the gypsum board. Instead of a mesh, it is allowed to use paper-based masking tape or paper tape glued to PVA. In any case, the top layer of putty should be as thin as possible, no thicker than 1 mm.
How to putty corners of drywall
Particular difficulties arise when processing corners. Internal and external corners are processed using two different techniques. Internal corners are processed by gluing a strip of mesh to each corner plane, after which the joints are leveled with a second layer of mortar.
Aluminum profiles are used to process external corners. Most often, simple corner perforated profiles are used, but there are also profiles equipped with a sickle tape on each plane. Such profiles are attached to a still damp layer of putty and pressed in from above. Excess solution is distributed from above to level the surfaces. A layer of putty is also applied on top.
Video on how to properly putty drywall corners
If the corners have a rounded shape, for example, when forming curly cutouts, sides and arches, use a plastic profile rather than a metal one. It fits tightly to curved lines and adheres easily to putty. If this is not the case, use the same aluminum profile, but in the place where the trajectory changes to a curve, transverse cuts are made on it. If the corner has a complex shape, then trimming is done on both planes, but more often trimming is required only on one side. The frequency of cuts varies based on the trajectory.
Materials used to decorate the arch in the apartment
The formation of arched openings in a house or apartment is associated, first of all, with the correct geometry; the arch should have a clear contour of a semicircle or semi-ellipse, unless, of course, something wavy and asymmetrical is planned. To ensure that the corners have the correct shape and 90 degrees, special rigid profiles are usually used as a kind of frame limiting the edges of the structure made of plasterboard sheets.
Ideal lines are created directly during the puttying process, when thin metal or plastic perforated corners are placed on the solution. Moreover, special forms of profiles are produced for arches, with one solid shelf and the second in the form of a series of teeth or petals. Plasterboard sheets are made quite smooth, in fact, it is dry plaster, which is used to cover the walls and ceiling, and also perform other work, in particular, finishing an interior arch in an apartment with your own hands.
How to putty drywall for painting
If drywall is puttied before painting, this process is treated with the greatest responsibility, because Even under a thick layer of paint it is difficult to hide the slightest errors. The disadvantages are most noticeable when finely dispersed paint, such as acrylic, is used.
Video on how to properly putty drywall before painting
In this case, it is impossible to do without fiberglass mesh at the joints in order to obtain an imperceptible transition between different gypsum boards. The use of a mesh will avoid cracking of the solution. All irregularities, including those resulting from unsuccessful installation or unloading, namely cracks, chips and depressions, must be puttied. After the solution has dried, the surface is sanded. To do this, use 0-grit sandpaper. Large grain sandpaper may damage the surface.
Do I need to putty drywall?
The need to putty drywall is determined by only a single factor - the decorative properties of the finishing coating. If, for example, ceramic tiles are used as the visible layer, then this process can be omitted. But if another type of coating is used, such as wallpaper, paint or decorative plaster, its use will be mandatory.
Putty allows you to make a monolithic wall from separately sewn gypsum boards, regardless of the characteristics of its shape. At the same time, it protects them from penetration under the outer layer of moisture, which can destroy it. Also, in addition to the joints, the heads of the self-tapping screws connecting the wall, frame and gypsum board must be puttied, because During operation, they can cause rust to appear on the surface. Well, how to putty drywall is described above.
We take a small portion of putty from a container with a ready-made composition, or prepare a limited amount from a dry mixture. Using a spatula, apply thick strokes between the screws and smooth them, carefully pressing the solution into the perforation holes to ensure sufficient adhesion to the base. In this case, the mixture should also lie on top of the corner, grabbing it to the surface of the drywall.
When creating the mixture, it is necessary to achieve a uniform consistency ; for this, use a drill with a mixer attachment, apply the solution with a small spatula to a large one, and then rub it over the surface of the plasterboard. A plasterboard arch does not have to be an arch in the standard sense; when placed not only in a doorway, but also, for example, in the middle of a room, it makes the interior design unique. We glue the edge of the plasterboard arch with serpyanka, or use a special arched corner and fasten it with a construction stapler. It is necessary to strictly ensure that the surface to be finished with putty does not protrude as a bump and is at the same horizontal level with the wall and arch.
Excess material is carefully removed with a special plasterboard knife. Leveling should be done while the mixture is still wet; after drying, it will be impossible to smooth out the protrusions.
How to putty drywall
When carrying out finishing work, craftsmen are often faced with the question of how to putty drywall. This question is relevant, since today this material is very widely used in the decoration of residential premises and work with it is carried out constantly. To bring the surface to a perfectly smooth state and prepare it for decorative processing, you need to rub it. This is done using sandpaper or a special abrasive mesh. Tip: the primer should be applied before each layer of putty, that is, if the surface is putty again, then it is necessary to go through the previous layer with a primer.
I must say that this DIY work requires some efficiency. You can stretch the surface putty in just a few steps. It can be secured with screws, or directly with putty.
For external corners, special decorative round corners or metal corners are used. In order to understand how to putty a plasterboard arch, it must be said that a wider plastic flexible corner is used here. It is also applied directly under the putty.
Subtleties of working with an arched opening
Decorative finishing should match the needs of the owners. Decoration requires working out all the details to match the decor in the apartment. The main design should be combined with an arched transition. The door or window opening must match the qualities and color characteristics of the arched model. Before repairing, it is useful to consult with a designer, choose the color and multi-layer coating.
The arched doorway in the apartment attracts attention with its pomp and zones the neighboring rooms. The design of the opening should complement the interior of the entire residential or non-residential premises. The subtleties of finishing an arched opening in an apartment have several variations and depend on the style:
- High tech. The most popular style using the most advanced finishing materials. Outwardly it resembles clear forms with extreme minimalism.
- Minimalist. Finishing and puttying in this style takes a minimum of time and money. Anyone can design the arch themselves.
- Classic. A rectangular entrance with a barely distinguishable color of the opening from the main color of the room. Used to separate living rooms, bathrooms, living rooms or halls.
- Improvisation. Any idea is allowed, up to the curvature of the shape and the variety of color combinations of shades. The upper part is often made straight, and the corners are designed with rounded edges.
- Modern. The radius of an arched opening with a large width. Transitions from rounded to straight sections are visible.
Whatever option is used when finishing and puttingtying an arched opening, a suitable composition is selected for high-quality work.