Drywall in the bathroom
Many people still doubt the possibility of using drywall in the bathroom. In this article we will look at why this material can and should be used in the bathroom, we will describe the rules and features of finishing in the wettest room of the house.
So, drywall is afraid of moisture - and this is true. However, this only applies to ordinary gypsum boards. To decorate rooms with high humidity, a special moisture-resistant material is produced - gypsum plasterboard.
Moisture-resistant plasterboard for the bathroom contains special additives that allow it to “breathe”. If the room has dry air, gypsum plasterboard produces moisture, and if the moisture content in the air is high, it absorbs it. The material is impregnated with water-repellent compounds, which provide it with reliable protection from the destructive effects of moisture. In addition, manufacturers treat the sheets with special antifungal agents. Externally, moisture-resistant gypsum board differs from ordinary gypsum board in green color.
Before starting work, moisture-resistant plasterboard must adapt to the conditions of the room. If installation begins immediately, the sheets may become deformed due to temperature changes.
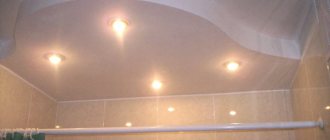
Using plasterboard in the bathroom greatly simplifies repairs and reduces finishing time. Ceramic or mirror tiles are quite simply and quickly attached to sheets of this material. GKLV is used in finishing when there is a need to hide communications, create suspended ceilings or a niche. Working with drywall does not require professional skills. You can independently implement any design solution.
It is advisable to attach drywall in the bathroom to a metal profile. This will allow you to create a structure of sufficient strength that can withstand the weight of ceramic tile cladding. However, it is worth remembering that the construction of the frame involves a slight reduction in the usable area of the room (about 5 cm on each side).
To carry out the work you will need the following tools:
- Building level.
- Protective glasses.
- Hacksaw for working on drywall with a blade 18 mm thick.
- Metal shears or jigsaw.
- Side cutters.
- Pliers.
- Hammer.
- Special knife.
- Tape measure, plumb line, pencil.
To create a frame from profiles, a drill-driver is used.
Finishing materials:
- GKLV sheets.
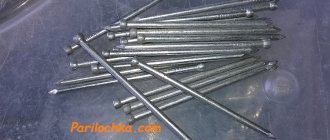
- Dowel nails and self-tapping screws.
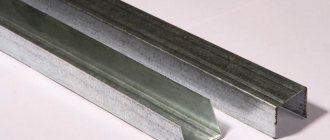
- Metal profiles.
- Primer.
Basic information about moisture-resistant drywall
GKLV is very easy to distinguish from ordinary drywall, since the upper shell of the material is made of special green paper. It acquires its moisture-resistant properties due to treatment with special substances that protect the material from moisture and fungus formation.
Advantages of using gypsum plasterboard in the bathroom:
- Environmental Safety.
- Light weight and easy to process.
- The opportunity to make any dreams and projects come true.
- The sheets always have standard sizes, which allows you to calculate the required quantity with absolute accuracy.
- Moisture-resistant drywall is intended for those rooms in which the humidity exceeds the norms permissible for conventional plasterboards.
But it is important to remember: even when installing a material that is moisture resistant, it is necessary to make a hydro- and vapor barrier.
Based on all the listed characteristics, we can conclude that plasterboard walls in the bathroom will be reliable and will last for a long time.
What brand of drywall do you use?
USEFUL INFORMATION: Which paint is better to choose for wallpaper for painting?
Installation of drywall in a bathroom with lathing - main steps
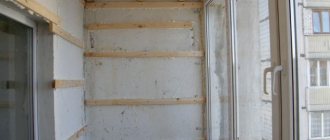
Step 1 . We install guide profiles on the ceiling and floor using dowels and nails along the perimeter of the surfaces. To control the level plane, use a building level or plumb line. The installation of the rack profile is carried out strictly vertically at a distance of no more than 60 cm. We fix horizontal jumpers from the same profile between the rack profiles. The installation of the frame is completed.
Step 2 . We install electrical wiring and waterproofing. It is necessary to determine in advance the locations for creating technological holes for laying electrical wiring and communications.
Step 3 . We sheathe the structure with moisture-resistant gypsum board. The sheets are attached to the profiles close to each other using self-tapping screws. We clean the corners and joints between the sheets from dust and treat them with sealant. This measure will ensure adequate protection against moisture. To strengthen the structure, gypsum boards can be laid in two layers. Moreover, it is enough to attach the second layer to the base using an adhesive composition.
Installing drywall in the bathroom without using lathing:
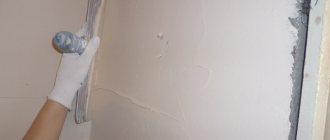
Step 1 . Preparing the walls. We cement potholes and cracks, treat the surface of walls and ceilings with a waterproof, deep-penetrating disinfectant primer. This measure will significantly improve the adhesion of the material. Moreover, the sheets are treated with a primer on both sides. It is recommended to coat the joints with a special water-repellent mastic.
Step 2 . We apply glue to the walls and sheets of gypsum board using a paint brush or roller. The adhesive must be moisture-resistant, intended directly for installing drywall. We glue the sheets to the wall and press them down with a rule.
Step 4 . We treat joints and seams with sealant.
Step 5 . After gluing the moisture-resistant gypsum board, the walls are plastered with a moisture-resistant finishing mixture and painted.
Of the two above options for lining a bathroom with plasterboard, the most durable and reliable is installation on a supporting frame made of metal profiles.
Frame installation
At the initial stage of frame manufacturing, all parameters are calculated. In accordance with them, markings are applied. This is done using lines (when applying markings, be sure to take into account the thickness of the future box). They are applied to the plane of the walls and floor. Please note that the structure should be slightly recessed under the bathtub. 0.3-0.5 mm is enough.
The following profiles are used to make the frame:
- 3x3;
- 2.5x2.5;
- 4x4 cm.
The frame is strengthened with the help of profile elements installed across. It can also be attached to the floor surface, as a result of which the rigidity of the product increases.
A profile is fixed to the cast iron bathtub. A drill can be used for these purposes.
The maximum hole size is 0.5 cm. Making it larger is strictly prohibited!
If you have a bathtub made of acrylic or steel, the frame parts are attached using liquid nails. Before final fastening the frame, perform preliminary assembly. This way you can check how correctly the frame components fit together. If no inaccuracies were identified during such a check, you can begin to secure the frame base.
Frame (top view)
Finishing, leveling walls with plasterboard with your own hands, video
Let's learn how to level gypsum board walls correctly with sheets.
When building private houses or doing a major renovation of an apartment with your own hands, the problem always arises of how to quickly and economically level the walls, the ideal condition of which will subsequently determine the quality of painting or wallpapering of vertical surfaces. And if there are no plastering skills, then lining the walls with plasterboard will be economically justified. This saves time during leveling, creates an absolutely flat surface for painting, creates space for wiring and heating systems inside the wall, and embodies design ideas for the implementation of niches, arches and partitions. If you also provide for the use of vapor barrier films, then you can safely additionally insulate the rooms in the “space eaten by plasterboard.” The last thing, the fact that such leveling of walls with plasterboard with your own hands steals several centimeters of living space, is a minor disadvantage of this technology. This instruction, as always, contains photo examples and a video lesson to better understand the material. Let us remind you that we have already told you how to make a plasterboard ceiling with your own hands with video and photo instructions.
Today, there are two main, but radically different technologies (methods) for leveling walls with plasterboard: the first, the usual installation of sheets on a metal or wooden frame fixed along the walls, and, second, gluing the sheets directly to the surface of the walls using “lepukhs” (special glue). The second method, although economical and does not steal centimeters, is not suitable for walls that are too crooked and damp, and if their height exceeds 3 meters. Therefore, below we will consider in detail the classic method of leveling walls with plasterboard over a metal frame.
Before you start installing drywall yourself, you should take into account that it does not like haste and negligence, and if you do not fulfill the basic requirements of attaching the sheets to the base, then over time such a wall will begin to “play”, and even though you may not see anything like this under the wallpaper , then webs of cracks will certainly appear on the painted surface. Also, you should determine in advance what you will hang on the wall, i.e. provide for maximum loads on drywall, which technically cannot support the weight of a bookshelf or a huge painting. Therefore, based on a pre-compiled design project, additional boards should be provided so that they take on the bulk of the things hung on the wall. Another point is that in rooms where humidity is excessive (toilet, bath, kitchen), it is advisable to finish the walls with special moisture-resistant plasterboard, additionally treated with waterproofing material. Even if it costs more, it will allow you to glue tiles on it. Agree, a perfectly flat and moisture-resistant surface is very convenient for future tiling work.
DIY plasterboard wall installation
So. First, we determine the required number of plasterboard sheets and metal profiles (and we will definitely need UD and CD profiles, photo on the left) to level the walls of the room. We assume that the size of the wall sheet is (height*width*thickness) 2500x1200x12.5 mm; The UD profile is used as a starting profile (length 3 or 4 m) and is attached to the floor and ceiling, and therefore its quantity is equal to double the perimeter of the room; The CD profile is used to fill the base (length 3 or 4 m) and its consumption rate per square meter of wall is about two meters. You should also purchase: U-shaped brackets (based on 1 piece per 1 m2, photo on the left), dowel nails (2.2 pieces per 1 m2), black metal screws (13 pieces per 1 m2 ) and flea beetles (2.5 pieces per 1 m2). And the tools you need to have are: a drill, a screwdriver (preferably a cordless one), a tape measure, a building level and a plumb line.
Let's get started. First, we check the unevenness of the walls with a plumb line, and use a tape measure to check the length of the walls, so that, taking into account all the differences (usually they are no more than 10 cm), we can hide them using the frame. That is, if one wall we measured turned out to be 3.00 m, and the opposite one - 3.05 m, then we start marking from the smaller wall - plus taking into account the guide. As a result, you can achieve perfectly right angles. It’s easier, of course, to check the room with diagonals, which should match in length, and as soon as you achieve a match, you can say that the corners in the room are right. These measurements will help you draw the lower rough outline of the future frame on the floor. We retreat from the wall 5 cm and draw the main line parallel to the rough line. Then we lower a plumb line from the ceiling so that the tip of the weight coincides with the line of the lower contour - we put a mark on the ceiling; and so on at every corner. Let's connect the dots on the ceiling with lines. As a result, we achieved ideal verticality of the future walls.
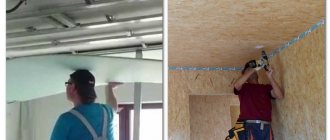
Now covering the walls with plasterboard with your own hands proceeds to the next stage, using dowels to securely fasten the starting UD profile along the lines marked along the perimeter on the floor and ceiling. Then, in the corners of the starting profiles, we insert and secure with fleas the guides of the CD profile, which, in turn, are fixed to the wall with a U-shaped bracket.
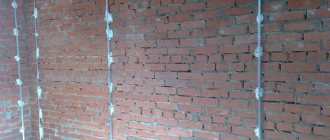
Tip: before attaching the guides, you should first fix the brackets on the wall along a vertical line with dowels (every 50 cm), which will greatly facilitate the installation of the CD profile. Now a short photo instruction, and a video below the article.
Profile mounting
When installing drywall on a profile frame, the material's capabilities expand. Under it you can hide wires, heat-insulating materials, you can use it to change the shape of the room, make various niches or shelves, which will be very useful in the bathroom.
When installing drywall with your own hands on a metal profile frame, you must adhere to certain rules:
- When installing the frame, it is important to remember that areas with maximum load must be further strengthened.
- For the bathroom, the distance between the profiles must be made smaller than in other rooms. This applies to both horizontal and vertical directions.
- At the joints of gypsum boards with the floor and ceiling, as well as in the corners and places where pipes exit, it is necessary to lay sealing tape and treat them with a sealant or mastic with water-repellent properties.
- After assembling the frame, it is worth taking care of all passing communications. Pipes can be insulated with mineral wool, preventing the formation of condensation, and electrical wires are placed in a special corrugation.
- If you want to make shelves and niches, it is necessary to take measurements with increased accuracy, since the aesthetics of these decorative additions depends on this.
- After attaching the drywall is completed, you can begin sealing the seams and fastening points with waterproofing compound and moisture-resistant putty.
Plasterboard wall covering
Now let's tell you in more detail. To prevent the frame from becoming concave or curved, we pull at least two laces horizontally from the corners, which will allow you to control the vertical plane. Next, we fill the walls with a CD profile in 60 cm increments using the technology as described above. Usually filling the frame does not cause difficulties, and the result is always pleasing. In a word, after a few hours the frame (base) for fixing the plasterboard sheets is ready.
If you decide to fill the space between the main wall and plasterboard with insulation, then mineral wool is perfect for this; its characteristics are excellent (insulation from the inside is considered not entirely correct, due to the likely occurrence of condensation on the walls in winter, because the dew point falls on the surface of the drywall), then be sure to use a vapor-proof film, which is attached directly to the frame, and then plasterboard sheets on top of it. Also look at the types of soundproofing materials to decide which one to choose.
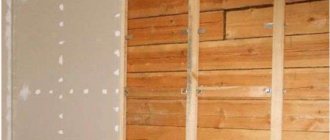
Now you can safely attach drywall to the prepared base. To do this, we cut off the required length (if the ceilings are below 2.5 m) of the sheet and fix it with metal screws (their length is 25 mm) to each CD profile in increments of no more than 30 cm. The heads of the screws must be recessed one millimeter into the sheet. Plasterboard sheets are cut with an ordinary stationery knife; you just need to make a cut strictly along the line - and, applying force with your own hands, the sheet can easily be broken.
We gradually fill the entire metal base with plasterboard: first, if possible, with solid sheets so that the seams of the plasterboard boards are only on the metal profile, and then with pieces cut to size. Advice: if the height of the wall is more than 2.5 m and you have to finish the required length in a piece, then the joining should be staggered with each subsequent installation of the sheet, which will reduce the likelihood of cracks occurring after puttying work. In the area of window and door openings, joining is not allowed: only solid pieces of sheets. Also, do not forget to attach the intermediate CD profile horizontally at the joints.
That's it, the result should be an ideal horizontal surface, which all that remains is to putty. Well, then you can either paint it or cover it with wallpaper. Now watch the video tutorial on how this is done by the hands of craftsmen. A free construction calculator for plasterboard will help you find out how much material you need; you will find out what profile taper, screws and sheets you need.
A peculiarity of the bathroom is the presence of water supply and sewerage pipes, one type of which can interfere with its aesthetics. Most of us wonder how to hide these communications “out of sight.” This problem can be solved very simply - by installing a gypsum plasterboard box, which can be made collapsible or equipped with doors for access to the pipes during their inspection and maintenance. Any normal person tends to strive to improve his home as much as possible, to give every corner a unique appearance and a high level of comfort. Using our research as an example, you were able to see that gypsum board is an excellent assistant in this matter; it can be used to cover any room.
Today we want to talk about the use of drywall in the bathroom, one of the most important and “problematic rooms” of our home. Moisture-resistant drywall, like other types, is produced in various thicknesses. To level the walls, choose sheets with a thickness of 12.5 mm.
Thin gypsum boards are used to create suspended ceilings, arches, and decorative elements (shelves, niches). Thicker HA sheets are used for flooring. The wall is ready for finishing.
If everything is done correctly, the surface will be smooth, durable, and able to withstand a certain load.
- Alignment of walls. Dismantling the old covering and leveling the wall, without which not a single renovation or bathroom renovation can be done, takes builders a lot of time. These events involve a large amount of garbage that has to be collected and taken out. Plasterboard walls in the bathroom “eat up several centimeters of space, but allow you to get perfectly smooth walls in a matter of hours. This makes laying ceramic tiles much faster and easier.
Important! Moisture-resistant drywall is secured using metal guides. The frame is constructed from a metal profile; it allows you to level the surface to be finished.
The second layer of drywall can be glued using a special mastic. The result of installing tiles on drywall will directly depend on the correctness of the chosen adhesive and its use. Three types of adhesive coating are used: In order for the gypsum board to hold firmly, it must be mounted to the wall using an aluminum profile.
Installation directly to the wall is not possible, as is installation on a wooden base. Wood rots very quickly when in a humid environment. Its surface is an excellent breeding ground for the formation of pathogenic bacteria and mold, which in a short time will “eat up the wooden frame.
Drywall for the bathroom: installation features
If you discuss the laying of plasterboard systems in advance with a master tiler, you can receive firm guarantees of the reliability of such a structure. Typically, professionals know how to prevent possible problems when tile adhesive interacts with plaster surfaces. There is another reliable method of insulation.
It must be said right away that its implementation is possible only if the system is mounted on a frame base. To do this, cover the entire back side of the panel with plastic film. Fix it on the front part so that the ends of the sheet are under the film. This is an inexpensive, but very effective way to protect the structure from evaporating liquid entering it. Leveling the walls is one of the preliminary rough work performed by builders.
Many tilers refuse to cover such surfaces precisely because they do not know how well the sheets are fixed. In addition, good waterproofing of the entire system, including the supporting frame, also plays an important role in this case. It must be said that today's technologies make it possible to adapt almost any material to the conditions of bathrooms. In this case, drywall is no exception.
Only an extremely unskilled tile maker can argue with this. Any master with knowledge of modern installation technologies knows that proper processing of drywall in the bathroom guarantees an excellent result. You can level walls quickly and efficiently using plasterboard structures. However, some owners have doubts whether drywall can be used in the bathroom. The reviews of many masters on this issue differ significantly.
To determine how appropriate this method is, you need to study in detail the features of this material and the nuances when installing it in rooms with a high moisture content in the air.
Plasterboard partitions
A distinctive feature from other types of material is the external color of the surface. International standards state that it must be green. Initial work involves drawing up a project, carrying out the appropriate calculations and markings. The marking is carried out from the wall with the window, after the required distance has been measured, you need to put a mark on the side walls and draw two vertical lines. To make them even, you can use a long level.
If the planned structure is not continuous, or it must be made only at an angle of 90°, then you should resort to the rule of the Egyptian triangle.
- perfect evenness of the walls;
- suspended ceilings, not excluding options for multi-level compositions;
- decorative partition;
- niches serving for storing various hygiene products, cleaning products, and also hiding internal communications;
- bathroom screen.
Dry plaster, which is part of the sheets, acts as a noise barrier from sewer risers. However, before purchasing, you still need to find out what type of gypsum board can be used in a room with a high level of humidity. For such purposes, there is a special type called moisture resistant. It received its name due to technical characteristics that counteract the formation of fungi and mold; in addition, it does not absorb moisture, that is, it does not have “breathing properties.” Its composition is represented by two-layer cardboard and gypsum internal filling, which has improved hydrophobic properties.
It can be used in rooms where the humidity level does not exceed 90%.
DIY installation instructions for drywall in the bathroom and toilet
To protect drywall in the bathroom, you need to identify its weak points. These will be cut unprotected ends, which during a flood can take on the load of heavy exposure to moisture. Therefore, it is precisely for these weak areas that additional precautions need to be taken. The walls and, without fail, the ceiling can be equipped with a metal frame in the bathroom for high-quality ventilation of the space under the finishing.
To carry out this work, you will need to prepare: Finishing with plasterboard refers to rough types of surface treatment of walls or ceilings, which significantly facilitates further finishing work. In relation to water, gypsum is a rather demanding material, but modern technologies adapt it to use in humid environments. In addition, the gap itself must be filled with glue, which is used when laying tiles.
It has moisture-repellent properties and, together with grout for the joints, will provide reliable protection for the drywall underneath along the entire perimeter of the bathroom.
- 1 Installation features • What else needs to be considered before installation
- • Installation of plasterboard sheets without load-bearing sheathing
Drywall mounting options
Finishing with plasterboard is called dry plaster. Smooth walls can be sewn up by securing the sheets with glue. This option is not suitable for a bathroom; you need to hide the pipes and cover the bathtub itself. To do this, a box is made from a metal profile or wooden beam.
The frameless method of attaching drywall is used to save space in small bathrooms on walls that do not have pipes. The surface must be carefully prepared, leveled with plaster, putty, maximum differences along the plane should not exceed 2 mm. If the walls have a large curvature, the plasterboard sheets will warp, trying to repeat the configuration of the base. The bathtub walls will quickly lose their appearance.
Before gluing it is necessary to prime the surface 2-3 times. This will strengthen it and increase adhesion - adhesion to the glue.
Wooden frame
Wooden beams with a side size of 40-60 mm are widely used for plasterboard covering of interior residential premises. When using it in the bathroom, it is necessary to take into account the constant dampness and the wood’s reaction to moisture - it swells, warps, and begins to rot. Self-tapping screws can become loose over time in soft materials.
Before creating a frame for drywall, the timber is treated with antiseptics and other preparations that protect it from moisture, fungus, and rodents. When cutting wooden parts, the ends should be primed immediately.
If there are heating devices in the bathroom, the wood should be treated with a fire retardant - a means that prevents fire.
Metal profile frame
Aluminum metal profiles are used for drywall, plastic and other types of cladding.
It costs more, but it is more profitable to sew up a bathroom with it at home, given its advantages over wooden beams:
- repels water;
- does not burn;
- has a service life of more than 40 years;
- easy to install and dismantle;
- Available in various types specifically for drywall;
- installed on walls of any curvature;
The metal profile weighs little, it is easy to make a custom-shaped box from it, including curves, and sew it up.
During operation in damp rooms, the aluminum profile slightly changes its linear dimensions. When the air temperature increases by 10°C, it lengthens by 2.4%. This is taken into account when creating a box in the bathroom.
Installation is simplified by the availability of profiles of different sections and shapes. Hangers allow you to attach racks along the entire length, including places with large dents in the wall.
Drywall in the bathroom under tiles
If the walls in the bathroom were tiled, then the old coating must be removed along with the tile adhesive. This will allow you to maintain the volume of the room when finishing the working surface with plasterboard sheets. It is recommended to use an electric hammer drill as the most suitable device for dismantling tiles. As soon as all work on dismantling the previous coating is completed, it is necessary to inspect the working surface for any bulges. Bathroom walls made of plasterboard under tiles must be thoroughly cleaned.
The process of preparing the room also includes drying the walls for several days. During this time, you need to cover the inner surface of the gypsum plasterboard with an aqueous solution of latex DVKhB-70 at the rate of 1: 2. The treated sheets must dry for at least 24 hours. In some cases, it is allowed to use gypsum plasterboard as a base for ceramic tiles, but in a particular room it must be fully functional ventilation. You can tile a plasterboard bathroom with your own hands using a special glue based on a cement-polymer binder.
Drywall in the bathroom
Also, you should not buy cheap materials from little-known manufacturers. It’s better to overpay a little and gain confidence in the final result than to later regret minor savings that result in the destruction of the cladding. We hope that all the recommendations described above will help you correctly cover the walls in the bathroom with plasterboard sheets for subsequent laying of tiles. If all the nuances are observed, this finish will serve you faithfully for decades.
The initial stage of work is attaching the guide profiles to the ceiling and floor using dowels with self-tapping screws. In this case, it is important to install the parts in the same plane, so it is better to use a plumb line instead of a building level. After installing the guides along the entire perimeter, rack elements are installed with a pitch of 600 mm, which are inserted into the guides and secured with metal screws. With proper installation and subsequent finishing, plasterboard bathroom walls will last for decades.
However, this is ensured not only by strict adherence to the technology of repair work, but also by the relatively high technical and operational properties of the gypsum board itself. Sheathing the frame with plasterboard sheets is done using special self-tapping screws, which craftsmen call “bugs”. GKLV are mounted close to each other; for additional protection from moisture, all joints and corners can be treated with sealant. Also, the joints are puttied using fiberglass mesh for reinforcement.
The final finishing is carried out after the completion of the covering work and puttying.
What kind of gypsum board can be used in the bathroom
Sheets of ordinary drywall cannot be used in bathrooms, as they are susceptible to moisture and will not last long. To use in such a room, you must purchase special moisture-resistant material. Its main difference from the usual one is the presence of a water-repellent film on the surface.
Special drywall is resistant to mold due to its impregnation, which includes antibacterial and antifungal additives.
This water-repellent material can be easily distinguished from ordinary material.
Manufacturers paint such sheets blue or green.
Also, there are differences in the labeling of materials. Regular gypsum board is marked GKL, and moisture-resistant - GKLV.
When choosing a material, do not forget about such a detail as the thickness of its sheet. If you plan to cover the walls, then the thickness of the gypsum board should be 12.5 mm. For the ceiling, you can take sheets of smaller thickness - 9.5 mm. But in any case, the water-repellent material will be a little heavier than usual.