Before installing the suspended ceiling, the ceiling must be carefully prepared. Tensile structures have recently become so popular that traditional finishing methods are slowly becoming a thing of the past.
The tension fabric can hide all defects of the main ceiling; cracks will never appear on it. In case of flooding by neighbors from the upper floors, the canvas can withstand a load of about 200 liters. This design can hide all electrical wiring and give the room an aesthetic, well-groomed look.
In order for the suspended ceiling to serve for a long time, and its structure to be durable, you need to pay special attention to the preparation of the main ceiling surface. Such measures will allow you to avoid damage to the ceiling in the future, and will also greatly facilitate the installation process. Therefore, before installing the ceiling, you need to carry out a number of preparatory measures. You can learn more about this from this article.
The main stages of preparing the ceiling for tension fabric
Since a suspended ceiling can hide all the unevenness of the main ceiling surface, the stages differ significantly from all other repair work. Before installation, the following work should be carried out:
- Clean the ceiling surface. This is a necessary condition, since small particles of paint or whitewash during shedding can damage the ceiling canvas.
- Seal the joints. It is necessary to carefully check all joints and corners, as voids in these areas can cause future damage.
- Prime the surface. The primer must be applied to prevent fungus and mold from developing in the interceiling space.
- Carry out electrical installation work.
The room in which the installation will take place must be cleared of furniture, curtains and chandeliers removed, and carpets removed. It is best if you prepare in special clothing. It is recommended to wear a scarf on your head. You may also need a respirator, gloves, and safety glasses.
The cleaning process is often very dusty, and you need to take care of your health before it can deteriorate.
You also need to think about all the necessary tools in advance. Among them, you may need a pointed narrow spatula, a long-haired roller, or a brush. Buy quality soil. It is recommended to use an acrylic-based primer. If you need to remove marks or stains, stock up on antiseptic primer.
Preparing the ceiling for a suspended ceiling
The next stage of work is preparing the ceiling surface. We mentioned above that before installing the tensile structure, it is necessary to clean the surface, treat it with a primer and remove all foreign elements (for example, tiles).
But this is just the “tip of the iceberg”.
Preparatory activities include:
- checking the joints of the ceiling with the walls of the room;
- elimination of existing defects;
- surface treatment using a fastening compound.
Experts assure that the installation of a tensile structure should be done last (after leveling the walls, installing windows and doors).
It is prohibited to carry out dusty work after installing the ceiling, as this will lead to contamination of the surface. In addition, the room where installation is carried out must be hermetically sealed to prevent changes in temperature.
To simplify the task, it is worth studying the video of preparing the ceiling for suspended ceilings, where all the work is discussed step by step:
- the process of removing paint or putty (if it was applied to the base ceiling);
- coating the surface with a primer (reliably protects the PVC film from damage in the event of an accidental fall of certain elements);
- preparation of the electrical part (lighting) and plasterboard boxes;
- ceiling markings.
The correctness of the work depends on:
- correct location of the ceiling structure;
- aesthetic appearance after completion of work;
- film life resource.
If everything is done correctly, then after installation is complete:
- sagging of the ceiling structure is excluded in case of temperature changes;
- no harmful odors are formed;
- there is no condensation on the surface.
Please remember that PVC ceilings can be used at temperatures from zero to +500 degrees Celsius.
The next stage of work is the installation of the electrical part. Here it is worth starting with the selection of lighting fixtures, as well as determining a suitable location for installation.
Several factors depend on the quality of electrical installation work:
- operational safety and reduction of short circuit risks;
- convenience of replacing lighting devices in the future (if they burn out).
When choosing lighting fixtures, keep in mind that PVC film does not tolerate overheating and can melt from elevated temperatures. In this regard, the maximum power of the light bulbs used should be no more than 60 W.
If halogen lamps are used, their power should not exceed 40 W.
The best option is to use energy-saving or LED lamps, for which power limitations are not relevant due to the lack of heating.
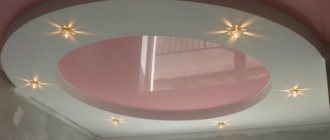
A separate issue is the choice of the type of glow. As a rule, it is recommended to buy sources of warm light, because a cold shade can ruin even the most thoughtful design and make the room uncomfortable.
Installation of lighting devices takes place in several stages:
- outline the place where the light sources will be installed;
- organize the wiring and make sure the finished structure is operational;
- decide on the exact location of the light sources. This is important, because the level of the film depends on the height of the location.
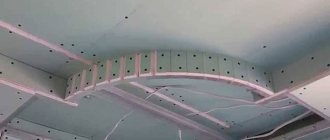
The next stage is preparing the plasterboard structure. This also includes work on adjusting the elements into which the PVC film will be mounted.
The structure itself is a profile installed in a horizontal plane. The distance from the top of the niche to the mounted tension structure is 15 centimeters or more.
The correct installation of plasterboard structures depends on:
- ceiling service life;
- appearance;
- reliability of fastening.
The last stage of preparation is marking the ceiling for subsequent installation. Here the sequence of work is as follows:
- set marks in the corners (use a laser level for work);
- Connect the given points with each other. The result of the work should be a horizontal line around the perimeter. To create a straight line, use a special cord;
- measure the distance between the line and the ceiling;
- measure the required distance from the point installed below. This will be the top level of the installed PVC film;
- measure the height of the “stepped” area. By the mark you can judge where the lower part will be located;
- measure the distance from the main line to the established points;
- connect the points, which allows you to get two straight lines parallel to the main line;
- if the ceiling is multi-tiered, mark the remaining levels in a similar way.
Stretch ceiling in the bathroom Preparation for installation
How can you clean the ceiling surface before installing the tension fabric?
The cleaning process involves not only removing the old coating, but also removing rust, fungus, and greasy stains. Depending on what material your old ceiling is covered with, cleaning will be different:
- If the ceiling is covered with whitewash, then the cleaning procedure consists of generously wetting the ceiling surface with water. A solution of soap and salt will also work. If the whitewash is limestone or chalky, it will swell and can be easily cleaned off with a spatula.
- If the ceiling is covered with paint, then the cleaning process is possible in one of two ways. The first method involves applying a special solution to the paint, which corrodes the paint. This is an easy process, but requires precautions as paint-corroding solutions emit toxic fumes. The second way is to use a hammer. This method is labor-intensive and dusty, since you need to beat the paint off the ceiling surface with a hammer.
- If wallpaper is pasted on the ceiling, then to completely remove it, you need to soak it generously with water. Then, using a spatula, remove the layer.
- If there are tiles glued to the ceiling, then you will have to put in a fair amount of effort. To remove ceramic tiles, you need to use a drill with a special attachment. You can also use a hammer. If the tile is not ceramic, but polyurethane foam, then it can be easily cleaned with a sharp spatula.
No matter what material your old ceiling surface is covered with, be sure to use all kinds of protective equipment, especially if you are working with a hammer or drill.
How to remove ceiling stains
After you remove the finish, you need to examine the surface for any possible stains. You can't leave them! For a specific type of stain, you need to use a specific product:
- Antiseptic primer works great against fungal stains and mold.
- A vitriol solution with 10% copper content will cope with rust.
- Grease stains can be easily removed with gasoline, acetone or alcohol.
- A 2% solution of hydrochloric acid will cope with soot.
After all stains have been removed, the ceiling should be rinsed with warm water. To do this, use a foam sponge.
How to properly repair the ceiling before installing a stretch ceiling
There is no need to carry out a perfect repair of the main ceiling surface - this will not be necessary anyway, but large cracks and potholes need to be repaired. In order to carry out surface repairs, you must adhere to the following plan:
- Using a hammer or large screwdriver, you need to tap the entire ceiling and the joints between the walls.
- If, in the case of tapping, voids are found, they need to be cleaned of dust.
- All existing large cracks must be sealed with polyurethane foam.
- You need to fill potholes with a depth of 1 cm or more with sealant or cement-based putty. To fill potholes, you can use a narrow trowel. Using a spatula, you need to work the problem area first across and then along the crack.
It often happens that in new houses there is a gap in the ceiling between the floor slabs. Such a gap also needs to be processed, and then, using PVA glue, glued with a bandage.
Do I need to remove furniture and other items when installing suspended ceilings?
The first thing you need to do when preparing a room for installing a stretch ceiling is, if possible, to free up the space in the room as much as possible. Furniture, household appliances, plants and other objects can interfere with the work of installers and also create a threat of damage to the PVC sheet during the process of tensioning it.
Do not forget:
- Remove hanging shelves, cabinets, and paintings from the walls.
- Move, as compactly as possible, into the center of the room objects that are not possible to remove (for example, massive cabinets and furniture). Cover them on top with film.
- Attach a special strip to the previously installed sliding wardrobes for mounting the panel fastening.
- Cover the floor covering (laminate, parquet, linoleum) with thick cardboard. During work, there is a possibility of damage from stepladder legs or other devices.
Note! It is better to install particularly delicate floor coverings after installing suspended ceilings.
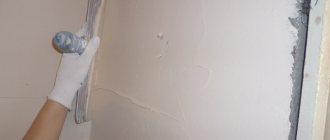
How to properly apply primer to an old ceiling
The process of applying primer is one of the most basic. It is best to use deep penetration soil. Thus, it will allow you to avoid the appearance of fungus or mold in the future. When applying a primer, you must adhere to the following rules:
- Treat corners and joints with a primer brush.
- Apply primer over the entire perimeter of the ceiling using a soft roller with long pile.
- Perpendicular to the first layer of primer, apply the second layer immediately after the first has dried.
All subsequent work cannot be carried out until the entire primed ceiling is completely dry.
How to carry out electrical installation work correctly
You need to take a responsible approach to choosing lighting elements. If you decide to install halogen lamps, then remember that the power of such lamps should be below 35 W, otherwise the tension fabric will become very hot, which can lead to damage. If you choose ordinary lamps, then their power should be at least 60 W. You can use both chandeliers and spotlights.
The most ideal lighting option for a suspended ceiling are energy-saving lamps or LED lamps. Their power can be any, since they do not heat the tension fabric at all.
Recommendations from experts
Almost all manufacturers of suspended ceilings, as well as experienced specialists who professionally install them, claim that the presented structures can be operated in the temperature range from 0 to 50 degrees.
Important point! Be sure to remember that when installing suspended ceilings, sudden changes in temperature in the room should not be allowed. You can install the presented structures when the thermometer shows no less than plus 10 degrees.
Never rush to begin installing suspended ceilings immediately after completing the preparatory work.
Think carefully about such important things as steam, noise and waterproofing. It may make sense to complete all the work as a whole, which will allow you to save a decent amount of money.
If you have decided on the choice of suspended ceilings, start looking for ceiling skirting boards, which should be harmoniously combined with each other. This issue is especially relevant in the case when an ugly joint has formed between the new ceiling and the wall.
A detailed analysis of the presented topic showed that preparing the ceiling for a stretch ceiling is not a very difficult task. Almost every adult man can do it. To do this, you need to carefully study the above information, and in the process of preparing the ceiling, adhere to these recommendations.
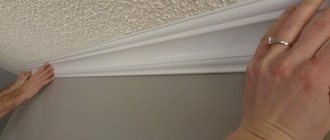
How to properly mark for installing a stretch ceiling
First you need to clean the walls of the old finish and level them, and then start marking, otherwise all the dust will settle on the ceiling stretch fabric. After this work is completed, you can begin marking. It is done according to the following plan:
- Using a laser level, you need to mark the corners.
- Using a building level you need to connect the dots. Thus, you should get a solid, even line around the entire perimeter of the ceiling.
- Measure the length of the line.
- Measure the distance to the top level of the covering.
- Measuring the lower level, calculate the height of the “step”.
- Measure the length of the segments at all angles from the point to the main line.
- Connect the points so that two straight parallel segments are formed. The resulting segments should be in the same plane as the main line.
- In this way, you need to mark all the tiers.
- From a previously prepared drawing, which should show the location of all electrical appliances, transfer these marks to the ceiling surface.
Carry out markings with a simple pencil - this is most convenient.
In conclusion, it is worth saying that stretch ceilings are not only a fashion trend, but also a practical, universal solution for any room. In order for the ceiling canvas to be firmly fixed, not deformed, and not become covered with fungus or mold, the main surface must be carefully prepared and processed, following the rules specified in this article.
What needs to be done before starting work on installing suspended ceilings
Even if you know how to prepare a ceiling for a suspended ceiling, you will definitely be interested in the recommendations presented, which have repeatedly proven their effectiveness in practice.
Room
You need to start this work by preparing the premises. First of all, you need to remove all things, furniture and household appliances from the room.
If you have heavy cabinets that are difficult to move to another room, place them in the center of the room and carefully cover them with thick film.
It is much easier to work in an empty room. Nothing will stop you from placing the stepladder in the right place; you will have access to any point on the ceiling.
If you do not plan to replace the floor after installing the ceilings, then, in order not to damage the surface, cover it with thick cardboard.
There are three stages of preparatory work for the subsequent installation of suspended ceilings:
- Checking how the ceiling fits into the walls.
- All irregularities and other defects are eliminated.
- A fastening compound is applied to the ceiling.
Many experienced specialists argue that there is no point in wasting time and energy on making a perfectly smooth surface.
The main argument is that stretch ceilings will hide all imperfections and irregularities. But on the other hand, if you do not thoroughly clean the ceiling, then after a certain time putty, dust, paint, etc. will fall onto the canvas.
Wiring for lighting
Another important point in the preparatory work is the electrical cable for lighting fixtures.
At this stage, you need to create a safe and reliable lighting system for the room.
If you have no experience working with electricity or have doubts that you will do everything correctly, contact specialists in this field.
When dealing with room lighting, keep in mind that ordinary high-power light bulbs get very hot, and this can cause damage to suspended ceilings. It is best to install lighting fixtures that require LEDs or energy-saving lamps.
Some “experts” reduce the solution to the question of how to prepare a ceiling for a suspended ceiling only to the installation of electric lamps, but this is a big mistake.
In addition to preparing the lighting system, it is necessary to pay attention to ventilation and other important elements, access to which will be closed after installing the stretch ceiling.
Preparing the walls
If you work on the walls after installing the stretch ceiling, then some of the construction dust will simply settle on them and you will have to spend another day washing the ceiling.
Taking into account the above information, we can conclude that the next stage of preparatory work is the implementation of all “dusty” procedures.
It is necessary to clean the walls of old paint, plaster, etc., and then eliminate cracks and other defects using gypsum, putty and cement mortar (one part cement to three parts sand).
Experts recommend finishing the walls in several stages, following the rule: each subsequent layer of mortar is applied only after the previous one has dried.
To improve the quality of the work performed, you can use gauze, which is impregnated with glue (fixed between two layers of plaster).
I use putty and apply the final layer to the surface of all walls. This way, you will eliminate places that stand out strongly from the general background.
To complete this work you will need:
- Spatulas (2-3 pieces of different sizes).
- Cement, sand, putty and glue.
- Primer.
- Containers for preparing the solution.
- Gauze and dry rag.
- Drill or grinder with appropriate attachments.
- Mixer.
- Sandpaper.
- Hammer.
In some cases, additional tools may be used, it all depends on the specific situation.
When the last layer of plaster has dried, you can begin applying the primer.
This material is used to strengthen the surface of walls and protect them from dust, dirt, and other external factors. The modern building materials market offers a wide variety of types of primers.
Some are more focused on performing protective functions, others are reliable insulators or have anti-corrosion properties.
If you can't purchase primer at a hardware store, make your own.
The following components are required for this:
- Laundry soap – 1 pc.
- Carpenter's bone glue – 500 g.
- Copper sulfate – 100 g.
The listed ingredients are poured into boiling water and cooked in it for about half an hour (be sure to stir it all). The resulting mixture must be filtered and then cooled. The primer is applied to the walls in a thin layer using a regular brush.
Profile markings
In order to install suspended ceilings, the ceiling is prepared, aimed at determining the lowest point of the structure and applying markings for a plastic or aluminum profile. It is on this that the entire structure will be supported.
Please note that the profile can be mounted both on the base ceiling and on walls.
The choice of fixation method depends on various factors. For example, it is sometimes easier to drill holes for dowels in walls than in a solid concrete ceiling with iron reinforcement.
It is also necessary to take into account the weight of suspended ceilings: light structures can be fixed on the main ceiling, and heavy ones are better fixed on the walls.
Professional craftsmen recommend setting the minimum height of tension structures at six centimeters from the main ceiling.
Particular attention should be paid to multi-level ceilings. They are mounted according to the principle of steps, that is, each subsequent level will be lower than the previous one (counted from the main ceiling). When making markings for multi-level suspended ceilings, you need to carefully check each stage of the work done.
Practice shows that even experienced specialists, when making markings for multi-level stretch ceilings, can make mistakes. Therefore, it is better for beginners to start with the simplest options for preparatory work, which include marking.