One of the simplest and most inexpensive ways to cover a ceiling is whitewashing or snowball painting. It does not require any specific skills and therefore is popular when whitewashing ceilings without the help of specialists. When painting, whitewash is used for the ceiling. One of the companies that produces high-quality paint for reasonable money is (“Sniezka”). It is produced by the Polish Paint and Varnish Factory, which in just a few years has made its way into the first ranks of paint production in Poland.
Before painting the ceiling with Snezhka paint, you need to whitewash the ceiling.
Preparatory stage
It often happens that after finishing, drips and stains remain. As a rule, this is the result of incorrectly selected materials. And it’s not always about quality. You just need to choose a specific tool for each paint. But first, decide what paint to paint the ceiling. In addition, a properly prepared surface is also the key to successful and high-quality painting work.
Selection of tools and materials
All decisions at this stage depend entirely not only on your own wishes and financial situation. The fact is that different paints are suitable for different rooms. In some places you can get by with whitewashing. Just remember that if whitewashing is the cheapest option, then it also has the shortest service life. Therefore, this option is definitely not suitable for the kitchen and bathroom. Evaporation and high humidity will very quickly ruin the fresh appearance of the surface. In the living room or bedroom, whitewash lasts much longer.
A pretty good option is water-based paints. Although its price is much higher than lime, the ceiling will look aesthetically pleasing for much longer. This coating can be cleaned and even washed, which allows you to keep it clean for a long time. The main color is white, but colored ones are also available. If none of the existing colors suits you, then you can remove the shade using special additives. For the ceiling in a children's room, a snowball is best suited. Before you paint the snowflake ceiling, be sure to ensure that the plastered surface is thoroughly dry. Otherwise, you cannot avoid stains and streaks.
Tools needed
You need to know the following about choosing a tool. Whatever you choose, whitewashing or painting, you will need a roller and a brush in any case. Smooth and large surfaces are painted with a roller, and hard-to-reach places such as steps, corners and protrusions are painted with a brush.
Never buy a cheap foam roller. It absorbs a lot of paint, which subsequently flows down and forms bubbles on the surface. Take a better quality roller with long pile (or medium) and without rough seams. Such connections leave behind unsightly stripes. If a high-quality roller is compressed, it will not deform, but will quickly return to its previous shape. By the way, its width should be 25-30 cm.
When choosing a brush, don’t skimp on money either. And to check the quality of the tool, pull the fibers thoroughly. If you don’t have them in your hands, then you can safely opt for this brush. Strong fibers are the key to quality painting. The width of the brush should be no more than 7cm.
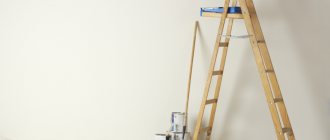
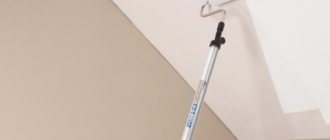
To paint the ceiling with your own hands, in addition to the main working tools, you will need a stepladder, a paint tray, masking tape and overalls. You can also prepare a strong stick so that you can later use it as an extension cord and holder for the roller.
Preparing the premises
If you have already decided what to paint the ceiling with, proceed to preparing the room. First of all, you need to remove all furniture and lighting fixtures from the room. If there is nowhere to take it out, then at least cover it tightly with film or other waterproof material. Also cover floors, walls and windows, even if they are not completely finished. You don't need any extra splashes or drips. And so, at the end of the work, you just need to collect and throw away the covering material. Before painting the ceiling in the room, cover with masking tape the areas that you intend to paint in a different color or leave in the same condition. The walls at the junctions with the ceiling should also be covered with the same tape to avoid any unevenness.
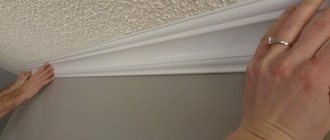
Important point! If you are going to install ceiling cornices in the same color as the ceiling, it is better to do this in advance to avoid double work. Turn off the electricity, but take care of additional lighting. Be sure to make sure there is enough paint to cover the entire area. And keep in mind that you will have to cover the surface at least twice. Also, a certain amount will be needed to correct flaws. You especially need to take care of the stock if you select the color using a tint. In case of shortage, it is very difficult to achieve an identical tone.
How to paint a ceiling correctly
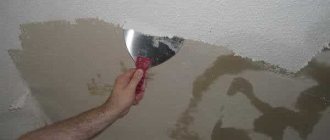
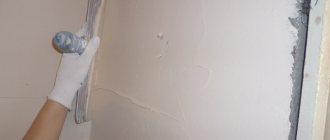
Whatever material your ceiling is made of, it must be cleaned before painting. Even if it seems to you that the old coating is holding firmly, you will have to scrape and sand the entire surface. If there are cracks, they need to be puttied. After the putty has dried, sand it again. And only after that you can start priming and then painting. To avoid the question of how to fix the ceiling after painting, do everything right right away.
Concrete and wood surface
Both wood and concrete surfaces must be primed. This will not only save any paint product, but also improve its adhesion to the surface. This way the paint will adhere just perfectly. Just before you paint a wooden ceiling, pay attention to its texture. If it is without flaws, you can open it with a protective compound and varnish. If the raw materials are cheap and knotty, then carefully putty the joints between the boards and cover with paint.
Dampen the brush with paint and rub it on a wooden board. And only after that, paint a strip along the walls 5-6 cm wide. If you attach the cornice after painting, you can “grab” the wall a couple of centimeters. The painted area will not be visible behind the cornice. A brush will also be needed when you need to cover hard-to-reach areas around pipes or fixtures.
The main work is done with a roller. It needs to be moistened with paint poured into a special tray. To remove excess and distribute the paint evenly over the sandpaper, roll it over the ribbed surface. The first layer of paint should be applied to the surface on the side opposite the window. The next strip should overlap the previous one by a few centimeters. In this case, you need to work quickly so that the previous strip does not have time to dry.
While working, inspect the coated areas from all sides to avoid unpainted areas. After finishing work, try to protect the room from sunlight and drafts. Also, under no circumstances should you turn on heaters to speed up the drying process. This causes the paint to dry out and crack.
Is it possible to paint a suspended ceiling?
Before painting a suspended ceiling, find out whether it can be done at all. The fact is that the result may not please you very much. The gloss and gloss of such stretch fabrics is difficult to restore even for a good professional. After painting, the canvas will no longer repel dust, and if the temperature changes, it may crack.
If you are determined to paint the tension surface yourself, then at least pay attention to useful tips. Painting work can only be carried out with canvas that does not have connecting seams. You will need a spray gun and only acrylic paint. Remember that after each painting the stretch ceiling sags under excess weight. Therefore, you cannot paint it more than three or four times.
Read also: How to solder a bumper with your own hands
Now that you know how to paint a ceiling evenly, get to work. Be careful and follow the tips described above.
How to paint a ceiling with water-based paint?
The market for modern building materials offers an incredible number of opportunities for ceiling restoration. The choice of water-based paint is based on a number of advantages of this material. It is easy to apply, dries quickly, is moisture resistant and environmentally friendly. In addition, this dyeing method optimally combines high-quality results at low costs.
Preparing the ceiling for painting
To obtain an ideal result, it is necessary to thoroughly prepare the surface before painting. To begin with, the ceiling is “removed” from the previous layer of paint or whitewash. The cleaned ceiling must be leveled, cracks repaired and primed. A ceiling primer for painting is necessary so that the paint goes on evenly and adheres well. Also, the primed surface reduces the consumption of paint material.
To assess how well the ceiling surface is prepared for painting, you need to strongly dilute the paint with water and apply it to the ceiling. All flaws will immediately become visible. After this, it is important to choose the right paint.
Choosing water-based paint for painting the ceiling
Each type of water-based paint has advantages and disadvantages. Acrylic and silicone paints have gained the most popularity.
The addition of impurities gives paints additional qualities: dullness or shine, resistance to damage and chemical reagents.
The choice of paint should take into account the specifics of the room where it will be applied. When painting the ceiling in the kitchen, washable paint is important, and in the bathroom it is important to choose a material with antifungal additives.
It is recommended to buy all the paint from the same batch and from the same manufacturer, because the tone may vary slightly.
Painting the ceiling with snowball
“Snieżka” is often called the paint produced by the Polish company of the same name. This company has gained particular popularity due to its high-quality products and long existence on the building materials market. This paint, like most water-based paints, has wear resistance, strength, durability, vapor permeability and environmental friendliness. At the same time, the technology for painting ceilings with snowballs is no different from applying any other paint. The main thing here is to adhere to the correct painting technology.
Subtleties of painting the ceiling with water-based paint
To get the best coloring result, you need to follow a few fairly simple rules:
- study the instructions on the paint package;
- before use, the paint must be thoroughly mixed so that the color applies evenly;
- first, use a brush to paint all the corners and ceiling plinths around the perimeter of the room;
- apply the second layer of paint across the first;
- do not try to speed up the drying process of the paint;
- eliminate drafts during the painting and drying process;
- After applying each layer of paint, wash the instrument thoroughly and dry it.
When using color additives, it is not easy to achieve the desired shade. In this case, it is advisable to involve professionals.
Painting the ceiling with a spray gun
Using a spray gun to paint the ceiling has significant advantages over using a conventional roller:
- the speed of work is several times higher;
- when using a spray gun it is easier to apply an even layer of paint;
- the occurrence of divorces is excluded;
- There are no areas that are inaccessible for painting with a spray gun.
When painting the ceiling with a spray gun, it is necessary to protect your eyes and respiratory organs from unwanted paint.
Painting the ceiling with water-based paint is not at all a difficult task; the main thing is to approach this issue with all seriousness.
Video tips for high-quality ceiling painting
Today, painting the ceiling is still popular. This is a simple and fairly cheap option for finishing the ceiling, which can be completed in a short time and without special construction skills. The only thing that can spoil the impression of a freshly painted ceiling is its uneven surface. Therefore, preliminary preparation of the ceiling for painting is necessary. The work itself takes up the lion's share of the entire ceiling finishing. But if the preparation of the ceiling for painting is poorly done, then the final result may be disappointing. To prevent this from happening, you need to be patient and carefully complete all the work to prepare the ceiling for painting.
Preparing the ceiling before painting takes place in several stages. Each of them is necessary to create a smooth and reliable surface for further paint application. To carry out surface preparation work, you will need a certain tool :
- wide and narrow spatulas;
- roller and brush;
- paint trough;
- container for mixing putty;
- drill and special mixer attachment;
- stationery knife;
- a grater with a sanding mesh or a special sanding machine with zero sandpaper;
- safety glasses and respirator.
Materials you will need :
- deep penetration primer, for example, Ceresit ST 17;
- Knauf multi-finish gypsum putty or other;
- painting fiberglass “gossamer”;
- glue for glass wallpaper;
- a stepladder, or better yet a table or trestle.
Having acquired everything you need, you can begin the actual work of preparing the ceiling for painting.
Ceiling cleaning
When finishing from scratch in a newly built house, you can immediately proceed to the second stage of work. But if a major renovation is being carried out, then you will first have to clean the ceiling of the old finish. There are several options for what you have to do.
- If the ceiling was covered with wallpaper , then using a regular spray bottle or roller we wet the surface with warm water and let it absorb. After some time, the glue will get wet, and the wallpaper can be carefully removed using a regular spatula. It is enough to pick them up, they will easily come off. As a result, not a single piece of paper should remain on the ceiling. Finally, wash off any remaining glue. This can be done with a regular sponge dipped in warm water. You may need to change the water several times. The main thing is that the ceiling surface is clean as a result.
- If the ceiling was previously painted with water-based paint or whitewashed , you will have to do the same as with wallpaper. First, lightly wet it and then use a spatula to scrape off the old finish. But unlike wallpaper, which can be removed almost as a whole canvas, paint or whitewash is not so easy to scrape off. Ideally, the old coating will be removed in small flakes. Otherwise, you will need to work hard. To facilitate the process, the surface will have to be slightly moistened from time to time. Some craftsmen remove the whitewash dry. This approach has its place, but it has one significant drawback - too much dust. Upon completion of work on removing whitewash or water-based emulsion, the ceiling must be thoroughly washed. You will have to change the water several times.
- In the case where the ceiling was painted with acrylic paint , you can go in two ways. The first is to moisten the surface with a special remover, and then carefully remove the paint using a spatula. This method is the easiest, but also the most harmful to health. The second option is to use a hammer to knock off the old paint. Which method to choose is up to the masters to decide. After cleaning the ceiling from acrylic paints, it is enough to scrape it with a metal brush.
- If the ceiling was covered with plastic or ceramic tiles, you will have to be patient, since the removal job will not be easy. And if with plastic panels everything is relatively simple - tear off all the panels and then remove the remaining glue. In the case of ceramic tiles, you will have to tinker, beating the mortar with a hammer.
- For suspended plasterboard ceilings, things are somewhat different. The thing is that it is quite difficult to remove the old coating without damaging the sheet of drywall. Therefore, the option of complete or partial replacement of sheets is possible. And these are additional costs. But in contrast to this, less effort will be spent preparing the surface of a plasterboard suspended ceiling for painting.
Ceiling repair
After cleaning the ceiling from the old coating, you should carefully inspect its surface for cracks, potholes or other damage. If there are any, you will have to do a little repair and seal them. To do this, we impregnate the damaged areas with a deep penetration primer. The most convenient way to do this is with a brush. Let the primer dry completely and then, using a narrow putty knife, seal it with multi-finish putty. A special feature of multi-finish putty is the ability to perform both finishing and rough finishing, applying a layer of putty up to 10 mm. If the depth of damage is more than 10 mm, then cement-based putties should be used. After complete drying, some unevenness of the putty area may occur due to shrinkage of the putty. This is quite natural and will be eliminated with further leveling of the surface.
Important! The putty dries quickly enough, so to carry out rough repairs to the ceiling you should do a small batch. After completing the work, you can safely throw away the remains and rinse the container thoroughly.
Ceiling primer
After the repaired areas have completely dried, you can begin priming the ceiling surface. Applying a layer of primer will ensure better adhesion of the putty to the ceiling surface. To do this, use a roller to evenly roll out the primer over the entire surface. You can apply the primer in two layers, which will only increase adhesion. The work itself should be carried out wearing safety glasses.
For convenience, the roller can be attached to a telescopic handle. This will allow you to saturate the entire ceiling quickly and without much difficulty. Coat corners and hard-to-reach places with a brush. Here you will have to work hard, getting to difficult places with the help of a stepladder. If you plan to putty the walls in the future, then immediately prime 15–20 cm of the wall from the ceiling. Upon completion of work, leave the primer to dry. The drying time is indicated on the packaging and should be adhered to.
Surface reinforcement
To give the ceiling additional strength, seal cracks and partially level the surface, the surface is glued with fiberglass “gossamer”. The first thing to do is to coat an area equal to the size of the canvas with special glue for glass wallpaper. Apply the glue with a roller, then apply the canvas and press it so that it sticks to the ceiling. Complete leveling is carried out using a wide spatula, holding it at a slight angle, first along and then across the canvas. Having smeared another area, glue the next canvas. At the same time, we make a small overlap of 2–3 cm over the previous one. Now we take a utility knife and, using a metal ruler or a wide spatula, cut both canvases along the entire length of the overlap. The result will be slices on both canvases that fit perfectly together. Having removed the cut pieces, we bring together and glue the edges. This method of bringing the edges together is necessary so that the surface of the ceiling after gluing the fiberglass is smooth, without protrusions or cracks. Having pasted the entire surface in this way, we apply another layer of glue, which will strengthen the already glued canvases. After letting the glue dry completely, you can proceed to puttying the ceiling.
Ceiling putty
Plastering the ceiling is quite a labor-intensive process. The reason is the inconvenience of applying materials. Of course, after some time the skill is perfected, and the work goes quite quickly. But for a beginner, preparing a plasterboard ceiling for painting, or even preparing a regular concrete ceiling, can seem like quite a daunting task.
To make puttying the ceiling relatively easy, you should ensure ease of movement. And a goat is perfect for this. If this is not the case, you can put a couple of tables nearby. The main thing is that when performing work you can move freely 1.5 - 2 m forward and backward. Also, for convenience, it is necessary to ensure that there is a height reserve of 10 - 15 cm above your head. This will allow you to see all the flaws without straining your neck too much.
Read also: How to submit electricity meter readings, how many digits
Having arranged the workplace, we perform putty. Everything is simple here. According to the instructions on the package, add the dry mixture and water in the required proportion to a large container. First, after mixing a little by hand, connect a drill with a mixer attachment and knead until it becomes thick sour cream. If the resulting consistency is too runny, you can add a little mixture and mix thoroughly again. If it’s thick, use water. We make the batch at the rate of production in 40 – 50 minutes. Beginners are advised to make small batches and see how long it takes to produce it. And only then make a full batch.
Important! It is highly not recommended to add mixture and water to an old batch. Such a batch will not have the necessary strength characteristics.
Now we take an ordinary wide or notched spatula and apply the finished putty on it. This is done using a narrow spatula. Next, placing the spatula at an angle to the ceiling, pull it towards you. We repeat such movements over the entire surface of the ceiling until we have worked out all the putty from the spatula. At the same time, we make sure that no large clumps of putty remain on the surface of the ceiling. And the surface itself was smooth and without drops. If necessary, use a spatula and level it. After puttying the entire surface of the ceiling, leave it until completely dry, after which we proceed to sanding.
Ceiling sanding
Preparing the ceiling for painting with Snezhka, Auro, Tikkuril or any other paint requires a perfectly flat surface. Otherwise, in a certain light, all the imperfections will be visible. Therefore, at the last stage of preparation, the ceiling is sanded. It can be done manually or using special grinding machines.
Sanding the ceiling manually is done “under a light bulb”. To do this, take a regular incandescent lamp attached to the end of the holder. By holding it close to the ceiling and highlighting it, you can see all the imperfections after puttying. You can level them using a grater with a mesh. To do this, performing circular movements with a grater, we move in a straight line from wall to wall. From time to time we go some distance away and check the work. The mechanical grinding method is much simpler, requires less effort and time, and there is almost no dust. But the principle of doing the work is the same - circular rubbing while moving in a straight line.
Important! When sanding by hand, you must protect your eyes and respiratory system from gypsum dust.
After sanding the ceiling, all that remains is to go through the primer again, let it dry and the surface is ready for painting. All work on preparing the ceiling can be safely done alone, since there are no particular difficulties in this. When working, the main thing is to carefully ensure that the surface is smooth during puttying and sanding. As a last resort, you can go through the putty again and sand it again.
Preparing the ceiling for painting: video
There are many options for finishing the ceiling, but whitewashing is the most popular of them. It is inexpensive and looks very good if the paint was applied correctly. It is usually recommended to thoroughly clean the ceiling of the old layer of lime or chalk before applying a new one. However, you can put the next coat of paint directly on top of the old one . The main thing is to know how to do this in order to be guaranteed to get a good result. There is nothing complicated here - with the necessary knowledge, anyone can cope with this on their own without spending a lot of time doing all the necessary work.
How to whitewash a ceiling using old whitewash
Painting the ceiling
Now you can start painting. It is also better to do this with a roller, with a medium length of pile. You can choose synthetic fur or natural sheepskin. When buying a roller, you need to check whether the fibers stick well, otherwise they will remain on the ceiling.
Important! After opening the container and immediately before use, the paint must be mixed! It is better to do this using an electric drill and a mixing attachment. Don't forget to do this, even if only one day has passed since opening the jar!
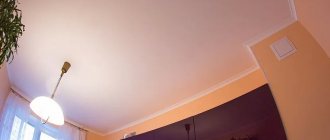
The choice of paint itself may be determined by the operational properties of the room itself. The wettest areas are the bathroom and kitchen, where the ceiling is periodically exposed to moisture due to steam condensation.
It is known that high humidity is a good environment for the appearance and spread of fungus, therefore, in such places, first of all, sufficient air exchange (ventilation) must be organized. But even if everything is in order with the hood, it is worth using paints and varnishes designed specifically for wet rooms.
Snezka's is latex paint containing silicone additives. It is called ŚNIEŻKA KUCHNIA-LAZIENKA (Snowball-Kitchen-Bathroom).
Latex paint ŚNIEŻKA KUCHNIA-LAZIENKA
It contains silver, which is known to have disinfectant and bactericidal properties. This prevents the formation of fungus. The presence of silicone makes the coating resistant to washing and abrasion, and the latex-based base allows the coating to “breathe,” which is very important for wet rooms.
Sometimes the ceilings in the kitchen have streaks and stains from grease, soot, and leaks, and some stains are quite difficult to remove and sometimes appear through the finishing coatings. In order to cover such a defect, ŚNIEŻKA ZACIEKI-PLAMY paint is used.
Paint ŚNIEŻKA ZACIEKI-PLAMY
It is made on an acrylic base and can be used simply as a primer for preserving stains, as well as as a final coat.
The universal material for whitewashing the ŚnieŻka ceiling is ŚNIEŻKA MAX WHITE LATEX - latex paint that has very good hiding power. One kilogram can cover up to 14 square meters. surface (in one layer).
Latex paint ŚNIEŻKA MAX WHITE LATEX
One of the advantages of this material is the very low content of volatile organic compounds (VOCs), resulting in virtually no odor. Withstands repeated wet cleaning.
Recently, many people are susceptible to various allergic diseases, and there is hypersensitivity to any paintwork materials. This often happens in childhood. If your home has such a problem, then you should use ŚNIEŻKA EKO acrylic paint to paint the ceilings.
Acrylic paint ŚNIEŻKA EKO
This product has hypoallergenic properties and does not cause reactions even in very sensitive people. These qualities make it possible to use Snezka Eco in hospitals and kindergartens.
The use of materials from one manufacturer is convenient because you can purchase the entire necessary set from one supplier at once. In addition, such a complex is specially developed, and there is an unambiguous guarantee of compatibility of all products with each other.
The tools for whitewashing the ceiling with Snezka will need a standard painting kit: a narrow brush for corners and hard-to-reach places (for example, behind a heating pipe), a roller with medium-length pile, a paint tray (corresponding to the size of the roller), masking tape and a knife (if there are surfaces which should not be painted), stepladder and lighting.
To save time and water, place a trash bag over the tray before pouring paint into the tray. After finishing the work, you will only need to remove the dirty packaging, and the tray itself will remain clean.
Tips for saving time and water
Usually, for a well-prepared ceiling, two layers of paint are enough, applied with intermediate drying (from 2 to 4 hours, depending on the room temperature and air humidity). The manufacturer does not recommend painting at temperatures below 10 degrees. These conditions should be observed so as not to violate the properties of the coating.
Important! Any water-based paints must be stored at a temperature of at least 5 degrees. Therefore, when purchasing such materials in winter, you need to make sure that the seller has warm warehouses!
How to whitewash the ceiling?
You can whitewash the ceiling:
- chalk;
- lime;
- water-based paint.
Each of these options has its pros and cons.
Table. Materials for whitewashing the ceiling.
| Material | Advantages | Flaws |
If you do not want to wash off the old whitewash, you need to keep in mind that you cannot apply lime to the chalk and vice versa - otherwise the paint will not adhere well and dirty stains will form on the ceiling.
On top of the chalk you can put a new layer of chalk or water-based paint, and the lime can be covered with the same emulsion or lime. At the same time, it must be taken into account that enamel and oil paint are absolutely not suitable for painting over an old layer of lime or chalk.
Painting the ceiling over a layer of lime or chalk
The advantage of Snezhka products
Variety of paints
Before painting the ceiling, you need to know certain properties of different types of paints. After all, for a wide variety of rooms, different paints are needed, for example, in the bathroom, where there is very high humidity, paint is not suitable for rooms in which it is dry.. Paints can be based on drying oil, resin or varnish, and in addition water and emulsion. The properties of the paint are determined by the binders and coloring pigments in the composition. Acrylic, latex, silicone, silicate paints are the most popular because after application to the surface, the water disappears from them and they become a solid layer (see Ceiling painting
water-based paint based on polyacrylate: specifics and detailed instructions) Water-based paints based on polyacrylate are resistant to contamination, but they have poor vapor permeability, which makes it advisable not to use them in rooms with very high humidity. But it is suggested to paint them only 2 times, this is enough for the paint to create a durable surface. But silicate paints, on the contrary, perfectly allow moisture to pass through, and the ceiling seems to “breathe.” But before use, it is better to prime the ceiling surface with a silicate mixture. Such paints are not elastic, but they do not allow the formation of microorganisms. Silicone paints are expensive, but this, after all, is their only drawback. Silicone paints are often mixed with silicate and latex-based paints to improve their quality. They have high vapor permeability and are antiseptic.
Tools
There are three main methods of applying whitewash that you can use:
If you paint with a roller , the paint will lay down in an even layer, there will be no streaks or stains. In order to get a good whitewash using this tool, the coloring composition will need to be applied in two layers. In addition to the roller itself, you will need a container for the solution, something for mixing and a painting tray. You also need a small brush to apply paint to the areas of the ceiling at the junctions with the walls - you won’t be able to do this carefully with a roller without staining the walls.
A whitewash brush can be purchased at any building materials store. It's inexpensive. While working with a brush, the paint splashes heavily, so you need to carefully protect the furniture in the apartment, as well as your eyes.
Tools for whitewashing the ceiling
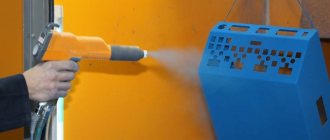
Using a sprayer, whitewash can be easily applied in a very neat, even layer. If the paint will be applied by spray, you need to carefully ensure that it is free of lumps. Its consistency should be more liquid than that of whitewash, which is to be applied with a brush or roller.
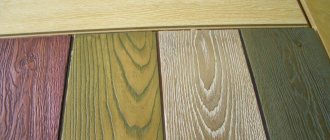
Sniezka Extra Fasad - acrylic paint for facades and external walls
The facade is the outer, front side of any building and needs protection from the harmful effects of time and precipitation. Therefore, the facade must be protected with a layer of paint and varnish material, thereby additionally giving it attractiveness and the necessary color.
There is a huge number of facade paints on the Ukrainian market of paints and varnishes, however, it is worth highlighting a truly high-quality product at an affordable price, this is Sniezka Extra Fasad.
Sniezka Extra Fasad is a high-quality water-based acrylic paint for facades and exterior works. Also, it can be used for interior work, in rooms with high operational load, such as retail premises, corridors, staircases, etc. It has a matte gloss level.
Snezhka Extra Facade paint can be applied to substrates made of cement and concrete, plasterboard, brickwork, gypsum and cement-sand plasters, and wood surfaces.
The paint contains a combination of two resins, due to which the painted surface has complete protection from UV radiation, temperature changes, sudden increases in humidity and precipitation. High-quality pigments in Sniezka Extra Fasad guarantee bright color throughout its entire service life.
Sniezka Extra Fasad facade paint can be set with Sniezka Colorex pigment dyes using the Śnieżka Color System.
You can buy facade paint Sniezka Extra Fasad in Ukraine in the specialized construction market OxiDom by following the link https://oxidom.com/otdelochnye-materialy/kraski/kraski-dlya-vneshnih-rabot/sniezhka-extra-fasad-matovaya-akrilovaya- emulsionnaya-kraska-dlya-fasadov-i-vneshnikh-sten
Paint Features
- resistance to precipitation;
- protection of painted surfaces from UV rays;
- paint vapor permeability;
- coverage guarantee for at least 10 years;
- high resistance to mechanical stress and abrasion;
- economical consumption;
- high degree of hiding power.
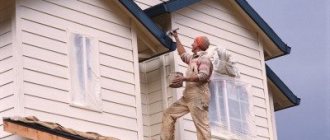
Recommendations for surface preparation
First you need to clean the surface of the facade from the layer of previous paint and varnish material. To do this, you can use mechanical, chemical or thermal heating. The mechanical method involves using sandpaper, an angle grinder with a special wheel, a metal brush, a spatula or other tool. The chemical method is the use of specialized compounds, paint and varnish removers. The temperature heating method involves the use of a hair dryer.
Application of Sniezka Extra Facade paint
You can apply Snezhka Extra Facade facade paint with a roller, paint brush or spray.
Recent pages from the section:
- Choosing a video surveillance system for a country house
- Laying flexible tiles
- We trust cartridge refilling to professionals
Previous pages from the section:
- Manufacturing of stamps and seals to order in Ukraine
- “Husband for an hour” and plumbing repair
- Choosing the right laptop: what is important to know?
Next page >>
How to choose water-based paint
If everything is more or less clear with chalk and lime, then choosing a suitable water-based emulsion is a more difficult task. There are many varieties of these paints, which differ in composition and properties.
- Polyvinyl acetate water-based emulsions are the most affordable.
- Paints with acrylic additives are the most popular. They are suitable for any surface and are abrasion resistant (although in the case of ceiling paint this property is not so important).
- Silicone water-based paint fits well over old whitewash even without the use of a primer. It is highly vapor permeable and is perfect for painting the ceiling in the bathroom or kitchen. This type of coloring composition will reliably protect the surface from the appearance of fungus on it.
- Water-based latex paints have very good water resistance and can be washed with detergents. In terms of price, they are superior to all other water-based emulsions.
Concentrated water-based paint Diola-78 (5 kg.)
To make the best choice, read the label carefully before purchasing. It should indicate the purpose of the paint, the degree of its hiding power, consumption per square meter and other parameters that need to be paid attention to. A correctly selected water-based emulsion will allow you to create a snow-white and durable coating; it will not turn yellow over time and is guaranteed to protect the ceiling from the appearance of fungus.
Painting ceilings with water-based paint
Choosing paint for the ceiling is a rather difficult process.
Nowadays there is a huge variety of water-based paints. They are popular due to their affordable price, lack of odor and good quality of painting. Let's consider these types of water-based paints with additives:
- acrylic;
- silicone;
- latex;
- silicate;
- polyvinyl acetate.
If you want to paint ceilings in enclosed spaces (basements, saunas, attics), then you should use silicate paints. Silicate water-based paints contain substances that prevent the appearance of fungi and mold.
Silicone paints can be applied directly to plaster, without using a primer. It is a good choice for bathrooms and kitchens. They are also mildew resistant.
Acrylic paints are an excellent choice for painting ceilings in living spaces and kitchens. They are resistant to soot, smoke, and have good abrasion resistance. These are the most popular paints.
Painting the ceiling with water-based paint requires observing certain nuances so that marks from a brush or roller are not visible. It is important to consider the direction of the light flux during painting, and to observe certain time intervals for the paint to dry.
Painting with water-based paint
In order to get a good paint job over lime, it is best to first coat the old layer with an acrylic primer. After this, you need to check the surface for strength by trying to scratch it. If it does not crumble, then you can apply paint.
Read also: Table of tightening torque of bolts with a torque wrench
Painting a wooden ceiling using a sprayer
But when painting over chalk, it is not necessary to do this - water-based paint will bind it well and will stick even without primer.
Before you start work, you need to prepare the room. It is necessary to remove or carefully cover all items with film so that they do not get dirty with paint.
If you are applying paint with a brush, place strokes first perpendicular to the windows, then parallel. If the last layer is laid parallel to the light source, the streaks will not be visible after drying.
Painting with a roller is a simpler and more convenient process in which you need to perform the following steps:
- pour paint into the paint tray;
- dip the roller into the bath, and then roll it along the slope, evenly distributing the paint over the surface and letting the excess drain off;
- lay the first layer of paint perpendicular to the windows;
- wait for the composition to dry completely;
- then add a second layer, which should be parallel to the window opening;
- Carefully paint the sections of the ceiling at the junctions with the walls with a brush.
How to whitewash a ceiling correctly
Applying paint from a sprayer is even easier - just apply three even layers, and you don’t need to watch the direction. The main thing is not to miss a single square centimeter of the surface when applying each of them.
Painting process
The last stage of painting is finishing it with a roller.
- The paint is poured into a specially prepared tray. If the whitewash is too thick, then it needs to be diluted a little and stirred thoroughly.
- Then it is recommended to paint the perimeter of the ceiling 2 times with a brush. This is necessary so that when painting with a roller you do not touch the walls and paint hard-to-reach places.
- Next, you need to dip the roller in the paint bath and squeeze lightly. It is best to apply the paint in 2-3 thinner layers. This type of painting will last longer.
It is best to start painting from the window, gradually moving deeper into the room. The first layer is applied across the sun's rays onto the surface, and the second - along. To avoid streaks on the ceiling, apply the paint in a W-shaped motion. To remove excess paint from the ceiling, you need to walk over the surface with a roller that has no paint left on it.
To avoid the formation of unsightly stripes on the ceiling, do not treat the surface after painting with a dry roller. The paint on the roller should always be evenly distributed. To do this, the roller is often dipped into the bath, and then carefully rolled out along the side of the bath. This allows you to remove excess paint from the surface of the roller. To ensure that the paint evenly covers the entire surface, it is best to paint the last layer with an unused roller.
If the windows of the room in which the ceiling is painted face the sunny side, then it is recommended to shade them. It is necessary to ensure that there are no drafts in the room. Under no circumstances should you speed up the drying process of the ceiling using any heating devices . This may cause the paint to lift from the surface.
Chalk painting
It is not difficult to prepare a chalk solution for painting the ceiling; for this:
- For 10 liters of water you need to take 5 kg of chalk and 50 g of wood glue;
- the consistency of the solution should be such that it does not flow from the knife; if the mixture flows from the blade, you need to add more chalk;
- You can add blue to the composition, in which case the ceiling will be snow-white, without a yellow tint.
Preparation of chalk solution for whitewashing the ceiling
The technology of painting with chalk is fundamentally no different from the technology of applying water-based emulsion . First, choose one of the options - application with a brush, roller or spray gun. Then, during the painting process, take your time and carefully ensure that the composition is applied in an even layer. In this case, the new look of your ceiling will definitely please you.
How to whitewash a ceiling correctly?
To find out, we recommend that you read this article. You will probably also be interested in learning how to paint a ceiling with water-based paint.
How to paint a snowball ceiling if it is covered with lime
With the onset of spring, many people decide to update their homes. Some are doing a major renovation, while others decide to simply re-glue the wallpaper and update the ceiling. This work is not at all difficult and will not require much effort, unless, of course, the ceiling canvas is smooth and does not have significant defects. Everything is simple here, repair mini flaws, if any, polish and prime them, and after that, paint the surface. An excellent option would be water-based paint “snowball”. In this article we will look at how to paint a ceiling with a snowball, if it is no longer new at all, has a lot of defects and, moreover, is painted with lime.
Painting with lime mortar
In order to make a lime solution for painting the ceiling, you need:
- take 2.5 kg of lime, add 100 g of salt soaked in water and a small amount of blue;
- Having mixed all the components of the mixture, add water to them so that the final volume is about 10 liters.
Lime mortar for whitewashing
The basic rules of application are the same as for chalk and water-based paint.
How to paint ceilings with your own hands
Professional painters can tell you subtleties that will be very useful when painting the ceiling correctly. Proper painting of the ceiling requires some skills and dexterity, which can be quickly learned.
- Start painting the ceiling from the corners of the room. First, paint the corners farthest from the entrance with a thin brush, then switch to a roller. The first brush stroke is done from yourself, and the subsequent ones - vice versa.
- Roll evenly. To avoid smudges, roll the roller in a small amount of paint.
- When painting the ceiling with a brush, you need to press evenly on the ceiling to avoid paint dripping from the brush. It is recommended to hold the brush perpendicular to the corner of the surface to be painted. You should end up with a fairly wide stripe that needs to be shaded. Periodically get down from the stepladder and examine the result of the work, highlighting it with a lamp.
- Under no circumstances should drafts or strong temperature fluctuations be allowed to occur.
- Take good care of your tools while painting the ceiling. Brushes should be washed thoroughly in warm water between jobs.
Important points
When whitewashing the ceiling, you must take into account the specifics of the room . For example, in the bathroom you need to use a special composition that will be resistant to moisture and protect the ceiling from the appearance of fungus. Otherwise, the paint will quickly lose its appearance and may even begin to crumble quite quickly.
It is also important to remember safety while painting. In order to avoid getting whitewash into your eyes, skin and respiratory tract, you need to use safety glasses, rubber gloves and a respirator . If this is not done, the coloring composition can cause allergies or even chemical burns.
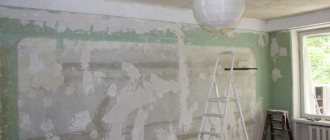
Ceiling preparation
The first thing you need to do when whitewashing a ceiling is to free the surface from the previous coating. The only exception is when the material that was applied earlier is known, the ceiling does not need leveling, there is no loose plaster, fungus, leaks or other damage that requires complete repair.
If there is the slightest doubt about the old finish, feel free to remove it to the base of the floor panel to be sure of the further use of the room without unnecessary problems.
Removing Old Finish
After cleaning the ceiling from the old whitewash, it is necessary to prime it. For loose and highly absorbent substrates, it is better to take deep penetration primer ACRYL-PUTZ® GP41, and if the condition of the ceiling is quite satisfactory, use the usual universal primer GP40.
When it is necessary to level the ceiling using putty, ACRYL PUTZ ST10 putty is suitable for the first layer, which can be used as a starting and finishing putty.
Putty ACRYL PUTZ ST10
For wet rooms, as a finishing leveling layer, there is a special thin-layer lime putty ACRYL-PUTZ® RV13 RENOVA, which is resistant to mold and mildew.
Putty ACRYL-PUTZ RV13 RENOVA
The final operation in preparing the ceiling for whitewashing is its re-priming, which is done using a brush or roller (the latter is preferable, since the surface is already smooth, and rolling it with a roller will be much faster).
How to wash off old whitewash from a ceiling
Despite the fact that the ceiling can be painted using old whitewash, the best option for obtaining high-quality painting is to first clean and level the surface. Old whitewash that does not adhere well and is peeling must be washed off. If you don't do this, you can't expect a good result. If the layer of lime or chalk that is already on the ceiling is thin, even and holds up well, painting directly on top of it would be a good option.
Removing old whitewash will be the best option to obtain a high-quality paint job
In order to wash off chalk whitewash, you need to:
- take a foam sponge and soak it in water so that it is damp, but the drops do not flow off;
- after this, you need to run a damp sponge over the ceiling over and over again, washing off one layer after another, and it needs to be moistened as often as possible;
- then you need to thoroughly wipe the ceiling with a wet rag - you also need to dip it in water as often as possible.
Washing off the lime layer is a little more difficult because:
- the first step is to moisten the entire ceiling; for this you can use a spray bottle;
- using a spatula or scraper, you need to remove the soaked layer of lime;
- and finally, you need to thoroughly wash the ceiling with a damp rag or sponge to remove any remaining lime and dust from it.
Removing old whitewash: a - moisten the ceiling, b - remove the soaked coating.
It is better to work in sections - while you are removing the soaked lime from one of them, the other will be saturated with moisture. This way you can go through the entire ceiling quite quickly.
In order to wash off old whitewash, you can also use special compounds.
- You can purchase a special remover at a hardware store. It must be applied to the ceiling using a sprayer. When it dries, a crust will appear on the ceiling, which must be removed with a scraper. After this, the surface will simply need to be washed with a cloth.
- Another option is to add vinegar to the water (one large spoon per 5 liters will be enough) and 50 ml of bath foam, mix thoroughly and apply to the ceiling surface. After waiting 20 minutes, you can clean it with a scraper and then rinse thoroughly with a wet cloth.
- Another way is to make a paste by mixing water and flour. It must be applied to the surface of the ceiling and allowed to dry, after which the whitewash can be easily removed.