In order to give the room a complete aesthetic appearance after renovation, you need to correctly design the junction of the ceiling and walls. Previously, this problem was solved with the help of borders - paper strips glued to the top of the wall, decorated with wallpaper. Nowadays, ceiling plinths or baguettes are increasingly used. With simple installation, they have much wider potential when decorating a room. You can do this work yourself if you know how to properly glue baguettes to the ceiling.
What are the advantages of using ceiling skirting boards?
In addition to the ability to beautifully and harmoniously design the transition from walls to ceiling, baguettes have a number of advantages, including:
- Low cost.
- A wide selection of shapes, sizes and configurations.
- Can be used with any type of ceiling covering.
- Flexibility - allows you to hide defects and unevenness of the wall.
- Simplicity of installation work.
Types of baguettes
The fillets are made from the following materials:
- Foam or polyurethane. The most commonly used types of ceiling skirting boards. They have gained enormous popularity due to their low cost and versatility.
- Plastic. Such baguettes are glued under suspended ceilings and used when finishing the surface with PVC panels. Read about the rules for installing plastic skirting boards for ceilings here.
- Aluminum. Quite an expensive type of ceiling moldings. The main advantages are strength and durability. They are rarely used in apartments, usually when finishing in a high-tech style. More often such interior elements are found in office premises.
- Plaster. Stucco molding made from this material requires a ceiling height of at least three meters, so gypsum moldings can rarely be seen in apartments.
- Tree. Best combined with a wooden ceiling. Quite expensive, more difficult to install, but the result is worth the cost.
In addition to the material, baguettes vary in shape, size and pattern. In rooms decorated in modern styles, simple moldings are more common. But if the designer’s idea requires it, you can easily find curly ones.
USEFUL INFORMATION: Is it possible to glue liquid wallpaper to the ceiling: instructions
The most popular and effective adhesive compositions
To work with ceiling plinths, glues based on polymer, silicone and acrylic are used. Each of them has its own characteristics.
- Polymer adhesives.
They are made on the basis of polymers that dissolve in water. A wide range of such adhesive mixtures for different materials and conditions allows you to choose the best option for your baguette. Some craftsmen note that polymer glue is not very sticky and forces you to press the baseboard tightly for several minutes. This may be inconvenient when gluing long friezes.
- Silicone adhesives.
Most often they are produced in tubes for a pistol, which makes them easier to work with. The basis of this glue is a rubber base; some silicone mixtures include antibacterial and antimicrobial additives. However, they are not compatible with all types of ceiling plinths, so this point needs to be monitored additionally.
- Acrylic adhesives.
These substances are non-toxic, moisture resistant, and are not afraid of aggressive environments. This glue dries quickly, and this can become a problem, because an incorrectly glued baguette will no longer be able to be corrected. The second problem is the unpleasant smell of glue.
Whatever type of glue you choose, it is worth preparing a clean soft cloth, a brush and water. All this will be useful to quickly remove excess composition from under the baseboards. If you let them dry out, the appearance of the walls and ceiling will suffer.
Preparatory work
Without preparation, it is impossible to attach the baguette correctly and securely. Therefore, a minimum of preliminary work is necessary.
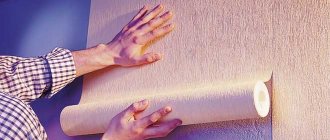
Professionals advise installing the fillets first, and only then proceeding with wallpapering. This is explained simply: it is more convenient to seal cracks and seams between elements and paint baseboards without fear of ruining the wallpaper.
Procedure:
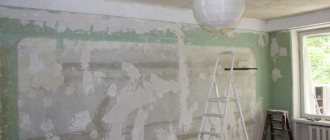
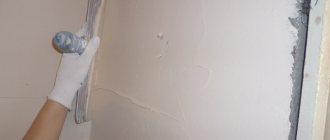
- Uneven walls are leveled using plaster or putty. This is especially true if you plan to install wooden or plaster fillets. When using flexible baguettes, a coat of primer will be enough to eliminate unevenness.
- The primer is carried out after the surfaces are cleaned of dust and dirt.
If the ceiling covering is already painted, then it does not need to be primed. But it is better to paint the ceiling and fillets at the same time.
How to correctly calculate the required number of baguettes
In order not to purchase too much material, it is worth first calculating how many skirting boards will be used for the ceiling covering. It's easy to do:
- Measure the perimeter of the room.
- Divide the resulting number by one unit of one baseboard. By standards it is 2 m.
- If the final result is in decimal form, round the figure to a higher amount.
- Add 2-3 more moldings to spare. Excess is needed in case of accidental damage to the baguette during transportation or as a result of installation of structures.
How to attach baguettes to the ceiling?
There are several ways to glue ceiling plinths. The choice of method depends on the material from which they are made and the nature of the ceiling surface.
- For finishing putty. It not only securely fixes the element, but also fills small cracks at the joints or where the baguette adheres to the wall.
Advice. To ensure a more reliable fixation, you can add a little PVA glue to the putty.
- Using various adhesives. It can be “Moment”, “Titanium” or liquid nails. The latter glue is good because the composition sets almost instantly, which means you don’t have to hold the part in the desired position for a long time.
The choice of glue must be taken carefully: it must be compatible with the baguette material. So, for foam fillets, the adhesive composition should not contain a lot of solvent.
- With acrylic glue. It is well suited for light wooden or foam baseboards.
- For silicone sealant. It provides good fixation, but it should be taken into account that the surface on which it is applied cannot be painted. Therefore, you need to work with the composition as carefully as possible or choose a different method of attaching the plinth.
- Self-tapping screws. They are used to attach substantial weight wooden or aluminum baguettes to the walls.
- Using staples or wood screws. This is how plastic products framing a suspended ceiling made of PVC panels are attached to the slats.
USEFUL INFORMATION: How to paint a ceiling with water-based paint correctly and without streaks
Glue selection
Of the most popular, only a few types of adhesive compositions show good results; the rest, even out of a desire to save money, are not worth taking. Therefore, you need to choose one of the following:
- Moment-montage
- Titanium
- Eco-naset
- Bustilat
- The Dragon
You can use equally popular liquid nails or regular putty for gluing. Moreover, using the latter provides another advantage - there is no need to process the transition points from the fillet to the plane - they will be sealed with the same putty to which the baseboard is glued.
Slicing
Let's look at the basic rules for cutting baguette.
- Cut the fillets with a good hacksaw. Only a few professionals are able to do this efficiently with a sharp knife.
- The most difficult moment during installation is adjusting the internal or external corners. To do this, it is better to use a standard device - a miter box, with which you can easily obtain an angle of 45°.
- If the walls in the apartment are not at right angles to each other, the adjustment is carried out manually, and possible flaws are repaired with putty.
Craftsmen recommend measuring and cutting baguettes during the installation process, rather than preparing them in advance. This way there is less chance of making a mistake and ruining the fillet.
Preparation for installation work
You can glue the ceiling plinth only after it has been left unpacked for a day. Therefore, after purchasing a baguette, you have at least a day to fully prepare for the installation process.
First of all, you need to purchase all the materials and tools that you may need:
- Glue or putty, depending on the chosen installation method.
- A miter box, a fine-tooth saw and a construction knife will help you carefully make a cut at the junction of two baguettes with the desired outer or inner corner.
- Spatula, rags and sponges to remove excess glue and putty.
- Paint and brushes for painting the border.
If you have little or no experience in gluing ceiling plinths, you need to practice filing corners. Therefore, it is better to purchase an additional baguette and use it to make all kinds of corners that are available in the room.
Ceiling plinths should always be glued to a dry and clean surface, so the place of attachment should be wiped with a cloth to remove dust. If the baguette is attached to a plastic surface, it must be degreased and wiped dry.
Marking, docking features
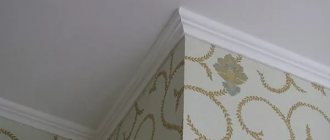
It is advisable to draw a line on the wall along which the lower part of the plank should be located. This will help glue the moldings evenly. Its application is mandatory if the baguettes are planned to be placed so that there is space between them and the ceiling surface. Often LED lighting is placed there, which not only decorates, but also visually enlarges the room.
Before gluing the planks, apply them to the wall and check that they are cut correctly.
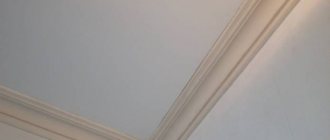
Note! The length of one baguette is not enough for the wall of even a small room. Most often, the planks are simply applied to each other. But professionals advise joining them by cutting them at an angle of 45°, as shown in the photo. This will make the junction less noticeable.
Features of installing baguette in corners
The last plank must be adjusted with a corner cut out to prevent damage to the material when an error with the angle is detected.
If the room has even angles (90 degrees), then the angles between the two walls and between the ceiling and the wall should be straight. In this case, it is possible to correctly cut out the corners using a miter box.
First you need to trim the corner baguettes using a miter box. Then bring their ends to the required size with a sharp knife. Distribute the gaps evenly across both sections to prevent a step effect.
Procedure for using a carpenter's miter box:
- If you have no experience in this kind of work, we recommend practicing on small pieces of frieze.
- Place the bar in the miter box as it will be on the ceiling.
- Press the lower part of the frieze tightly against the side of the miter box.
If there is no miter box, you can trim in this way:
- Attach the frieze to the corner on the left side.
- On the ceiling from the corner, draw a segment (10-15 cm) along the baseboard with a pencil.
- Do the same steps on the right side of the corner.
- Where the lines intersect is the starting point of the cut.
- On the left and right strips, mark the intersection of the segments.
- From the mark to the opposite side of the left and right frieze, cut evenly with a construction blade at an angle of 45 degrees.
- Check that the cutting is correct by placing the processed friezes against the corner.
As you have seen, there is nothing complicated about gluing baguettes. Guided by our advice, you will successfully complete this job.