It is recommended to whitewash or paint ceilings only after the old finish has been removed. However, this matter is quite complicated. Removing old chalk or lime from the ceiling is long and tedious.
In addition, after this a lot of dirt remains in the house. Previously, glue was added to the chalk solution before whitewashing. If the surface is finished with just such a product, cleaning it becomes a pain.
What you need to know
In principle, you can paint or whitewash ceilings without removing the old coating. But not in all cases. So, for example, whitewashing the ceiling over old whitewash with chalk is extremely undesirable if it is covered with lime (and, accordingly, vice versa). Otherwise, sloppy streaks will definitely appear on the ceiling. If you don’t want to clean off the old coating, you should whiten the ceiling with the same product that was used before. You should also not use lime or chalk if the surface was previously treated with water-based paint. The surface simply will not become white. The ceiling will remain yellow no matter how many layers are applied.
[custom_ads_shortcode1]
How to paint a ceiling if it is whitewashed: recommendations
Old whitewash does not seem to be a big threat to the subsequent painting of the ceiling - its layer is thin and even a little rough. But will the paint stick to the whitewash, will the new coating peel off along with the old one or on its own? Many would like to clarify this issue, since the work of removing whitewash from the ceiling is labor-intensive. There are options, although not many.
Using paint - is it possible?
Many owners of houses and apartments are wondering, among other things, whether it is possible to whitewash the ceiling over old whitewash with water-based emulsion. It is considered acceptable to use this remedy. But only if the layer of old finishing is not too thick and adheres to the ceiling firmly enough.
Under no circumstances should oil paint or enamel be applied to whitewash. When using them, the old coating will still have to be removed.
If you decide to perform such an operation as whitewashing the ceiling using old whitewash, before starting processing you will have to carefully prepare the old surface. Chalk on a layer of plaster usually lies flat. Lime may come off in chunks.
Therefore, in the latter case, before whitewashing, you need to check the entire ceiling for the presence of such detachments. Of course, all loose pieces should be removed with a spatula. After performing this operation, there will, of course, be some unevenness on the ceiling.
They need to be sealed with a special chalk putty or thick lime mortar with the addition of a small amount of PVA glue (depending on the type of old finish). Of course, you need to coat all the cracks and chips on the surface.
Before you start leveling the ceiling, it is advisable to go over it with a damp cloth in order to remove dust, cobwebs, etc. It often happens that the old chalk or lime coating has a yellow color. Once the new finish is applied, that yellowing will likely still show through.
Therefore, before starting work, such a discolored surface should be bleached. Such a need, for example, will definitely arise when finishing the kitchen. Ceilings also turn yellow if one of the owners smokes right in the apartment.
It is not difficult to whiten such a surface. It is enough to simply add a little inexpensive “Belizna” product to the water in which the rag is dipped during cleaning. If the ceilings are very yellow, you should go over them with a roller soaked in the prepared solution.
Chalk and lime usually do not adhere very well to concrete. Therefore, a ceiling previously finished with such a product should be treated using a spray bottle rather than a roller. In this case, the surface will be smooth and neat.
A roller can also be used. But when using this tool during work, you will have to carefully ensure that no streaks remain on the surface. Of course, you need to whitewash ceilings over old lime or chalk layers not in one, but in at least two or three layers.
[custom_ads_shortcode2]
Is it possible to paint a whitewashed ceiling?
Since whitewashing is the most common way to give a ceiling a fresh look, and is also the cheapest, in many homes the ceilings are simply whitewashed.
When the time comes for renovation, owners often decide to replace whitewashing with painting, but not everyone knows how to properly prepare the ceiling. It would, of course, be very convenient if the paint stuck to the whitewash, but, as experience shows, the whitewash must be removed. As a rule, the ceiling is whitewashed, if not annually, then at least once every three years, and the old whitewash is not removed, but simply a new layer is applied on top. Thus, the whitewash layer gradually becomes too thick, and if you paint it on top, the whitewash will begin to fall off in pieces along with the paint. Some advise painting over whitewash only if it is applied very thinly and the ceiling itself is free of problem areas - cracks, crumbling areas and other defects. But ideal ceilings are quite rare, so the question of whether it is possible to paint the ceiling whitewash has only one answer: you shouldn’t do it. The same applies to applying new paint to old paint: you should never paint a surface if there are traces of old paint there. After the fresh paint dries, the old one will begin to deform and lag behind the ceiling, and at the same time pull the new paint along with it. But if the paint does not fall off, the appearance of such a ceiling will be unsightly.
Using water emulsion
Having asked the question of how to whitewash a ceiling using old whitewash, you should, of course, decide on the type of finish used. Chalk and lime are used extremely rarely today when decorating ceilings. In most cases, apartment and house owners use water-based paint. This product is applied to the ceiling surface much more evenly. In addition, the water-based emulsion does not peel off over time. But of course, such a finish will last a long time only if it is applied correctly.
Before painting with water-based paint, the bleached ceiling should be primed. In this case, a special deep penetration agent should be used. After the primer has dried, you need to test the old coating for strength. To do this, just try to scratch the ceiling with a spatula. If the old coating is easily removed, it is better not to risk it and remove it anyway. If the chalk or lime soaked in primer holds tightly, you can start painting.
Sometimes owners of apartments and houses finish whitewashed ceilings with water-based emulsion and without prior priming. This is also acceptable. But only if very high-quality paint from a good manufacturer is used.
[custom_ads_shortcode3]
Ceiling preparation
You cannot whitewash a ceiling using an old coating: when wet, the previous layers of whitewash will begin to peel off and stick to the brush, making the process difficult. In addition, the surface will not be perfectly smooth, which is completely undesirable. When cleaning the ceiling, you must take everything out of the room or cover it with polyethylene, otherwise you will have to wash everything from lime and plaster.
Step 1: Surface Cleaning
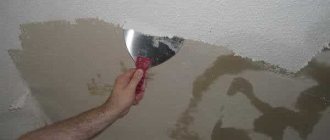
Cleaning the ceiling with a spatula
For cleaning you will need:
- bucket with water;
- sponge;
- medium-sized metal spatula;
- clean rags;
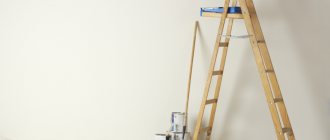
- ladder.
If you clean a dry ceiling, a lot of dust will rise, and the process itself will take a long time; It is much faster and more convenient to remove the whitewash after moistening. You should not immediately wet the entire area, as the surface dries out very quickly; it is better to divide the ceiling into small sections and moisten as you go.
After wetting the whitewash, you need to wait a few minutes until the layers are saturated with water to the base, then the coating can be very easily removed with a spatula. Finally, wipe off any remaining chalk or lime with a clean, damp cloth until no traces remain.
Step 2. Sealing joints and cracks
For further preparation you will additionally need:
- serpyanka;
- putty;
- sandpaper;
- primer;
- brush or roller;
- level.
There are always joints between the ceilings, which gradually diverge over time. To prevent them from appearing on the ceiling, they are embroidered, filled with putty mixture, and covered with sickle tape on top. Putty is again applied over the serpyanka and thoroughly rubbed with a spatula, making the surface even.
While the joints are drying, the ceiling is carefully inspected and defects are eliminated. Small cracks are simply rubbed with mortar, recesses and chips are puttied.
Step 3: Remove stains
Very often stains appear on the ceiling that show through the finish. It can be quite difficult to remove them, but this must be done at the preparation stage, otherwise after a while they will again be visible through the whitewash layer. Stains from water leaks are removed using bleach or bleach: dip a sponge in the liquid and press it onto the stain until it lightens. Of course, you need to wear rubber gloves to protect your skin.
How to clean a ceiling
To remove rust stains, you will need copper sulfate. Prepare a saturated solution of bright blue color, spread the stain well, let it dry and repeat everything again. If necessary, re-process until the marks fade. After this, the problem areas are well primed and dried.
Step 4. Alignment
Putty is best used to eliminate small defects on the ceiling: cracks and irregularities
When all noticeable defects have been removed, a level is applied to the ceiling surface in different places to determine the magnitude of the differences in height. If there are recessed areas, they are puttied separately, and when the solution dries, the entire ceiling is covered with putty. Usually a finishing putty is used, which is applied in 2 layers 1-2 mm thick.
To work, take two spatulas - a narrow and a wide one; when applying, hold the spatula at a slight angle to the ceiling. The resulting sagging or stripes are removed after the mixture has dried with sandpaper. It is necessary to sand the entire treated area to give the surface maximum smoothness. Finally, the ceiling is wiped with a dry cloth to remove dust and primed.
Primer
Basic rules for whitewashing
Of course, before starting such an operation as whitewashing the ceiling using old whitewash, the room needs to be prepared. Floors and furniture should be covered with technical polyethylene film. You need to wear rubber gloves on your hands. This is especially important if slaked lime is used for processing. As you know, it can severely corrode the skin.
All doors and windows must be closed before starting to whitewash the ceilings with water-based emulsion, lime or chalk. Otherwise, after drying, unsightly stains and stripes will appear on the ceiling.
[custom_ads_shortcode1]
How to prepare the ceiling
In order for the whitewash to lie flat on the surface and for stains of dirt or grease not to appear through it, it is necessary to first prepare the ceiling. Typically the process takes place in stages and looks like this.
Removing an old layer
To do this, you will need a regular sponge or dishwashing brush, a spatula and a soap solution. The process of getting rid of the old coating will be easy or difficult depending on what material was used. If you don't know what the surface was painted with, run a damp finger over it. Chalk will be easily erased, lime will simply get wet, and water-based paint will remain unchanged. The last two coatings will have to be scraped off with a spatula; just wash the chalk with a sponge.
Treat the ceiling with soapy water in parts. If you wet it all at once, the surface will dry out and you will have to repeat the procedure several times.
The more thoroughly you clean the surface of the old layer, the better the new one will lie: the adhesion will be stronger and will not allow unwanted bubbles to form. Whitewashing the ceiling using old whitewash is also possible, but in this case the result may not be the best.
Before work, it is worth covering the floor and furniture with waterproof material. It is best to use construction polyethylene for this.
Getting rid of dirt
After you have cleaned everything, inspect the ceiling to see if there is any mold, rust or other dirt. If you find rusty stains, wash them with water, and then treat the areas with a 10% solution of copper sulfate. Mold must be removed using a special solution, which can be found at any hardware store.
Other stains should also be removed by regular washing. Fat can be scrubbed off with soda. If the stains still stubbornly appear, paint over them with a solution of synthetic drying oil and lime. The substances must be diluted in a ratio of 1 to 20. The resulting mixture should be applied to the stains 3 times until they disappear.
Leveling the surface
You can do this yourself at home, you just need to understand the necessary technology. If you decide to apply whitewash to the old layer, then surface imperfections should be filled with the same solution that was used to whitewash the ceiling. For example, if you have a layer of lime plaster, then the cracks need to be treated with the same.
To treat the cleaned ceiling, use adhesive putty. It is easy to use and lasts well afterwards. For application, use a regular spatula. First treat all cracks and grooves across, then apply putty along. Afterwards, you can walk over the surface with pumice or fine-grained sandpaper - this will give you an even base for applying white.
Use of special tools
The sprayer gives a very thin layer of finish. Therefore, whitewashing the ceiling over old whitewash with water-based paint when using this tool should be done in at least three layers. This allows you to get a smooth, completely white and clean surface.
Before applying each subsequent layer, be sure to wait until the previous one has completely dried. This rule, by the way, is observed both when using a spray gun and a roller.
[custom_ads_shortcode2]
Types of painting
Now we will look at how to properly paint a ceiling with water-based emulsion and find out what the features of different types of painting are. As elsewhere, here it all starts with preparatory work. The most correct solution in such a situation would be to eliminate the old ceiling finish.
But situations are different.
Perhaps the old finish leaves much to be desired, but the ceiling is still in pretty good condition. Then you can paint over the old paint. The most important thing here is to remove all visible dirt, possible irregularities and cracks.
But if you do not know what primer was originally applied to the surface, then it is better to abandon the idea of painting over the old finish. Why?
The fact is that vitriol and alum primers negatively affect the emulsion. They simply destroy it. Moreover, regardless of how long ago the work was done.
If you still decide to paint “uncharted territory,” then conduct a simple experiment: apply “water-based emulsion” to a small area of the surface. If it remains unchanged for several hours, then you can safely paint the entire ceiling.
If you paint over whitewash, take into account the thickness of the layer of that same whitewash. If the chalk layer is too thick, the paint will not stick to it. Only with a thin and well-adhered layer of whitewash can water-based paint interact without problems.
Is it worth finishing the surface without pre-cleaning?
So, we found out whether it is possible to whitewash the ceiling using old whitewash. In principle, this is allowed. If all the recommendations listed above are followed, the owner of an apartment or house can ultimately obtain a fairly even and beautiful coating. However, unfortunately, such finishing will have to be corrected in the future sooner than if the ceiling had been previously cleaned.
Therefore, before deciding to whitewash without removing the old layer, you should think carefully. The lime sticks to the ceiling quite firmly. Therefore, if the surface is finished with it, applying a new layer without removing the old ones still makes some sense.
But chalk can be removed from the ceiling very easily - just with a rag and water. Therefore, in this case, it is more advisable to pre-clean the surface.
Home / Types of ceilings / Painted and bleached / Restoring a whitewashed ceiling Sometimes, when performing repair work, the old coating on the ceiling still looks quite tolerable, but there is a desire to give it a little more “marketable appearance”. Let's talk further about how to refresh a whitewashed ceiling. This can be done, although it will require a whole range of measures.
In general, painting the ceiling after whitewashing is only possible with the same composition that was applied earlier. If chalk was used, then such a coating can be restored by simply washing off the old one and repainting, but if plaster and lime are applied, then there will be much more work.
[custom_ads_shortcode3]
How to remove whitewash from the ceiling
Whitewash is the most “water-soluble” finishing option, so we wash it off with water. It’s troublesome, dirty, wet, but there’s no other way out. The steps for cleaning a whitewashed ceiling are simple.
- Wet the surface with hot water – generously, two or three times. Here you can use a brush, a roller, and a spray gun (or another sprayer).
- We give the whitewash layer time to swell - this will take 15-20 minutes.
- We clean off the peeling layers with a spatula.
- We wash off the remaining whitewash with a hard cloth (for example, an old terry towel). Rub vigorously and rinse the cloth regularly.
Is it possible to paint directly over old whitewash?
Certain situations provide for such a solution. Before you paint a whitewashed ceiling, you need to make sure that the old whitewash is still holding strong enough and does not lag behind the floor slab anywhere. If there are no cracks or lagging areas, then this coating can be repainted.
In principle, this solution is suitable for all types of painted surfaces, but you should take into account what everything was painted with before. If chalk was used, then you should not use lime - you will only get unsightly stains. The same applies to the reverse option - you should not whitewash with chalk compounds based on lime.
In general, it is better to avoid re-application over the old coating. Even the most durable, it loses its adhesive properties over time and can simply crumble.
This is especially true when painting not with chalk or lime, but when using ready-made store-bought compositions. It's better to work a little and get a decent result in the end than to curse yourself for laziness when you see the new coating peeling off.
When choosing what to paint the ceiling after the previous whitewashing, it is better to opt for water-based paint if the old one has not been completely cleaned off. Since this type of coloring composition goes better with a whitewashed base.
[custom_ads_shortcode1]
How to paint a ceiling if it is whitewashed: recommendations
Old whitewash does not seem to be a big threat to the subsequent painting of the ceiling - its layer is thin and even a little rough. But will the paint stick to the whitewash, will the new coating peel off along with the old one or on its own? Many would like to clarify this issue, since the work of removing whitewash from the ceiling is labor-intensive. There are options, although not many.
Determining what has been done
This is easy to do - you just need to run your finger along the plane and look at it. If the finger turned white, then chalk was used, as it gets very dirty. In this case, you can get away with a small list of work.
If the coating does not stain your hand, then, most likely, lime has been applied, which will not tolerate simple repainting. It can easily crumble. Therefore, it must be completely removed from the plane.
In cases where a water-based emulsion is applied to the surface, you will also first have to remove the building coating where it has begun to lag behind the surface. This can be done using a spatula and various special compounds.
[custom_ads_shortcode2]
How to paint a bleached ceiling
Water-based paint should not be thick, otherwise it will remove all the whitewash. Therefore, it is recommended to dilute the paint with water until it becomes milky. Most likely you won’t be able to paint it in one pass, so we’re counting on at least two approaches.
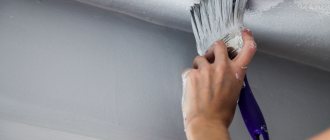
First you need to go through all the corners with a brush, since the roller will not reach there. Next, we paint the entire ceiling gently; don’t stay in one place for too long, otherwise the whitewash will get wet and come off. We remember that you cannot interrupt; according to the technology, you should roll out the ceiling from beginning to end, otherwise there will be stripes.
Removing the layer of old coating
The easiest way is to paint the ceiling after whitewashing with chalk. Since it is quite simple to remove the chalky coating - it is soaked and partially washed off with ordinary warm water. After this, the entire layer is easily removed with a regular spatula. Next, you can prime and paint, but in situations where paint or lime is applied to the surface, it will be more difficult to remove the old layer.
For lime coatings, you will need a spatula, which will need to be used to remove all loose areas of the coating. This work is quite tedious, but even small lagging areas cannot be skipped - then, when a new layer of coloring composition is applied, it can easily “wrap around” the roller in this place, being soaked with primer and new paint.
The paint may remain on the surface, but first you also need to roll it with a wet roller and see if it comes off the ceiling. If such areas are found, you need to clean them with a spatula, right down to the concrete slab. When the old layer is completely removed, you can begin further work to give the ceiling a beautiful look.
[custom_ads_shortcode3]
The main stage of painting
Painting tools
To perform high-quality painting of the ceiling with paint based on water emulsion, you will need:
- paint brush for painting butt joints between the wall and ceiling, as well as corners;
- a narrow brush for making corrections;
- fur, long-haired roller,
- paint tray,
- ribbed surface for even distribution of paint over the surface of the roller.
Coloring rules
just like when whitewashing with chalk, it is better to apply the first layer of paint parallel to the rays of light from the window, and the second - parallel to the window frame
Many people do not know how to paint a ceiling with water-based paint correctly. In most cases, they do not take into account the direction of the light flux and many other nuances during painting work. Therefore, the painted surface turns out uneven, with stripes from the passage of a brush or roller, with lighter or darker spots. To prevent this from happening to you, follow these rules.
- You should always start painting from the corners and joints between the wall and the ceiling. In this case, the farthest corner relative to the front door is painted first. To do this, wet a wide paint brush halfway in the paint, then squeeze it out slightly to remove excess. A passage is made along the entire perimeter, 3 to 5 cm wide. Thanks to this, during further painting with a roller, the junction of the ceiling and the walls, as well as the corners, will not be damaged.
- The main whitewashing of the ceiling with water-based paint is done with a roller. It is applied in three passes, regardless of what type of paint is chosen. In this case, the very first pass of paint is carried out parallel to the rays of light incident from the window. The second is in a direction perpendicular to it. The latter should always be directed towards the window.
- Each subsequent painting is carried out only on the well-dried previous layer. This requires from 8 to 12 hours.
Painting technology
- In a tray filled with paint, moisten the roller and rub it three or four times over the rough surface. This will allow the paint to spread evenly across the roller.
- Make the first pass on the ceiling section. Starting from the corner on the left side of the wall opposite the window.
- The roller must be moved from left to right. Then change direction. In this case, you need to ensure that the paint is applied in an even layer, without visible transitions. You can also move the roller using W-shaped movements.
- The following technique will help remove excess applied paint: when there is no more paint left on the roller, pass it over the painted surface. It will absorb all the excess.
- While painting, use a directed bright beam of light to check the quality of the paint.
- Using a new roller during the last painting will ensure a uniform surface.
- Until the paint has completely dried, no drafts are allowed in the room. It is advisable to protect the painted surface from direct sunlight. This will prevent stains from appearing. Do not try to dry the painted surface with electrical appliances.
Features of painting a plastered surface
The ceiling to which plaster has been applied can be painted using a special spray gun or a regular vacuum cleaner. They provide high-quality, uniform distribution of paint on the plastered ceiling surface. At the same time, it lays down in a thin, even layer. It is best to paint using a spray gun over a primer that has already been applied with a roller or brush.
If, when painting the ceiling with water-based paint, all the technology was strictly followed, then the result will delight you with the beauty and uniformity of the surface.
Primer work
Here you should pay attention to the seams and joints of the ceiling tiles. They must first be thoroughly cleaned of all old putty and paint. After this, all such places are primed with a brush, not a roller.
The main plane also needs priming. When performing this stage of work, areas with a lagging old layer of paint or whitewash that were not noticed before may appear on the surface. They should be thoroughly cleaned down to concrete and primed again.
[custom_ads_shortcode1]
How to remove whitewash from the ceiling
Whitewash is the most “water-soluble” finishing option, so we wash it off with water. It’s troublesome, dirty, wet, but there’s no other way out. The steps for cleaning a whitewashed ceiling are simple.
- Wet the surface with hot water – generously, two or three times. Here you can use a brush, a roller, and a spray gun (or another sprayer).
- We give the whitewash layer time to swell - this will take 15-20 minutes.
- We clean off the peeling layers with a spatula.
- We wash off the remaining whitewash with a hard cloth (for example, an old terry towel). Rub vigorously and rinse the cloth regularly.
Whitewash
Then everything will depend on the quality of the prepared composition for whitewashing or on how good the paint will be used. The first direction of movement of the coloring layer should go across the light flow entering the room. Simply put, along the wall on which the window is located.
The next direction of coloring is across the first. If there are more than two passes for painting, then it is necessary to select their directions so that the last one is directed away from the window. To paint with different compositions, you need to use different tools.
It is best and easiest to use a spray gun, but not everyone has such a device. Therefore, most people prefer a roller.
You should always start painting from the corners and lines along the walls. To do this, use a narrow brush. It is more convenient for her to work in the corners, and along the wall, a strip of paint is applied so as not to stain the walls with a roller. In addition, the roller will leave unpainted stripes where its edge simply does not fit close to the wall.
You should take a roller with medium pile. A small pile can leave unpainted areas, but too long pile paints everything quite thickly. And besides, it’s harder to work with such a roller.
If in some areas the whitewash begins to peel off, it means that the work on cleaning the surface was done poorly, and after the applied coloring composition has dried, in such places you should clean the surface down to the concrete and putty it again.
[custom_ads_shortcode3]
Primer and whitewash
The ceiling surface prepared for further work must be carefully primed.
This will ensure better adhesion of the paint to the surface and reduce its consumption. It is best to use not just any roller for this, but a regular paint brush. It will make it possible to apply the primer most thoroughly in places where it cannot be primed with a roller, for example, in slab joints and seams.
Of course, there is no need to treat the entire surface in this way; on flat areas, a regular roller will do just fine. Next, after the primer mixture applied to the ceiling has completely dried, you can begin to paint it.
The easiest way is to use a paint roller and brush. You should choose a roller with medium nap size. Too long a pile can leave blots on the surface and it is simply difficult for them to work, due to the fact that, when it absorbs the coloring composition, it becomes very heavy, although professional repairmen praise the long-pile models. Which one to take is up to you.
A short pile can have the opposite effect - it is too light and can slip through some areas of the surface without painting them.
Foam rollers can leave bubbles on the ceiling, which will be very unsightly, and most importantly, they are very difficult to remove later, therefore, using foam rollers is highly not recommended.
You will also need a paint cuvette for paint, with a special platform for removing excess solution from the roller.
A small brush will be needed for painting corners and places where a roller simply cannot be reached. There is such a place along each wall - if you don’t want to get it dirty, then you can’t bring the roller close, which means there will be unpainted areas that will need to be painted over with a brush.
Having prepared the necessary tools, you can pour paint into the ditch and dip the roller there for the first time. You should thoroughly soak it, and after that, squeeze it out no less thoroughly on a special area of the paint ditch. This will ensure it is completely saturated.
The first layer, when whitewashing the ceiling with water-based paint, must be applied across the flow of light entering the room. The second is along it. This scheme is applicable in cases where no more than two layers will be applied. If you plan to make more layers, you need to choose their location so that the latter is applied along the line of the light flux entering the room.
Roll out one layer completely, preferably before the surface begins to dry. Otherwise, the transitions from one colored area to another may become too noticeable. It is also advisable not to make the overlaps between them large, no more than a couple of centimeters. Otherwise, you can get a kind of “step”.
This will make any streaks that may have remained during painting invisible. In addition, transitions from one painted section of the ceiling to another will not be visible.
Is it possible to whitewash the ceiling using old whitewash?
Let’s say right away: it is highly undesirable to carry out any finishing work, except frame work, without removing the chalk. This is due to the fact that whitewashing prevents the adhesion of the new material to the base, which can lead to peeling, swelling and other undesirable consequences. But if there is no other way out, let’s consider what is the best way to whitewash the ceiling and how best to do it.
First of all, let’s find out in what cases it is impossible to whitewash the ceiling without washing off the whitewash:
- Presence of unsealed cracks.
- The presence of stains, especially rusty ones, or untreated fungus.
- Repeated previous whitewashing.
- Not tight adhesion to the base of the old layer.
If you are dealing with this state of affairs, it is better to wash off the old whitewash from the ceiling. However, there are cases in which it is possible to either leave it completely or carry out partial repairs:
- The thickness of the old layer is minimal or insignificant.
- There is no shedding of whitewash or other peeling.
- The ceiling does not need additional repairs.
In these cases, it is enough to either simply treat the surface with a deep penetration acrylic primer or carry out local repairs, prime it and you can start whitewashing the ceiling. Before you begin finishing work, you must complete the following steps:
- Depending on your situation, either remove the old whitewash or make any necessary local repairs. Particularly dangerous are stains, protruding fittings and various mold cultures.
- Using chalk or gypsum putty, remove minor defects and, if necessary, completely treat the ceiling.
- Prime it completely with acrylic primer.
- Wait for it to dry and start painting.
[custom_ads_shortcode2]
Painting a whitewashed ceiling
How to paint a ceiling with water-based paint without streaks
If you don’t know what paint to paint a whitewashed ceiling, then we want to disappoint you - such paints simply do not exist. In other words, in order to paint a whitewashed ceiling, you first need to clear it of this building material.
This is explained by the fact that whitewash does not have sufficient strength, and also has the ability to roll off if, for example, PF-115 enamel is used when painting. Also, the number will not work with water-based paints, since whitewash cannot tolerate moisture, and especially water.
True, some on specialized forums advise thoroughly priming the whitewashed ceiling before painting and this, supposedly, will solve all the problems. Remember, and if you can’t, then write it down: whitewash cannot tolerate absolutely any contact with liquid products.
Even if you prime such a ceiling with the most expensive and high-quality primer, the integrity of the whitewash will be damaged under the influence of moisture. And, even if you manage to paint the primed whitewash on the ceiling without any problems in the future, then in a short time all this mass will simply fall on your head. This can even happen because the upstairs neighbors slammed the door hard! Not to mention private houses, which are subject to shrinkage every hour. For this reason, before painting, it is necessary to remove all whitewash from the ceiling.
Removing whitewash from the ceiling
Removing whitewash
Please note that there are many ways to remove old whitewash from a ceiling. Among all of them, the most popular is removing whitewash by gradually wetting the ceiling and cleaning it from the whitewash layer
When wetting the ceiling, you can use a spray gun. If you don’t have one on your farm, you can make a homemade version. So, you should take the nozzle from a regular sprayer for cleaning windows and put it on a simple plastic bottle.
It is not recommended to spray the entire ceiling at once, because while you clean a certain wetted area of the ceiling from the whitewash, another will have time to dry and you will have to do the wetting procedure again. This will significantly delay the preparatory process of cleaning the ceiling for painting.
Please note that before you start removing old whitewash from the ceiling, first cover the floor and kitchen furniture
As roofing material, you can use both old unnecessary sheets and ordinary newspaper. To minimize dirt, when cleaning the ceiling from whitewash, you can hold a piece of plywood or a plastic tray over the area being treated.
When cleaning whitewash from the ceiling, do not try to remove all of it. As soon as a minimum layer of whitewashing materials remains on the ceiling, you can proudly consider all the dirty work done. Now, the remaining layer of whitewash on the ceiling can be washed off with a sponge. Try to keep the size of the latter as large as possible. This will reduce the tedious task of rinsing the sponge in water.
With the above operation, you should also not scrub the ceiling to a perfect shine. Currently, there is a huge selection of deeply penetrating primers, which you will subsequently use to fix the remaining layer of whitewash, which will be quite enough for further painting of the ceiling.
So, in order to properly paint the ceiling, it is necessary to carry out high-quality preparatory work. This action is responsible for the final quality of the painted surface and its appearance. As mentioned above, a ceiling that has been painted with whitewash must be thoroughly cleaned and washed.
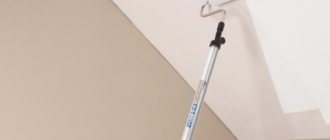
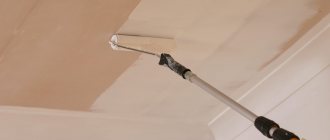
Removing the whitewash layer is quite simple. To do this, you need to take a lint roller and thoroughly moisten a certain area of the ceiling with warm water. After the whitewash has soaked, it will take about 5-10 minutes; it can be removed from the ceiling using a simple spatula.
Whitewashing the ceiling with water-based paint using a roller
To paint with a water-based composition, you can use a paint sprayer or roller, or a simple paint brush. If we are talking about whitewashing on a whitewashed ceiling, it is necessary to take into account its type, for example, the chalk coating cannot be coated with a water-based composition, the ceiling must be either removed to the base, but lime and old latex coatings can only be primed with an acrylic primer. Followed by:
- Pour the water-based mixture into the cuvette.
- Dip the roller into the ditch, and, evenly distributing the paint over the fur coat, blot off the excess paint.
- Whitewashing of the first layer of paint is carried out depending on the parameters of the ceiling in such a way that the second layer is, if possible, along it.
- Wait for the time specified by the paint manufacturer.
- After this you can whitewash the second layer.
- Proceed with whitewashing the sections of the ceiling where they meet the walls.
If you are going to whiten the ceiling, keep in mind: the lowest consumption will be when using a sprayer, but this method requires special professional skills and special equipment. In addition, the paint should be lump-free and more liquid, so its covering ability is reduced. Among the positive aspects, one can note the uniformity of painting and the absence of streaks.
[custom_ads_shortcode3]
How to paint with water-based paint over whitewash
First, it is recommended to prepare all surfaces for further processing. Then a primer is applied. After its layer has dried, the main actions begin. The paint is used 3 times if a spray gun is used, since it produces relatively thin layers. When doing work at home with a roller or wide brush, painting is done in 2 layers. It is recommended to take breaks of 7-8 hours while working so that the layers have time to dry.
Surface preparation
Surface grinding.
In order for the ceiling and walls to be painted well, they must first be prepared. To do this, it is recommended to remove the top layer of whitewash. To make it come off faster, you need to moisten it with water, and then clean it off with a spatula after 15-20 minutes.
After this, the treated slabs are washed with clean water and then dried for several hours.
In this case, all defects appear, which are eliminated with a spatula and putty.
It is necessary to pay attention to the joints of the slabs, where the whitewash crumbles more and crumbles faster. Using fine sandpaper, sand all overlaps until smooth.
Then use a damp cloth or vacuum cleaner to remove the accumulated dust.
Painting - step by step instructions
A layer of primer is applied to the cleaned surfaces. To do this, choose mixtures that penetrate deeply into the whitewash. If there is a suspicion of the presence of fungi and mold, then use formulations that contain antiseptics.
The primer is applied with a roller or spray gun. It should cover all treated surfaces evenly, without streaks.
It is recommended to purchase masking tape before painting. It is used to cover vertical surfaces right up to the ceiling to protect them from paint penetration.
The paint is poured into a tray with a grooved bottom. A roller with short hairs is dipped into it, and after collecting the substance, the excess is removed by squeezing along the grooved surface.
Painting with a roller.
Before starting work, the composition is thoroughly mixed. To do this, use an attachment on an electric drill or a construction mixer. If you don’t have a spray gun, then use a brush to pre-treat the corners and joints in the places where the tape was glued.
Apply paint with quick movements. Drops and smudges must not be allowed to appear. Coloring is done in small squares, the sides of which slightly overlap each other.
After applying the first layer, wait for it to dry for 7-8 hours. The first time they paint parallel to the window opening, and the next strokes are made perpendicular to it. This allows you to get rid of defects in the form of stripes or spots.
If you use a spray gun, then to obtain the desired tone, it is advisable to first practice on a piece of cardboard. After completion of work, the device is disassembled and thoroughly washed.
According to experienced builders, it is better not to paint the old whitewash, but to completely remove it. But if this is not possible, then it is necessary to strictly comply with all the requirements of the technology for carrying out such work.
How to whitewash a ceiling with chalk
First of all, to do this you need to prepare a chalk solution and strain it thoroughly. The usual proportions are prepared: for 10 liters of water, 5 kg of chalk and 50 grams of wood glue, you can add a little blue.
The technology for whitewashing a ceiling with chalk is no different from applying a water-based composition; apply the chalk composition in an even layer, wait until it dries completely and repeat the process. If it is applied to the ceiling with a paint sprayer, applying a second layer can be avoided by lengthening the whitewash, but be sure to achieve uniform coverage.
Such a coating will have a pleasant matte structure, it is much cheaper than latex paint, but it also has its drawbacks: over time, the chalk coating can crumble, it is not resistant to wear and high humidity.
[custom_ads_shortcode1]
How to whitewash the ceiling in an apartment with your own hands
You can use different substances to treat the ceiling. Each of them has its own pros and cons.
Treating the surface with chalk gives a snow-white coating. Accordingly, the room will look brighter than it was before the renovation. However, the coating has disadvantages: the chalk will peel off a little at a time, so more dust will appear in the room. You will have to wet clean more often. Also, the material is not resistant to moisture, so you should not treat the bathroom with it.
How to make chalk solution
Add 30 grams of glue or grated laundry soap to a container with 5 liters of warm water. The glue can be PVA, carpentry glue or Bustilat. Next, add 3 kg of chalk in portions, constantly stirring the solution. To whitewash the ceiling with chalk without streaks, the material should be sifted in advance. To obtain a whiter liquid, you can add 20 grams of blue. The proportions are calculated for a surface area of 10 square meters.
Lime
Lime whitewash has many positive qualities. It is moisture resistant, so it is suitable for treating both the bathroom and the kitchen, where it is often humid. In addition, it kills fungus, which often spreads in damp rooms. Lime can also correct minor defects: sinking into cracks, it evens them out a little. The disadvantages of whitewash include the fact that it can cause allergies, and the fact that it does not have a crystal-white hue, therefore it is inferior to other finishing materials.
Tools for whitewashing
Before whitewashing the ceilings yourself, prepare the necessary tools - this work is performed in one of three ways, for which they are used:
- roller;
- sprayer, also known as a spray gun;
- brush.
If painting is carried out with a roller, then the coloring composition will lie in an even layer, without forming spots or streaks. To get a good result, whitewash is applied in two layers. You will need to have not only a roller, but also a container for the solution, a mixing tool, a paint tray and a small brush for applying paint where the ceiling meets the wall.
Preparing the premises
- remove all small-sized furniture from the room, and securely cover what cannot be removed with plastic wrap along with the floor;
- you should clear the room of furniture so that you have room to maneuver;
- Close the door to the room tightly, as well as all the windows, otherwise you risk causing streaks to appear on the ceiling that has not yet dried.
Selection of material for whitewashing
Whitewashing the ceiling is done using one of three materials: chalk, lime or water-based paint.
- Chalk. This is one of the most popular types of whitewash, the main advantages of which are environmental friendliness and low cost. Chalk whitewash makes the ceiling perfectly white and is easy to apply, but it has a significant drawback - the durability of such a coating is very low. After some time, the chalk gradually begins to crumble, so it is not recommended to apply it over the existing coating.
- Lime. Lime whitewash has the same properties as chalk, but is more durable and resistant to abrasion. Due to its porous structure, lime is capable of allowing water to pass through itself, which makes it more effective in conditions of high humidity. Lime whitewash hides minor imperfections well and is more resistant to mold growth.
- Water-based paint. This type of whitewash differs from the previous two in its characteristics, which depend on the specific type of paint (acrylic, silicate, silicone, acrylic-latex, polyvinyl acetate). One of its main advantages is that there is no need to prepare a solution, since the paint is sold ready-made. In addition, a large selection of shades allows this type of coating to be used in a wider range of design solutions.
The main disadvantage of water-based paint compared to chalk and lime is its higher price and high consumption.