general information
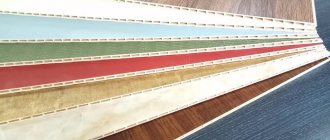
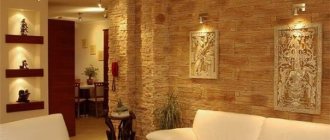
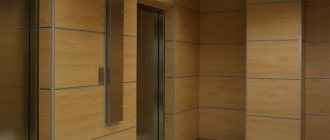
Modern panels are made from environmentally friendly and safe plastic. There are single-color, bright and striped models. Popular options that imitate wood, with a rough surface, as well as textures that connect without visible marks.
Since the quality of modern plastic is comparatively higher than just ten years ago, it is therefore used not only for office interior design, but also in residential buildings.
Finishing the walls with PVC panels does not make it difficult to install all the necessary communications. They are mounted in horizontal and vertical positions.
They are lightweight, so you don't need to buy a lot of fasteners to keep them in place.
The advantage of slats is as follows:
- They are strong and durable. They withstand high humidity, retain color for a long time and do not fade.
- They have low cost.
- Provide good sound insulation.
- Easy and quick to install. Experts say that this is easier than assembling a construction set.
- Antistatic, so dust does not accumulate on them. It is enough to wash them with warm water and detergents.
But there are several disadvantages. For example, they can be easily damaged by impact, and sudden temperature changes can cause deformation.
Due to their ability to tolerate moisture well, the panels are even installed in bathrooms. Source myprofnastil.ru
Smooth elements will provide an aesthetic appearance to the walls. If there are no sharp changes and waves, then the joints will become almost invisible.
Disadvantages of PVC panels
Each building material has its drawbacks, and panels are no exception.
- Low physical strength. The panels are made of thin plastic and have a hollow structure. They hold static and dynamic forces very poorly. Moreover, the damage cannot be repaired; the coating has to be completely replaced.
- Evaporation of harmful chemical compounds. There is a particularly high concentration of unlicensed goods. In addition, during combustion, toxic smoke is released, a person loses consciousness even after two or three breaths.
- Negative reaction to hard ultraviolet radiation. Under the influence of UV rays, the intermolecular bonds of polymer plastics are significantly weakened and they become brittle. Even with little effort they crack.
The panel can be damaged by a sharp blow
Unfortunately, the domestic building materials market is oversaturated with fakes. Low-quality PVC panels are almost completely devoid of real advantages, and the negative sides appear even more noticeably.
Preparation for the procedure
The installation process begins after small preparatory work:
- The walls are cleaned of dirt and old wallpaper is removed.
- Treat the surface with a primer with an antifungal effect.
- They check whether there are any irregularities on the wall and determine the level of its plane.
Attention! Before construction work, it is recommended to keep the material indoors so that it adapts to new temperature and humidity conditions.
How to stick on the wall
Algorithm of actions:
- preparing the finishing surface . At this stage, we level, remove the old wallpaper, and apply a primer to the wall;
- mark the panels using a tape measure, cut them to the required size;
- apply glue to the surface;
Apply glue to the surface
- press down on the MDF, trying not to damage the outer layer;
- we trim the joints if necessary;
- we fill the seams with a sealed substance so that moisture does not get in and the panels do not deform;
- Now we wait until everything is completely dry. This lasts about a day.
There are no difficulties in the process of gluing MDF to the wall. This can be done by any novice master who has not previously dealt with this type of activity.
How to calculate how much material is needed
Before attaching plastic panels, they decide to install them horizontally or vertically.
If the choice fell on the second option, then to calculate the amount of material required, first measure the perimeter of the room. The width of all openings is subtracted from it and divided by the width of one rail. To the resulting value you need to add several panels in reserve.
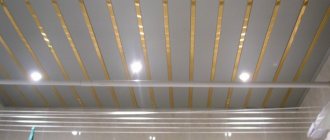
Not only the walls, but also the ceiling are finished with panels Source zab.ru
If installation in a horizontal position is preferable, then after measuring the area of the room, all openings are subtracted from the result. The resulting figure is divided by the area of one rail. Here you need to leave a margin of at least 10%, since in this case more material is spent on trimming.
To determine the number of slats and fasteners, it is also necessary to carry out calculations. After measuring the height of the walls, the indicator is divided by the sheathing pitch, which is usually within 0.5 m. The resulting number is multiplied by the perimeter of the room. The data will indicate the size of the plastic panels in linear meters. To the result you need to add the perimeter of the openings for windows and doors.
See also: Catalog of house projects in which fiber cement panels are used for decoration
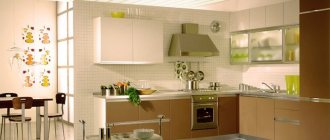
Installation of plastic panels in the kitchen
Such elements are very beneficial to use for kitchen aprons. These areas have previously only used ceramic tiles, but installation of such materials requires experience. In addition, the tiles are installed for many years, and the panels can be changed at any time, this can be done using simple technology. It does not require the use of fasteners; the low height of the apron makes it possible to save installation time.
An apron made of plastic panels looks no worse than tiles
How to install slats?
- Accurately measure the distance between the tabletop and wall cabinets.
- Add 2-3 cm to it and cut the required number of panels.
- Place the lower end of the lamella on the desktop, bend it slightly and place the upper end under the hanging bedside tables. They need to be tilted; after installing all the slats, the bedside tables are put in place.
- Screw the plinth onto the table.
Installation of an apron made of plastic panels
This simple installation technology allows you to remove outdated panels at any time and replace them with new, more fashionable and beautiful ones. To guarantee, the lamellas can be glued, but this technology does not have any noticeable advantages. But there are several disadvantages: the complexity of the technology, the impossibility of performing repair work and increased cost.
Basic methods of attaching slats
There are several installation methods. To do this, glue, screws and clamps are used. To use the first option, you need to have very even and smooth walls in the house. Regular adhesives will not mount the panels. You need to acquire special tools.
If you use glue for PVC panels, this method will greatly facilitate and reduce the cost of the installation process, since there is no need to attach the sheathing.
Installation of plastic sheets does not cause difficulties Source guruotdelki.ru
But the main drawback is that if damaged, it cannot be removed from the wall; it will have to be torn off along with the primer.
Installation with glue is carried out as follows:
- The foundation is being prepared. Dirt is wiped off the wall.
- The reverse side is treated with adhesive. The glue is applied in thin strips at a short distance from each other.
- The rail is applied to the desired location and gently pressed, holding for a few seconds.
Liquid nails have some specific features. For example, if you apply them to a panel and attach them to the ceiling, you will have to wait half an hour for the glue to set.
To avoid having to wait so long, you need to:
- Treat the panel with the product and wait for 6-7 minutes.
- Attach it to the ceiling, so it will stick faster.
You must first apply a primer to the ceiling base.
This will make it easier for the panels to adhere to the wall. Another fastening method is to use self-tapping screws. This is a reliable option that does not require perfectly leveling the surface. To screw in the screws, you will have to get a screwdriver, otherwise installation will take a lot of time.
Plastic lathing is considered one of the most affordable and reliable Source roomester.ru
See also: Contacts of construction companies that specialize in finishing materials
The disadvantages are that a wooden frame is more suitable for self-tapping screws, so you will have to first saw the timber and treat it with an antiseptic.
The most popular installation of plastic panels is with clamps. They can be quickly attached to the battens and the slats can be securely fixed to the wall. The lathing is made from a metal profile, and damaged lamellas can be easily replaced with new ones.
Advantages and disadvantages
When purchasing building materials, consumers should pay attention to their pros and cons. The advantages of the product we are considering are:
- the material must be available on the market;
- low cost: five to twelve dollars per square meter of quality material.
The product is used not only for correcting the wall surface, but also for decoration. Frame facades and 3D panels are made from this material.
You can install MDF boards yourself, even if you are not an expert in this industry. Installation is usually done quickly. It takes a lot of time to install the frame.
Lathing options
If the room is dry, then you can do without battens and simply attach the panels to the wall. But this option is not suitable for wet rooms.
Most often they prefer to use a plastic or metal mounting profile as a sheathing. In this case, special clips are used to attach the panels. This makes them easier to install and remove.
Metal lathing is usually installed before attaching plastic panels to the ceiling in rooms with high humidity levels.
They are installed in several stages:
- Fasten the profile with self-tapping screws to the ceiling.
- Install the mounting profile around the perimeter of the room.
- The transverse profile is fixed as a basis for the plastic.
The panels will look great on the balcony Source wiki.4-u.info
How to attach to a concrete wall
Such adhesive for a concrete wall must have certain properties :
- presence of specialization. You should see the words “universal” or “designed to work with wood-based panels”;
- guarantee high-quality attachment to mineral (brick, plaster) or organic (chipboard, plinth) material;
- the glue must also quickly exhibit its properties and act quickly on the finishing surface;
- be resistant to moisture, chemicals (salt, acid, alkali), different temperatures.
Experts advise gluing MDF to walls exclusively indoors. Because of this, frost-resistant additives are not added to the glue.
Transparent silicone-based adhesive is usually made for installation work. This material is perfect for stone, ceramic, acrylic products, and others.
But it is worth considering that this glue is not suitable for wood. It is not recommended to use glue for wooden MDF.
Installation process
When installing PVC panels on the wall, you need to take into account that changes in environmental conditions can affect the condition of the material. Therefore, when adjusting the panels in height, it is better to leave a small gap.
Before attaching PVC panels to the wall, you should remember that:
- If the slats are attached with nails to the sheathing, then it will not be possible to reuse the material, since it will be practically destroyed during the dismantling process.
- The best fastening option is with clamps. But another popular method is using staples, which are driven in with a special stapler.
Moldings allow you to get a holistic pattern and improve the appearance of the panels Source doma125.ru
Installation
Before purchasing panels, it is recommended to carry out careful calculations so as not to run around, then look for products of the same color shade and not overpay for excess that may never be needed.
To carry out the calculation, you first need to decide on the direction of installation. Products can be mounted both horizontally and vertically. Vertical placement is preferable for small rooms such as hallways, kitchens, and baths. With this finishing method, the ceiling is visually raised due to vertical lines. Horizontal installation is more often used for finishing spacious rooms, for example, at camp sites, in hostels. It is reminiscent of traditional horizontal finishing, especially if the panels are selected, for example, to resemble wood.
Loggia finishing
There are three ways to attach panels:
- for any adhesive composition;
- on self-tapping screws;
- on the sheathing.
The first method is the easiest, simplest and fastest, but is used only if the base is sufficiently leveled. The second one is also not particularly complicated, but requires skill in handling a screwdriver. In this case, the panels can be dismantled over time and moved to another location. The method of fastening to the sheathing is the most durable, labor-intensive and capital. This way the cladding can be firmly mounted on uneven surfaces.
GKL systems
The selected mounting option does not in any way affect the sequence of activities when installing the plates directly:
- fittings are installed: starting and finishing strips, internal and external corners;
- fittings are installed along the openings;
- the panel is inserted with a narrow shelf into the fastening element. Attached on the side of the wide shelf with self-tapping screws. Elements must be mounted tightly;
- the final panel must be squeezed between the one in front of it and the finishing element of the row. The excess can be trimmed carefully along with a knife;
- joints with the ceiling are covered with ceiling panels, joints with the floor are covered with floor skirting boards.
How to glue panels
Gluing is the easiest way to decorate a room with panels, which is allowed either in the case when the wall is perfectly flat or when the rented premises are being renovated according to the principle that it will do, clean and fine. It will be quite difficult to dismantle such finishing in the future and it will certainly not be possible to use it for re-installation.
The panels are glued to a flat or slightly uneven base. To improve adhesion, you must first remove and clean all unevenness and weak layers of the previous finish. Then plaster and putty uneven areas. Then prime the surface to improve adhesion. The finished base for gluing the cladding must be smooth, dry, and clean.
Apply the adhesive to the wall, spread it in an even layer with a notched trowel and carefully press the panel against the wall. The duration and force of pressing usually depend on the glue and are indicated on the packaging or in the instructions for use. Apply glue to the next panel as well, then it should be carefully joined to the previous one and pressed to the base. This way you can quickly get a beautiful decorative coating.
Video - Installation of PVC panels using glue
As for panel adhesives, modern manufacturers offer simply a huge selection of adhesives. The most popular ones can be listed:
- liquid nails Quality;
- liquid nails and Titan Wild glue;
- Emfikol 34012A;
- Kleiberit 636.
Prices for liquid nails
Liquid Nails
The above adhesives are resistant to high humidity and temperature fluctuations. The facing materials glued to them will remain in place throughout their entire service life.
Advice! If you have a choice, it is better to choose the fastest setting adhesives - for example, liquid nails. Then you won’t have to wait a while for the first panel to set before you can start gluing the second one.
Installation of PVC panels with self-tapping screws
This installation method also requires a sufficiently level base . Although the requirements for surface condition are lower than when working with glue. There is no need to remove greasy stains from the wall and treat it with a primer to increase adhesion. However, to improve the quality of work and increase the speed of installation, you will need a screwdriver. However, today screwdrivers can be bought for even one and a half thousand rubles, so this installation method can be called quite budget-friendly.
As for self-tapping screws, you can opt for wood screws that have a wide notch. The length of 16 mm will ensure normal fixation to the wall. If you plan to finish the bathroom , you should opt for galvanized ones , which will not rust during operation. Do not choose screws with a wide head, it may interfere with joining.
The process itself is extremely simple. From the inside, the screws are screwed into the bottom of the lock, where they will not interfere with the fixation of the next panel. The next strip is inserted into the lock, pressed down and secured with self-tapping screws from the inside. All subsequent parts are attached in the same way.
You can take the most affordable screwdriver
Attention! Be sure to check where the wiring goes in the wall. To do this, you can use inexpensive devices such as indicator screwdrivers, alarms or metal detectors.
Prices for popular models of screwdrivers
Screwdrivers
How to attach panels to an uneven wall on a lathing - step-by-step instructions
If the wall is very uneven and you are planning to live in the apartment for a long time, you cannot do without lathing. There are 3 types of lathing systems: wooden, metal and plastic. Wooden is an option for the most extreme cases. Wood is not suitable for a bathroom - it will swell from moisture, for the same reason it should not be used on a loggia. Therefore, the best option is galvanized profiles for gypsum boards with a width of 40mm .
Tips for installing PVC panels
The only drawback of traditional lathing fastening is that it eats up 3-4 cm of usable area on each wall . But you can lay communication cables under it, as well as make a sound-insulating layer in the apartment or a heat-insulating layer on the loggia.
Thermal insulation can be laid under the sheathing
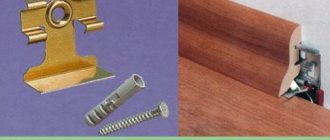
A good variety of convenient and easy-to-assemble lathing system is plastic mounting strips and plates - clamps. This is a special fastening system designed for PVC cladding. Fastening is carried out as quickly and simply as possible: the plate is snapped into the groove on the profile using clamps. No other fasteners are used. If necessary, this finish can be disassembled instantly: just pry it off with a screwdriver. Installing the entire cladding in a room of 15 square meters with such a system will take no more than a day.
The advantages of plastic sheathing are obvious. Firstly, if one panel is damaged, it can be pulled out and replaced without having to disassemble the entire structure . Secondly, if the house shrinks, or if it is a country house, as well as during seasonal movements, the cladding will retain its solidity . Thirdly, such sheathing eats up only 1 centimeter from each wall.
Installation of clamps for PVC panels
For bathrooms and kitchens, the best option is a ready-made plastic lathing system sold in building departments. It does not deform due to high humidity and temperature fluctuations, does not rot or crack. Galvanizing is also an excellent solution to the problem. It is also permissible to use wood blocks, but before starting work they must be treated several times with special impregnations to prevent rotting.
Let's look at how to install the sheathing step by step:
Step 1. Clean the wall from crumbling old finish. There is no need to level it.
Cleaning the surface
Step 2. Treat the surface of the wall with antifungal compounds.
We treat the surface with a special product
Step 3. Mark the places for the planks of the lathing structure. They should be located perpendicular to the PVC panels. If they are attached vertically, then the sheathing is attached horizontally. The distance of the slats should be 30-35 cm .
Apply markings for the sheathing
Step 4. We attach the blocks at the beginning and end of the wall, around openings, niches and other structural elements of the room. Then the rest. The entire system is attached to dowels. They put 6*40mm in concrete , 6*60mm in brick with a pitch of about 60cm .
We fasten the sheathing
Step 5. Align the sheathing with a plumb line in one plane. To do this, first the fasteners are not completely screwed in, but if necessary, thin plywood is tucked under the planks to the required level. After alignment, the fasteners can be retightened. For attachment, you can use gypsum board hangers. They make it easier to level the surface of the sheathing.
We make sure there are no distortions
Step 6. If the system is assembled from plastic elements, it is necessary to check that they are perpendicular to the PVC panels, otherwise there is a risk that the locks will not snap into place. It will be more convenient to work with plastic sheathing if you install wooden blocks along the perimeter of the entire wall to be finished according to the thickness of the guides.
Types of panel fastenings
Prices for building levels
Construction levels
Now you can see how the panels are attached to the sheathing:
- Starter and ceiling plinths are installed and secured to the system with appropriate fasteners . As a result, a frame is formed. It is necessary to strictly check the verticality and horizontality of this frame, and then the level of the facing plane, since even a millimeter deviation can cause blockage in the future.
- The elements are cut to length with a hacksaw . The protruding tenon of the first panel is cut off, then the cut side is inserted into the corner, and the edges are tucked into the profiles. The plank is driven all the way and fixed to each cross member.
- Subsequent panels are joined.
- The latter is cut to width and inserted into the profiles.
Video - Installation of PVC panels on the sheathing
Note! Some craftsmen prefer to work without corner profiles. The panel that goes into the corner can be trimmed from the back and carefully bent so as not to break it. This is usually possible the first time, since the plastic used to make the panels is quite flexible and elastic. From the front side, such a fold will look beautiful and neat.
Moldings for joints
The final stage of installation consists of installing the moldings. With the help of these elements, they improve the appearance of the slats and also make the design holistic. They allow you to hide the joints and places where the panels adjoin the ceiling.
Moldings allow you to complete the wall decoration Source elite-decor.com.ua
Typically, moldings are installed at a distance of 5 mm from the corner. With this placement option, the cellular structure of the finishing material is not destroyed. These elements are attached with screws or regular nails.
There is a large selection of molding colors that allow you to implement any design solutions. Since they are made from polyvinyl chloride, you can choose a wood-look option. Moldings can withstand high humidity and have a long service life.
Advice! Before installing plastic panels, it is preferable to first install communication systems. With their help, you can make pipes and electrical wiring less noticeable.
Varieties and sizes
What are PVC panels? These are products intended for cladding surfaces, for the purposes of decoration and protection of the base. Depending on the type of model and its purpose, different parameters are offered, with different decorative possibilities.
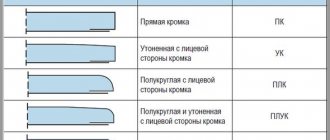
- Standard panels, with a two-layer structure, connected by jumpers. They have a lock, a tenon and a niche to insert one panel into another. Width, from 100 mm to 370 mm, length, from 2700 mm to 3000 mm, thickness, from 4 mm to 15 mm. Manufacturers offer varieties for ceilings, the strength and thickness of the walls of which are lower, and for wall cladding, the durability of which is increased by greater thickness. Canvases for walls have a width from 8 mm to 12 mm, and for ceilings up to 5-8 mm. You can learn more about the subtype of panel models by following this link.
- Sheet models. Single-layer with a thickness of 3 mm, and having a rectangular shape, such models are applied only to a leveled surface using glue, without a frame, and strength is acquired due to a tight fit to the wall. Length 980-1200 mm, width 480-1200 mm.
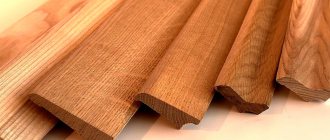
- The next standard size, which you are familiar with, is called plastic lining. With a width of 10 cm and a thickness of 10 mm, reaching a length of up to 6 meters. The structure of the structure is the same as that of a panel, two layers connected by ribs. A relief surface is created, similar to wooden lining.
When choosing, you should pay attention to the method of applying the engraving to the product, which determines the durability of the background image of the front part.
- Panels with a pattern that is applied first to the film and then glued to the product are considered a more expensive type (laminated). Durability is achieved thanks to a protective film with various patterns and relief. This technology preserves the design for up to ten years or more, but is much more expensive, directly affecting the cost of the product.
- The design immediately applied to the panel, using the offset method with printed frieze and decorative lower part, treated with varnish, are quite durable and resistant to sunlight. They have a small variety of illustrations (available in the form of marble, a type of tile), and an average cost, in comparison with laminated ones.
- The most common and inexpensive models are produced by thermal printing, by transferring paint to the outer part of the canvas, with a large selection of patterns. They have a less durable appearance and fade when exposed to direct sunlight. Such panels quickly lose color and the main pattern.
- Undecorated panels are also produced; these are white; due to the lack of varnish, they quickly get dirty and turn yellow. Varnished, can be glossy or matte, more durable due to varnish. Models painted in a specific color, blue, yellow, green, etc., the color is acquired by adding a coloring pigment at the production stage, and they are not subject to fading, since the entire mass is painted.
Also read: Decorating the bathroom with plastic panels; DIY repair in one day
Characteristics
The variety of products is so great that it will be difficult for a beginner and inexperienced buyer to understand among the entire range presented, but they have common properties. Let us highlight the general parameters of polyvinyl chloride building materials.
Pros.
- Wide variety of textures and colors.
- Hiding communications.
- Long service life.
- Resistance to moisture.
- They do not rot, do not form mold or mildew.
- Light specific gravity.
- Easy to install and dismantle.
- Harmless.
Minuses.
- Low resistance to mechanical and physical influences.
- Low fire safety; when melted, toxic fumes are released.
- A soft covering is created, without the possibility of hanging heavy objects.
- Non-breathable material, not advisable for use in children's rooms and bedrooms.
Purchase of panels
When choosing a canvas, consider the main parameters of the product and the place of application. In the bathroom and kitchen, laminated options and panels with a frieze are better suited. Models with thermal printing are best installed in rooms with the least exposure to ultraviolet radiation, this could be the hallway or utility rooms. In pantries and basements, you can choose the cheapest products, in different shades. Be sure to check the products;
- Are the ribs deformed?
- Is there a blurry picture?
- Is the color tone different?
- Matching size by connecting them together.
- For any mechanical damage.
The strength of a product can be determined by its appearance; cheap ones have a translucent surface. We also pay attention to the number of stiffeners; for high-quality panels they should be at a distance of 1 cm, and the thickness of the front side should be at least 1 mm. By pressing on the front side, if mechanically applied it is easily pressed through, it means it will not be suitable for wall cladding and will not last long. Also, the presence of a strong plastic smell indicates a cheap, low-quality product; such panels are perfect for framing walls in utility rooms.
Choosing a color palette.
Coloring may affect visual dimensions. In apartments, bathrooms are often small in size, and it is better to choose light colors, with striped prints, deep patterns, which will visually expand the space.
Bright colors, such as red, will quickly become boring over time, and it is more advisable to dilute aggressive colors with soft neutral tones. The black color goes well with red and old shades, and the decorative seam with rustication richly highlights the space.
Relief with imitation of different images creates looks that are not inferior to natural materials. Mosaic, marble, brickwork or natural stone, etc. create a unique design.
The products are presented in a huge range, and among the entire range you can easily choose the type that interests you.
General advice on selecting and installing panels
It is recommended to install plastic panels in compliance with the following tips:
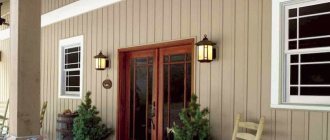
- Panels are most often used to decorate balconies, loggias, bathrooms, hallways and living rooms. If you decide to install them in the bedroom and children's room, then it is better to give preference to more breathable materials.
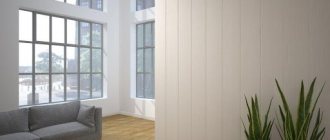
- For rooms with air conditioning, it is better to buy seamless plastic.
- It is not recommended to completely decorate the entire bedroom with plastic. It is recommended for certain sections of walls.
- It is not advisable to use these elements to create a kitchen design. Fat and moisture will settle on the panels, which will create excellent conditions for the proliferation of pathogenic microorganisms.
Balcony covered with panels Source yandex.ua
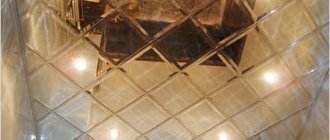
Creating suspended ceilings from PVC panels: photo models and technologies
PVC panels are excellent for suspended structures. This material can be used for kitchens, toilets, and showers. Panels that imitate lining are often used for ceilings.
Below are the ceiling finishing options.
The following design options are used for finishing:
- glossy and matte surfaces;
- imitation of natural stone and wood;
- with ornaments and plain;
- with thermal film and with printing.
Before installing the ceiling, you need to carry out calculations. In this case, there is no need to take into account openings. The material is taken with a margin of 15%. To design suspended ceilings, the lathing parameters are calculated, and the lighting design features are also taken into account.
If you follow the recommendations for installing the panels, you can perform a high-quality finish with your own hands.