Features of plaster
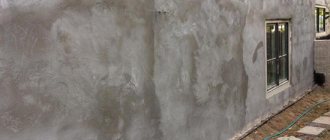
Rotband plaster from Knauf is a dry gypsum multifunctional plaster mixture “originally” from Germany, which has rightfully been the market leader in its segment for several decades. Translated from German, “rotband” means “red ribbon”. This concept was proposed for commercial use by the company's founder, Karl Knauf, for marketing purposes in order to distinguish different product lines. The “Rothband” line also includes thin-layer putty and materials for decorative finishing “Rothband Profi” (paste-like mass) and “Rothband Finish” (dry mixture).
Gypsum plaster "Rotband" is used for interior work. It is ideal for finishing walls and ceilings, for leveling them and preparing them for painting, wallpapering, tiles and other finishing materials. The difference between “Rotband” and standard gypsum mixtures, which are often prepared directly at a construction site, is the presence of a special retarder additive “Alenal”. This additive reduces the rate of setting of gypsum, which, as is known, hardens very quickly. Thanks to this composition, the solution can be added in larger quantities and used for a longer time.
Gypsum plaster of this brand has other features that are its advantages:
- Versatility. The material is suitable for many purposes - it can be used for roughing, finishing and even decorating surfaces. “Rotband” will repair cracks and chips, eliminate small and large defects, and increase adhesion between the decorative finish and the wall. Even in the absence of a primer, the plaster will fulfill its purpose.
- High quality. Plaster is valued by craftsmen, as it invariably has efficiency, a perfectly smooth texture, the absence of foreign impurities, and excellent adhesion to most building materials (gypsum plasterboard, concrete, OSB, cement, etc.).
- Adaptability for different situations. "Rotband" can be used in various climatic conditions. The plaster is suitable for rooms with low to moderate humidity, but with additional protection it will be suitable for rooms with high humidity. Rotband is also suitable for both professional and private use.
Universal gypsum plaster Rotband
A little history
Until the 60s of the last century, all gypsum plaster solutions were mixed directly on the construction site in proportions determined by the craftsmen “by eye” based on their own experience. Moreover, due to the property of gypsum to set almost instantly, batches were made in very small portions in order to have time to work them out in a short period of time. This affected both the speed of work and its quality, since the mixture quickly lost its plasticity and was poorly distributed over the surface.
The situation changed after the invention of a substance that, when added to the gypsum mixture, slows down its setting. It was named Alenal after the inventor.
And in 1962, the Knauf company, at its production facility located in West Germany, began producing Rotband dry mixes, the consumption of which for each batch increased significantly compared to the previous technology, and it became easier to apply the finished solution. The company's technologists have developed a precise recipe for mixing the mixture with exact proportions of dry matter and water, holding time and application.
Knauf plant for the production of building mixtures Source static.360tv.ru
On a note! Translated from German, Rotband means Red Ribbon. Knauf also has other “ribbons” - green (Grundband), blue (Blauband), gold (Goldband).
Knauf products “came” to Russia and the CIS countries in 1993. It is produced in the Moscow region (Krasnogorsk), in St. Petersburg, Chelyabinsk and Kuban, as well as in Moldova.
Specifications
The main technical parameters of a material determine its properties, quality, and application on different surfaces. Typically, finishers are interested in such characteristics as the composition, shade of the mixture, possible layer thickness, drying time and a number of other indicators.
Release form
Rotband plaster is packaged in paper and plastic bags of different capacities. Most often you can find packages of 5 kg and 30 kg on sale, although there are other packaging (10 kg, 25 kg). As for the Rotband finishing in paste form, you should look for it in plastic buckets of 5-25 kg. To distinguish original plaster from a fake, you need to pay attention to the following signs:
- marking the date and time of production accurate to seconds;
- presence of a round stamp “German standard. Proven quality";
- the presence of embossed strips of special paper on the top layer of the package.
Terms and conditions of storage
The shelf life of plaster in a bag with preserved integrity is 6 months. The material must be stored in a dry, ventilated area away from heat sources, direct sunlight, excluding increased humidity during the entire warranty period. It is best to keep the material on wooden pallets. The temperature for safe storage of the mixture is +5…+25 degrees.
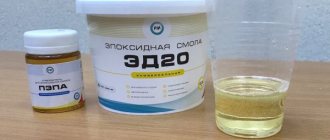
Compound
The exact composition of the plaster is kept secret by the manufacturer. It is known that it contains a finely dispersed gypsum mixture with the addition of chemical components that prevent early hardening. The plaster composition also includes components of mineral origin to increase elasticity, strength, and minimize shrinkage and cracking. In order to improve adhesion and fluidity, the material is equipped with polymer additives (latex, resins, etc.).
Plaster gypsum mixture with polymer additives
Color
The shade of the mixture must be selected based on the needs of the user. For finishing work, in most cases, white material is ideal, which is found in the store more often than others. The white plaster mixture is produced by the company's factories located in Germany, the Astrakhan region and the Krasnodar region.
Rotband is also produced in a gray version, and its color is determined by the characteristics of the mineral components, and not by the introduced pigments. Gray plaster is a product of the plant in Krasnogorsk. Plaster mixtures with a pink tint are made in Chelyabinsk and Kolpino, since this is the color of the gypsum mined in this area. The tone of the plaster does not affect the quality of the finished coating, so it is not indicated on the packaging. If the shade of the mixture is really important, you can determine it by the manufacturer.
The color of the mixture varies from gray to pink
Fraction size
The grain size of the gypsum plays an important role in the attractiveness and effectiveness of the plaster. All Rotband building mixtures have a fine-grained texture, and yet the size of the fraction in them may be different. The maximum size of gypsum particles allowed by the manufacturer is 1.2 mm. At the Chelyabinsk and Krasnogorsk deposits, the mineral of the smallest fraction (about 0.5 mm) is mined; in Kolpino, the grain size is approximately 1 mm.
The finer the plaster fraction, the better the finished mixture is applied, the smoother it lays. However, the finest plasters are used primarily to create a perfectly smooth surface for painting or paper wallpaper. To do your own decorative finishing, you should choose a coarser-grained coating, just like when tiling walls.
Characteristics of KNAUF-Rotband plaster
Layer thickness
The minimum and maximum possible thickness of the plaster layer varies depending on the type of base. For example, when finishing walls, Knauf recommends applying a layer within 5-50 mm, and for ceilings - from 5 mm to 15 mm, no more. A layer within 10-15 mm is considered optimal in terms of quality and consumption, but this is only possible in the absence of serious deviations in the plane of the walls. If you need to make a thick layer of plaster (more than 50 mm), you will have to work according to the following scheme:
- applying Rotband building mixture up to 50 mm thick;
- complete drying of the finish;
- priming the surface 2 times;
- applying a second layer of plaster 15-50 mm thick.
Thickness and consumption for various Knauf mixtures
Drying time
The technical characteristics of Rotband plaster indicated on the packaging necessarily include the setting and drying time of the solution. Here are the main parameters for hardening the building mixture:
- ripening time after combining dry powder with water is 5-10 minutes;
- keeping the liquid consistency in a container without a lid - 30 minutes;
- drying of the plaster after application to the walls - 45-60 minutes (depending on the thickness of the layer, temperature and humidity in the room);
- complete drying of the coating before finishing work begins - 7 days.
Time of maturation and strength gain of the solution
Strength
The compressive strength, or resistance of the plaster to pressure without damaging the integrity of the layer, is 2.5 MPa. The bending strength of “Rotband” is 1 MPa. It is impossible to measure these indicators at home, but in reality they fully correspond to the figures indicated on the packaging.
Plastic
Rotband plaster fits perfectly on walls and ceilings, is easy to level, and does not stick to tools, since it is highly plastic. It evenly fills chips, recesses, cracks and voids, easily penetrating into the smallest defects. The plasticity of the plaster is due to the use of high-quality mineral raw materials, as well as the presence of synthetic modifiers.
Adhesion and density
The material boasts an excellent level of adhesion to various building substrates - brick, concrete, cement plasters, wood, plasterboard. After reliable adhesion of the plaster to the base, no cracks occur, and shrinkage of the layer is not observed in the future. If necessary, Rotband can be used for finishing porous substrates, but only after preliminary priming. The density of the material in liquid and solidified form is 730 kg / cubic meter. m and 950 kg/cu.m. m respectively.
Water holding capacity
Plaster has the ability to absorb excess water at high air humidity and release it to porous substrates. Therefore, in order to avoid uneven drying and a decrease in the quality of the finish, you should pre-treat surfaces that can strongly absorb moisture.
Frost resistance, moisture resistance, vapor permeability
The plaster can withstand up to 75 cycles of freezing and thawing without losing its basic technical properties. It also has excellent vapor permeability and does not disturb the natural microclimate in the premises. The material can deteriorate under the influence of high humidity, although after special treatment it is even suitable for finishing a bathroom, bathroom, or kitchen.
Thermal conductivity
The thermal conductivity of plaster is 0.25 W/m, which makes it possible to use this material to provide additional wall insulation and maintain optimal temperature in the house.
Resistance to various factors
The material is quite resistant to low temperatures, does not support open combustion, and does not deteriorate from temperature changes. However, when applying, a temperature range of +5...+30 degrees should be observed.
Consumption
Plaster consumption per 1 m2, according to the manufacturer, is 8.5 kg. This indicator corresponds to reality provided that the thickness of the plaster layer is about 1 cm. Also, the instructions for use state that the yield of the solution from 100 kg of dry mixture is 120 liters. When purchasing plaster, you should always take into account a small margin (5-15%). In practice, more finishing materials are spent on treating problem areas than on fairly smooth substrates.
Application procedure
To calculate the required amount of dry plaster, you need to determine the curvature of the walls and the thickness of the layer that can level them. To do this, use plumb lines, levels, and cords stretched along the plane. For the calculation, take the longest distance.
Let's assume it is 25 mm. Knowing that Rotband consumption per 1 m2 with a thickness of 1 cm is 8.5 kg, we multiply it by 2.5 and get 21.25 kg. We multiply this value by the area of the leveled surface, divide by 30 (weight in one bag) and get the number of bags.
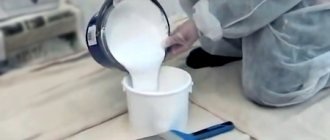
To prepare a solution from 1 bag according to the instructions, 18 liters of clean cold water are required.
Mix the solution in a clean bucket using a construction mixer Source gidpokraske.ru
The plaster is ready for application 5 minutes after mixing. It is advisable to use it within 20-30 minutes, so if you lack experience, it is better not to knead a large volume at once.
Application area of plaster
Plaster can be used to level walls and ceilings indoors. It allows you to smooth out defects between slabs, joints of horizontal and vertical planes, eliminate gaps and cracks, chips and depressions. Thanks to plaster, you can prepare any surface for subsequent decorative finishing.
With the help of "Rotband" you can solve the following problems:
- seal grooves for various purposes;
- smooth out the joints between gypsum board sheets using reinforcing tape;
- make slopes of window blocks (provided they are insulated from moisture);
- increase the sound and heat insulation of housing;
- treat thin brickwork and partitions during redevelopment.
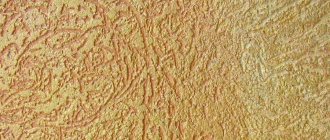
Also, plaster of this brand is suitable for creating smooth and textured decorative coatings, for making imitation stucco molding, and various volumetric elements on walls and ceilings. The building mixture can be tinted with dry pigments and made into various designs and relief images.
Rotband: step-by-step instructions for use for beginners
The instructions for use suggest that the sequence of plastering a room when Rotband plaster is used is similar to the procedure for working with other plaster compositions.
The order of work during plastering of the entire room:
- ceiling plaster;
- processing and leveling of walls;
- finishing of slopes, columns.
Next, we will consider in detail each stage of plastering with rotband.
Preparing the base
Regardless of the newness of the walls, before plastering the surface of the base is prepared, since conditions must be created for a strong connection of the two materials. The second purpose of preparation is to cleanse stains of a biological nature - to protect the plaster coating from the appearance of mold, rot or fungus in the future. And removing rust prevents brown spots from bleeding through the layers of finish.
Another task of the preparatory stage is to strengthen the weak near-surface layer and repair defects. In addition, if the base has a porous structure, then the open pores during plastering will take away the water needed by the solution, disrupting the hardening processes of the plaster. Therefore, the pores need to be clogged before starting work.
Before work, you should de-energize the wiring and protect sockets, windows and doors from damage.
In the room being renovated, plaster, wallpaper, paint, peeling, unusable old plaster are removed from the walls. The resulting cracks and deep potholes are repaired. Remove old metal fasteners (nails, screws, hooks) from the walls.
If hardware needs to be left, they should be insulated (for example, painted) to prevent rusting. Stains of efflorescence, formed rust, grease, soot or any biotic growth are removed.
In a new building, preparation is also necessary. In brickwork, the seams are deepened to a centimeter and unstitched. The surface of the brick is scratched with steel brushes. Traces of grease are removed from the concrete, and notches are applied to smooth walls. Nodules and large protrusions are cut down. At the joints of plasterboard sheets, chamfers are cut off and screw heads are recessed. Before plastering, they are covered, for which a serpyanka is applied to the joints.
Primer
Before priming, be sure to remove dust from the surface and dry the base. The correct choice of primer for Rotband Knauf determines the result of all subsequent work.
The instructions indicate the brands of primers used for different substrates:
- easily absorbing water (cellular or expanded clay concrete, cement-lime plasters, brickwork) - primed with Tiefengrun or Mittelgrunt (dries in 6 hours);
- Dense materials that do not absorb moisture (concrete, polystyrene foam, cement plasters, tongue-and-groove slabs) are treated with Betonkontakt and dried for 12 hours.
Mittelgrunt (can be replaced with Knauf-Multigrunt, dilution proportions are given in the primer manual).
Displaying beacons and corners
To level the surface of a wall that has only slight deviations, you can do without beacons. When walls are littered or have a surface with large differences, beacons are used to create landmarks.
Before using them, ceiling and wall surfaces are weighed, the most protruding points are found, and the location of the auxiliary plane is determined. A mark (plaster) with a thickness of at least 5 mm is made on the site with a solution. They navigate by it by installing the slats. There is a detailed article about installing beacons on our website.
In addition to beacons, profile corners are mounted on protruding corners, aligned in the same plane with the beacon strips of adjacent walls.
Preparation of the solution
The instructions for use provide scant information about how rotband plaster is prepared for use. There are only four lines that may not be entirely clear to beginners. Therefore, we describe the process sequentially.
To dilute one (30 kg) package, you need to prepare a clean (without remnants of the previous batch, which is important) plastic container and pour 17 liters of water into it. So, out of the 18 liters specified in the instructions, there remains a liter of water, which will be needed if the resulting solution is too thick.
In the latter case, at the end of mixing, the density is adjusted by adding liquid. The capacity of the vessel depends on the number of plasterers involved in applying and leveling the mixture on the wall. If plastering is done alone, then a 90-liter container is enough to have time to work out the entire mass before setting begins (there are only 20-25 minutes left from the end of mixing).
The temperature of the air, as well as the base, is not lower than +5°C, not higher than +30°C.
Open the bag, scoop out the powder with a dry trowel, pour 8-10 portions into water, and begin to knead the mixture with a mixer.
Mixing a small amount of powder creates a solution, which will take a couple of minutes. During this time, additive substances pass into the water, facilitating the correct flow of the subsequent chemical process.
After this, the rest of the material in the bag is gradually poured in. This is done while continuing to stir, after which the solution is left, allowing 5-7 minutes to soak. Mix thoroughly and add water if necessary. If the solution mass comes out a little liquid, add dry powder from another package. Naturally, stored water is not added to such a mixture. After the second mixing, the mass is used for plastering, and SS can no longer be added to it.
Mixing is performed at low mixer speeds.
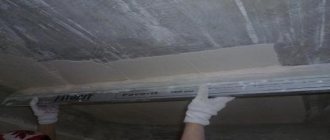
Tightening and leveling
The solution is applied in the same way as cement compositions. Use a spatula with a wide spatula or a wide grater. The mixture is used to fill the space from lighthouse to lighthouse. Having filled an area about a meter long, the solution is leveled along the beacons using a rule with an h-shaped profile.
If the thickness of the leveling coating is more than 15 mm, the plaster is applied in two layers. At the same time, having applied the first mark, it is “combed”, covering the surface with combs (for which a spatula with a comb is used). A day later (not earlier), when the applied mass has hardened, apply the next layer, which is leveled along the beacons.
The instructions warn that applying a second layer over a freshly laid one is only possible if another half hour has not passed since the start of its application. If they do not have time to meet this period, the layer is allowed to harden for a day.
To align, the tool bar is usually guided, leaning on the edges of the beacons, with small zigzags across the longitudinal line. The solution that accumulates on the rule is removed with a spatula, transferring it to unfilled areas. The rule is to do it one or two more times. After which they continue to fill the space between the beacons.
The slopes are plastered, maintaining the “dawn angle”. The correct plastering sequence is: the top one is plastered first, followed by the sides. For leveling, you can use a cut (short) rule, a wide spatula, or a specially made tool.
After approximately 45-60 minutes from the mixing time, the condition of the applied solution is checked by pressing it with a finger. If the set dough does not stick to your fingers, cut off the protrusions using a trapezoidal rule (the same can be done with a wide spatula). On slopes this is done with a “kantenhobel” (plane).
The result is a finish that has small (up to 3 mm) unevenness in the form of tool marks, scratches or burrs, as well as sagging up to 2 mm. A rough finish of this quality is suitable for decorative plaster (with a filler fraction of more than 2 mm), as well as gluing tiles.
Second contraction and alignment
If you need a better quality surface, wait 15-20 minutes after the first trim and perform a second trim. To eliminate unevenness, use a wide spatula.
Removing beacons and sealing grooves
The procedure for removing beacon profiles is carried out after the mortar mass has set and pulling out the metal parts will not cause the mortar to slide. Remove the planks by clearing the area near the end with a chisel. The edge of the lighthouse is clamped with pliers and pulled away from the wall.
After removing the profile, a groove is formed on the wall - a groove. Dust is removed from it, the inner surface of the groove and adjacent areas are primed. Then fill it with mortar, which is leveled flush with the wall with a wide spatula.
Grouting plaster
A special quality of smoothness can be achieved by grouting rotband plaster, performed 15-20 minutes after the second trimming. The plaster coating is moistened generously using a sponge grater (you can use a felt trowel).
Moving the grater in a circular manner, smooth out the marks left by the spatula or rule. Allow moisture to be drawn into the solution (this can be seen by the wall becoming dull), then smooth it with a spatula. This achieves a finishing quality suitable for gluing structural wallpaper, applying texture paint or decorative plastering with finely graded compounds.
If after another 2.5 hours (or within 24 hours) we wet the wall again with a sponge, we will pull out the gypsum milk from the surface layer. It will fill the remaining pores under the influence of the smoothing iron. This creates the basis for painting the wall with matte paints, making the Venetian.
How to work with plaster
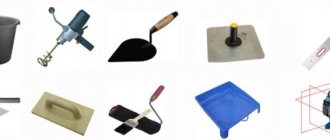
The degree of complexity of finishing work depends on the evenness of the original surface, the requirements for the quality of the finished coating, and the type of finishing. To apply plaster and especially to prepare walls, be sure to stock up on personal protective equipment - gloves, a respirator, goggles, and thick clothing. As for the tools, the following are prepared for working with Rotband:
- building level;
- trowel and spatulas;
- rule - regular and trapezoidal;
- Master OK;
- grater;
- brush or roller;
- construction mixer;
- dilution container;
- ladder.
This brand of plaster can be applied mechanically, with the help of hand ladles, and with conventional construction equipment - the choice is up to the master. In case of significant unevenness of the walls, plastering along beacons is used.
Preparatory stage
Initially, the walls, as well as the room itself, must be carefully prepared for plastering. To do this, remove construction waste from the room, remove dust from all coverings, and protect surfaces from possible contact with plaster (cover with cellophane, construction tape). In new buildings, plastering begins immediately, and in rooms where repairs have already been made, the old finish is removed:
- clean off loose plaster;
- scrub or sand the paint;
- wash off the lime;
- moisten with water and peel off the wallpaper.
Surface priming
In addition, all bulges in the base and large irregularities are ground off using sandpaper or a grinding machine. Metal elements are treated with an anti-corrosion compound. Next, priming is done with Knauf or other compatible compounds. The primer is applied in 2 layers with a break of 24 hours. If required, place plaster beacons with a gap of 40 cm, leveling them in one plane using a level.
Mixing the solution
For high-quality application of plaster, it must be properly diluted. The dry powder from the bag is mixed with water in the proportion specified by the manufacturer. To do this, pour 18 liters of water into a basin or other convenient container, after which the contents of a 30-kilogram pack are poured out in portions, stirring the product regularly with a mixer. Mixing must be carried out until even the smallest lumps disappear from the mass, and it itself begins to resemble thick sour cream. After 5-10 minutes of “ripening” the plaster under the lid or film, mix it again, after which it will be ready for application.
Preparation of Rotband plaster mixture
Professionals advise immediately pouring in a slightly smaller amount of liquid than indicated by the manufacturer. It is quite easy to dilute a mixture that is too thick, while adding dry powder to an excessively liquid mixture is problematic. If the plaster applied to the walls has the wrong consistency, the following troubles are possible:
- layer cracking;
- the appearance of tubercles from unmixed lumps;
- peeling of plaster;
- swelling of the layer.
Application of the composition
The plaster is applied to the walls by spreading it with a spatula or trowel and then smoothing it with a rule using wave-like movements. In case of significant unevenness, use the classical technology - applying plaster in 3 layers:
- Spray. Using a trowel, spread the solution between the beacons, level it as a rule until a layer of 5-6 mm is obtained, and allow to dry.
- Priming. Apply a second layer of the required thickness with a spatula and rub it in with a trowel. For relatively flat walls, this stage can be made final. For old, crumbling coatings, it is better to carry out additional reinforcement with a special mesh directly onto the damp second layer, and then perform the third.
- Cover. It is applied with a spatula and rubbed with a construction trowel. This layer is intended for final smoothing of base defects.
Applying plaster to a brick wall
Leveling is done on the ceiling with a special tool - a “falcon”, moving it towards you. The guideline for alignment in this case is a cord stretched between the metal beacons.
Pruning
This stage is carried out after applying the only or last layer of plaster approximately 40 minutes after completion of the work. After the specified time, the gypsum plaster has already set, but has not yet completely hardened. For pruning, it is best to use a trapezoidal metal rule with sharp edges. With its help, you can easily cut off all the bumps and bumps that still remain on the surface of the wall after rubbing. If the work in the previous stages was done very well, trimming may not be necessary.
Trimming the mortar using the rule
Grouting plaster
When walls are being finished for painting, grout is applied to the set layer of gypsum using a construction float. The tool is pressed against the wall and the surface is rubbed in a circular motion until it becomes perfectly smooth.
Glossing plaster
Usually this technique is also used before painting the walls. It is as follows: 4 hours after grouting, the plaster is sprinkled with a little water and treated again with a metal trowel.
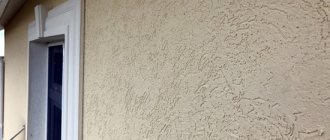
Decorative design
The finished plaster layer can be painted with latex or acrylic paint. The coating can be plain or multi-colored, with stenciled patterns or other interesting decor. It is also possible to form a relief on a material that has not yet hardened. For this purpose, the plaster is covered with special textured rollers, stamps, or the desired ornament is drawn manually, using a trowel or other convenient tool. The most commonly used decor is:
- imitation stone or brick;
- stripes;
- Christmas trees;
- geometric figures;
- floral motifs.
Decorative plaster from ROTBAND
To obtain a “rain” structure, you can use brushes with hard bristles or special paint floats. The top of this coating is also painted or varnished. An original solution is to scatter the paint onto the wall with a dampened brush or an ordinary broom.
More from personal experience.
The brand appeared on our market quite a long time ago, winning the love and trust of many builders. Its characteristics can be read above in the text. Today it is a sales leader compared to its main competitors - “Starateli”, “Volma Plast plaster” and “Osnovit”. Despite the fact that it is considered German, it has been produced in Russia for a long time. Rotband plaster is packaged in 30 kg bags. As a rule, these are paper bags with increased strength that contain rotband plaster. Instructions for use are on the bag itself.
Special properties.
After reading rotband plaster and instructions for use, you will see that the recommended layer thickness is 5-50 mm, but this is not always correct. As numerous practice shows, layers of 1 mm adhere very well due to increased adhesion and proven strength.
You can calculate the consumption per 1m2 using the calculator on the Knauf website. It has three colors, as the manufacturer assures, they do not affect anything and appear as a result of the difference in gypsum from nature. On the market you can find Rotband in pink, white and gray colors.
Still, it is worth paying attention to them, since there is a difference in the technical characteristics of rotband plaster.
When a thick layer of white and gray Rotband is applied, small smudges appear in the form of horizontal waves; when using pink plaster, this does not happen. But, if you want to line the wall with wallpaper, according to the instructions it is better to use white and gray colors, just go over the grout a little after finishing.
The difference in color properties is due to the grain size; pink Rotband plaster has a fraction of 1.2 mm, while others have a fraction of 0.5 mm. This is not written in the instructions. At the same time, the consumption of the compounds is approximately the same.
Therefore, it is worth considering this when purchasing. Unfortunately, there is no color information on the packaging itself. You can determine it by manufacturer (there are several factories).
- White Rotband is produced at Knauf Gips Baskunchak CJSC, Knauf Gips Kuban LLC
- Rotband gray – Knauf Gips LLC
- Rotband pink – Knauf Gips Kolpino LLC, Knauf Gips Chelyabinsk LLC
Preparation of the solution and how long it takes to dry.
Remember that Rotband plaster dries according to technical specifications when diluted with water for no more than 20 minutes. Therefore, do not dilute a large amount of solution at once. Determine in advance a 20-minute workload so as not to waste your money in vain. Having decided on the volume, you need to choose a container for stirring, preferably without angularities.
Otherwise, the composition will not be completely mixed. The simplest and most convenient option is a simple bucket. You can knead manually or mechanically using additional mechanized tools.
Pour water into the container according to the proportions in the instructions for rotband plaster on the bag. Two parts water to three parts mixture. It’s better not to report than to say too much, at least you can always add. Use cold water, this will increase the drying time.
By mixing the mixture with a construction mixer, achieve the consistency of thick sour cream. It is necessary that it does not flow down from the trowel turned down. Did it turn out a little runny? No problem, add more dry plaster. Next, you should wait for the solution to fully ripen for 5 minutes and stir it again.
Important: It is not recommended to add water or dry plaster to the completed, mature solution. This can lead to deterioration in quality in the form of peeling.
A necessary tool.
The entire plastering process involves a lot of work. In addition to the application itself, there is also the preparation of the plane in which brute force often has to be used. Using hammers and chisels to remove humps and bulges from bricks or concrete base. Sanding may be required. Therefore, safety is first and foremost important. Get gloves, construction glasses, and a respirator.
Important: It is better to cut off all the bumps, no matter how difficult it is, otherwise the plaster consumption will be greater, because you will have to add a few millimeters over the entire area.
After stripping the base of paint or wallpaper, you need to check the evenness of the area being treated. To do this, according to the instructions, use a building level or a homemade plumb line in the form of a thread with a load at the bottom. You can secure it with a nail on top. Tie the thread so that it does not touch the application area. Afterwards, simply measure the distances in several places with a ruler.
Covering and leveling is done using hand tools - trowels, spatulas of different sizes and rules. Typically used to work on beacons. In addition to manual application, application can also be mechanized. After completely applying the solution and drying it, you will need grout, which you will use to complete the final leveling. Having prepared for further work on decorating with wallpaper or finishing plaster.
Alignment with beacons.
When you have prepared the tool and the previous coating has been removed, you should level the walls horizontally. To do this you will need ropes or strong thread. At the corners of the wall or edges, nails are hammered onto which a rope is tightly tied and pulled. We look at it and measure the evenness of the wall with a ruler.
We set beacons based on its indicators. This will allow you to get a perfectly flat wall in the future. If the walls are made of brick or concrete, and you have not plastered them, then according to the instructions it is better to use T-shaped beacon profiles.
They are fastened with Rotband “Knauf” gypsum plaster; its technical characteristics allow it to hold light weights. Just throw the solution in the places where the lighthouse will be. 3-4 points of contact are enough. Set it so that it does not touch the exposed thread.
Important: first you need to coat the wall with a special primer to increase the strength of the base and increase the adhesion of Rotband.
The leveling process itself occurs, of course, after applying the plaster. This is where the Rule tool is used (emphasis on the “i”). Having applied a layer of Rotband between the beacons, you need to slide over them from bottom to top, removing excess solution and distributing it to less saturated places. Having leveled the surface, remove the beacons and move them to the next area. The remaining gutter from the lighthouse can be easily leveled with a trowel.
Leveling with grout.
Having completed the process, it is necessary to proceed to the next important stage - grouting. It is better to do it right away, so that in the future there will be no additional difficulties when gluing wallpaper.
If you do not grout, you will have to additionally level the plaster using fine dispersion putty.
Rotband “Knauf” gypsum plaster is rubbed down 40-50 minutes after coating. When the solution becomes solid.
Take the grout moistened with water and spray the wall generously. Make circular movements with the grout along the plane without pressing too hard. After a short period of time, “milk” from Rotband is formed, which helps remove traces of unevenness from spatulas and trowels.
It will be much more difficult to make movements, since the viscosity of the structure is increased. But the expenditure of force in general will not be significant. After removing the grout from the wall, remove the “milk” from the tool and proceed to a new area.
Advantages and disadvantages of plaster
Plaster "Rotband" on a gypsum basis has a number of undeniable advantages:
- environmental cleanliness and complete safety for humans;
- plasticity, easy distribution over the working surface;
- smooth, pleasant to the touch texture, suitable for all types of finishing;
- participation in the formation of a favorable microclimate in the house, the ability to quickly absorb moisture and release moisture;
- exclusion of fungus and mold, hygiene;
- excellent sound and heat insulating characteristics;
- high rate of adhesion to building materials;
- excellent leveling and decorative properties;
- low risk of shrinkage and cracking;
- moderate consumption and efficiency;
- quick drying, the ability to quickly begin finishing;
- small mass of plaster layer.
Rotband also has its drawbacks. Despite the economical consumption, the price of the plaster itself is quite high, especially compared to domestic brands. The product is resistant to cracking, but may still shrink under certain conditions. This happens due to incorrect application of the solution or violation of the technology for applying the mixture. In addition, gypsum plasters are not suitable for outdoor work and unheated rooms and cannot be used in these cases without additional protection.
Question answer
When using Rotband plasters, many craftsmen have questions. We will answer the most popular of them.
Is it possible to use Rotband for outdoor work?
Rotband is a gypsum mixture and is used mainly for interior work. It can be used for finishing balconies and their internal walls. However, this plaster is not suitable for use on external walls. It is better to use special cement compositions that are resistant to aggressive environmental factors.
Rotband plaster is used only for internal plastering of wall and ceiling surfaces
Is it possible to lay tiles on KNAUF-Rotband
Yes, you can lay tiles on Knauf Rotband. To do this, the plastered surface is treated with a deep penetration primer and tile adhesive from Knauf is used.
Is it possible to glue wallpaper on KNAUF-Rotband
After the plastered surface has completely dried, it can be treated with sandpaper, then putty and primer can be applied and wallpaper can be glued.
Which mesh to choose for reinforcement
For reinforcement when strengthening layers of plaster, you can choose metal mesh, plastic or fiberglass mesh. Metal mesh is suitable for thick layers of plaster; they are the most durable, wear-resistant and do not rust due to special metal processing.
To strengthen plaster, meshes made of plastic or metal are most often used.
Is it possible to use KNAUF-Rotband in the bathroom
Rotband plaster can also be used in rooms with high humidity. You just have to use hydrophobic putties and primers so that the plaster is protected from water. If you cover it with tiles and carefully seal the seams, then moisture will not threaten the plaster.
Rotband gypsum universal plaster is suitable for anyone who wants to make repairs with their own hands. Reasonable price and excellent quality explain the popularity of this brand in the construction products market. Using a universal mixture, you can create both smooth and structured surfaces. In any case, high quality plaster will make any repair easy and durable.
Comparison with other plasters
Among the Knauf brand products there are other plasters based on mineral and polymer substances that have leveling properties. They have some features in their purpose:
- Knauf Eisberg - white plaster for light finishing coatings;
- Knauf Goldband - a solution for leveling walls with rough defects (has less adhesion force to smooth substrates);
- Knauf HP Start is a starting mixture for creating a plaster layer 10-30 mm thick.
In fact, all of these materials can be interchangeable; there are no significant differences between them. “Rotband”, as well as the three indicated plasters, are most often applied manually, although mechanized application is also possible. If you have to finish large areas, it is better to buy other building mixtures, for example, Knauf MP 75 or Knauf MP 75 Ultra. They are ideal for use in professional plastering stations and other units. The company's range of plasters is large enough to easily select the most suitable one for a particular situation and produce high-quality finishing work.
Composition and characteristics of plaster based on gypsum mixture
Dry plaster "Rotband" is rightfully considered a universal mixture. It is used for any interior finishing work, leveling concrete and brick walls or cement-bonded particle boards. This versatility is due to the composition of the plaster.
The mixture is based on gypsum, which reacts well to a humid environment, so Rotband can be used to level walls in bathrooms and toilets. By the way, this is the only type of gypsum plaster that is suitable for finishing such premises. In addition to gypsum, the composition includes polymer materials that increase adhesion (adhesion to the surface). Therefore, the plaster adheres well even to smooth wall structures.
In addition, the composition may contain coloring impurities that give the composition a pink and gray tint. These components do not affect the quality of the plaster as a whole.
Specifications table
| Technical specifications | Unit | Magnitude | |
| Working temperature | WITH | 5 – 30 | |
| Thickness of applied layer | minimum | mm | 5 |
| maximum | 50 | ||
| recommended | 10 | ||
| Consumption of dry plaster mixture with a layer thickness of 10 mm | kg/m2 | 8,5 | |
| The amount of solution obtained from one bag weighing 30 kg | l | about 40 | |
| Time | solution maturation | minute | 10 |
| life of the solution in an open container | 20 – 25 | ||
| drying of a layer 10 mm thick | 45 – 60 | ||
| full strength gain | day | 7 | |
| Density | dry mixture | kg/m3 | 730 |
| dried plaster | 950 | ||
| Strength of hardened plaster | bending | MPa | more than 1.0 |
| for compression | more than 2.5 | ||
| Grit size | mm | up to 1.2 | |
| Plaster color | — | white, gray, pink | |
| Shelf life in undamaged packaging | month | no more than 6 | |
Rotband plaster: how to dilute
Before you start plastering, clean the surfaces from dirt, dust and stains, because this will significantly improve the quality and durability of the finish. The instructions for use also say that before plastering you need to smooth out all the protrusions on the wall, and also coat the metal with an anti-corrosion compound. Make sure that there is no high humidity in the room and that the temperature is above +5°C. Also keep the room away from the sun and drafts.
photo from the site https://obustroeno.com
- For 30 kg of plaster you will need 18 liters of water, so prepare a large, capacious container that will be convenient to work with and pour the liquid into it.
- Pour 5-7 trowels of powder into the container.
- Mix the components until the solution is homogeneous.
- Then add the remaining dry plaster.
- Using a plaster mixer, make a homogeneous mass without lumps.
- Let the mixture sit for 5 minutes.
- Mix the ingredients again.
Remember that while the mixture is not completely ready, you can still add more water or powder. If the mixture is already ready and infused, then doing this is strictly prohibited, so as not to spoil the plaster.
Control the consistency
To determine that the plaster is prepared correctly, apply it to a tool (trowel, trowel, etc.) and turn it over. If the plaster remains on the tool, it means it is suitable for finishing the surface.
What are the most common mistakes when plastering walls?
What is important to pay attention to when performing plastering work so that the surface is durable and gives the interior a beautiful appearance? The answer lies in following the instructions for using rotband plaster, choosing the appropriate materials and accuracy when performing plastering work.
What mistakes are most often made when carrying out plastering work?
- work at low temperatures – below + 5 °C;
- applying the solution to wet surfaces, especially reinforced concrete - the maximum permissible residual moisture should not exceed 3%;
- applying rotband in two layers - all gypsum solutions are single-layer;
- insufficient preparation of the base - lack of primer, use of primers that are not recommended by manufacturers, lack of Knauf Profix reinforcing mesh;
- applying a solution of too small a thickness;
- making a surface that is too smooth creates a glassy microstructure that closes the pores of the plaster, which in practice leads to a very long drying time - up to 6 months, difficulty in painting such a surface, for example, the roller slipping and poor adhesion to the paint, and loss of properties for regulating the microclimate in the room.
The presented technology concerns the implementation of smooth plaster, which is the basis for painting, installing tiles or gluing wallpaper. If we want to get a certain texture on the wall, we should abandon smoothing. In this case, the plaster is applied in a different way, for example, by pressing a spatula into fresh plaster mortar on the wall, etc.