Decorative and applied art is a field of activity in which materials play an important role: varnishes, paints and primers. One of the most interesting popular areas where the use of these compositions is required is decoupage. Using this technique, various household items are decorated, from dishes to furniture. How the decorated product will look in the end and how much time this painstaking process will take will depend on the quality of the working surface. For this purpose, art stores offer special primers for decoupage from different manufacturers. Let's review the most popular ones, and also consider how you can prepare them yourself.
Briefly about decoupage
Decoupage is a type of applied art that uses the technique of gluing cut-out illustrations, patterns, compositions and other elements. At the last stage, such work is varnished. The name of this art form means “to carve” in French. The decoration process itself is to give naturalness to fragmentary images. A thin layer is removed from the paper cutout and glued onto the object, thereby creating a certain depth and making the picture look as if it had been painted.
As with any DIY project, creating a truly aesthetically pleasing piece requires a well-prepared foundation. To properly treat the surface, you cannot do without high-quality primer for decoupage.
What to prime
Primers are auxiliary materials for impregnating wood. They are needed so that the paint lays down more evenly, and during finishing processing, varnishes and other materials do not “fail.” When working with traditional linden and birch blanks, we will give preference to old recipes for priming with starch and egg white .
Potato starch is best suited for linden preparations. It not only seals pores well, but also gives the wood a pleasant white coating.
Prepare starch soil in the same way as jelly.
- Pour one level teaspoon into a saucepan and, stirring slowly, pour in a glass of cold water. There should be no lumps.
- Stirring, bring to a boil. Cool slightly. The paste should not be very thick.
- You should coat the workpiece while it is warm, using your hand or a flat, wide brush. At the same time, it is important that sagging does not form on the surface (for example, in the grooves of turning products); they must be rubbed out immediately.
- After the first drying, lightly sand the surface with #0 or #1 soft sandpaper, just to remove any rough spots. According to the rules, the starching procedure must be repeated twice. Sand the surface with gentle, non-chaotic movements in one direction and not too hard, otherwise all the applied starch will be erased.
- A product treated with starch primer needs a final coating with NC or PF varnish. Acrylic varnishes are not suitable for this method.
Egg white can also become soil. Carefully separate the white from the yolk, remove the flagellum, beat lightly and coat the surface with your hand. All processing rules are exactly the same as with potato starch.
One layer of nitro varnish (NC) can also be considered a primer. The varnish should be thin; if necessary, it can be diluted with solvent No. 646 or acetone. The varnish is applied to the surface, dried and sanded with sandpaper before painting.
Acrylic primers are modern materials, but transparent primers are not always easy to find, and dense white and black primers are not very suitable for painting, unless in some special case.
Primer color is, in fact, paint (tempera or acrylic) that is not diluted with water, which is used to paint the surface. This method allows you not only to prepare the base, but also to immediately give it the desired background.
Tinting is changing the color of wood while maintaining its texture. Impregnations like "Pinocolor" are sold, but any paint diluted thinner can also be a good tinting agent. It is better to apply paint with foam rubber, gently and quickly rubbing it in one direction. After drying, wood always becomes brittle and needs to be smoothed out with sandpaper.
The role of soil
The soil greatly simplifies the work process and performs a number of necessary functions. First of all, it has high adhesive properties, due to which it adheres well to the surface. It also ensures reliable bonding during subsequent paint application. If the base is non-absorbent, then this ability of the composition is simply necessary (for example, ceramics, metal, glass, plastic).
What other purpose is primer used for? Let us highlight its main advantages:
- the composition levels the working surface;
- significantly saves paint volume;
- whitens the base intended for decoration.
Acrylic varnish for decoupage: properties and characteristics
The varnish layer protects the product from the harmful effects of the environment and gives it a finished appearance. Acrylic clear varnishes come in matte and glossy, they have a lot of positive qualities
To make acrylic paint matte or glossy, just dilute it with a drop of varnish.
The compositions are most often used in decoupage for the finishing coating of crafts.
Positive properties of acrylic varnish:
- Acrylic compounds are non-toxic and non-flammable;
- They do not have a pronounced pungent odor;
- Durable and elastic;
- Do not turn yellow after drying;
- They have high moisture resistance.
Despite all its advantages, acrylic varnish also has one drawback - its drying speed directly depends on the humidity of the room. Often, an item coated with such a composition can be used only 2-3 days after drying.
Types of compositions
When it comes to decoupage, not only artistic compositions, but also construction paints, in particular acrylics, act as a primer. Of course, special primers are convenient to use. But sometimes the needlewomen themselves prefer to choose ordinary construction materials. For example, paint forms a porous layer that is easy to sand. During the grinding process, it is cleaned off in the form of fine dust, and the surface becomes perfectly smooth.
It is believed that professional products have better adhesion. How can a novice master understand the types of compositions? Paints and primers for decoupage are distinguished according to several criteria.
Firstly, they are divided according to their production purpose: artistic and construction. Secondly, by the type of surfaces used for decoupage. They are permeable and non-absorbent.
Ground Sonnet: pros and cons
Sonnet, when applied to wood, canvas, cardboard, forms a stable elastic film and has high adhesion (adhesion to the surface). However:
1. It sands very poorly - and precisely because it is elastic. When priming, brush marks often remain and smudges form, especially for beginners, and sanding out these smudges from Sonnet will require a lot of physical effort and time. Of course, thorough sanding is not always required: for example, if we are decorating a wooden piece to look like painted wood, brush marks will not bother us too much if they go along the grain and not across)))
But if we make a surface using any of the imitation techniques: imitation of stone, embossing, porcelain, ivory, etc., then our simulated surface should not have the texture of wood with its characteristic longitudinal stripes and, therefore, all layers of soil will have to be sanded down to obtaining a smooth surface.
But construction acrylic (and latex) paint (note that it is paint, not enamel, you need to clarify about enamel) has a structure closer to putty. As a rule, it does not form an elastic film, but a porous surface that is easily sanded with fine dust. When sanded, it is perfectly smooth and even shines.
2. There is an opinion that special primers have higher adhesion than construction paints. Perhaps this is true, but for absorbent surfaces (wood, ceramics, MDF), the experience of thousands of decoupage artists shows excellent results with construction paints, and for non-absorbent surfaces (glass, metal, plastic), in any case, it is advisable to use special primers or paints for glass and metal.
So, first of all, you need to know what surface we will decorate.
Characteristics and properties of a quality product
Creative lovers do not always purchase primers for decoupage in art stores. Often, acrylic paints are used for such purposes, which are available at any construction site. After all, what is important is not what will be taken as a basis, but what the final result will be. The primer for decoupage must meet the following criteria:
- A high-quality composition has a uniform consistency; there should be no lumps or clots in it. Otherwise, you will have to spend a significant part of your time sanding the product. This is a process in which drips, gaps and all the characteristic features of the object that serves as the basis for decoupage are eliminated. For example, if you need to create an imitation of stone or porcelain on a wooden surface, then you need to completely change its texture.
- The next properties that you should pay attention to are ductility and density. The choice of soil according to these criteria depends on the master himself. Some of them like to work with thick formulations because they allow for better coverage. If necessary, they can be diluted with water.
- It is also important how strong the smell of the product is. After all, you will need to work with it for a long time, and caustic and aggressive compounds have a detrimental effect on health. If you focus on this factor, then it is better to choose acrylic primer for decoupage.
Construction compounds can be used to decorate rough bases. If you need to work with a more elastic surface, then it is better to use an artistic product; it will protect things from cracking in the bend area. But this applies more to items with utilitarian functions.
Materials: Primer for decoupage
Primer for decoupage.
Let's assume that you have already done several works using the decoupage technique.
You liked it and already want to do the work not only beautiful, but also of high quality, from the point of view of professionalism. You look at the work of other masters (on the Internet or at exhibitions) and see the difference between your work and theirs, but you cannot understand what exactly the difference is. This is how I once thought.
A lot of nuances need to be completed in order for the work to be done really well. There are already articles about this on our website, you can read them. And in this article we will talk about soil. You can buy them in our online store, in the section - soils.
What is primer for decoupage?
It should be said that all surfaces have the ability to absorb. It all depends only on the density of the surface itself. Wood has a lower density and, accordingly, it absorbs more; glass has a very high density, so glass absorbs very little and, moreover, because of this, it generally does not hold paint, varnish and other substances well. But of course there are advantages. This is why we use glass and ceramic dishes in the kitchen; they are very easy to clean and remain clean and odorless, unlike plastic.
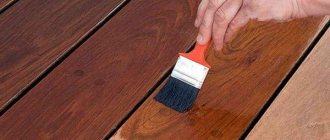
Primer for plywood and wood. Option 1.
If we consider a primer for decoupage, then for wooden surfaces an adhesive-based primer is used. It is more viscous. In general, why prime the surface? To ensure that the surface absorbs less paint.
First, you need to sand the wooden surface well. Then you can even wash it, just very lightly, to wash away all the sawdust. Wipe with a soft, lint-free cloth. And let it dry well for a day. If you can’t wait to start creating, then you shouldn’t wash it. After this, prime the surface. Apply the first layer evenly with a brush or sponge and let it dry. Then we apply a second layer, and only then paint, a napkin for decoupage, etc. I can tell you for sure that it will take you 2 times less paint and it will go on smoother and brighter than if you apply it to a simple wooden surface. What can we say about napkins? They simply cannot (according to all the laws of decoupage) be glued onto an unprimed surface.
Primer for plywood and wood. Option 2.
I was once very interested in painting. I read a lot of forums. What do you think real artists use? They do everything themselves. They would go broke if they bought special, expensive primers for canvases.
Artists make their own primer like this: they mix white paint (acrylic or oil) with PVA glue and water (adapted version). They also add lime and so on, we won’t need this. This is very suitable for decoupage primer for wood.
I personally did this before: I mix white acrylic paint: water: PVA glue in a ratio of 2:1:1. Very profitable, very convenient.
Now there are many special primers for decoupage on the market, and they are not expensive, take, for example, Russian manufacturers. It’s easier to buy ready-made, not like before.
Primer for glass and ceramics.
Both with wood and ceramics. Before priming or painting, ceramics and glass must be thoroughly degreased. Fat-free glass has much higher adhesion to the surface. You can go through with white spirit, or acetone, or solvent. Then the soil.
I have never seen such a special primer for glass. Many manufacturers have varnish glue. Here I give preference to German quality. All these varnish-adhesives are based on volatile compounds. You cover the surface and some of the volatile compounds from the glue begin to evaporate, and what remains sticks well to the surface. Paints for glass and ceramics are also based on this method. You can cover the surface with two layers of varnish-glue and it will be generally wonderful, and the paint will lie evenly (even acrylic) and will not wash off.
Many people use transparent car primer as a primer for ceramics. This makes it profitable. But all these aerosols have a very unpleasant odor, and if you have a child, and indeed in your apartment you won’t smell like that!
Again to myself). If we talk only about direct decoupage of ceramic and glass surfaces, I simply use ceramic paints as a primer. Then I bake it, and then if necessary I cover it with white acrylic paint, a napkin, etc. I like.
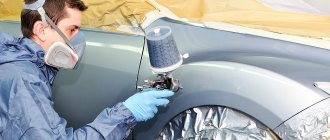
Primer for metal.
With metal everything is a little more complicated. To start decoupage on metal, it must be well prepared. As for decoupage, we are unlikely to leave our favorite decorated things in the rain, snow, etc. Therefore, when we start decorating metal products, be it a specially purchased watering can or a jar lying around, first of all we need to wash it well and remove the rust. If there is a lot of it, you can use vegetable oil. Dry. Sand it. Cover with soil. As a primer, everyone I know uses construction primers for metal. Various manufacturers. They guarantee the product’s anti-carrosion properties and adhesion to paint. Why reinvent the wheel?
Then we cover it with white paint, glue a napkin and voila! We admire the work.
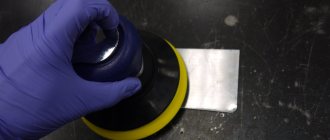
Primer for plastic.
The situation with plastic is similar to that with metal. The plastic product must be washed well. Dry. Degrease. Sand it well, with coarse sandpaper. Then cover with a special primer for cars and then follow the above scheme with white paint, a napkin, etc.
Features of the use of compositions depending on the types of surfaces
All materials used as a basis for finishing can be divided according to the degree of permeability. This is a determining factor, so it is difficult to say right away which primer for decoupage will be better. The composition spreads evenly onto absorbent materials and penetrates inside. For these, ordinary universal products are suitable. It is quite problematic to work with smooth bases, so it is better to choose compositions from the range of artistic primers. In this case, a more professional approach will be needed.
In fact, any surface can be decorated. Experienced needlewomen manage to do decoupage even on wax candles. First you need to select an object for decoration and determine its affiliation, that is, what type of material it belongs to. Surfaces accessible to primer penetration include:
- genuine leather;
- MDF;
- tree;
- unglazed ceramics;
- textile:
- cardboard.
The group of non-absorbent materials includes:
- plastic;
- glass;
- metal;
- polymer clay;
- shells, stone;
- glazed ceramics.
Incompatibility of the base with the soil often leads to deformation of the scenery. Sometimes newcomers to this type of creativity try to create products from scrap materials. Initially, such items may look good. But later, under the influence of external factors, the decoupage napkin can form folds, and the seemingly well-dried composition will begin to peel off.
Let's consider which compositions correspond to which type of material used.
Rules for handling wooden blanks
When working with material, do not forget that it is alive. He is breathing, he may be warping from something. Therefore, handle the blanks lovingly, and then it turns out that the object itself will tell you the best option for decorating it.
- “Underwear” brought from the street must be kept for a couple of days at room temperature so that it dries naturally (not near the radiator). And this applies not only to blanks purchased at opening days, but also purchased in the store.
- If there are defects on the surface in the form of knots and chips, they need to be filled with wood putty for interior work. It is advisable to choose one tinted to match the color of the wood, but you can also choose white.
- After final drying, the product must be sanded in the direction along the fibers.
- The surface of the wood can be primed, painted or tinted. And after any of these operations, treat again with soft sandpaper.
Compositions for permeable surfaces
In this case, the main task of the composition is to create a smoother surface, fill all kinds of pores and cavities using the first application for convenient and economical work with subsequent layers. For the preparation of absorbent bases, both special compositions and construction ones are suitable.
Of the first, you can use “Gesso” soil. It is designed for cardboard and wood, copes well with porosity and unevenness, and eliminates small defects. Its advantage is that it does not saturate the surface with moisture and cardboard products retain their original appearance.
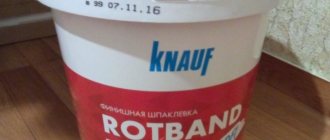
The “Sonnet” composition or the “Snezhka Eco” paint are also suitable. The first is a budget option, has an elastic texture and high adhesion.
The Russian primer is suitable for decorating cardboard and canvas before applying gouache, acrylic and oil paints. It forms a matte elastic film with a high degree of adhesion. To work with this composition, it is recommended to use rollers, spatulas and synthetic brushes. The only negative is that it is difficult to grind the product; it takes a very long time to grind.
In contrast to this composition, “Snezhka Eco” sands quite easily. The paint is hypoallergenic and does not curl when applied, the layer is more even.
For the design of textiles, leather and ceramics, you need to choose more elastic soils. Apply thin layers and wait until the product dries completely. Textiles and leather cannot be decorated with acrylic paints; it is better to use water-based options.
Special artistic primers for decoupage: disadvantages and advantages.
The main disadvantage of artistic primers is the price. As a rule, 1 liter of the cheapest thin. primer will cost more than 1 liter of good, very high-quality construction acrylic paint. If you remember the cost of blanks, mediums and other materials, the savings will be very noticeable. By the way, the same rule applies to varnishes.
The advantage of special primers is that they were created specifically to prepare the surface to be decorated for painting with acrylic (and other) paints and gluing the motif. However, not all special thin. soils meet the requirements of decoupage artists. The most striking example is the artistic soil Sonnet. I got the feeling that decoupage artists are divided into two groups: one loves him very much, the other can’t stand him. I myself belong to the second category and, when choosing between construction paint and Sonnet, I always choose paint. Why?
Compositions for smooth materials
For such foundations, artistic means are most often used, less often construction ones. In this case, the primer is expected to provide high-quality adhesion of the treated base to the acrylic paint. Such means include:
- aerosol soils:
- artistic compositions;
- building enamels and primers;
- paints.
To decorate metal and glass, only special primer is used for decoupage. For the first, you can use GF-021. This is a universal composition; it has proven to work well with metal due to its high binding properties. It is best to use anti-corrosion agents for this material. Construction compounds intended for metal processing can be purchased at a special store.
Special compositions for glass surfaces are not commercially available. How to replace primer for decoupage? Instead, adhesive-based varnishes are usually used. It is better to choose these products from German manufacturers.
High-quality adhesion is provided by artistic liquid compositions based on acrylic. They are very popular among needlewomen.
Paints for decoupage
The next important stage of decoupage is changing the appearance of the surface being treated.
Products are most often painted with acrylic paints. They are distinguished by their water solubility, short drying time, resistance and durability. The palette of such colors is very diverse.
Sometimes for tinting they use:
- water-based or regular enamel,
- watercolor,
- pastel,
- water-based or oil-based paint,
- gouache,
- tempera
Very often there is a need to preserve the texture and relief of a wooden surface. In this case, special dyes will come to the rescue, which only tint the wood without creating a visible layer of paint.
As a rule, the surface to be decorated should be light. Therefore, the most commonly used is ordinary white acrylic paint. By combining it with colored acrylic paints you can easily achieve the desired shade. You can also use gouache as an additive, but when mixing it with acrylic, the mixture very quickly becomes very thick, which can cause some inconvenience in work.
Decoupage technique. Video.
How to make your own remedy
It’s quite easy to make primer for decoupage with your own hands. To produce the composition you will need PVA glue and acrylic paint. However, there is one nuance in preparing the soil yourself, but it is also a plus: you will need to prepare two compositions with different proportions of components. For the first, two products are taken in equal quantities and mixed thoroughly. This composition is used to apply the first layer. To make the second type of primer, you need to take three parts of paint and one part of glue. They then cover the surface several more times.
Decorating bottles
Glass jars or bottles should not be treated with ordinary paints and primers. Over time, the layer will begin to crack and move away from the surface. Most often, an integrated approach is used to finish such products.
First, the base is degreased with alcohol or solvent. Then spray paint is applied. It can be transparent or colored. To enhance the tone, the last layer is covered with acrylic paint - this way you can save varnish.
A transparent composition intended for car repairs can also be used as a primer for decoupage bottles. If you use varnish-glue, then you need to apply two layers - this way the paint adheres better.
Features of decoupage on glass
Despite the availability of decoupage on glass, it has features that must be taken into account when working. The key to quality work is surface preparation - the glass must be thoroughly washed to remove dirt and degreased with acetone or alcohol. You can prime with either a simple acrylic primer or the so-called “composition for complex surfaces.” Experienced craftsmen use primers based on alkyd solvent for this. One of the most convenient options is aerosol primer for metal.
When using regular acrylic primer, before degreasing the surface, it is worth walking over it a little with sandpaper. Then tiny scratches will form on the glass, which will enhance the adhesion of the soil to the surface.
If the first layer is prepared correctly, further work with glass is no different from working with other surfaces. The standard set for classic decoupage is a picture, acrylic paints and varnishes. Tools include synthetic brushes and foam sponges. Since decoupage is a fairly wet task, it’s worth stocking up on paper towels or something that absorbs water well in advance.