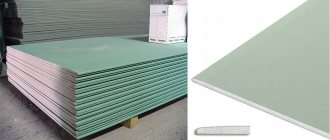
In order to make walls even in rooms, plasterboard sheets (GKL) are often used. The main type of fastening is a frame made of wooden slats or a metal profile, which serve as the basis for installation. But such a design, after installation, takes away useful territory, so it is undesirable to use frame technology in small rooms. In this case, you may need to glue the sheets directly onto the wall plane. The method of frameless installation using gypsum plasterboard involves the use of adhesive mixtures.
In what cases can drywall be installed with glue?
Attaching plasterboard sheets to a concrete wall is relevant in several situations:
- In small rooms, in order to preserve usable space.
- If necessary, level out the curvature of the walls and differences of up to 50 mm.
- To create a flat ceiling surface without reducing the height of the ceilings. Such work becomes more complicated due to the heaviness of the sheets themselves, which requires the use of additional fasteners. Dowel screws are used, which are located in increments of 60 cm between the fixation points.
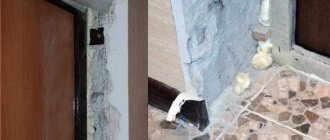
- When finishing door and window openings.
Important! On walls where there are large irregularities and flaws, gluing plasterboard sheets is not economically feasible.
The frameless method of leveling walls using gypsum plasterboard is simple and accessible to everyone. For a high-quality and durable fixation of drywall to a vertical plane, you will need special glue. Various adhesive compositions are used to ensure reliable fixation to both vertical and horizontal planes. Ready-to-use mixtures are easy to use. You should understand in more detail how to glue drywall to a concrete wall.
When profileless installation is justified
The main function of drywall - gypsum plasterboard - is the leveling of various surfaces: concrete, block, brick. Installation of drywall without a profile is possible in several cases:
- When the walls have small but numerous defects - pits or bumps. Plastering such surfaces will take a lot of time and will not be economically viable. High quality walls are also difficult to achieve.
- A final coating of wood surfaces and porous foam blocks is required. As a rule, the processing of such materials for subsequent cladding is complex and will result in significant expenses.
- If surfaces have a curvature exceeding 40 mm. They use bulk adhesive compositions, and apply them both to walls and to sheets of drywall.
- When there is no need to disguise communications and electrical wiring.
- In small spaces, where every centimeter counts.
Surfaces with a vertically disrupted geometry require experience from the craftsman, since control of the degree of curvature is necessary. It is carried out using a building level and a rule. Beacons are fixed on the planes, and they are subsequently oriented by them when installing plasterboard sheets. In small rooms, work without this stage is allowed.
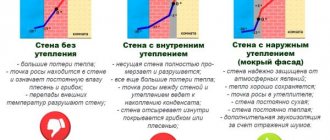
It’s impossible not to mention the disadvantages of such an easy method. This is the need to chisel the walls for electrical wiring, the impossibility of additional soundproofing and insulation.
Assortment for gypsum boards
Manufacturers offer a wide range of adhesive mixtures. GKL slabs are glued to the concrete wall firmly and reliably.
The most common compositions are:
- "Ceresit SM 11"
for laying ceramic tiles. The composition has good adhesion to smooth plasterboard boards.
- "Perflix"
(Knife) is an affordable option, which may well be suitable for fixing gypsum boards to concrete and brick walls. Due to its ease of use, it is used in everyday life.
- "Volma Montage"
- specialized gypsum-based mounting adhesive.
- Silicone-based adhesive adheres equally well to tiles and smooth plasterboard panels.
- "Fugenfüller"
- a dry mixture similar to putty, diluted with cold water for preparation. To knead, you will need a drill with a whisk attachment. Apply a thin layer to the surface.
- Putty "Fugen"
(Knauf) is used as a gypsum board clamp to a flat plane. The mixture has increased plasticity due to polymer additives. The strength of the connection is created by a thin layer.
- Polyurethane assembly adhesive in a container with an aerosol dispenser. Such compositions are resistant to high humidity and provide reliable and durable fixation.
- Polyurethane foam with a slight increase in volume.
- Liquid nails.
- Acrylic putties and sealants. Any type of sealant helps to stick drywall to brick, concrete or foam block walls.
Walls lined with plasterboard and using glue are inexpensive, so this method is a budget repair. Costs are also reduced due to the fact that the need to assemble a wooden frame or metal frame from profiles is eliminated.
Important! To improve the adhesive properties of gypsum plasterboard when joining with a concrete surface, a deep penetration primer is applied to the back side of the slab.
How to fix drywall
Currently, plasterboard is very widespread in all repair, construction and finishing work.
This material has earned boundless love for its characteristics: versatility, low cost and ease of use.
Such versatility in the use of drywall raises the question: how to attach drywall in certain cases?
Drywall mounting options
There are two main ways to attach drywall:
- frame and
- frameless.
Frame
The first case involves the construction of a metal frame, followed by placing finishing material on it.
The option is more labor-intensive than the frameless one, but this only manifests itself at the preparation stage; the fastening itself is much simpler and more reliable.
Frameless
The method involves installing drywall with a special glue.
Preparing the walls
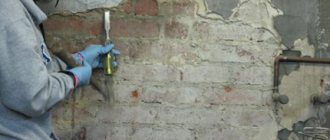
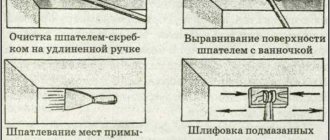
Before attaching drywall to a concrete wall, any dirt and dust present is removed from the work surface. The paint layer is removed from the painted wall using an angle grinder, onto which flap sanding discs are installed. To remove dispersion or water-based paints, use a stiff brush.
The completely cleaned wall surface is treated with a special primer “Betonokontakt”. If the surface is clean and has a glossy coating that cannot be removed, then Betogrunt is used to give better adhesion.
The preparatory stage also includes a number of mandatory actions that will help determine the optimal option for attaching drywall:
- It is necessary to examine the working surface for curvature and the presence of flaws. This will require a rule or plumb line.
- Any protruding elements - screws, nails, concrete mounds - are removed from the walls.
- Old wallpaper and other finishing materials are completely removed to a clean concrete surface. Such actions are labor-intensive, but they will increase the reliability and strength of the connection.
- To control the correct installation of the sheets (in the same plane), marks in the form of lines are made on the floor surface. Additionally, they can be applied to the ceiling if the vertical plane has large curvatures. The maximum difference should not be more than 2 cm.
Important! If the surface is smooth and has no flaws, then you should not increase the layer of glue to hide the wiring. It is enough to make grooves.
Knowing how to attach drywall to a concrete wall, you need to stock up on building materials in advance:
- Plasterboard sheets.
- Glue.
- Primer composition.
- Plaster mixture. This will be necessary if it is not possible to level the wall using drywall alone.
The number of gypsum plasterboards is determined in accordance with the area of the walls. More complex calculations are performed when determining the amount of adhesive composition, since for each material the consumption per 1 sq. m. may vary. With a layer thickness of approximately 1 mm, up to 1.8 kg of glue is used. Each package indicates the quantity for a specific thickness of the applied layer.
How to attach drywall to a wall without profiles using self-tapping screws: step-by-step instructions
Drywall has recently become one of the most popular materials for renovation work in apartments. Large-area, even and smooth surfaces of the sheets make it possible to eliminate the curvature of the walls in a short time and prepare the room for subsequent finishing. In addition, if gypsum boards are attached to a frame structure, then it becomes possible to additionally insulate and soundproof the walls and ceiling.
How to attach drywall to a wall without profiles
But creating a frame is not possible in all cases, since such a design significantly “steals” the usable area of the room. Therefore, for owners of city apartments planning renovations, information on how to attach drywall to a wall without profiles is often more useful, so that the loss of space in already cramped conditions is minimal.
There are several methods for attaching drywall in this way. But for any of them, the wall requires some preparation.
Preparatory work
Any work begins with preparing a set of necessary tools and purchasing the necessary materials.
Materials and tools
A. Tools you will need:
- Knife for cutting drywall.
- Building level, plumb line, marking cord, tape measure, long ruler or rule, pencil or marker - for preliminary marking and constant monitoring of the verticality of the surface during the installation of sheets.
- Rubber and regular hammer.
- Spatula or trowel
- Container for mixing glue.
- Screwdriver, electric drill with mixer attachment.
- A roller with a long handle and a soft brush.
- Chamfer plane
B. Materials for work:
- Drywall sheets. Depending on the room, ordinary gypsum boards and moisture-resistant gypsum plasterboards can be used, and if a wall near a stove or fireplace is being finished, then fire-resistant gypsum plasterboards will be required. The number of sheets is calculated by taking into account the area of the walls of the room, subtracting from it the areas of window and door openings, and making a reserve of approximately 15%.
The calculator below will help you quickly and accurately calculate the number of sheets of drywall.
Calculator for calculating the required amount of drywall
Go to calculations
- Cement or gypsum based adhesive composition. Depending on the specific conditions, polyurethane mastic or polyurethane foam may also be used.
- Primer composition for pre-treatment of walls. The specific type of primer and its consumption depend on the material and quality of the wall surface. Detailed information can be found in the instructions from the formulation manufacturer.
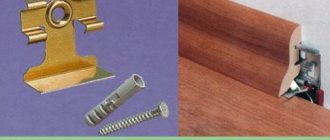
- Self-tapping screws or “fungi” dowels - depending on the surface on which the sheets will be attached.
Prices for drywall and sheet materials
Drywall and sheet materials
Surface preparation
Cleaning walls and filling defects
In order for the plasterboard sheets to adhere well to the wall, and for mold or mildew colonies to not appear in any remaining gaps between them, the surfaces must be carefully prepared. These measures should not be neglected, since the service life of the finish and the integrity of the base depend on them.
- If there is old plaster on the wall that has peeled off in places, then it should be removed completely or partially in places of defects, as it will reduce the adhesion of the materials to each other.
If there is a thick plaster “coat” consisting of several layers applied at different times, it is recommended to remove it completely. At any moment it can begin to lag behind the base, and sheets of drywall will come off along with it.
A thin, high-quality plaster layer will not interfere with the installation of gypsum boards, so it does not need to be removed.
- After cleaning the walls of old plaster, cracks or “sinks” may appear on the surface. They need to be sealed, otherwise condensation may accumulate there, which will contribute to the development of mold.
To repair cracks, they must first be cut apart.
The cracks must first be widened. This is done so that the sealing material stays more securely inside. Extended cracks and cavities must be thoroughly cleaned of small particles of sand and plaster using a soft brush, and then treated generously with a primer.
Approximate diagram of cutting cracks and crevices
- To fill surface defects, it is recommended to select a repair composition that is close to the base material, or one that will have high adhesion to it. If the cracks are wide enough and extend through most of the surface, then they can be filled with polyurethane foam.
Gaps of small width can be filled with sealant, which is plastic and will take the shape of the crack as it expands or narrows.
- After the primer has dried, all defects are filled completely with maximum density with the repair compound and brought into the general plane of the wall. If protruding protrusions are found on the surface, they are simply knocked down or cleaned to a general level.
Next, all walls should be primed with a deep-penetrating antiseptic compound.
Which primer is suitable for interior work?
The durability of the wall finishing largely depends on the quality of the applied primer. How to choose the right primer for walls under wallpaper or another type of finish - in a special publication on our portal.
This material is applied to the surface in one or two layers, each of which must dry well. The process is carried out using a soft roller, and internal corners and hard-to-reach places are additionally treated with a brush.
The time for complete drying of the soil is indicated on the packaging of the composition, and it should be adhered to, since installation of drywall should only be carried out on a dry and clean wall.
Surface marking
After the walls have been primed and dried, you should begin marking. For this, it is best to use a laser level, but if you don’t have one, then you can get by with a standard set - a plumb line, a regular building level, a long ruler (rule), a tape measure and a square.
The easiest way to mark is with a laser level.
- When marking the wall, you need to take into account deformation gaps, which must remain at the junction of the plasterboard with the floor and ceiling. When shrinking the house, they will not allow the sheets to be damaged on harder surfaces.
The gaps between the sheets of finishing material and the ceiling should be 3÷5 mm, and the gypsum boards should be raised from the floor by 8÷10 mm. For this purpose, a control horizontal line is marked from above, and on the floor it will be easier to maintain these gaps by placing pieces of plywood of the required thickness under the gypsum board. Later, after the glue has hardened and the sheets are securely fixed, these stands are removed, and the gaps at the top and bottom of the sheets are filled with polyurethane foam.
- If the sheet of drywall does not completely cover the height of the wall, then in this case, you will have to cut two lines - along the height of the whole sheet and along the top of the wall. This area will be covered with a fragment of the required size cut from the whole canvas. These elements can complement solid sheets only from above, but many professional craftsmen recommend placing them in a “checkerboard pattern,” that is, alternately from above and below.
The corners in the rooms are not always even, so using a plumb line, a vertical line is measured and accurately marked along the junction of two walls. It is necessary for installing and securing the first sheet on it so that it stands perfectly level. The evenness of the entire row depends on how it is positioned and fixed.
What glue is best to use?
Installation of plasterboard sheets on a wall without a frame is carried out on surfaces of varying degrees of evenness. Therefore, various adhesive compositions can be used for work.
We can roughly distinguish three main options:
- installation on a flat wall;
- fixing to a brick surface;
- gluing to walls with large irregularities.
Glue for flat surfaces
Smooth surfaces include concrete monolithic and stone plastered walls. Of course, they do not always have perfect smoothness, but usually do not require serious corrections in the form of alignment. It may be necessary to place beacons made of plasterboard or gypsum mixture if there is a slight slope in one direction or the other on the surface.
Drywall will be glued to a flat or corrected wall using any adhesive - it can be a gypsum- or cement-based composition, as well as polymer mastic or polyurethane foam. However, the simplest and fastest installation option would be gluing the panels onto polyurethane foam.
Adhesive foam, great for drywall
If the surface is completely flat and smooth, then you can also use glue produced in the form of mastic, which is sold in special plastic cartridge tubes and is squeezed out using a construction syringe or gun.
Glue in the form of viscous mastic
Cement or gypsum-based adhesives are produced in dry form and require dilution with water immediately before the installation process. The proportions for their dilution are indicated on the packaging, and they must be strictly followed. If such a cement or gypsum composition is used, then before installing the canvas to the wall, it is recommended to lightly spray its surface with a spray bottle.
Features of installation on a brick wall
Brick walls also have to be leveled with plasterboard. If the brickwork is of high quality and smooth, then installing a gypsum board on it differs slightly from fixing it on a flat surface. But be that as it may, such a wall requires the presence of certain defects in the form of differences and seams between the bricks. This means that the glue on its surface will be distributed unevenly, which means that the drywall sheet may not be securely fastened. In this case, the preparation of the brick surface is carried out as follows:
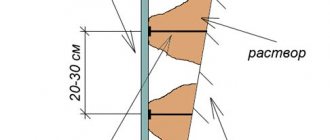
- Using a plumb line, the verticality of the wall is determined. If differences are detected that are more than 20 mm, it is necessary to make substrates from strips of plasterboard - their width should be 100÷120 mm. Level strips can be fixed vertically from floor to ceiling or parallel to these surfaces, depending on where unevenness is found. These pieces of drywall will become “beacons” for securing large canvases.
The glued strips become beacons for installing drywall sheets
- Sometimes, instead of even strips, rectangular fragments cut from the same plasterboard are used - their size can be approximately 100x150 mm. They are glued to the wall at a distance of 150 ÷ 250 mm from each other, depending on need.
When leveling a brick wall with sheets, you can use any glue, but the most economical and reliable option would be to use a gypsum or cement-based composition. If you use polymer mastic or polyurethane foam, then too much of these materials will be required, and it is not a fact that the sheets will be securely fastened.
One of the adhesives for installing drywall
One more point needs to be taken into account - the material from which the brick is made. If the masonry is made of red brick or foam concrete blocks, then any glue can be used - good adhesion will be ensured. Cinder blocks and silicate material require a special approach, since they do not have high enough adhesion to some compounds and have to be strengthened. Ready-made adhesive dry mixtures seem to be considered universal, but this is not always confirmed in practice, so many craftsmen modernize them by adding additional components. So, for example, 0.5 liters of PVA and 1 kg of gypsum can be added to 10 kg of cement-based composition, but only 0.5 liters of PVA glue can be added to 10 kg of gypsum-based mixture.
In any case, it is recommended to fix plasterboard fixed to a brick wall with glue using dowels—“fungi.”
Installation on uneven surfaces
In this case, it would be optimal to use glue produced in dry mixtures, since a fairly large amount of it will be required. Installation on a surface with large differences is similar to attaching sheets to brickwork. Only in some areas of the wall, instead of one layer of plasterboard rectangular backing, you will have to glue two or even more. This leveling method will require more time, since each of the backing layers must dry completely before the next one is applied to it.
On curved walls, you need very reliable fixation of the sheets to the surface using dowels and dense filling of the space between the wall and the drywall, especially at the edges.
When using substrates to level the wall, they can be secured to the wall with mounting foam, and to glue the main panels, use glue mixed from dry compounds.
Installation of drywall without frame
The techniques for applying different types of glue to drywall sheets differ from each other.
Installation with glue from dry construction mixture
The most common material for attaching drywall to a wall is gypsum-based adhesive. A cement composition is often used. But both the first and second are applied to the canvas according to the same principle.
- Along the edges of the underside of the sheets, glue is applied in long dotted or solid strips, since it is necessary that when pressed against the wall, the composition completely fills the gap between the base and the finishing material. Along the main plane of the sheet, the glue is applied pointwise, in slides, in increments of 200÷300 mm.
One of the methods of applying glue to a sheet of drywall
. Provided that the wall surface is perfectly flat, glue is also applied along the edges in strips, and dots of glue measuring 120÷150 mm in diameter are applied only along the middle part of the sheet.
In order for the sheet to be securely attached to the wall, the total area of the adhesive applied to the surface of the sheet must be at least 10% of the total size of the sheet.
- After applying glue to the drywall, the sheet is placed on stands prepared for it on the floor made of plywood or old ceramic tiles, 8-10 mm thick.
- After pressing the canvas to the wall, they go over it as a rule, gently tapping it on the front surface so that the glue is distributed evenly between the two surfaces and the plasterboard stands perfectly vertical.
Aligning the sheet after installing it to the wall
- Then the sheet must be checked using a building level, and if a tilt is detected in one direction or the other, appropriate adjustments must be made. This will be possible within 8 ÷ 10 minutes after gluing.
- Fixing with “fungi” dowels is carried out only after the glue has dried under the leveled sheet, otherwise its evenness can be disrupted again by pressing it too hard.
- In the same way, all the whole panels are glued, and then proceed to the installation of the missing fragments.
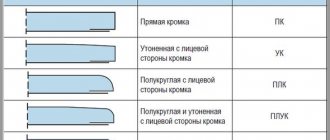
Before installing a narrow piece of drywall on top of the sheet, the edges at their junction need to be cut at an angle - chamfered to create a gap that will be filled with putty.
Edges of sheets with homemade chamfers
You can cut the edges with a drywall cutting knife or a plane. The edges of the material are processed with a plane before it is mounted on the wall, and with a knife you can trim the already glued canvas.
If it is more convenient, then the glue can be applied to the wall
- It is not at all necessary to apply the glue specifically to the drywall - if it is more convenient to do it directly on the wall, then you can do the gluing this way. There is no fundamental difference in the processes, but in this case the wall must be prepared with a primer.
Installation on synthetic compounds
The second installation option, using synthetic compounds, can be carried out in two ways:
- Foam or mastic is applied directly to the drywall sheet.
- The space between the wall and the installed and leveled sheet is filled with foam.
Gluing gypsum boards onto polyurethane foam
This option is used when installing gypsum boards on a wall that does not require special adjustments.
Foam is applied to the surface of the canvas more economically than glue made from a dry mixture. It is enough to foam strips along the perimeter of the sheet and crosswise or diagonally in its middle. After the composition is applied, the sheet is immediately glued to the wall. Since the foam has good adhesion to any surface, both smooth and porous, it will set quickly, and after a day it will be impossible to tear the sheet off the wall.
Options for applying polyurethane foam to gypsum board sheets
In the same way, all the material is attached to the wall and left to dry for a day.
If it is decided to use polyurethane mastic for gluing, then it is applied to the sheet in more frequent stripes and always along all edges. Inside the sheet, glue can be applied in different “patterns”, the main thing is that the lines run at a distance of 150÷200 mm from each other. In this case, when the sheet is pressed against a flat surface of the wall, the glue will be evenly distributed between them.
Polyurethane mastic from a tube is applied in strips
Drying and complete polymerization of each of the compositions take place differently, so when purchasing mastic, you should immediately pay attention to this criterion.
If small pieces of drywall are glued to the wall, then it is enough to apply mastic only along their edges.
For small fragments, coating only around the perimeter is sufficient.
Video: installation of plasterboard wall coverings on polyurethane foam
Prices for mounting foams and cleaning gun cleaners
Polyurethane foams and cleaners for construction guns
Gluing gypsum boards with subsequent filling of voids
This installation method is more labor-intensive to implement, but it gives a good result when leveling a not very flat surface. It should be noted right away that when using it, only polyurethane foam can be used, and in fairly large quantities. The consumption will depend on how curved the wall is, that is, how large the cavities will remain between it and the gypsum board.
For installation in this way, you will need some auxiliary materials that need to be purchased in advance, and some of them can be found in the household.
So, the work goes like this:
- The plasterboard sheet is installed to the wall according to pre-made markings. Holes are drilled directly through the gypsum board into the surface of the wall - there should be 10-12 of them, evenly distributed throughout the entire sheet.
Next, the sheet is removed from the wall, the holes in the wall are slightly expanded and plastic dowels are carefully driven into them.
- The next step is to glue pieces of foam rubber onto the back surface of the drywall sheet using double-sided tape. They should be located 120 ÷ 150 mm from the drilled holes. These inserts will be used as a spring adjuster that will help align the blade correctly.
Plastic dowels are driven into the wall, into which self-tapping screws are then screwed to adjust the position of the sheet
- Next, the sheet is again attached to the wall, which now needs to be fixed with wide self-tapping screws. If there are none, then washers are first put on ordinary fasteners. Self-tapping screws need to be selected to the required length, since they will be used to regulate the installation of the sheet. They are screwed through prepared holes into dowels driven into the wall, thus pulling the sheet as close as possible to the wall.
Checking the surface with a building level, it is adjusted by loosening or tightening the screws, achieving the desired vertical position.
In the same way, all sheets are aligned and adjusted to each other.
- The next step is to drill through holes with a diameter of 7–8 mm in the plasterboard sheets between the screwed-in screws. They are designed to pump polyurethane foam through them into the gap between the wall and the gypsum board. Injection occurs using a special construction gun on which foam cylinders are installed.
Before filling the gaps, it is necessary to adjust the dosage of foam coming out of the container in order to use it as economically as possible. Usually it is adjusted so that with one click on the gun a spot with a diameter of 120÷150 mm is formed. It is important to do this in advance because gluing the canvas to the wall will be done blindly.
Filling cavities with foam is best done with professional material and a gun
- When the foam has hardened and the sheets are firmly fixed to the wall, if desired, the screws can be unscrewed altogether, or even better, they can be sunk 1-2 mm into the drywall and covered with putty on top.
Sealing seams
After the installation is completed and the glue has completely dried, they proceed to sealing the seams.
The work is carried out in the following order:
- The joints between the sheets are carefully primed. The primer on the surface must dry completely. Typically, on those edges of the sheets where the chamfer was cut with your own hands, priming should be carried out several times so that the cut does not begin to crumble when sealing the joints.
Initial filling of joints with putty
- Next, putty is carefully applied along all joints with a spatula.
- A serpyanka mesh or sealing tape is glued onto the uncured, leveled putty and slightly embedded in the composition.
Seam reinforcement using uncured mortar
- After the seams have dried, they proceed to priming and filling the entire surface of the plasterboard wall.
How to finally level the walls with putty?The process of bringing walls to perfect evenness and smoothness using putty is not so simple. We recommend that you first familiarize yourself with the rules for filling walls with your own hands , set out in a separate publication on our portal.
After familiarizing yourself with the basics of the technology, it is recommended to try to do all this practically on a limited area of the wall. If everything goes smoothly, then you can safely take on large-scale work on finishing the room.
Required Tools
To work you will need the following tools:
- Assembly knife for cutting plasterboard sheets.
- Level and plumb.
- Container for preparing plaster and adhesive mixture.
- A special attachment is a whisk, which speeds up the mixing process.
- Electric drill.
- Spatulas, including serrated ones, for distributing the finished adhesive mixture over the surface of the drywall.
- A mallet used to level the position of the sheets.
- Bars in the amount of 2 pcs.
- Pencil for making marks.
Leveling walls with plasterboard without a frame with your own hands
To work you will need the following set of tools:
- jigsaw;
- sharp stationery knife with a set of blades;
- durable twine, fasteners;
- level, plumb line and pencil;
- drill with whisk, container for mixing the adhesive solution;
- spatula, hammer, rubber mallet.
The materials you will need are the gypsum board itself, dry glue to secure it, and a mesh for gluing the joints.
Surface preparation
The main tasks of preparation are to clean and level the wall. After cleaning the surface of all contaminants, it should be primed. In addition, primer should be used to coat the back surface of the drywall.
To level, the entire wall is examined using a level and a plumb line, after which the depressions are filled with mortar or putty, and the protruding places are trimmed.
Once aligned, you can secure the electrical wires to the wall if you need to hide them under the trim. If necessary, grooves are made under them at the base.
Mount without beacons
The first step is to dilute the adhesive solution. To do this, pour an amount of dry drywall adhesive into a bucket of water corresponding to the proportions recommended by the manufacturer.
The glue is not applied in a continuous layer, but in a combined way - a strip of solution is formed along the edges of the sheet, and the remaining area is covered with lumps of glue in a checkerboard pattern.
For the best adhesion to the surface, at least 10% of the gypsum board area must be covered with glue.
After applying the solution, the sheet is applied vertically to the wall in the intended location and pressed tightly over the entire area. The evenness of the fastening is checked by a level.
If there is a noticeable difference in heights, the sheet is pressed with great force . It is not recommended to remove drywall to add glue, since it is easy to break the gypsum board when peeled off.
How to attach drywall to a wall without a video profile.
The glue sets in about 20 minutes . In order not to hold the sheet, you can carefully secure it with dowels in the corners and in the center.
By lighthouses
If the wall is too uneven, you will have to use beacons - special pads in places of greatest deflection of the surface.
The order of work is as follows:
- Wall irregularities are measured by level.
- Drywall is applied to the surface, in the places of the depressions it is drilled through so that a hole appears in the wall.
- A string mesh is formed over the wall - it will serve as a guide, marking the plane in which the drywall should be mounted.
- In places where the wall was drilled, gypsum plasterboard scraps are secured with glue. You need to glue it in such a way that the wall is aligned with the guide grid.
- Glue is applied to the entire sheet of material. This should be done according to the same scheme as in the previous case.
- In places that will fall on the beacons, you need to apply a smaller amount of solution.
- The sheet is pressed tightly against the wall surface and is additionally fixed with dowels.
- The seams between the sheets are sealed with putty.
On a wooden wall
Unlike brick or concrete, gypsum plasterboard in a wooden house does not need to be glued using a special solution. In this case, for installation it is enough to screw the gypsum board to the wall wood screws
The fastener caps must be recessed into the surface of the material. In uneven areas of the wall, wooden blocks or slats are used to prevent the drywall from moving in waves.
Thus, despite the greater number of advantages of the frame method, it is possible to install drywall without a profile - it’s even easier. mistakes are made during the work and the surface becomes distorted, this can be corrected with putty.
The choice of glue depending on the flatness of the wall
It is very important to choose the right way to glue drywall to concrete. For non-professionals to do the work themselves, it is better to use universal gypsum-based adhesive. Instructions for use are included.
It is worth talking about each type separately:
- The mixture prepared at home has a short shelf life - it must be used up within 30 minutes, because after the specified time it will lose its properties and will be unsuitable for use.
- The finished Fugenfüller putty is applied in a thin layer to the work surface. You need to know how to use this composition, which makes it accessible only to professionals.
- Silicone compositions are similar to Fugenfüller putty. They require skill to apply and are therefore not suitable for use by beginners.
- Perlfix gypsum adhesive is versatile. Even beginners can use this composition without much difficulty. The mixture is sold dry. To prepare, combine with water and stir until smooth. Application is carried out on the back side of the slab or directly on the wall. This adhesive composition not only securely fixes the drywall to the working surface, but also eliminates the curvature on the wall.
- Ceresit SM 11, although intended for laying tiles, is identical in application to Perlfix.
- Polyurethane foam is a reliable connecting material used to fix drywall to the wall. Foam with a low expansion coefficient is suitable for these purposes.
Important! Using foam requires knowledge and skill. Before foaming, all sheets should be installed in planes
Advantages of installing drywall without a profile
The frameless method of attaching gypsum boards to walls is justified under certain circumstances. The most compelling and mandatory use of a frameless fastening method is the curvature of the walls. The maximum permissible value of curvature is 5 cm over the entire plane of the wall, otherwise it is unlikely that you will be able to level it using adhesives and save money.
When choosing a frameless fastening method, you can save a lot, but remember, the more irregularities, the more adhesive you will need
So, three reasons why installing drywall without profiles is beneficial:
- This method will allow you to save significantly. Thus, by purchasing all the necessary elements for a metal frame, you can spend five times more than on purchasing adhesive compositions. However, it is worth remembering that the greater the unevenness, the more glue will be required to level the walls.
- Gluing drywall will not reduce the total area of the room as much as installing gypsum board on the frame. For comparison: when installing lathing (depending on the unevenness), the length of each wall will take about 5–10 cm, while with the adhesive installation method it will be 2–3 times less, often no more than 1 cm.
- You can attach drywall directly to the wall in different ways and on different bases. It doesn’t matter whether they are permanent or partitions, brick, shell rock, foam concrete or aerated concrete, concrete panels or clay blocks. It also does not matter whether it is a wooden base made of boards, timber or shingles, covered with plaster or not.
Leveling walls with plasterboard without a profile is possible regardless of the technical condition of the base. This could be old brick or clay walls, old plaster, wallpaper or paint, partially crumbling plaster, etc. Naturally, there are certain restrictions:
- large rubble of walls;
- high room humidity or direct contact of plasterboard with water (even moisture-resistant drywall will collapse under constant exposure to moisture).
Step-by-step instructions for gluing drywall to a flat wall
There are different ways to glue drywall to a concrete wall. Differences in performing such work directly depend on the condition of the surface. In order for the mounted sheets to stand and not peel off, you should know how and with what to glue drywall to a flat concrete wall.
Fixation on a vertical plane is carried out with any adhesive mixtures - gypsum or cement based, polymer mastic, mounting foam.
A notched trowel is used to apply the finished adhesive mixture. Small portions are distributed over the surface at a distance of 25 cm. After the entire area of the sheet has been covered with glue, its lower edge is placed on the lining, the vertical position is leveled and pressed against the working plane. The assembled sheet is supported by a wooden block until the mixture completely hardens.
Installation of plasterboard sheets with self-tapping screws
This installation option is only possible if there is a base into which self-tapping screws can be screwed. This can be wood, aerated concrete blocks or gypsum partitions.
Preliminary preparation for installation work will consist of removing protruding sections of the wall plane. The tubercles of the wooden base are leveled with a hammer and chisel; it is also possible to use a hatchet. Foam concrete and gypsum partitions are easiest to process with a hammer drill and chisel.
Sheets of drywall are fastened in a staggered pattern. Wood screws are used as hardware for fastening. The length of the screws varies depending on the wall material. For cladding a relatively flat wooden surface, self-tapping screws of 3.9x25 and 3.9x35 mm are suitable.
Self-tapping screws 3.9x45 mm are used for installing gypsum boards on aerated concrete and gypsum partitions. When tightening the screws, it is necessary to monitor the depth of recessing of the hardware head. It is considered normal if the screw is immersed in the drywall by 1 - 2 mm. The fastening pitch is about 250 mm at the edge of the sheet and 250 - 350 mm at its center.
Particular attention should be paid to the places where the gypsum boards are attached in areas called depressions. Tightly tightened screws simply deform the drywall. As a result, it will exactly repeat the relief of the uneven walls.
In such cases, it makes sense not to reach the hardware, leaving a small space between the base and the sheets. This will not greatly affect the strength of the structure, but the number of layers of putty for leveling will noticeably reduce.
Step-by-step instructions for attaching gypsum boards to an uneven surface
The wall surface is distinguished by the irregularities present on it. What to use to glue drywall to a nervous concrete wall?
The choice of method depends on the degree of unevenness:
- For slight curvature of up to 2 cm, the Perflix adhesive composition is used, which is applied to the back surface of the sheet in small cakes. The application procedure is performed first along the perimeter in increments of 30 to 35 cm, and then the central part is filled.
- For deviations greater than 2 cm, the Fugen composition is used. The glue is distributed over the surface at intervals of 30-35 cm.
After applying the adhesive mass, the plasterboard sheet is lifted and placed on pads located on the floor. GCRs are aligned along the lines drawn on the ceiling and floor surfaces. It is necessary to ensure that the glue does not protrude through the seams; if this is observed, the excess should be removed with a spatula.
Important! When choosing a dry adhesive composition, it is necessary to take into account that the applied layer will be quite thick.
Features of fastening gypsum boards without a profile to different bases
Carrying out repairs on their own, many home craftsmen wonder whether it is possible to attach drywall directly to the wall and how exactly to do this.
When choosing a method for attaching drywall to the wall, pay attention to the wall material
There are several ways in which you can attach sheets of drywall directly to the base and still correct the plane. The main parameter when choosing methods is the material of the base wall.
Wooden base
Whether it is a wooden partition in an old “Stalin” building or a wall made of timber in a new house, plasterboard is attached to the wall without a profile using wood screws. It is better to use self-tapping screws of at least 35 mm, but you should pay attention to the curvature of the walls. Perhaps in some places the fastenings will need longer ones, for example in old houses on wooden walls, where a thick layer of plaster is applied, which should not be removed. In this case, you need to choose a self-tapping screw of such a length that it reaches the tree.
What to use to make holes in drywall for lamps - the issue is resolved
Self-tapping screws can only be screwed in with a screwdriver; doing this with a screwdriver is extremely inconvenient. In this case, you need to ensure that the fastener fits strictly perpendicular to the gypsum board sheet.
After installing drywall on a wooden structure, the seams must be reinforced, because fluctuations in humidity and temperature may change the geometry of the sheets. For reinforcement, a narrow sickle mesh is used, which is applied to the seam and puttied.
Capital base (brick, foam concrete, etc.)
To attach drywall without profiles to a solid brick base or to a foam block wall, it is optimal to use the following methods:
- fastening with gypsum glue;
- fixing gypsum board sheets with mounting foam;
- with a perfectly flat surface with differences across the entire plane of no more than 5 millimeters, gluing gypsum boards to assembly adhesive (for example, liquid nails) is allowed.
Gluing a sheet of drywall using any of the above methods is not enough to securely fix it. How to properly attach drywall to a wall without a profile using each of the above methods, we will consider in more detail.
Walls with large irregularities
You should also know how to glue drywall to a concrete uneven wall with bumps that cannot be removed. Here you will also need beacons to level the surface. You will also need to make a kind of frame from narrow strips of drywall. The sheet is cut with a knife into strips 10 cm wide, which are fixed vertically with Perflix compound at a distance of 40 to 60 cm. A level is used to check the correctness of the mounted slabs in the same plane. After the glue has completely hardened (after 2-3 days), the gypsum boards are installed using Fugenfüller or liquid nails.
Important! If there is an uneven surface with a large curvature, it is necessary to take as small a step as possible between the strips to ensure reliable fastening.
Preparation
The wall is cleaned of old plaster, primed in 2 layers and dried. The gap between the gypsum board and the ceiling without a profile is 3-5 mm, between the floor – 7-10 mm.
The first nail is hammered into the upper corner, the second into the lower corner (taking into account the specified gap). By pulling the thread between them, place it at 90° to the floor (plumb). On the opposite side - similarly. Then the nails are connected with thread, achieving an ideal line.
The unevenness of the wall is revealed in the thread square. For defects larger than 20 mm, prepare a substrate from pieces of gypsum board 10 cm wide, fixed vertically.
Preparation
Detailed markings are applied to the wall for precise cutting of the sheet. If the gypsum boards are short, the pieces are added in a checkerboard pattern: to the ceiling - to the floor. Open spaces (pipe outlet, etc.) must also be taken into account.
To set the beacons, strings are pulled horizontally at intervals of 50cm. The geometry of the strips is controlled by level and plumb.
Glue is applied to each thread at the same intervals - beacons-cakes Ø 7cm. Grind them in thread by thread, checking with a level. When the beacons are exposed, let the glue dry and proceed to the installation of the gypsum board.
Useful tips
It is advisable not only to know what to use to glue drywall to a concrete wall, but also how to work with different adhesive mixtures.
Such knowledge is necessary in order to ensure a strong and high-quality joining of two planes:
- Finishing of the premises should begin after completion of all electrical wiring work.
- Lime plaster should be removed before attaching drywall to a concrete wall.
- Installation should be carried out only on a solid supporting base without signs of delamination or crumbling.
- Additionally, use dowels to secure the sheets. It is advisable to take 4-5 pieces per plate.
- Leveling walls with sheets must be carried out at a temperature of at least +10°C.
- The plasterboard slabs must first lie in the room where they will be installed.
- A 10mm gap should be left at the bottom to protect the plasterboard from moisture coming from the floor.
- If there is a flat and uneven surface on the same wall, you can use different fastening methods.
- The adhesive composition is applied to walls made of silicate blocks, and not to the surface of the sheets.
Advice! Before gluing drywall to the wall, you need to moisten it with water from a spray bottle.
Mounting methods
The question often arises: Is it possible to attach drywall to a wall without a profile? Drywall can be attached to the wall in two ways: framed or frameless.
One of them is selected based on the conditions:
- type of main surface;
- magnitude of elevation differences;
- the nature of the premises;
- operating conditions of the finishing material.
The frame method is the main one and has some advantages over fixing gypsum boards directly on the wall, but it is more difficult to implement and requires large financial investments.
Its advantages are as follows:
- The curvature of the wall does not matter.
- The main surface does not require careful preparatory work.
- Insulation or soundproofing material can be laid under the drywall.
- Inside the frame there is enough space for communications - heating pipes, electrical wiring.
This method involves the formation of a frame from a galvanized profile, to which sheets of drywall are already attached.
If the dimensions of the room do not allow you to construct a frame, you can attach drywall to the wall without a profile.
The frameless method is simpler, but its implementation requires the following conditions to be met:
- A solid base, cleaned of old finishes and not damaged by microorganisms.
- The wall is protected from moisture and is also well insulated.
- The surface is thoroughly cleaned of dirt, dust and oil.
- There should be no significant distortions of the wall.
- The height of the ceilings should not exceed the length of the gypsum board, since without a frame it will not be possible to perform high-quality transverse joining.
The disadvantage of the frameless method is limited design possibilities. In this case, it will not be possible to form wall niches.