The technology of laying tiles on drywall in the bathroom has a number of features that distinguish it from the classic cladding method. The presence of a reinforced metal frame, the use of a primer and additional waterproofing of plasterboard panels increase the service life of the erected structure.
To level the walls in the bathroom, only moisture-resistant plasterboard is used.
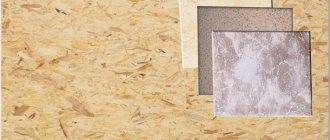
Which drywall to choose for tiles
For finishing bathrooms, choose waterproof slabs (GKLV), which are marked in green. Such sheets are easy to cut, do not crumble or break, and their gypsum base contains antiseptic additives that prevent the spread of mold.
For rooms with high humidity, it is recommended to use gypsum fiber panels (GVLV) with a thickness of at least 12.5 mm. It is more difficult to work with this material - the slabs crumble when cutting, and their corners often break off.
Gypsum fiber sheets have high strength and long service life. The advantages of the material include the possibility of restoring broken fragments. High quality finishing is provided by products from KNAUF, Gyproc, Lafarge.
In some cases, the bathroom is sheathed with standard plasterboard, provided there is good ventilation in the room.
Important point!
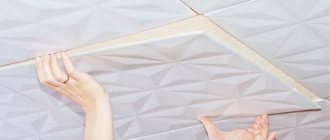
Rule ten: when laying tiles on drywall, all work is carried out intermittently. You cannot cover the entire wall at once. We made five rows - rest. Let the drywall “get used” to the load and adapt to new conditions! In addition, carry out all work only using a level. Each tile must lie flat. And don't rush! Remember that correcting defects is quite problematic, since glued tiles can only be removed with a piece of plasterboard base. The work is completed by laying the last row.
Choosing tile adhesive
Ceresit CM 9 - adhesive for ceramic tiles.
The glue is chosen based on the nature of the work being performed. If it is necessary to replace several tiles, use waterproof liquid nails, which are based on a water emulsion.
They dry quickly, but are expensive and can be toxic. They are applied to the surface using a glue gun.
Sand and cement based glue has a lower price. It also contains various additives and plasticizers that increase the elasticity of the product.
These mixtures are universal, safe for health and suitable for finishing small areas, but they quickly harden when the temperature drops.
The consistency of elastic tile adhesive allows you to make changes to a structure already mounted on the wall. To fix tiles, Ceresit products are most often used - compositions CM 9, CM 11 Plus or CM 14 Extra.
Such mixtures include inexpensive IVSIL FIX and Knauf Fliesen adhesives, designed for gluing heavy facing materials.
Advantages
Drywall adhesive has a certain list of advantages over other methods of attaching this material:
- significant acceleration of the process of laying plasterboard sheets. For example, if drywall is installed on a metal frame, it takes twice as long as gluing the material to the surface.
- In addition, drywall adhesive dries very quickly , so you can soon move on to other repair work.
- ease of use. Diluting the mixture is not difficult if you follow the instructions on the package. And the installation process itself is very simple, because it is enough to apply glue either to the wall itself or to a sheet of drywall, and then press it against the wall.
- In addition, there is no need to pre-level the surface , because to apply the glue it is enough to simply clean the wall of debris and prime it.
- less financial costs. This is especially noticeable in comparison with a metal frame, where you need to purchase fasteners, metal profiles and other components.
- on average, when compared in terms of financial costs, installing one sheet of drywall on a metal profile will cost four times more in cost than using glue. In addition, the frame “takes away” space from the room - about 4 cm from each wall .
- As for the glue, with this method it is possible to minimize these losses to 2 cm.
However, the use of glue will be impractical if the unevenness of the walls is very large. Although, the same Perlfix is excellent for leveling surfaces, but those where the deviation from the norm is no more than 3 cm over the entire surface.
How to choose tiles for drywall
When purchasing tiles, you should give preference to ones that are plain or have a clear pattern and are free from defects. The evenness of the products is checked by folding them right side out and noting the tightness of the fit and the width of the gap. Hardness is assessed by ear - when you lightly hit the tile, a dull sound should be heard.
For covering drywall, you can choose both ceramic and plastic plates with a side length of no more than 33 cm. You should buy them with a margin of about 15-20%. When purchasing plastic products, it is necessary to take into account the low thermal stability of the material and not place such tiles next to heating devices.
To cover plasterboard walls in the bathroom, you can use any ceramic tile of a suitable size.
Requirements for base and material
Tile is a fairly heavy finishing material, so emphasis should be placed on strengthening the structure of the frame for drywall. Vertical guide profiles are fixed with a minimum pitch of about 40 cm, and reinforced with horizontal guides every 0.5-0.7 m. It is also worth remembering that the distance between the screwed sheets of drywall, walls, ceiling and floor should be within 4- 7 mm.
Plasterboard foundation
The tiles can be glued to any type of drywall, but if these are wet rooms, then the conditions here are dictated mainly not by the finish, but by the microclimate. In a bathroom or toilet, all work is done from moisture-resistant gypsum board, while for the kitchen or hallway, ordinary sheets are also suitable.
Step-by-step instructions for tiling drywall
You can make the cladding of plasterboard floors with your own hands, following standard technology.
Preparation of tools and materials
The frame for fastening the slabs in the bathroom is assembled from galvanized metal profiles. This material is durable, does not corrode, has rigidity and high load-bearing capacity. Among the leading manufacturers of rolled metal for gypsum boards are GYPROC, Knauf, Metalist.
For greater strength, the structure is reinforced with horizontal posts with a width of 50×50, 75×50, 100×50 mm. At the joints, it is best to use wide products to secure the edges of both panels. A profile with a thickness of 0.6 mm is considered optimal for a frame for cladding.
To strengthen the frame for plasterboard, a steel profile of 50×50, 75×50 and 100×50 mm is used.
When laying tiles on plasterboard walls in the bathroom, use:
- building level;
- tape measure and marker;
- a spatula with a smooth edge and a comb tool;
- serpyanka mesh;
- container for preparing an adhesive solution;
- construction mixer or drill attachment for mixing dry mixture;
- brush or paint roller;
- tile cutter;
- plastic or wooden mallet;
- jointing tool;
- composition for grouting joints and crosses for leveling them;
- rubber spatula for applying the grout mixture;
- fine sandpaper;
- acrylic moisture-resistant primer;
- cement or polymer putty, compatible with the primer composition.
Surface preparation
Drywall is laid in 2 layers, so the structural elements are installed at a distance of 40 cm from each other to avoid divergence of the seams and deformation of the tiles. The sheets are attached to the guides using self-tapping screws, while the strips themselves are placed only under the bottom layer.
If the size of the room does not allow for double cladding, a plaster mesh can be used, which is fixed with PVA glue and secured with staples. To increase the strength of the structure, these technologies are used simultaneously.
In places with pipes that have valves and stopcocks, an inspection window with a door should be provided for access to communications if necessary.
Seam treatment Primer and waterproofing
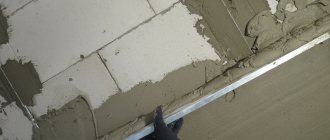
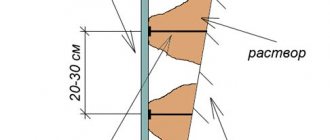
- First, the chamfer is removed at an angle of 45⁰ with a construction knife, and it is necessary that the depth of the cut is ⅔ of the thickness of the sheet.
- The resulting V-shaped groove is coated with a deep penetration primer with antiseptic additives. Apply the product with a roller or wide brush in 2 layers, leaving for 30 minutes.
- The joints are filled with gypsum putty and, after drying, sanded with sandpaper.
- The reinforcing serpyanka is glued on and the putty solution is applied again.
- Then the putty layer is sanded again.
After this, an acrylic waterproof deep penetration primer is applied to the surface of the plasterboard partitions with a drying period of at least 45 minutes. This technology reduces the absorbent properties of the material and improves the adhesion of the adhesive.
To obtain a smooth and even surface, the procedure is repeated 2 times and diluted tile adhesive is added to the second layer of primer.
The junction between the bathtub and the plasterboard wall should be treated with coating waterproofing.
Even before installation, you can put a plastic film on the frame to protect the plasterboard from moisture penetration. The material is secured in such a way that it wraps around the top end and back side of the sheets.
The panels can be treated with mastic and, after installation, their edges can be covered with silicone sealant. Their reverse side is protected by applying a primer and waterproof acrylic paint, penetrating insulating compounds, or using lining materials - roofing felt, glassine, roofing felt.
To protect the lower edge of the slab, the sheathing is fixed with a small gap from the floor and, during the preparatory work, it is filled with tile adhesive. 10-15 cm of the floor surface is treated with the same product, after which a waterproofing tape is attached and it is also covered with glue. All corner joints and joints are closed in a similar way. The openings for communications are treated along the contour with silicone sealant.
Calculation of required materials and layout
Laying of tiles begins after 24 hours. To ensure that the cladding has a pleasant appearance and there is little waste, a diagram is drawn up and markings are made.
Simple types of layouts include:
- straight, plain, when the slabs are laid parallel to the floor, without alternating colors;
- diagonal - in this case, the corners of the elements are connected to the walls and floor, and tile fragments cut diagonally are used to fill the gaps;
- staggered laying;
- in the form of a border, when there are inserts from slabs of a different width.
The number of elements is calculated depending on the selected scheme for each wall separately. First you need to measure the width of the wall, subtract 3 mm from it, divide by the width of one slab and add 3 mm. If the result is a fractional number, it is rounded up.
Calculations for height are performed in the same way. After this, the number of tiles obtained for each row is multiplied, and thus the volume of material for covering the entire wall is determined. It also includes an additional 10% tile quantity.
To calculate and lay out bathroom tiles, you can use special online programs and services.
In order to exclude the bathroom door and ventilation window from the installation calculation, the following calculations are performed: the height and width of the openings are divided by the corresponding tile parameters, the resulting values are rounded to a lower value and multiplied among themselves.
The marking of horizontal rows on the wall begins with the definition of the zero row. Using a level, draw a straight line from one corner of the room to the other. The maximum distance from it to the floor should not exceed the size of the tile, taking into account the gap.
Before installation, a wooden profile is fixed, which serves as a support for the bottom row of tiles. Vertical rows are marked on top, which makes the cut tiles less visible.
The area to begin cladding is selected based on the length of the surface. If the number obtained by dividing this value by the size of the tile exceeds ½ its width, installation should be carried out starting from a more noticeable area, and if the figure is smaller, the tiles should be laid from the center. It is recommended to use this technology on a wall with a window, then the cropped fragment will be invisible.
Laying tiles
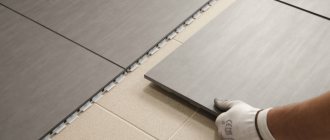
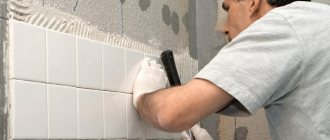
The procedure is performed in a standard manner. It is important to be careful when cutting elements - to separate the required area, you should run a tile cutter along it, and then carefully hit the tile on a hard surface.
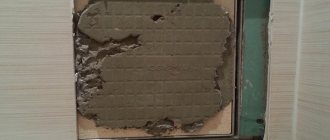
Dry glue is diluted according to the instructions and stirred to the consistency of rich sour cream for at least 3 minutes. After a short break, the product is kneaded again for 1.5-2 minutes. The finished mixture is designed for laying 1 m².
To apply the glue, it is better to use a wide spatula so that the mixture is evenly distributed over the wall surface.
After this, an entry-level wooden profile is installed and installation begins. A layer of glue of approximately 0.5 cm is applied with a spatula to the comb, and then to the wall and the inside of the tile, after which the tile is pressed against the wall. Small elements are glued by hand; when gluing large slabs, it is better to use a special hammer equipped with a rubber nozzle. The remaining glue is removed without waiting for it to harden.
The same size of seams is achieved by inserting plastic crosses between the tiles. When the row is laid to the edges, the necessary pieces are cut with tolerances for the gaps. At the corners, using trimming, you can make a 45° joint and install overlays later.
Lay 3-4 rows of tiles in one go, then you need to take a break for 1 hour for the glue to set. The procedure is repeated until the end of the cladding, after which the starting profile is removed and the bottom row is laid. After 2-3 hours, the joints are opened to make room for grouting.
Grouting joints
The procedure is performed using a rubber spatula 72 hours after completion of laying the tiles. To do this, remove the crosses from the seams, sand the joints with sandpaper, apply a grout mixture and wash it off with water after half an hour.
Calculation of the laying order
The dimensions of the room directly affect the choice of where to start laying the tiles. The “reference point” is determined after preliminary calculation of the number of tiles along a horizontal line, adjusted for the gaps between them. The result is very rarely an integer. The place where work begins depends on the amount of balance:
- If it is less than half of one tile, then start from the center of the wall. This way the tile will lie symmetrically with the trimmed elements at the edges.
- If the remainder is more than half of the fragment, then the installation is carried out so that the trimmings are less visible: they start from the most noticeable area.
USEFUL INFORMATION: Drywall screwdriver attachments: with and without limiter
How to avoid mistakes when laying tiles on drywall
Some of the mistakes that beginners make include:
- weak frame reinforcement;
- violation of proportions when mixing glue;
- incorrectly selected composition of primer and putty;
- carelessly finished seams.
It is necessary to cover the surface with the adhesive mixture so that no voids appear under the cladding and the solution is distributed as evenly as possible. Any mechanical load on the cladding before it is completely ready leads to the need to repair the slabs.
Poor grouting of the joints between the tiles in the bathroom is one of the main mistakes that can lead to peeling of the cladding in the future.
Preparing the walls
- To choose the method of wall cladding, it is necessary to determine the curvature of the walls using a water level or plumb line.
- Protruding nails, screws, etc. are removed from the wall.
- The base is cleaned from the remnants of the old cladding to clean brick or concrete.
- The wall is cleaned of dirt and primed to increase adhesion.
- Lines are drawn on the floor along which the position of the sheets will be adjusted. In case of strong curvature, lines are also drawn on the ceiling, which will ensure high-quality installation of the sheets in the same plane.
Don't miss: Sealing grooves for wiring. How to properly seal grooves. We fill up the grooves correctly. How to putty electricians' grooves
Moisture-absorbent materials are coated with an agent that reduces absorption.