Oriented strand panels are one of the most popular materials for home interior cladding. Their performance characteristics allow them to be used on any surface. But such a base needs finishing, which is not always easy. Particular difficulties may arise if it is necessary to glue ceramics to OSB; for this, some features should be taken into account.
Is it possible to glue tiles onto an OSB board?
There is no clear opinion on this issue: many experts and home craftsmen believe this is possible, others are firmly convinced of the opposite. The fact is that the process has an important feature - the need for more thorough preparation of the base, taking into account the type of surface. You should also take a responsible approach to choosing suitable compositions and products for pre-finishing. All this takes time and effort.
Since floor coverings experience greater loads than wall coverings, certain recommendations and rules must be followed:
- For vertical surfaces, it is better to use small-format ceramic products. They have minimal weight, so they create less stress. Larger parts will require additional application of putty.
For wall cladding made of OSB, it is advisable to use small-format tiles or mosaics - Horizontal structures are less stable, especially if the oriented strand panels are cut into fractions. In this case, and if the object area is large, the floor area is first hemmed with gypsum fiber sheets. In a small room without numerous joints, additional cladding before laying the tiles may not be necessary.
It is possible to glue tiles onto an OSB board, but only if all rules are followed and high-quality materials are used. This is often a problem and sometimes requires preliminary experimental manipulations to evaluate the product.
On a note! The English abbreviation OSB (oriented strand board) in Russian can sound like OSB or even YUSB.
OSB is considered one of the most popular materials, but the sheets require additional decorative cladding
Features of OSB boards
Wooden building materials are very different from concrete in structure and performance properties. They are not as tough, less durable and hard. The floor under the tiles may be too mobile, which will lead to deformation of the tiles and cracking. Wood is susceptible to rotting and molding, swells when absorbing water, and settles over time, so it is unsuitable for use in rooms with a humid microclimate.
Oriented strand board - the household abbreviation OSB or OSB (from the English name) - is a slab building material. It is made from large and medium-sized wood chips, pressed and glued together using resins and synthetic wax. During production, chips are laid in different orientations, layers perpendicular to each other.
Properties of OSB boards
- High rigidity and strength with sufficient flexibility. OSB board can withstand significant floor loads, including bending.
- Fireproof and waterproof. The special chemical impregnation of the board and the resins that bind the chips ensure its inertness compared to other wood materials - water is practically not absorbed into it, therefore, the likelihood of swelling and rotting of the wood is reduced.
- The surface of the OSB board is wood chips. It does not have the same levelness as concrete screed or glass concrete.
The adhesion of the tiles to the particle board is difficult, which causes certain difficulties during installation. Laying tiles involves additional processing of the base surface.
OSB board has significant advantages compared to other wood building materials, however, it is still not an ideal base for laying ceramic tiles on the floor. If such a need exists, you need to carefully prepare the floor before installation, select high-quality tile adhesive and be patient.
Selection of adhesive composition
The correct choice of tile adhesive eliminates the possibility of peeling of the facing material, provided that other preparatory processes are carried out accurately. Different types of products can be used for the job, but the following are recommended:
• Elastic polymer. Excellent for work, especially on unstable surfaces. Due to its plasticity, such glue is able to reduce stress.
• Silicone. These compounds are classified as sealants, but are often used to lay tiles on walls. Although good results are observed with these products, great difficulties may arise. The fact is that there are many varieties of the mixture and not all of them have the declared qualities, so you have to choose the appropriate option by trial and error.
• "Liquid Nails". A universal solution that allows you to reliably glue various parts and elements. Its acquisition should also be approached responsibly.
Such compositions are not used as the only binding component and are applied only after preliminary surface finishing.
Preparing for work
If you plan to lay the tiles on a wooden particle board, then you need to ensure the rigidity of its base. It is imperative to take into account that the chipboard sheets must lie completely on the concrete screed with their entire surface.
Instructions for performing work:
- For higher reliability, double fastening is performed. Initially, the chipboard sheet is glued with liquid nails, holes are pre-drilled around the entire perimeter, with a distance of 300-400 mm between them. Next, nails must be nailed between the places where the glue is applied.
- The gaps must be cleaned and then filled with a special putty mixture. If the base turns out to be old, it will need to be primed first so that there is no delamination in the future when the glue is directly applied. Do not forget about the compatibility of the primer composition with the glue, since the tile itself will subsequently be placed on it.
- For proper adhesion of the tiles to the chipboard sheets, a reinforcing mesh should be attached in 150 mm increments. A special stapler with construction staples will help you with your work. If you have a lot of free time, you can use small nails in your work.
- After all the work, you need to trim the surface, while simultaneously rubbing the adhesive into the mesh cells.
Preparatory work
Before laying tiles on vertical or horizontal surfaces lined with OSB, it is necessary to take measures to increase the adhesion of materials and prevent their deformation. All work is done by hand:
- First of all, it is necessary to clean the surfaces from dirt and dust after previous procedures. To do this, remove everything unnecessary from the room and vacuum it with a device with a dust catcher. Wet cleaning is also carried out. This is done with special care, since ceramic or tile products can only be glued onto a clean base.
Cleaning oriented strand boards is a mandatory procedure before decorative finishing - The absence of protruding areas, screws, and nails is checked. Naturally, the flooring of oriented strand boards must be made in a single plane, without differences. To do this, you should check everything for level again.
- The seams between adjacent panels are sealed with elastic putty.
- Prepare the primer, brush and roller. The most preferable composition in this situation is concrete contact, which increases the adhesion of the coating to the glue and reduces the influence of substances used in the production of slabs.
- Before using the primer mixture, the type of panel is determined. For interior work, OSB-2 and OSB-3 are most often used. The latter option has additional moisture-resistant protection, which significantly complicates the process, since it does not allow the ceramic to be securely fastened. Such surfaces are degreased with alcohol or solvent.
Facing moisture-resistant slabs requires additional manipulations - You need to prime carefully, treating all areas without gaps. It is recommended to carry out the initial finishing in two layers, after each application the base is dried.
- To increase the reliability of adhesion, especially if the walls and floor are made of OSB-3, reinforcement is carried out. The mesh is rolled out over the surface and secured with a stapler. Sagging should not be allowed, so the product is kept taut.
When covering walls made of OSB with tiles, as well as other heavy materials, the surface is reinforced with fiberglass mesh - To eliminate the harmful effects of a loose mesh, the entire surface is coated with a mixture of concrete contact and PVA. Reinforcing products cannot be glued with purposefully complex compounds.
- The room is left until the coatings dry.
It is not recommended to use the object immediately after preparation.
First stage
Initially, before laying the tiles on the surface of the particle board, it needs to be primed and create reliable protection against moisture penetration.
Applying a primer to OSB boards of high-quality installation
This procedure will not only help protect the base, but will also result in better adhesion of the materials.
There are three common ways to treat the base.
Primer coating
The use of a polymer composition will help create protection against moisture. The surface of the slab will first need to be treated with sandpaper. Then a primer is applied using a roller, preferably in two layers. At least 12 hours must pass between application of protection and styling.
Creating an additional layer
The tiles can be laid not on OSB, but on a second layer created from ordinary plywood. To do this, you will need to place logs on the base in small increments, and screw sheets of plywood of the appropriate size or plasterboard onto them. The level must be maintained, otherwise the tile will simply fall off in the future.
Surface reinforcement
This method involves laying a reinforcing mesh slab on a floor or wall made of OSB. It is mounted using glue or special fasteners.
After laying the mesh, it needs to be primed, allowed to dry, and only then should you start laying tiles.
Sometimes varnished slabs are found. In this case, the glossy surface will need to be sanded to improve adhesion.
Laying tiles on the floor
It’s easy to do everything right if you follow the instructions:
- Preliminary marking of the room is carried out, the space is divided into zones according to the order of actions.
- The parts are started to be glued from the center, so the trimming of the elements is calculated in advance.
The choice of technique for laying tiles on the floor depends on the size of the room - If required, an adhesive mixture is prepared. It is advisable to use compounds applied with a notched trowel. This will create a uniform coating and eliminate voids.
- The solution is distributed over the area for 2-3 tiles. The reverse side of the element being laid is also treated with a thin layer. The product is pressed well and tapped with a mallet.
- The next part is mounted taking into account the gap formed by plastic suture crosses. Although you can also use a special system for this.
It is convenient to apply tile adhesive with a notched trowel - To place the fragments correctly, a level is used.
Read more about how to lay tiles on the floor with your own hands.
Important! If work is carried out in a room with high humidity, then all joints are first sealed.
Laying the OSB base
Direct laying of ceramic tiles must be preceded by careful preparation of the OSB base. If necessary, the material can be laid directly on the ceilings or a strong old plank floor.
Leaving boards become stronger, less prone to deformation and drying out, so they can become a good basis for particle boards, but the existing floor made of wooden boards must be carefully checked, treated with an antiseptic and rotten elements (boards, substrates, joists) replaced. The underground space is insulated with glass wool, leaving a small air gap under the floor itself.
The base must be leveled as much as possible using substrates. The subfloor and the OSB board must be separated by a small distance for free passage of air. For this purpose, you can also drill special holes for ventilation.
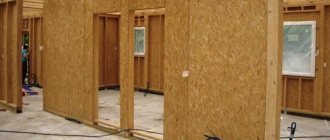
The most rational option is to lay OSB boards on logs. The installation process is simple, but requires careful adherence to certain points:
- Waterproofing is laid on the floor: dense polyethylene or special rolled materials.
- The logs are treated with antiseptic substances to protect against mold. The step between them is determined taking into account the planned final floor covering.
- The space between the logs for sound insulation and insulation is filled with either a layer of expanded clay or insulation (for example, mineral wool).
- OSB is being laid. The joints of the slabs should fall directly on the logs, and on the spaces between them. The slabs are secured with self-tapping screws.
- Ceramic tiles require a particularly hard base, so it is recommended to lay OSB in two layers, with the upper slabs overlapping the joints of the lower ones.
- The technology requires leaving a small gap between the OSB boards and the walls in order to avoid deformation of the material during temperature changes.
Installation of an additional layer
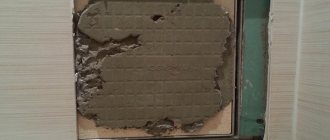
There is no point in gluing tiles directly onto OSB; they will not be able to adhere well to the surface of the oriented strand board. You can lay it like on plywood, using a special mesh and glue, but this technology does not guarantee the durability of the coating.
Using a mesh, the tiles were glued onto OSB...
... and literally a day later the tile fell off.
The best option would be to install additional flooring to provide the best foundation for installation.
To create such a layer, glass magnesite or cement-bonded particle board is used, the surface of which is covered with fine crumbs and is perfect for gluing tiles.
The additional sheathing is firmly attached to the OSB with self-tapping screws (as shown in the photo above), construction adhesive is used for greater strength, and the DSP is laid in the direction opposite to the main covering. Small gaps are left between the sheets and near the walls.
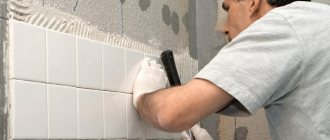
Gluing tiles to walls
It is easier to lay tiles on vertical surfaces, but only in the case of small product formats. Any type of glue can be used for the process. The technology is as follows:
- Preliminary marking is carried out. It is recommended to divide the base according to the size of the parts, taking into account the seam.
- Due to the fact that it is better to place the trimmed area from below, the laying begins from the second row. To do this, the holding and guiding profiles are aligned evenly.
If trimming of the bottom row is required, the tiles are laid from a temporarily fixed profile - The mixture is applied either to the base and the reverse side of the parts, or only to the tile. The latter method is suitable when using the composition in tubes, which are laid along the points, perimeter or crosswise, which is more preferable.
- Each element must be glued in its place and aligned according to the level and markings.
To maintain the gap between the tiles, crosses of the appropriate section are used - The parts should be laid in rows, but no more than three at a time, this will prevent the coating from slipping.
All activities are carried out only at positive temperatures, constant humidity and the absence of drafts.
Laying on the mesh
A good result will be if you glue the tiles to OSB along the reinforcing mesh. To do this, you need to lay a metal mesh on the prepared and primed base, which is attached in any of the available ways - from using self-tapping screws to ordinary staples driven in with a stapler.
The mesh for reinforcement should have perforated cells ranging in size from 5 to 10 mm. The mesh should cover the slabs evenly without swelling or tearing. When joining, the mesh sheets should overlap each other by several centimeters.
Is it possible to glue tiles with regular mixtures? Yes, but it is still better to use mixtures with increased elasticity and high adhesion to wooden surfaces.
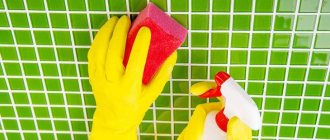
Grouting joints
The tiles are left for 2–3 days, depending on the chosen composition. Further actions:
- The quality of fixation of the cladding is checked: all parts must be held securely.
- The suture crosses are removed.
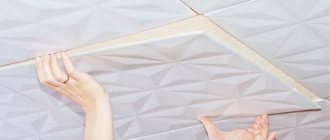
- The joints are being sealed. It is better to use specialized compounds. The solution is applied to the desired area and spread with a rubber spatula. For a better appearance, decorative devices are used.
It is convenient to apply the grout using a rubber spatula - Excess mixture is immediately removed.
Although the work of laying slab material is quite labor-intensive, it ensures that there are no problems in the future.
Gluing the coating
Fundamentally, installation of a coating on an OSB board will not differ from similar work with other types of bases; there is only one caveat - the correct selection of the adhesive composition. No matter how carefully you have prepared the base, you should only use mixtures that are specifically designed for installing ceramic tiles on wood or plywood bases.
Of all the options presented in stores, the most popular are compositions such as “Ceresit CM17” - a special adhesive solution designed for gluing coatings to deformable substrates and compositions based on epoxy resin. The latter will cost more, but will certainly give a high-quality result - the tiles are glued very firmly and last a long time. The rest is the same as in the case of the standard surface type.
Fastening adhesive and tiles
Since the frame structure is subject to deformation and shrinkage under the influence of climate, it is not recommended to use cement adhesive, since it is prone to cracking and, accordingly, damage to the tiles when the base is deformed.
In this case, you should not skimp on the adhesive mixture, as this can be fraught with detrimental consequences for the coating.
Among the mandatory performance qualities of the required glue, the following should be noted:
- The main thing is that the glue is as elastic and high quality as possible.
- In addition, the mixture must be designed to work with problematic substrates and have good moisture resistance.
The glue will withstand slight irregularities in the frame. The following brands of glue are best suited for the job: Ceresit CM 17, Soudal 24A and KNAUF-Flex. Thanks to these brands, you can safely lay tiles on the stove. Liquid nails can be used as an alternative material, but it is better to give preference to glue.
The tile also needs to be chosen correctly. It is advisable to use 30x30 cm tiles.
What is OSB?
First, let's figure out what this material is. This board consists of several layers of compressed wood glued together using a mixture of resins. The particle wall has high strength and at the same time ease of processing; it is multifunctional. But it is impossible to glue tiles to a particle wall without preparation, despite the moisture resistance of OSB, it deforms during prolonged contact with water, so the wall must first be prepared.