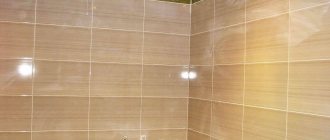
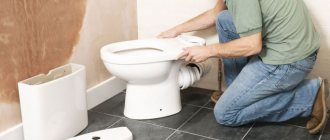
How to glue tiles quickly and firmly
Tile tiles are a fairly heavy but durable material that is difficult to glue to walls, ceilings or floors using conventional means.
How to properly glue tiles to different surfaces so that beautiful decor and reliable protection last as long as possible? Let's look at the main methods of fixing tiles and the necessary materials in this article.
How to glue tiles - principles of the process
Choosing the right glue
There is a wide range of modern products used for gluing tiles, which can be divided into three groups:
- mixtures based on rubber and high-tech plastic;
- various cement mortars;
- numerous adhesives.
Universal types of glue can be used for any surface, but experienced craftsmen recommend using highly specialized types of glue. For example, to glue tiles onto tiles, you will need to clean the surface from gloss, and then use cement-based screeds and mortars.
Attention: if you do not remove the top layer of old tiles using a grinder or manually using coarse and medium sandpaper, the new surface will crack at the joints in a very short time.
Gluing tiles to an old layer of tiles
When choosing the best adhesive for working with tiles, you need to pay attention to the following indicators:
- Does this type of tile adhesive bond the surface firmly enough?
- What surfaces is it designed for: vertical, horizontal or any.
- Is the adhesive suitable for all types of work (interior and exterior).
- What is the rate of hardening and hardening of the product?
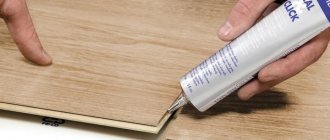
If there is a problem of how to glue tiles to tiles, preference is usually given to cement mortars based on PVA construction adhesive or silicone bathroom sealants. The second option is more expensive, but fast and convenient.Attention: when choosing sealants, you need to make sure that they are not water-soluble, otherwise if the temperature or humidity rises, all the work will have to be redone.
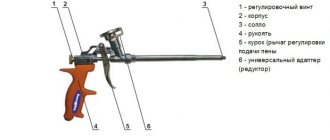
Each individual case will most likely require different tools, but there is a list of tools that you cannot do without when laying new tiles:
- a convenient plastic container - you need to be prepared to throw it away when using quickly hardening cement mortars (1);
- metal graters with a user-friendly handle (3 and 4);
- angled, straight or beveled notched trowel (5 and 6);
- a convenient rubber float for smoothing seams and rubbing them (7);
- a regular brush or soft broom to sweep away particles of the solution after complete drying.
special grater with sponge (2);
Tools for laying tiles
A tile has fallen off - what to do?
If there is no need for a complete replacement, then the question arises - how to glue the fallen tiles faster and more reliably?
To do this, you need to follow a simple plan of several points:
Attention: traditionally, if you need to fix one or two tiles, use “liquid nails” glue. The application technology is the same, but instead of a metal spatula, you can use a rubber analogue.
Fashionable plastic border - how to attach it to tiles
To glue plastic parts to tiled walls or ceilings, you can choose one of several options. Each method has its advantages and disadvantages, so you need to consider: the weight of the plastic part, its location relative to sources of humidity and the final cost of installation.
Means for gluing plastic to tiles
How to glue plastic to tiles - methods to choose from
We glue tiles onto non-standard bases
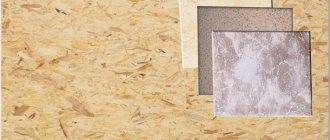
Many summer residents are interested in how to glue tiles to plywood? Most buildings on personal plots are made from scrap materials, so it often becomes necessary to fix tiles on non-standard bases.
What to use when gluing tiles to chipboard or plywood is what the country “old-timers” are divided into:
- You can use proven liquid nails. In this case, the surface of the plywood or chipboard must be rough; this effect can be achieved using simple sandpaper;
If it is possible to prime the base using any convenient means, for example, Biotex, you can use KS glue. This product is popularly called liquid glass;
We fix the tiles on plywood
There are a great many ways to fix tiles to a variety of surfaces when tiling. In every case, it is worth using the services of professionals or choosing specialized glue and tools. The main rule: thoroughly clean, degrease and level the surface where the tiles will be attached.
Nuances: how to stick tiles on a wall
If you have decided on the design and size of the tiles, calculate the required quantity. If you have decorative inserts, do not be lazy to measure the walls and draw an exact design for the future tiled covering. Consider where the joints and seams will be. When creating a drawing, keep in mind that it is better to start work from the most visible corner, this will help move the cuts to places that are not obvious. If you use small tiles, purchase them 15% more than the planned area; part of the material will be used for trimming. You are unlikely to be able to use the remaining parts of the tile after trimming.
It is imperative not only to calculate the number of tiles, but also to prepare the tools for the job
The tiles are glued with nuances:
- Using a plumb line, determine the main vertical line from which you will begin laying the tiles.
- Given the unevenness of the floor, the first row may need to be trimmed. Cut joints near the floor will be less noticeable, so start gluing the tiles from the second row.
- Use a level and draw a horizontal line along which you will align the bottom edge of the second row.
- To support the row, attach a flat block to the wall. The upper edge of the bar must be placed strictly along a horizontal line. This simple trick will help keep the tiles from moving down. You can remove the block a few days after the solution has completely dried, and only after that, close the first row of tiles.
- Clear the room of small debris so that it does not fall into the solution or stick to the material or tools.
- To create a solution, you can use a mixture of cement and sand with the addition of glue. Or purchase a ready-made composition in the store.
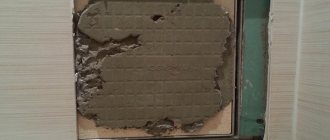
How to glue a fallen tile set on a cement-sand mortar
It turned out that the problem is quite common and there are a lot of options for solving it. Some advised to use tile adhesive, others, as in Soviet times, to glue it with ordinary paint or drying oil. But two good tilers recommended liquid nails, so I decided to go this route (considering that the cement-sand mortar held up perfectly).
I purchased the following for the job:
All this could easily be taken from Leroy Merlin, with the exception of the wedges. There were only crosses available, which were not very convenient to use. But when nothing is at hand, you can even use matches.
- First, I removed the old tiles and checked the base.
- Using a construction knife, carefully so as not to damage the enamel, I cleaned the tiles of grout and cement.
- Primed the tiles and wall. I left it for a day.
- Using a gun, I applied liquid nails to 5 points on the tile.
One of the tilers recommended Tytan 901 (available in several stores on Yandex Market), since the Moment is more liquid. That's why I used these liquid nails. I applied the tile to the installation site and moved it so that the glue spread.
Without wedges, the tiles slide off after a while. One package was not enough for me, so I used matches here and there. A day later I spread the tile grout. At the same time, I didn’t have a drill with an attachment at hand, so I deviated from the instructions and mixed it with a hand tool. Next, I applied the grout with a rubber spatula.
Due to inexperience, I applied more grout than necessary. Yes, and I mixed it too much at once, but, as it turned out, it dries out quite quickly. I had to add water all the time and mix thoroughly until it reached the consistency of sour cream. And I successfully dealt with excess, too large layers and unevenness using a damp cloth, which is especially effective if the grout has not yet dried.
What are the disadvantages of this method:
Update (02/10/2016)
I didn't remove all the tiles in the kitchen. The tiles glued with Tytan 901 liquid nails have been holding up perfectly for two years now. The rest of the tiles continue to fall off. I glued some of it last year to Titan 901, and some had to be glued the other day. This time, “heavy-duty adhesive Tytan 901” was not available for sale at Leroy Merlin (this was explained to me as a temporary phenomenon, and not at all a renaming of Titan assembly adhesives).
I found transparent rubber-based mounting adhesive Tytan Professional Classic Fix and rubber-based mounting adhesive Tytan Multi-use SBS 100 on Yandex Market, but did not understand how they differ from Tytan 901 and whether they would be suitable as an alternative.
In order not to waste time searching for and delivering liquid nails, I chose at random acrylic-based mounting adhesive Axton, which is produced in Russia by order of Leroy Merlin. Of course, there is no confidence that Axton will hold glued tiles as well as Tytan 901. Let's see how this experiment ends.
Axton assembly adhesive was applied in the same way. First, I cleaned the tiles with a construction knife, then primed them and the wall, and then let them sit for 2 hours. Next, I squeezed out the glue at 5 points on the tile.
Then I moved the tile where it was glued to spread the glue. Unlike Titan, Axton glue did not last for 10-15 minutes. I just placed the tile and pressed hard on it. In this case, of course, you should be careful when pressing so that the tile does not crack. You can also try to increase the area of contact between the palm and the tile.
The distance between the tiles was maintained using wedges and crosses.
After gluing with Axton assembly adhesive, it is advisable not to apply mechanical force to the glued surfaces for 48 hours. The glued tiles were also left for 2 days before applying grout for the joints.
Update (November 8, 2021)
Fortunately, the tiles, glued with glue, either rubber-based or acrylic-based, stick. Although, of course, it was necessary to use rubber-based glue in both cases. The tile, which was not done right away, continued to fall off. This time I used rubber-based mounting adhesive from Axton and Leroy Merlin. It is a little more liquid than we would like, but after 10 minutes of applying it to the tiles and spreading it by moving the tiles along the wall, it becomes of good consistency and sets well. At a price of 157 rubles for 310 ml, it seemed to me the best option. I glued the tiles and grouted them in the same way, fortunately the previous times gave me enough experience.
Gluing tiles to concrete
Various materials used in the construction of building walls require the use of different finishing methods. Concrete has increased hardness and the ability to absorb moisture, which can make finishing concrete surfaces difficult. Before gluing ceramic tiles to a concrete wall, it is necessary to evaluate the evenness and ability of the wall surface to adhere to the glue. Possible difficulties when gluing tiles to concrete walls were laid down even during the pouring of concrete mortar during construction.
The fact is that modern technologies for the construction of reinforced concrete buildings involve the use of reusable formwork panels. A sheet of special plywood is attached to the steel frame of the shield, the surface of which forms the surface of the wall. To prevent the plywood from sticking to the mortar, its front side is treated with a special lubricant, which penetrates the surface layer of concrete and subsequently impairs its adhesion.
The unevenness of the walls and corners is a consequence of poorly assembled formwork, which, when pouring the mortar, could bend or completely separate at the joints. Unevenness can also be caused by careless sealing of cracks in the joints of walls and ceilings. Often outlets and switches are on top of dome-shaped projections for the same reason.
What is this article about?
Which tile to choose
Wall tiles should be combined with floor tiles.
There is a wide range of tiles on store shelves, both budget options and designer versions.
Before choosing a material, you need to pay attention to its properties. What types of ceramic tiles are there? Conventionally, it is divided into:
- wall;
- sexual;
- for indoor work;
- for facade finishing;
- for lining pools.
You need to understand that tiles intended for walls should not be used on the floor or vice versa.
It is also necessary to pay attention to the size of the tile, its surface, color and installation method.
It is advisable to decide on all this when designing the interior, because you need to know how much material to purchase.
Tile coverings are divided into classes based on wear resistance and porosity. A is the highest, it can be used in swimming pools, B and C are lower class, suitable for finishing residential premises.
Preparing a concrete wall
Applying any coating to a wall requires preparing its surface - removing grease (if any) and ensuring the required roughness. Old coating (paint, wallpaper, whitewash) must be removed. But if the old oil paint holds firmly, it is enough to mat it with coarse-grained (No. 40 - 60) sandpaper, a wire brush, etc. The greater the depth and number of scratches, the stronger the connection between the coating and the wall will become.
Next, you need to remove (wash off) the dust and begin degreasing the concrete if it contains lubricant. It is in this sequence - when treating a wall with ingrained grease with sandpaper or a brush, oil contaminants are rubbed into the scratches and the applied coating (primer, putty, cement, etc.) will not adhere well.
Degreasing is carried out with white spirit, a special degreaser or soda ash. But it is not advisable to work with white spirit indoors - it has a strong odor and its fumes are toxic. This also applies to other solvents.
A degreaser is good if the wall is small - due to the price, this is not the most budget option.
The most accessible is soda ash, sold in household chemicals departments. It must be dissolved in hot water and applied to the wall with a rag. If necessary, repeat the procedure until the grease is removed. You need to wear gloves when working - it is a strong alkali. After degreasing, wash off the sediment with warm water.
Wall alignment
Considering that the tiles will be glued to a special grout or cement, which allows you to level the surface due to the thickness of the adhesive layer, leveling the walls is sometimes done only in certain areas.
Sludges of concrete can be knocked down with a hammer, a hammer drill, or removed with a concrete solvent. Dips are sealed with putty or cement. There is no need to “smooth” the walls perfectly - the tiles and adhesive layer will complete the leveling. In places where the expected thickness of the leveling compound will be more than 1 cm, you need to make notches with a hammer drill, grinder with a diamond wheel or chisel for better adhesion to the wall.
If the curvatures of the walls and corners are multiple, then they can be leveled by securing a metal plaster mesh over the entire area and installing slats of the same thickness as beacons. If the wall area is large, break it into several sections with beacons - this makes it easier to navigate.
Wall marking
Before you begin laying ceramic tiles, make preliminary calculations. Tiles are not wallpaper, and the slightest mistake at the beginning will complicate the work when joining them in corners, in places where faucets, sinks and other equipment are installed.
If the sink is easy to remove, remove it. An even and beautiful joining line between the tile row and the bathtub can be ensured by gluing a plastic or aluminum profile. Also, a profile or corner will help out when joining tiles on external or internal corners, if it is difficult to trim the tiles evenly to size.
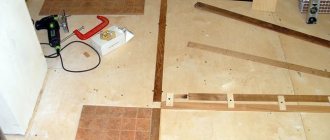
The unevenness of the floor can be compensated for by securing a metal or wooden straight strip or profile to install the first (lower) row, setting it horizontally in level.
Compare the dimensions of the tiles and walls in advance. In order to ensure that the tiles are cut symmetrically on different sides of the wall (if you wish), model the future appearance of the wall to scale on paper, taking into account the gaps between the tiles.
Symmetrical installation will give the wall a complete appearance. It is best to place the first tile approximately in the middle of the wall and not lay a whole row at once, but move from the middle alternately in different directions - this method of laying allows you to adjust the straightness of the rows and, as a result, the harmonious appearance of the wall.
But it’s easier to glue the tiles, moving from bottom to top. The first row is laid along a fixed rail or profile. To regulate the protrusion of the tiles along the plane, at a distance of about 5 mm from the future surface of the row, you need to pull the cord, securing its ends with self-tapping screws screwed into dowels. The protrusion of the tile is regulated by the thickness of the adhesive layer.
Tiles have fallen off in the kitchen: how to glue them
The most likely option for destruction of tiles in the kitchen is an incorrectly selected primer mixture, or the absence of this step at all before installing the tiles.
The most common mistake in the priming process is the use of concentrated latex, which subsequently forms a rubbery film that prevents reliable adhesion of the material.
An excellent solution when gluing tiles is to use glue from Ceresit
Before proceeding with the installation of the fallen part, the entire surface must be inspected for chips or cracks, and also tapped with a rubber hammer for the presence of voids. If more than 20% of the surface needs restoration, then dismantling the entire coating is inevitable, since destruction will most likely continue.
Related article: Self-connection of the oven
The following finishing works will continue in the following sequence:
- On the surface where the base is exposed, the mineralite is removed. All parts are removed to a solid surface.
- Using coarse sandpaper or a cobbler's knife, you need to remove the old grout. The surface must be cleaned of glue residues to a perfectly flat surface. Then it can be primed.
- If you have a supply of old cladding material, use it or purchase new one. In cases where it is not possible to purchase new slabs, you can use those that have fallen off, the most important thing is to clean it of old glue residues.
- Laying ceramics is carried out from bottom to top. To maintain gaps, experts recommend using fixing crosses. Glue is applied to the back side of the material. The thickness should be slightly greater than on the boundary slabs.
- The tile is pressed against the base; any adhesive that protrudes beyond the edges must be removed immediately.
The process is not long, but the life of the tiles, as well as the integrity of the entire coating, depends on its quality.
Laying process
The accuracy of installation and gluing of the first tile determines how accurately the rest will be laid. It is necessary to control the laying level.
Before gluing the tiles, be sure to apply a primer to the wall with a brush or roller. It is not advisable to use a sprayer; the primer must be rubbed into the surface to ensure good adhesion to the wall.
It is advisable to glue the tiles before the primer is completely dry - then the tile adhesive will adhere to it better. The most effective is double priming - the first layer fills the pores in the concrete or putty and prevents the tile adhesive from drying quickly. Concrete quickly absorbs moisture, which can cause cracking and peeling of the adhesive layer. It is recommended to apply the primer a second time no more than an hour before gluing the tiles, so during the work process, apply the primer as you lay the rows, allowing it to dry.
The gaps between the tiles are established using plastic crosses.
Tile adhesive must be mixed in warm water, preferably using an electric tool. The consistency should be such that the solution is held on a vertical surface without slipping. Different manufacturers use different combinations of components, so carefully read the instructions for use.
Apply the adhesive solution to the tile so that it can be moved, setting a gap. To do this, scratch a layer 5 - 6 mm thick with a notched trowel; thicker ones should be applied in the form of bumps. This ensures the mobility of the tiles during installation and a more dense shrinkage of the adhesive.
How to glue tiles
The technology for laying tiles is simple. Main stages:
- Puttying. Used to increase the adhesion of glue to walls. To proceed to the next step, you must wait until it dries completely. Information about this can be found on the packaging.
- Layout. The stage at which parts are tried on and adjusted, and markings are made on the wall
- Searching for the horizon. Responsible moment. Using a building level, you need to draw a “starting” horizontal line on the wall. The lower it is located to the floor covering, the better.
- Applying glue. The composition is applied with a notched trowel. The width of the application is slightly greater than the height of one tile.
- Laying tiles. The tiles are applied piece by piece to the surface, slightly pressing. Compliance with geometry is checked using a building level. Crosses. They are used to achieve equal gaps between tiles over the entire surface.
What you can do is glue several porcelain stoneware tiles directly onto the screed.
In one corner of the kitchen it is REALLY necessary to stick 4 porcelain tiles directly onto the screed, i.e. Tile adhesive, due to its insufficient minimum thickness, does not seem to be suitable. I thought about buying dispersion glue, but even the smallest package would be too expensive for 4 tiles, and there would be nowhere to use the rest of the glue.
What can I use to glue these 4 remaining tiles? I mean “folk” recipes, because porcelain tiles are not ceramic tiles, and they won’t stick to “something”. Is it worth using PVA mixed with cement?
Can be glued with epoxy glue.
jek wrote: Is it worth using PVA mixed with cement?
iale wrote: You can glue it with epoxy glue.
This has been tested, will it hold? The fact is that the layer you need is very, very minimal.
Yes, an ordinary EAF, like this (full of them in construction stores)” >
iale wrote: Yes, an ordinary EDP, like this (full in construction stores)
The description doesn't seem to say anything about concrete.
jek wrote: The description doesn't seem to say anything about concrete.
Well, stick it on the one on which it is indicated, only this “indication” will cost a little more “>” >
Okay, but will porcelain tiles stick to clean furniture PVA (it is the thickest)?
2jek You pose an interesting question - you are afraid of epoxy glue, about which it is stated that you can glue ceramics, glass, concrete, stone, and then you ask about FURNITURE PVA.
Yes, it’s unusual, somehow, for epoxy.
Does the sticker technology have any special features? Is it necessary to prime and what to prime with?
jek wrote: Yes, it’s unusual, somehow, for epoxy.
Why on earth - how old are self-leveling epoxy floors and sealing cracks in concrete? " > " > " > " >
I can’t advise you about PVA, even class D3-D4 - I haven’t used it. But the link, for example, is alarming
” >
jek wrote: Does sticker technology have any special features? Is it necessary to prime and what to prime with?
If we’re talking about epoxy, then the granite is already clean, just brush off the dust
and concrete d.b. clean, dry, without dust and dirt, loosely adhering to the surface. layer.
iale wrote: and concrete should be clean, dry, without dust and dirt, loosely adhering to the surface. layer.
. So should I prime (and with what) or not?
jek wrote: . So should I prime (and with what) or not?
To remove dust it is necessary to prime. Any waterproof primer: acrylic, alkyd. At least with paint. By the way, you can also glue it to paint, go do a search and make sure.
Can it be primed with Ceresite ST-17?
Designed for preliminary preparation of wall and floor surfaces before subsequent work.
"Ceresit ST 17" is used for processing:
cellular concrete; particleboard, wood, gypsum and plasterboard boards; anhydrite self-leveling and wooden floors; absorbent plasters and monolithic cement floors; unpolished cladding; ceramic, stone and brick displays; Preparing the base.
The primer is applied to dense, load-bearing, dry, clean and dust-free substrates, free of fats, resins, oils, etc. substances. Slightly crumbling surfaces should be thoroughly cleaned with a brush. *emphasized gray
jek wrote: Can I prime with Ceresite ST-17?
Judging by the information from the search, it is possible. Is it difficult for the author himself to navigate Yandex? (we don’t have such pickles in Nsk)
What is the best tile adhesive?
What is the best tile adhesive? Which tile adhesive to choose – cement, ready-made or reactive?
Of course, reactive compounds are the most durable, flexible and modern compounds developed to solve any problems associated with laying cladding. But reactive compositions are many times more expensive than cement and ready-made adhesives. We believe that there is no point in shooting sparrows with a cannon, so we recommend choosing the optimal glue for a specific task.
In most cases, the use of cement adhesive will be sufficiently reliable. You can glue simple ceramic tiles to a concrete wall in the hallway of a house using the simplest cement-sand glue, for example, using Litokol X11 glue. And it will be as reliable as if you had chosen polyurethane glue. If you want to choose the optimal adhesive to complete your task, contact our specialists. We will choose a reliable and affordable option for you!
At the end of the article, we invite you to watch a video - a video that tells you how to waterproof a bathroom with your own hands, as well as how to glue tiles in the bathroom.