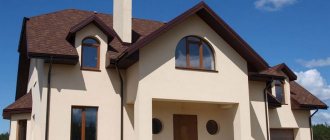
Before starting an apartment renovation, residents try to select the material for finishing the surfaces in advance. Out of habit, wallpaper is chosen for finishing walls, which can be found on different bases. However, today there are other, newer materials that can significantly transform and decorate walls. So, DIY decorative plaster will be an excellent option for you.
Applying the mixture to surfaces made of various materials
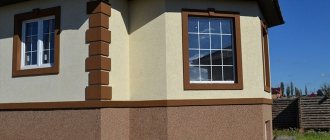
The advantage stated by the manufacturers is the ability to apply plaster for exterior use on many types of surfaces, but you need to consider how to properly work on each surface.
To begin with, you should follow the general rules:
- do not carry out work outdoors if the air temperature is less than 5 degrees Celsius;
- keep humidity at the required level, not higher than 70%;
- plastering the facade of a house with your own hands is done continuously, since when you stop, seams will appear visible to the eye;
- Immediately after construction, the building should not be finished; it should shrink.
This is a general set of requirements and recommendations for all types of mixtures.
Facade plastering technology using insulation
Work on creating a wet facade is divided into several stages. First you need to create conditions for work. a wet facade cannot be done at low or very high temperatures, optimal conditions are +15+25 degrees. Otherwise, you need to surround the building with scaffolding, cover it with windproof film and create a thermal contour. Next, the walls are prepared: you need to clean them of old coatings, if any, debris, dust, wash and dry. If there are chips and protrusions, they are removed with a chisel, hammer drill or other tool. Cracks and depressions are puttied and leveled. The surface of the walls should be as smooth as possible because... this ensures strong adhesion of the insulation
It is important to remember that the plaster and putty at this stage should already be combined in composition with insulation and other coatings. After this, the walls are primed
The next stage is installation of insulation. The insulation is glued, starting from the base profile, in horizontal rows, with a bandage of 20 cm. This is necessary to avoid long vertical seams that violate the thermal insulation of the structure. When laying insulation, you need to ensure that the error in smoothness does not exceed 3 mm, otherwise the resulting unevenness will be visible even after the work is completed. At the corners the insulation is glued with an overlap of 2-4 cm, the excess is later cut off. The technology for plastering a facade using insulation involves double fastening of the insulation: with glue (preliminary) and with umbrella dowels. You can fasten the dowels no less than a day after gluing. Now you can start reinforcing. Reinforcement consists of uniformly covering the insulation with a layer of reinforcing composition, into which a special alkali-resistant fiberglass mesh is immersed, and creating a top covering layer of the same composition. It is important that each layer of the composition is at least 2 mm thick, and the mesh is located between them, but not adjacent to the insulation. Reinforcement begins with the corners of the building, window and door openings, then the entire walls are reinforced. To facilitate the work and further strengthen the openings, you can use a reinforcing profile, which is a metal perforated corner connected to strips of reinforcing mesh, which is attached to the opening.
The next stage is finishing. After the reinforcing composition has dried (at least 72 hours), the walls are covered with decorative plaster or paintable plaster. The choice of materials here is huge, including smooth plasters, textured plasters, and colored primer paints that do not require plaster. In any case, you need to follow a few rules. All materials must be for outdoor use. The plaster and the finishing coat must match each other, i.e. Acrylic paint requires acrylic plaster. Weather conditions should exclude bright sun, low temperatures, wind and precipitation. Finally, the finishing coat is usually exterior paint.
It is important to keep in mind that for some types of paints, in particular for silicone and silicate (siloxane) paints, it is necessary to pre-prime the walls with appropriate primers
Price for facade plastering with insulation
A wet facade is one of the most affordable ways to decorate a house; its price is significantly lower than insulation and cladding separately.
It is especially important to simultaneously solve two problems: insulating the house and decorating its appearance. The plaster mixtures themselves cost between 70-90 rubles/kg
with an average consumption of 10 kg of the finished mixture per 4-7 sq.m. wall surface, depending on the thickness of the layer. Based on these figures, you can calculate the cost of materials. If you order facade work from a construction company, then plastering work will cost 250-300 rubles/sq.m. One of the important design solutions of a wet facade is the division of the insulation function between the walls and the outer cladding, which makes it possible to make the walls thinner, reducing the cost of construction. In addition, the materials used in this system “breathe”, which means they not only seal the walls from the influence of the external environment, but help maintain the microclimate in the interior. It is the combination of all these advantages that makes wet facades one of the most common in construction.
Rules for applying decorative plaster
There are no important requirements for carrying out plastering work. The finished mixture is applied to the surface with a wide spatula in the desired layer. Try not to do it in squares, but evenly over the entire surface. Then the wall will be smooth over the entire plane, homogeneous in structure.
You should not do it according to the following scheme: apply to part of the wall on the first day, and finish the remaining surface the next day.
The joints of adjacent mixtures will be very noticeable.
According to insulation
When the walls are insulated with expanded polystyrene slabs, it is better to place a layer of plaster on the reinforcing mesh. Many owners make the mistake of first securing the mesh and then applying adhesive on top. It would be better to do the opposite: first apply glue, then press the mesh into the adhesive composition.
On brickwork
There are two main methods of applying mortar to a brick wall, using a machine and using your hands. To ensure uniform plastering of external walls, it is worth installing plaster beacons. They should be secured using a plumb line, which will indicate how inclined the wall is. When working, use a long rule. The mixture is placed between the beacons, and then pulled from the bottom up.
Application to concrete
A concrete plane is rarely perfect. To carry out finishing work, it is worth priming the surface. You can cover the surfaces with a mesh. Spray the wall with clean water before installation. Apply the mixture to the surface using circular rubbing.
Facade plaster for aerated concrete
The heterogeneous structure of aerated concrete has specific features. A building made of silicate blocks is not protected from moisture, because the material absorbs water well. Simple plastering of external walls is useless. Consider the features of this material.
They are as follows:
- the block is smooth, not all compounds will adhere well to it;
- takes moisture from the plaster, then the coating cracks;
- The vapor permeability of the blocks and the solution must match.
You should choose a special powder for aerated concrete. The application technology is similar to brick.
Application to wood
The work must be carried out no earlier than one and a half years after the installation of the wooden house. The structure must shrink. When plastering wooden walls, the wood is initially protected from moisture, because it will absorb it from the plaster. This means that after the mixture dries, cracks will appear. Previously, shingles were used to cover wooden surfaces, but today other methods are used. By applying a protective layer to the wood, the owner will subsequently save himself from problems with fungus and microbes.
The following solutions are chosen for wooden walls:
- lime;
- plaster;
- cement.
At the preparatory stage, defects in the wooden surface should be eliminated. Seal large cracks, then install a mesh fabric (wooden shingles or metal), install guides, and cover with soil. Then you can plaster the surface. Methods that create decorated surfaces with an interesting texture are often used.
Do-it-yourself technology for plastering external walls
First, let's look at how to level and prepare external walls for applying decorative finishes.
Preparing the surface of the building facade
- Remove old finish.
- Clean the walls with a stiff steel brush.
- Inspect the surface to identify cracks and dents (roughness on the wood, burrs), etc. If there are any, clean them with sandpaper.
- Wash the wall with a damp sponge (with soap if necessary) and dry.
- Use a plumb line or level to check the verticality of the walls.
It is recommended to impregnate wooden facades with an antiseptic solution. If the walls are made of brick, stone, or aerated concrete blocks, then use empty masonry (with incomplete filling of the seams on the front side). This will ensure better adhesion of the wall surface to the plaster. If this has not been done, then before plastering, jointing is carried out (the seams are deepened with a chisel and hammer by 1 cm and cleaned with a brush). On concrete walls, with an ax or perforator, notches are made with a depth of 5 mm and a length of 5 to 10 cm in increments of no more than 4 cm.
jointing and notches for plaster
To improve the adhesion of the plaster to the surface of the facades, a primer is first applied. Its composition is selected taking into account the nature of the wall surface (concrete, wood, brick, etc.). The primed walls are left to dry for a day.
How to plaster: stages of applying a leveling layer
To obtain a good result, the plaster mixture is applied in three layers:
- Spray (starting) - from 3 to 9 mm (depending on the nature of the surface, a thicker layer is needed on wood).
- Ground - from 7 to 8 mm, if the plaster contains gypsum, then 9 - 12 mm.
- Covering (finishing) - from 2 to 4 mm.
To strengthen the facades and ensure rigid adhesion of the leveling layer, the plaster mixture is applied to the reinforcing mesh. To do this, after the primer has dried, apply the first layer of plaster and embed the mesh in it. Wooden facades can be reinforced with the same mesh or shingles - narrow wooden slats nailed diagonally crosswise. If the walls are insulated with mineral wool or similar insulation, then an adhesive solution is applied to it to fix the mesh. For example, ARMIERUNGS-GEWEBEKLEBER 215, PALADIUM PalafiX 402, Glims KF and others.
The procedure for plastering facade technology:
- The reinforcing mesh is installed on the street wall or on the insulation.
- If necessary, guide beacons made of metal profiles are attached. They are fixed to the wall with plaster mortar, and verticality is checked with a level.
- Apply the plaster mixture with a spatula or paint bucket, starting from the bottom and gradually moving upward. With the machine plastering method, a compressor and a pneumatic bucket are used for this.
- The applied layer is leveled using the rule. When using beacons, the rule rests on two guides and rises up, leveling the plaster layer.
- The second layer begins to be applied after a day. On the fresh layer you need to make notches or grooves to ensure better adhesion to the finish. You can use a notched trowel for this.
- After another day, apply the last layer - the covering. Dilute the plaster for it to a creamy consistency.
- After the finishing layer has dried, use a special trowel to grout. Press the device tightly against the surface, making circular movements clockwise. After processing the entire facade, rub it again in a straight line. If you need to achieve a perfectly flat surface, then wrap the grater in felt or felt.
Grout
If the decoration of the facade is carried out on the basis of leveling plaster, then immediately after applying the last layer, without waiting for it to dry, they begin to create a pattern or relief.
To do this, use special rollers with patterns, stencil stamps or a trowel. Options for drawings can be very diverse. Stamps are not very convenient, since they have to be washed frequently, and the expression of the design in different places is not the same due to different pressure forces. With a trowel, you can create a stone texture on the wall by simply making chaotic movements with it. If the plaster is planned to be painted, then after creating the texture and drying it is primed again and after that the paint is applied.
How to choose facade plaster for exterior work
Construction markets and stores have a large assortment of plasters, but when buying facade mixtures, you do not need to pay attention only to the colors of the mixtures. You have specific tasks, and to solve them you need to choose a product with the necessary parameters.
The mixture must perform the following functions:
- water absorption (less is better);
- protection from ultraviolet rays;
- adhesion percentage;
- low percentage of shrinkage, allowing it to not crack for a long time;
- good vapor permeability.
You can apply the composition to the wall yourself if you have a sufficient level of skill. Finishing the facade will be a simple task for you. If you have no experience, it is better to hire a specialist. Otherwise, there is a high probability of damaging the surface. It is worth looking at shelf life, frost resistance, consumption per square meter. Based on the available data, it will be easy to understand whether this mixture is suitable for plastering surfaces in your cottage, and what the planned consumption of the mixtures is.
Plastering technology for creating decorative surfaces
There are a huge variety of styles of material application. There are complex techniques where working alone is simply unacceptable.
Complex Travertino technique
Let's talk about the most common technologies:
- "fur coat";
- "bark beetle";
- "mosaic".
They will certainly decorate the facade of your home and make it unique.
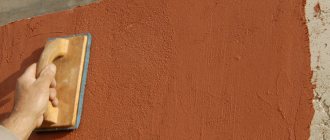
"Fur coat"
“Fur coat” is a variant of interior and exterior wall decoration with a rough surface. To do this, you do not need to look for specialized material; the effect is achieved through a unique application.
Options for applying a “fur coat”
Covering the wall is not difficult, so this option is great for DIY application. The layer turns out dense and thick, it serves as additional sound insulation for the house. For the “fur coat”, they often use not ready-made solutions, but self-made ones based on cement and sand.
Let's talk about four options for applying such a decorative layer:
- Using a roller with holes or made of fur. For this, a liquid solution is used. If it seems thick, it is diluted with water or another product. The mixture is applied to the wall with a spatula, and then it is rolled out over the surface using a roller.
- Using a spatula, apply the mixture to the wall, smooth it out, and then use a trowel to create a texture. This method is the simplest and can be used by beginners. To create the design, apply a trowel to the wall while the plaster is wet, and then quickly remove it. You will get a “fur coat”.
- You can also create a pattern using a special sprinkler. It is very convenient to work using mechanical means.
- The last option is to imitate the design using a broom. A new one is sprayed onto the applied thin smooth layer by sharp swings of a broom, previously lowered into a bucket of solution.
Creating texture using a fur roller
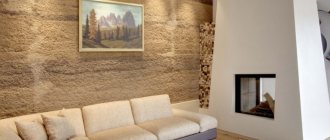
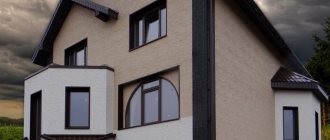
"Bark beetle"
Perhaps the most popular type of solution application. Externally, the surface resembles wood eaten away by beetles, hence the name.
Surface "bark beetle"
For such work, specialized ready-made solutions, as well as dry mixtures, are offered. First, a smooth layer of plaster is applied. As soon as it starts to dry out and stops shining, start rubbing it with a trowel. The design options “rain”, “lamb”, “carpet” depend on how the hand movements are made (horizontally, vertically, diagonally, in a circle).
The wall is made using the “bark beetle-rain” technique
A short video will help you decide on the technique:
Related article:
Do-it-yourself technology for applying bark beetle plaster. In this publication we will look at detailed step-by-step instructions for applying the bark beetle, the nuances of painting the finished coating, a review of textured plaster manufacturers, average prices, and useful tips.
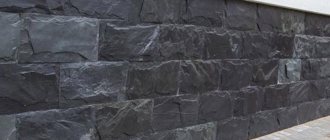
Mosaic
This option looks very impressive, and came to us from antiquity. The material contains marble, malachite, lapis lazuli chips, fractions up to 3 mm in size.
"Mosaic" option
The application technique is simple: using a grater, the mixture is pulled from one corner to another without drying out. You need to work quickly so that the joints are not visible.
Preparing the surface for applying the material
After completing the construction of the walls of the cottage, select a suitable design. Think over the finishing sequence yourself, develop a plan, and use the services of experienced designers. In the latter option, they will not only help you place an order for the project, but will also be able to calculate the consumption of materials.
Before plastering the facade, find out whether any mixture has been applied to the wall before. If such a coating has been applied, it will have to be carefully leveled by removing the top layer completely or partially. The surface is cleaned of dirt using a brush, and then degreased. Then take a primer that is suitable in composition for the plaster (information on the appropriate type of primer will be written on the bucket with the plaster).
You can often find a primer from the same manufacturer as the plaster.
Then there will be perfect adhesion between the walls and the mixtures. when the home has just been erected, carry out preliminary work by cleaning the walls with a brush, then cover them with soil. The preparatory work has been completed. Decorative facade plaster is supplied ready-made, or as a dry powder from which the mixture will be made.
Advantages and disadvantages
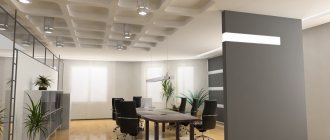
Mineral decorative plaster is not afraid of either moisture or temperature changes. It does not contain chemicals harmful to the health of residents. Therefore, this mixture can be used for finishing not only external walls, but also internal areas of the room. However, this composition can crack due to the constant vibration of the building. Therefore, it is not recommended to treat objects that are located near a highway or railway with a solution containing mineral components.
Acrylic mixtures can be easily painted in any color or shade. They are very flexible, so they are easy to work with. Also, thanks to this feature of the composition, you can create a variety of interesting textures on the walls and ceiling. The disadvantage of acrylic plaster is low vapor permeability. For this reason, it can only be used for finishing the interior surfaces of the house.
The mixture, which is based on silicone resins, after complete hardening, becomes quite durable and has a long service life. Walls coated with silicone mortar are completely resistant to moisture and breathe well. In addition, they are easy to clean from dust and dirt with water. Silicone-based decorative mixture is used for finishing interior and exterior walls.
The properties of the silicate mixture are similar to those of the previous composition. In addition, silicate-based plaster has an antimicrobial effect. Thanks to this coating, the walls will always be protected from the effects of fungi and various bacteria.
Types of facade paint on plaster for exterior work
If the decorative plaster for the facade of the house has become dull, paint will help. There are three main types of paint. With the main fillers - acrylic, silicate and silicone. We look at the resistance of the composition to weather, whether the paint has shine.
Varieties of mixture
In order for the quality of the plastered surface to be high, it is important to choose the right type of plaster mixture. As a rule, there are such types of plaster as:
As a rule, there are such types of plaster as:
- mineral;
- acrylic;
- silicate;
- silicone.
They perfectly perform the functions for which the right façade plaster is intended, but which mixture of them is best depends on your specific needs and budget.
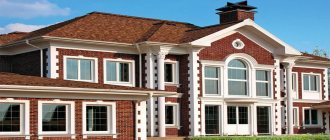
Mineral plaster for the facades of private houses is most popular due to its low cost and ease of use, which makes it easy to apply it to the surface yourself (see photo).
This mixture is made from a solution of cement and sand (warm plaster for the facade does not contain sand, but substances with low thermal conductivity).
This mixture has vapor-permeable properties, making it suitable for facade insulation with basalt wool or polystyrene foam.
Most often, mineral plaster for facade insulation is used together with foam plastic, mainly due to the low cost of both materials.
The disadvantages of this type include a short service life - about 10 years, and low resistance to various cracks and damage that often appear over time.
The acrylic variety of plaster has a much longer service life - 15 - 25 years.
Such elastic plaster for the facades of private houses allows you to conveniently hide small cracks due to the fact that it can stretch slightly during shrinkage.
The mixture is made from acrylic resin (see photo). Disadvantages include vapor permeability, which is why plastering of the facade over insulation with basalt wool is not carried out.
The façade of a house can be finished with this type of plaster and insulated with polystyrene foam.
It is better not to apply acrylic plaster near dusty roads, as it actively attracts dust, and after some time it may lose its color brightness.
The properties of the coating include vapor permeability, so it is recommended to use it when insulating using the “bonded thermal insulation” method using basalt wool.
In this case, it is better to refuse insulation with foam plastic. A facade with such plaster is highly resistant to various damages and cracks due to the elasticity of the coating.
The main advantages of this type are the presence of antistatic properties and the ability to repel dust.
Finishing the facades with decorative plaster makes it easy to clean and maintains its brightness throughout the entire period of operation.
Silicone plaster for facades has the status of the most technologically advanced and modern coating. The service life is up to 25 years.
Photo:
This variety has the highest degree of elasticity and vapor permeability in comparison with other types, as well as a high stretch coefficient.
The silicone coating is antistatic and easy to clean. It should be noted that the plaster does not absorb various salts.
General rules of work
When carrying out this type of work, regardless of what technology for applying facade plaster is used, or what type of plaster is used, a number of general rules must be observed:
- You cannot plaster newly constructed walls. They will inevitably shrink, which means that the applied plaster will crack and may even fall off.
- The layer must be smoothed or textured a certain time after application. If you begin to carry out this work immediately after application, the plaster will most likely lag behind the surface. However, if you wait too long, the solution will become too hard and unusable.
- If it is intended to apply several layers of plaster, it should be noted that the thickness of one layer should not be more than 1.5–2 cm.
Concluding the above, it is worth saying a few words that the process of applying plaster can be somewhat difficult for a beginner. You can verify this by watching videos of master classes by professionals. Therefore, for the first time, in order, first of all, to save your own nerves, it is worth turning to the services of specialists.