Plaster is one of the most popular methods of facade finishing. This is due, first of all, to ease of execution, as well as reliable protection from moisture and other atmospheric influences. However, simply applying the material to the wall is not enough, because there is a certain technology for applying plaster to the surface, preparing for finishing, as well as a number of other rules that must be strictly followed so that the material retains its appearance and is not damaged ahead of time.
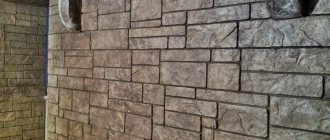
Bright decoration of the facade of the house with decorative plaster
Types of plaster
Basically, the classification of plaster mortars is made according to the type of binder used. Four types of this material are used for finishing facades:
- cement;
- silicate , also known as liquid glass;
- acrylic;
- silicone.
Types of facade plaster Source pt.decorexpro.com
Cement plasters
It is clear that the composition of these plaster mixtures includes Portland cement and fractionated sand. It is very important that such plaster solutions do not quickly release moisture. So that it does not go into the material from which the wall of the house is built. That is, when drying quickly, cement plaster begins to crack. Therefore, moisture-retaining substances are added to the composition.
In addition to them, additional plasticizers and modifiers are added, which increase the technical and operational characteristics of the mixture. Typically, the cement variety belongs to the category of textured plasters. Therefore, coarse fillers must be added to the composition. For example, pebbles from crushing granite are added to the “bark beetle” plaster. Their size varies between 0.5-3 mm. By the way, the fraction of the stone must be indicated in large numbers on the paper bag. It is by this parameter that the texture of the finish is chosen.
Dry mixture of cement plaster Source mdv63.ru
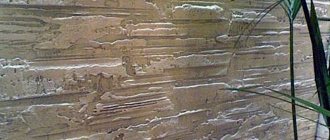
The process of finishing the facade of a house with bark beetle plaster is no different from ordinary mortar. It is pulled by the rule, aligned with the beacons. In this case, the pebbles roll under the tension of the tool, forming grooves that are very similar to grooves in wood eaten by a beetle.
Cement plasters have many advantages:
- high strength characteristics;
- cement mortar is a “ breathable ” material, therefore it does not have any effect on the vapor permeability indicator;
- environmentally material ;
- after drying, it is a gray finish that can be painted well with any type of paint;
- Compared to other types of plaster mixtures, cement has the lowest price ;
- easily fits on wall materials of any type; if application to a heat-insulating layer is required, then a reinforcing mesh is laid on top of the latter.
It is painting that increases the budget for using cement mortar.
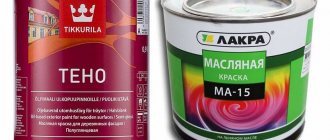
It should be noted that manufacturers offer dry mixtures of this type of facade plaster. The packaging describes exactly how to prepare the solution. You cannot deviate from the manufacturers' recommendations. Otherwise, there is no guarantee of the quality of the final result.
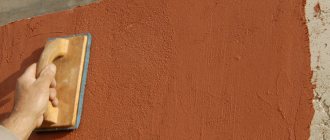
Applying cement plaster to the facade of a house Source pinterest.com
Silicate plaster
This type of decorative plaster for the facade of a house, like the previous one, belongs to the “mineral” category. Only liquid potassium or sodium glass is used here as a binder. Everything else is exactly the same.
The only thing that must be noted is the fact that silicate plasters are sold ready-made in plastic buckets. That is, you will not find it in dry form. Therefore, manufacturers try to prepare solutions, as they say, in full combat readiness. That is, pigments are immediately added to them. Therefore, the finish turns out to be colored throughout its entire body.
Now about the benefits:
- easily tolerates high and low temperatures ;
- 100% waterproof ;
- good thermal insulation qualities;
- it is a “ breathable ” material;
- excellent adhesive properties , even applied to insulation materials without forming a reinforcing frame.
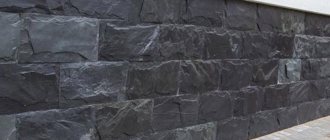
Silicate plaster Source hsbaustoffe.de
But this material also has its disadvantages:
- if moisture gets on a wall finished with silicate plaster, it will change its color , usually darkening;
- the finished solution applied to the surface of the wall hardens quickly , so when carrying out finishing work you will have to move more quickly;
- Before finishing, wall surfaces must be primed , preferably with a silicate primer;
- the price is higher than that of cement.
The technology for applying it to walls is standard: it can be done manually, or by machine. Apply the solution in a thin layer not exceeding 2 cm.
Facade wall covered with silicate bark beetle plaster Source pinterest.com
See also: Catalog of companies that specialize in finishing materials.
Decorative plasters based on acrylic
The fillers are the same. Binder is an aqueous dispersion of acrylic resins. This material is the main glue of PVC. Anyone who has encountered this type of adhesive knows well how elastic it is. The same quality is transferred to acrylic plasters. It allows façade walls to avoid cracking when temperature loads change. In this case, the solution is applied in a thin layer.
Like silicone varieties, acrylic goes on sale in finished form. Manufacturers today offer a fairly wide range of materials, the types of which can be used for finishing in different operating conditions of buildings and structures. For example, in coastal areas where humidity is high, solutions are used specifically for wet operating conditions. There are plasters for regions with a lot of sunny days, for areas where there is maximum dust formation or sudden temperature changes. That is, it is necessary to select plaster according to this principle.
Acrylic plaster “Fur coat” Source brickpark.ru
Now about the advantages:
- have high strength , easily withstand even impacts:
- the finishing does not collect dust in large quantities;
- easy to clean with water pressure;
- one hundred percent moisture resistance ;
- cheaper than silicate and silicone mixtures;
- good adhesion characteristics to almost all building materials;
- The applied plaster layer can be painted .
And the cons:
- low vapor permeability ;
- fades over time in the sun.
It should be added that manufacturers offer two types of acrylic plasters: for repairing facades and for finishing. The first is used to seal cracks, crevices and recesses. The second is for finishing. Almost all experts agree that exterior finishing of a house with this type of plaster is the best.
Advantages
The cost of plastering a façade today is quite high if you seek the help of professional builders. The average price of such work today is about 350-400 rubles/m². Therefore, many people decide to do all the steps themselves.
By using the presented type of finishing, you can obtain a high quality final result. First of all, it should be noted the aesthetic appearance. A variety of textures and shades allows you to create a fashionable, stylish design for the exterior of the house.
Facade plaster for exterior work, the price of which today is acceptable for almost every property owner, is easy to use. Depending on the type and manufacturer of dry mixes, you can purchase dry mixes (25 kg) from 350 to 500 rubles.
The products on sale today protect walls from moisture penetration, are resistant to low temperatures, and prevent corrosion.
Types of textures
It should be noted that all the plaster solutions presented above form the same textures on the facade walls of the house. Namely:
- Fur coat . This textured finish is independent of the mortar content. The method of application is important here. Therefore, to form a fur coat, they try to use plaster mixtures that contain fine fillers.
- Bark beetle . This type of finishing, on the contrary, depends on the fractionation of fillers. The larger the granules present in the material, the more clearly the texture and intensity of the relief is formed.
- Lamb . This mixture also contains fillers, but not just one fraction, but several. Therefore, a lumpy surface forms on the wall, reminiscent of curls on a sheep’s wool.
- Cereal or pebble plaster . The composition includes pebbles of the same large sizes. This plaster forms a finely lumpy surface.
- Mosaic, also known as plaster with crumbs of decorative stone . Included in the group of silicone or acrylic types. For this purpose, transparent resins and stone chips are used. Essentially, a rock ripple is formed on the wall.
Varieties of textures of facade plasters Source nashaotdelka.ru
Technology of work
Finishing work is carried out using a certain technology. By performing each stage correctly, you can achieve a good result, even without experience in carrying out such actions.
Facade plaster for exterior work, the price of which will be affordable for almost every owner of a house or cottage, is intended for finishing bases made of various materials. This could be brick, foam concrete, or other types of building materials. The most optimal and inexpensive finishing method is the use of beacons.
The work is carried out in several stages. First you need to prepare the base, then the beacons are installed. Only after this can you begin to plaster the facade. This method is suitable for manual application of the solution. It is important to adhere to the proportions when mixing the dry mixture, as well as the manufacturer’s recommendations regarding its drying time.
Rules for applying decorative plaster
There are no special requirements for plastering. Apply the prepared solution with a wide spatula to the wall surface in the required layer. The main thing is to do the finishing not by square meters, but by the whole wall. This way the finish will be smooth and uniform over the entire applied surface. That is, you cannot plaster part of the wall and fill the other part the next day. The junction of the two laid materials will be clearly visible.
If the walls of the house are insulated with polystyrene foam or mineral wool boards, then it is better to apply the plaster on a reinforcing mesh. Many people make the mistake of first laying the mesh and then coating it with adhesive on top. You need to do it the other way around: first glue, then the mesh, which is embedded in the composition.
If you decide to plaster wooden walls, then first of all the wood must be protected from moisture, because it is a hygroscopic material and quickly absorbs it. And for plaster this is a guarantee of cracks.
Material selection
, its smoothness and degree of protective functions , as well as the plasticity of the plaster largely depend on the composition and quality of the materials used to prepare the cement-sand mortar
For external work, cement is used, the marking of which is M250 and higher. But sand has a special meaning in the solution, so its choice must be approached extremely responsibly:
- Sand type. The place of sand extraction is exclusively a river or a quarry. The composition should not contain clay admixtures. It is advisable that it be sifted.
- Size. The granule fraction should not be too small, but not too large. Optimally - medium size. The use of coarse sand will lead to some roughness, and small granules will create a “spider web” effect, which will lead to the appearance of microcracks.
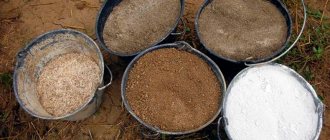
Preparation of a mortar from cement and sand
The amount of material is calculated as follows:
- classic – 1 part cement to 3 parts sifted sand;
- if the cement grade is M400, then the ratio will be 1 to 4.
Consumption of plaster mixtures
Experienced builders definitely pay attention to this parameter. After all, the amount of material purchased depends on it. On the packaging, manufacturers must indicate the material consumption in the form of a fork of two numbers. The spread is sometimes quite large. This depends on the quality of the finished base, its evenness, and the fraction of fillers.
- Mineral – 2.5-4 kg/m².
- Acrylic – 1.5-3 kg/m².
- Silicone - 2.5-3 kg/m².
The manufacturer must indicate the material consumption on the packaging Source stroimdom.com.ua
Recommendations for preparing the base
The brick base requires, in some cases, jointing. This procedure allows you to increase the adhesion of the solution to the base. The plaster will hold tightly, and the service life of the coating will increase. Some builders, when erecting brick walls of houses, leave the facade with empty seams. This allows you to prepare the base for finishing faster.
Jointing is not done for foam blocks. This also applies to walls made of reinforced concrete slabs of “rough” masonry, which have a smooth surface. These types of materials are immediately covered with mesh for plastering facades. It is first necessary to apply a layer of deep penetration primer. It will strengthen the adhesion of the solution to the base.
When choosing a primer, you should give preference to trusted manufacturers. It is also necessary to adhere to the correct concentration of the solution. In this case, the film will be durable.
Stage No. 3. Reinforcement
After the plaster layer has dried and gained strength, the team begins to reinforce the facade. The reinforcement is a 3-layer cake consisting of a plaster-adhesive mixture in the thickness of which a fiberglass mesh is laid. Reinforcement includes the following operations:
- - priming before reinforcement,
- - applying the 1st layer of plaster-adhesive mixture,
- - laying fiberglass mesh,
- - applying the 2nd layer of plaster-adhesive mixture.
The reinforcement prevents the appearance of surface cracks during operation.
Unscrupulous builders save money and ignore the reinforcement operation, which as a result leads to a significant reduction in the service life of the facade, surface cracks on which appear already in the first year of operation. We have been using plaster and adhesive mixtures for many years: Knauf Sevener, Tex-Color 1000 R, Osnovit Kaverplix TS117, Ceresit Thermo Universal. We recommend using fiberglass mesh with a density of 150 g/m2 and higher.
Grout
Plastering the facade involves the final stage. It is necessary to grout the surface. This procedure is performed after the cement finishing layer has dried. For this, special graters are used. They can be made of foam or wood.
If you use a putty that is not based on cement, you should follow the manufacturer's recommendations. They must be indicated on the packaging.
Grouting allows you to smooth out small irregularities and seal sinks after applying the rule. Grouting is done in a spiral. Circular movements begin with wide movements, gradually moving the instrument towards the center. A tubercle in the center is stretched from a large circle. With the reverse action, it is completely leveled.
Having considered how the facade is plastered, everyone will be able to perform the procedure well. In this case, the surface will be perfectly smooth. Following the recommendations of professional repairmen and builders is a guarantee of a good result of the final work.
Lighthouses
The technology for plastering facades involves the use of beacons. These are metal guides. They are installed on the base to indicate the level of plaster application. The rules, leveling the layer, slide their nose along the tops of the beacons.
It is believed that the use of this finishing method allows even a non-professional to create a perfectly smooth surface. However, the master needs to become familiar with the technology of installing beacons on a plane.
It is necessary to determine the verticality of the wall using a plumb line. Deviations from the level must be determined before installing the guides. If the top of the walls is inclined inward, this indicator must be taken into account. Beacons are customized to a specific size. The excess height of the guides must be cut off.
Base layer
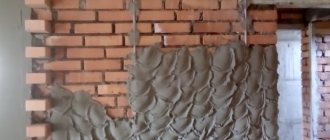
At the next stage, the main plastering of the facade is carried out. To do this, you need to prepare a solution. It should have the consistency of thick sour cream. It is thrown onto the surface between two lighthouses. Please note that the thickness of all layers of plaster should not exceed 5 cm.
The narrow side must be pressed against the beacons. The tool is moved from side to side. The edges of the rule should not fly off the tops of the guides. The movement is made in an upward direction. The excess is cut off. This results in a perfectly smooth surface.
If during the leveling process it turns out that there is not enough solution, it should be added. The mixture is added into the hole formed. Then the rule is passed over the surface again.