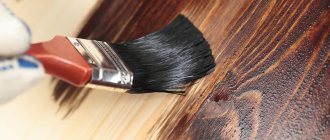
Sanding a house made of timber is a mandatory task before interior finishing. It must be carried out before painting or varnishing, as it allows you to level the walls from the inside and eliminate various defects that may appear after shrinkage.
Sanding timber inside a house may be required when restoring an old building - it will make it possible to update the color of the wood, which can then be coated with clear varnish and preserve its beautiful texture for a long time. Sanding a timber house is a boring and painstaking job, and it is no coincidence that it is quite expensive for professionals.
Why do you need to sand timber?
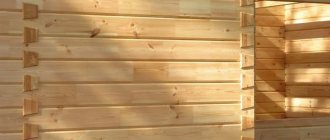
A house made of sanded timber looks beautiful: the wood is light and clean without splinters, blue spots or other defects, so sanding is a mandatory step before finishing. There are several reasons for doing this:
- The walls will acquire a smooth surface, which will simplify painting and other types of finishing work. Paint and varnish adhere much better to a smooth surface, so it will be possible to reduce the cost of purchasing materials. If we are talking about finishing a large wooden house, you can achieve significant savings.
- To reveal the natural beauty of wood. Once defects are removed, the timber can demonstrate its unique grain pattern, and this is one of the important reasons why wood is chosen for construction.
- A wooden house made of polished timber is more durable: antiseptics and fire retardants are much better absorbed into the treated surface, so the building will be more protected.
What's the best way to polish a building from the inside?
The question of how to sand a house made of timber is very important, since the speed and effectiveness of the work depends on the correct selection of tools. It can be done manually: sandpaper with different grain sizes was previously used for this. However, in this case, the process will take several weeks: manual sanding of a house made of profiled timber is needed only in hard-to-reach areas that cannot be reached with a tool.
Sanding is a very dusty job, so you need to take care of respiratory protection. There are models of sanding equipment that are directly connected to a construction vacuum cleaner: this allows you to immediately collect small particles of wood in a special container and avoid breathing wood dust.
Processing should be carried out at low and medium speeds, this will allow you to get a smooth surface without too deep cuts in the wood.
Why do you need a wooden house sanding service?
Before finishing a wooden house, pre-treatment . Sanding is a necessary and important stage of finishing work. Sanding makes the wood smooth, eliminates defects, unevenness and rough layers, prepares the surface for painting, emphasizes the beauty of the wood, saves paint and varnish materials and increases the service life of the house. With its help, it is easier to insulate inter-crown seams with sealants . It also minimizes the risk of developing pathogenic microflora.
During the sanding process, the top layer of wood is removed along with flaws, dirt and old coating. This treatment improves the appearance of the house , and the wood itself better absorbs paint and protective agents. The appropriate tool is selected based on the density and degree of aging of the wood. The treatment is carried out during the construction of a new or restoration of an old house.
The process of sanding timber walls
How to sand timber inside a house? This is a rather lengthy process that is carried out in several stages:
- Rough sand the wood surface using 40 grit sandpaper. It is designed to remove all significant irregularities and prepare the surface for finer processing. During operation, you have to frequently change the attachment on the sander, as it quickly becomes clogged with wood dust.
- Fine grinding allows you to get a smooth surface, pleasant to the touch and ready for subsequent painting. For processing, sandpaper No. 80-100 is used, the approximate speed of work is about 60 cm in 10 minutes.
Much depends on the professionalism of the builders: an experienced master will cope with such work several times faster than a beginner, so this task should be entrusted to specialists. Unprofessional processing may result in scratches on the surface, and the surface may be uneven.
- In some cases, timber walls are additionally polished. This is a delicate, labor-intensive work that is carried out using fine-grained abrasive up to 180. It allows you to perfectly level the surface and make it as smooth as possible.
How to sand a house made of timber so that the wood looks truly beautiful? It is important to choose a tool that will fit easily in your hand and provide maximum productivity. Nozzles need to be cleaned or changed as often as possible, and in difficult areas you will have to do the treatment manually.
Knowing how to sand a house made of timber, you can save a significant amount on the work of professionals. After treating the walls, they need to be coated with antiseptics and painted as quickly as possible, otherwise the sanding will have to be done again. The wood will quickly darken again, so it is important to take care of its final protection as quickly as possible.
Source: 1drevo.ru
Sanding timber with your own hands
For example, if the outer walls of a house are to be insulated, then the part of the timber that will face the street is not subjected to additional treatment. The lumber is placed in the log house immediately after it is brought from the sawmill. If it is not planned to cover the walls of the timber with anything, then before laying it in the log house, the side that will face the street is pre-treated with a plane. The same is done with interior walls. If the timber is not processed with a planer, then it will be almost impossible to make it smooth by grinding. So, remember, before grinding the timber must be processed with a plane.
Let's say a year has passed and the log house has settled down, the wood has dried. During this time, under the influence of sunlight, the timber changed its shade from light to dark. In addition, during an inspection of the external and internal walls, it may turn out that cracks, large and not very large, have appeared in some places of the timber. Unfortunately, this is a feature of wooden houses, which are assembled from freshly sawn material.
If your house is made of laminated veneer lumber or for some other reason there are no cracks in the walls, you don’t need to read the next 3 paragraphs.
The outer walls of a log house dry faster than the inner ones; tension arises in the wood, as a result of which cracks appear on the walls. Such a log house looks ugly; various insects can settle in the cracks, making their nests there. In addition, rain and snow can get into them, which will cause the wood to become wet and then rot. To prevent all this from happening, the cracks must be covered. For these purposes, wood putties, sealants and homemade putties are used. Putty is best used to seal cracks on the interior walls of a house, as it is resistant to moisture. A waterproof sealant is suitable for external walls. It will reliably protect the wood from natural precipitation and preserve its natural state for many years. Of the mixtures that you can prepare yourself, the most popular is putty made from sawdust and PVA glue. Pour sawdust into the container, add glue to it and mix thoroughly. The viscosity of the mixture should be like that of toothpaste, so that when sealing the cracks it does not leak out of them.
If you plan to paint your house white, you can use putty and sealant of the same shade. By the way, they are the cheapest. If some other color is used for decoration, then the putty must be selected to match the color of the wood, so that in the future traces of the repaired cracks will not appear under the paint.
It is best to apply putty to the walls with a small rubber spatula. First, fill the gap with the mixture, and then level it, removing excess. After about a day, when the putty has dried, you can begin sanding the timber. Again, let’s make a note to ourselves - before sanding the timber, the cracks must be sealed with putty or sealant.
Subtleties of the process of grinding timber inside the house
Grinding is a labor-intensive process that requires some experience and the availability of good tools. Knowing the intricacies of this important work, you can transform the wooden walls of your home with your own hands. Thanks to high-quality processing of the timber, the interior finish will not darken over time, will be protected from dampness, rotting and will retain its unique texture for a long time.
Peculiarities
Despite the high-quality professional assembly of a wooden building, individual rows of beams in the structure can protrude by 1-2 mm, making the walls uneven. To achieve ideal smoothness of the walls inside the house, it is necessary to grind the timber, although such work also has other purposes.
This process solves several problems:
Polishing also involves the removal of a layer damaged as a result of external influences, renewal after several years of operation of the room. In addition, this removes old varnish and antiseptic impregnation from the surface, which are no longer relevant. Sanding helps restore the timber to the look and color of fresh wood.
Why sand the walls inside a wooden house?
When assembling a house from a ready-made kit, and even more so from ordinary timber, you have to deal not only with the pile that appears as a result of shrinkage, but also with changes in the color of the wood. The top layer, as a result of shrinkage and under the influence of oxygen, oxidizes and loses pigmentation. Proper sanding removes the top layer with disturbed pigmentation from the timber and reveals the true color and texture of the wood. Often, during the installation process, pencil marks, small scratches, and dirt absorbed into the thin top layer remain on the beam. These contaminants cannot be washed off, because this will negatively affect the moisture content of the wood, so they are removed by sanding.
Required Tools
Only high-quality tools are suitable for such work, which completely excludes Chinese disposable products. The main criteria by which to make a choice are the lightness and power of the equipment. Depending on the type of timber, a grinder with special grinding attachments or a belt sander is used.
You will also need:
- vacuum cleaner;
- protective clothing, glasses made of unbreakable plastic, respirator;
- small rectangular wooden block;
- stand, ladder or stepladder.
A belt sander is typically used for initial polishing, while oscillating equipment is only suitable for repeat sanding. Professional craftsmen advise using the Makita device. This tool is convenient, equipped with a special dust collector, and is suitable for interior work.
The size of the abrasive paper is of great importance. It depends on the type of operation performed. In order to remove lint, use numbers 160-220, for leveling - 40-60, for removing paintwork - 100-140.
When choosing an angle grinder, you should pay attention to its weight. It is not advisable to use a heavy grinder, as this will complicate the already painstaking work. As for power, you need to focus on 850 W or more.
Corners and joints are difficult to reach places. To sand these areas, it is better to use a regular chisel or a wooden block.
During the working process, many small particles of wood dust are generated, therefore, in accordance with safety regulations, it is important to reliably protect the respiratory system. This means that the respirator must be of high quality.
Tools and equipment
For rough and final grinding of timber, including processing of grooves, you will need :
- belt or disc sander;
- angle grinder (grinder);
- drill with attachments;
- vibration tool (renovator).
Prepared or purchased in advance:
- scaffolding, trestle or stepladder;
- electrical extension cord;
- a set of sanding papers for rough, medium and finishing;
- a construction vacuum cleaner to remove dust if the work is carried out inside the house;
- wooden block, stapler or holder for sanding paper;
- protective equipment - glasses, respirator, headphones;
- cleaning products.
For work, you may additionally need a chisel and a hammer to level out large defects.
Planetary grinder
The main work is done with a grinding machine - leveling flat surfaces. The tool is reliable and has high performance. The work will not require much physical effort. However, profiled timber with rounded edges in this way; it is better to use a planetary grinder .
It is not advisable to use a grinder or drill to level large surfaces :
- The grinder will not withstand long-term continuous operation; frequent breaks will be required to cool the tool, otherwise the gearbox bearings will quickly fail.
- The drill is inconvenient to use due to the need to exert great effort to hold it.
Valera
The voice of the construction guru
Ask a Question
A grinder and a drill are in demand when processing grooves and small areas and removing traces of rot. For the same purpose, a renovator with suitable attachments can be used, and it can also replace a chisel.
Preparatory stage
During planing, a so-called radial structure can form on the timber, which threatens the wood to peel off. Therefore, the first task is to carefully inspect the tree.
The solution must dry completely, for this you need to wait a day. As a result, small particles will stop “ruffling”. This will help prevent failure of the grinding wheels and protect normal areas of the timber from defects.
If such a defect is found, you need to treat it in a special way (apply several layers of glue to these areas).
You can deal with this problem at the ends using a blowtorch. With its help, the pile is burned and removed. In addition, it makes the wood stronger and more durable. Since the ends are the weakest link of the structure, this approach provides better subsequent grinding and additional polishing with fine sandpaper.
Correctly carried out preparation and grinding of the ends will lead to the following:
- the wood will dry quite slowly, due to which the shrinkage will be uniform;
- painting and varnishing the timber will require much less material, which will make their consumption more economical.
Useful recommendations also cover other important points.
- It makes sense to start sanding work only after the roof has been erected. After this, new irregularities and defects may appear.
- It happens that the timber turns blue. Then, before sanding, you must first clean the walls with sandpaper and then polish.
- The beams may darken 6-7 days after treatment if they were not previously coated with protective agents.
You cannot grind fresh lumber material, as the equipment attachments may become clogged. In this case, you can use a plastic abrasive disc, but the wood must be collected in the cold season.
Stage-by-stage work
Sanding is carried out in strict sequence and involves several main stages.
- First, you need to process it with a coarse abrasive with a grit size of No. 40. This helps eliminate unevenness and roughness. You need to be prepared for the fact that the nozzle will quickly become clogged with small particles of wood and will have to be constantly replaced. The main thing is to position the grinding tool correctly. The machine should be at an angle of 45 degrees to the direction of travel. You should not press it hard or sharply; you should work without delay in one place. With rough processing, up to 1 mm of thickness can be removed in the most prominent areas.
Wall processing technology
Primary rough processing of timber.
Grinding of timber walls is carried out in the following sequence:
- Rough (primary) processing. The purpose of the process is to remove irregularities, dirt, and grind down the edges of dents to a flat state when they will not be noticeable. Grinding of the material is carried out using abrasive attachments with the largest grains. Work begins with No. 40, gradually reducing the size to No. 80. It should be borne in mind that the nozzles will quickly become clogged, so you need to have a substantial supply of abrasive material.
- Final (main) sanding. It is carried out for the final leveling of surfaces, bringing them to a glossy shine. Fine abrasive No. 120-180 is used, as well as polishing brushes that provide a final shine and remove dust from joints and corners. Difficult areas are straightened with a knife, chisel and fine sandpaper.
- Cleaning planes. After polishing, they are covered with a layer of dust and small shavings. The best option for removing them is an industrial vacuum cleaner. If it is not there, the work can be done with a sponge soaked in antiseptic, solving two problems at once.
When planning the treatment of walls, you need to take into account the properties of the material from which they are made. Massive timber, including profiled timber, must undergo a full leveling cycle. Glued products have a finer finish and are not as susceptible to shrinkage. Therefore, in the absence of significant defects, only finishing polishing can be used immediately after hardening of the surface.
Processing of a log house from timber inside
To treat internal walls made of timber, grinding and coating with special compounds are used. The main thing is to achieve two goals: to protect the wood from rotting and to make the walls beautiful. Grinding is painstaking work that requires knowledge and high-quality tools.
What tool is needed for grinding
For grinding timber, stores offer a variety of tools. But not everyone is suitable for such delicate work. The main criteria when choosing are power and lightness.
Building a house from timber has a flat shape and a belt sander is suitable for sanding. For example, a Makita tool with a dust bag is convenient for interior work. But not all models of grinding machines have dust collection bags.
For processing Finnish timber with a rounded side, a belt sander is not convenient. In such cases, use a grinder with grinding attachments. The grinding attachment for such a tool is a disk with sandpaper attachments.
In the most inaccessible places, grinding is done using a chisel.
When choosing an angle grinder, you should hold it in your hands. The tool must be light, otherwise the labor-intensive DIY work will become even more complicated. The power for grinding timber is 850 W or higher.
Among the most well-proven ones, it is worth noting the grinders from foreign companies Makita, Bosch, DeWalt, as well as the domestic Interskol. These cost from 2,500 rubles.
By purchasing cheap Chinese tools, the buyer receives a kind of lottery ticket. It’s hard to say whether it will be a winner or not.
How much does it cost to sand walls?
Due to the complexity of the work, the cost of polishing by specialists is not cheap. In addition, sanding timber walls requires at least a week.
The walls must be treated in several passes. One-time internal grinding costs from 250-350 rubles/m2.
It’s not difficult to make a calculation, for example, if the wall of a house is 3x4, then the area will be 12 square. Sanding in one pass will cost 12x300=3600 rubles. And this is just one wall.
It is better to do this work with your own hands, slowly. Moreover, you can work inside the house in any weather and time of day.
Choosing a grinder
If you can’t find a sandblaster, you’ll have to work with an angle grinder, preferably two in turn, so that the tool does not overheat. In addition, on one sander you can set the “grain” from 30 to 60 (remove the top rough layer of darkened wood), on the other - “grain” 80-120 (smooth and remove the raised pile of the log after the first treatment).
An eccentric belt sander is designed especially for grinding work, having a built-in bag for collecting dust and sawdust, which are inevitable during the process.
This wonderful device does an excellent job of sanding flat surfaces, but this handy thing may not be able to handle the task of cleanly sanding a rounded log. We will have to again consider the option with two grinders and special grinding attachments. But a good belt sander will do an excellent job of sanding walls made of timber!
Before buying a tool, look at where the machine takes air from. The correct air intake will be at the back rather than on the side to reduce clogging of the sander. The length of the cord is also important - it gives you freedom of action when working.
Which nozzle to choose for the job? Nozzle to nozzle - discord! Some say flap discs are ideal, others prefer a wire brush. There is one rule for any attachment: it should be smaller in diameter than the area of the grinding machine. Otherwise, you may be seriously injured if the accessory becomes stuck in a crack or groove.
Having decided what to grind, try the weight of the tool on your hand - you will have to work for a long time and if the tool is heavy, then “your hand will fall off”, and you will have to grind large areas and this must be done quickly so that dirt does not have time to settle on the sanded surface before it is treated with a waterproof fire-resistant antiseptic.
Another factor in choosing a tool is its power. It should be at least 200-300 W, and the number of revolutions per minute should be 10,000-12,000. All that remains is to arm yourself with a respirator or a thick mask to protect against dust and sawdust and goggles for the same purpose.
Wall grinding technology
Building a house from laminated veneer lumber involves sanding immediately after assembly. If it is natural humidity, then you need to wait until shrinkage and drying are completed. Otherwise, the wood fibers will lift up and you won’t get a smooth surface.
To work with your own hands you will need the following tools:
- Nozzles with different coarse sandpaper.
- Tape train - machine or grinder.
The first time sanding is done with sandpaper No. 40. It will remove all the unevenness. In the future, No. 80-100 is taken to obtain a smooth surface (for example, domestically produced Fera paper).
Changing attachments occurs frequently, since when working with wood, the abrasive becomes heavily clogged with dust and resin. Experts recommend extending the life of sandpaper using a wire brush and alcohol. But after this the working ability of the nozzle decreases.
Do-it-yourself processing moves on average 60 cm in 5-10 minutes. The speed depends on the skill, the type of timber (building a house from profiled timber from coniferous trees takes longer due to the high resin content), and the power of the tools.
You can sand it the old-fashioned way using a block wrapped in sanding paper. But your hand will get tired quickly, and such grinding of a room of 15-20 m2 will take more than a month. This method is good to use when you need to sand small parts and areas where the tool cannot reach.
All work is carried out in a respirator, since there is a lot of wood dust and it easily gets into the worker’s nasopharynx. You can use tools with special bag attachments, but these are more expensive.
How to properly sand the interior walls of a timber house
Sanding timber inside a house is a mandatory operation that is performed after the construction and complete shrinkage of a wooden structure. The main purpose of this work is to level the surface, remove darkened and blue-damaged areas of wood and prepare the interior walls of a house or bathhouse for further painting or varnishing. Sanding is required not only for newly built wooden houses, but also for old timber buildings. Sanding allows you to remove a layer of old paint and refresh the color of the interior walls of your home. Which tool is suitable for the job and how to properly sand a timber and log house from the inside are questions that will be discussed in detail in this article.
Additional recommendations
If the timber inside the house will not be sheathed, then it is recommended to carry out finishing sanding twice. The first - before applying the impregnation, the second - after the impregnation has dried. Then prime the walls along the inner perimeter again and only then cover with varnish or paint.
It is difficult to have time to polish the entire frame in a day, especially if its area is large. And if the sanded surface is not coated with special... solution during the first 12-16 hours, the wood will begin to darken again, and the labor-intensive work will come to naught. The maximum period is 36 hours, and even then you will have to clean it up again in some places. Therefore, someone who has sanded and processed a house himself advises dividing the frame into parts and sanding a small piece a day, bringing this piece to perfection.
Advice! It is better to start sanding from the top rims, gradually moving down. This will make your work more convenient.
After sanding, painting of the log house can begin within 24 hours, when the primer antiseptic thoroughly saturates the wood and “seizes” with an even adhesive film.
To give the log house a beautiful look over the entire surface, so that the color is the same everywhere, you can bleach the wood.
The whitening compound is applied before initial sanding, allowed to dry and sanded. If one layer was not enough, dark spots remained or the logs of the log house still differed from each other in color, the bleach was applied again and the wood was sanded.
Usually a couple of whitening procedures are enough. This treatment will prepare your sanded frame for polishing with clear varnishes or painting with light colors. The beauty of a properly polished log house, covered with varnish or paint, cannot be compared with the timber or log “rolling” that our log house looked like before it was so artistically processed.
Tips for choosing tools and polishing a log frame (1 video)
What you might need (20 photos)
Tools for grinding timber
The question of what is the best way to sand timber inside a house is far from idle. The speed and quality of work largely depends on the correct choice of grinding devices. Previously, sanding was carried out only by hand using a chisel and sandpaper of different grits. But manual sanding is a rather long and tedious process.
Today, manual grinding is practiced only for processing hard-to-reach places in the corners of logs, and grinding the entire area, as a rule, is done with different power tools.
- The most common method of grinding beams is using an angle grinder or grinder with attachments in the form of grinding wheels of different numbers. For initial processing and surface cleaning, nozzles with coarse abrasive No. 30-60 are used. Fine sanding of the wooden surface is carried out using an abrasive attachment with fine grain No. 80-120. An angle grinder is also suitable for processing the internal walls of a log house made of planed logs.
- A belt sanding machine, which processes the surface using a rotating abrasive belt, does an excellent job of sanding a house made of profiled timber. The machine is well suited for removing old paintwork from a large area. The functionality of the device largely depends on the length of the working blade. It is better to process a large area with a machine designed for a belt length of 610 mm. Most models are equipped with a bag to collect shavings and sawdust, which allows for dust-free sanding.
- To sand the interior walls of a log house, you can use an orbital sander with a rectangular base. Machines of this type are distinguished by high quality grinding, so they are most often used for fine finishing and polishing of wooden walls. Models with a triangular platform are suitable for processing hard-to-reach areas - corners and grooves of a log house.
During sanding, a large amount of dust is generated. If wood processing is carried out with tools without a dust collector, then it is necessary to take care of body and respiratory protection: a respirator, goggles, gloves.
Selecting Tools
The following set of tools is used to process walls:
- grinding machine;
- belt sander;
- grinder with disc attachments;
- chisel and sandpaper (for hard-to-reach places).
A grinding machine is used for professional processing; it can either be purchased (average cost 150 thousand rubles) or rented. A belt sander is more suitable for flat laminated timber, the initial cost is 1,500 rubles.
You can use a drill with a special attachment as an alternative to special profile equipment. It is used in combination with a grinder, which is likely to be found in every master’s kit. Choose lightweight models that will allow you to complete the amount of work faster.
Sanding the timber is carried out in stages, for this it is worth choosing attachments with different hardness, from low to high. For external and internal walls, use nozzles No. 80 (for rough processing) and 120 (for final finishing before painting). If this is not enough (pre-used timber, or with poorly separated bark), then use No. 30 and 60.
Important: it is necessary to add protective ones to the tools for direct processing, such as a mask, respirator and goggles made of impact-resistant plastic.
Rules for grinding timber
Some home craftsmen, having read incorrect information on the Internet, try to sand wood with water. However, wet wood should not be sanded as it will scuff. After such grinding it is unlikely that you will get a beautiful and smooth surface.
It is best to start sanding from the upper floors of the house, so that a minimum of dust enters the finished rooms. It is not recommended to carry out work over the entire area at once. It is more convenient to sand in parts. The surface of the wall to be treated is divided into sections, which are sanded alternately.
Before sanding a wooden ceiling, in order to clearly see all the surface irregularities, it is necessary to install the correct lighting. The light should fall from one side with a slight angle of inclination. Large area ceilings are faster and more convenient to process using an orbital grinder. For ceilings with complex structures, it is better to use an eccentric sander.
To avoid burning the timber during grinding, it is necessary to work at low speeds and not press hard on the tool. Another reason for wood fires is untimely change of sanding wheels. Worn or chip-clogged tips can cause a spark. During work, it is necessary to ensure that the cables are laid correctly, which, if twisted or broken, can also cause a fire.
Timber grinding technology
Sanding the walls of a log house is carried out in stages and includes three types of processing: rough, fine and finishing.
- At the first stage, rough processing of the timber is performed, the task of which is to remove all significant irregularities from the surface and prepare it for finer grinding. For this work, the abrasive with the largest grain size is selected. During initial processing, the nozzles very quickly become clogged with dust, and they have to be changed frequently.
- For basic sanding, fine-grain sandpaper is used. After processing, the result should be a flat and smooth surface, ready for subsequent painting.
- Final sanding is not always performed, but in cases where it is necessary to bring the surface into ideal condition for the subsequent application of a transparent varnish coating. The walls are polished using the finest abrasive to make the surface as smooth as possible.
To grind the grooves, use a grinder with an attachment several sizes smaller than the diameter of the circle. The corners are processed manually with a chisel with a working part width of 20 mm.
Log grinding technology: stages of work
Do-it-yourself sanding of profiled timber or logs is carried out in several stages:
- Rough grinding (rough).
- Processing grooves and corners.
- End processing.
- Final sanding (fine).
- Decorative treatment of log house with protective compounds and impregnations.
The process of external and internal grinding of a log house requires frequent changes of working attachments due to the formation of a large amount of wood dust. To clean the nozzles from dirt, you can use a steel brush treated with an antiseptic.
When working with wood, do not forget about basic safety rules, using personal protective equipment - goggles, gloves, mask and overalls.
Sanding timber walls inside and outside the house is carried out in the following order:
Personal means of protection against the negative effects of wood dust are used. Sanding is carried out from top to bottom. The wall area is divided into equal sections, which will allow for better grinding. The material is checked for problem areas - old loose pieces are removed, and the affected areas are cleaned of mold and mildew. The quality of the caulk is checked, and any defects in the form of cracks and gaps are eliminated with wood sealant. Rough grinding of the surface is carried out using large nozzles. This will help get rid of existing unevenness and roughness. When using a grinder, it is recommended to grind disc attachments on remote areas of the log house - above window and door openings, near corners. In this way, possible sparking of the nozzle and damage to the wood can be prevented. In addition, when processing surfaces, it is better to move the tool with the shoulder joint, rather than with the hands, in order to obtain the most even surface possible. Next, fine-grain attachments are used to remove wood lint.
Processing the material with the tool is carried out carefully at medium speed, which will help avoid damage to the wood and the formation of grooves on the walls. The ends and grooves of the frame must be thoroughly polished, since they are more susceptible to the negative effects of external factors. To process the ends, you can use attachments with a grain size from 40 to 120. Hard-to-reach places, as well as internal and external corners, are ground with a chisel with a blade width of 25 mm. The surface is cleaned of dust with a vacuum cleaner and a brush with nylon bristles. The sanded walls of a timber or log house are treated with antiseptic compounds to protect against fungus and mold, glazing agents to refine the wood, fire retardants to increase resistance to combustion, acrylates to protect against the negative effects of precipitation
To prevent darkening of the wood, sanded surfaces are treated with protective compounds no later than 2 days after sanding. Painting of the log house is carried out 36-72 hours after completion of sanding and impregnation with protective compounds.
Sanding logs is a long and rather painstaking process, the organization of which will require high-quality equipment and minimal experience in working with wood.
Typical mistakes when sanding timber
Many home craftsmen, when performing grinding on their own, often make mistakes, among which the most common are:
- Grinding wet timber, which inevitably leads to re-processing;
- Incorrect choice of tool, which affects the quality of grinding;
- Working at high speeds, which contributes to the appearance of depressions and grooves on the surface;
- Sanded walls remain without a protective coating for a long time, which causes darkening of the wood.
Sanding is a complex and time-consuming job that requires a lot of patience and a competent approach. It’s not easy to do it yourself, without certain skills and experience.
Professional grinding services
Our specialists are highly qualified, have extensive experience and proven work skills. All this ensures high quality grinding, which we will perform in accordance with the deadlines specified in the contract. In our work, we use modern professional power tools that allow us to achieve a perfectly smooth and even surface. If you need high-quality sanding of a country cottage, country house or bathhouse, we are very willing to carry out work of any level of complexity. Contacting us is very simple - on the “Contacts” page you will find all the coordinates of our company, and you can also leave your request.
Calculate the cost of painting and insulating your home right now
Source: master-srubov.ru