Insulating the walls of a house performs important and responsible functions - heat conservation, saving money spent on heating.
There is another task, invisible at first glance, but no less important from the point of view of protecting the wall material - eliminating moisture condensation on cold areas of the walls.
This process causes the material to become wet, corrosion of metal parts and can lead to the destruction of walls.
Therefore, wall insulation must be approached with attention and understanding of the meaning of all operations.
Insulation of walls outside and inside – which is better?
All experts clearly recommend using external wall insulation. This is explained by the peculiarities of physical processes: when walls are insulated, the dew point moves - the area with a temperature at which moisture in the air in the form of vapor begins to condense and settle on a cold surface. If the dew point is on the inner surface of the wall , then it will constantly get wet with all the undesirable consequences. Insulation from the outside solves this issue by moving the dew point into the thickness of the insulation.
CAREFULLY!
When insulating from the inside, the dew point ends up between the insulation and the wall, causing it to get wet . In addition, the internal atmosphere of the home becomes oversaturated with water vapor, which requires increased forced ventilation and does not have the best effect on the well-being of the residents.
Dew point
However, it is often necessary to carry out internal insulation . This happens due to the impossibility of carrying out external work for the following reasons:
- The height of the building makes it impossible to carry out work.
- There is no possibility of insulation due to dense neighboring buildings.
- Climatic conditions or weather do not allow working outside.
Such reasons force us to solve the problem in the only possible way - insulating the walls from the inside. This method has its advantages:
- Ability to carry out work at any time of the year and in any weather.
- There is access to all sections of the walls without the construction of scaffolding, platforms, etc.
- The sound insulation of the room increases.
However, there are significant disadvantages:
- The volume of rooms is reduced.
- The presence of insulation reduces the possibility of using hanging furniture.
- Air humidity increases.
- Transfer of the dew point to the inner surface of the wall, which will sooner or later cause it to become wet.
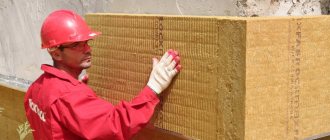
Such circumstances require a special approach to solving the problem, in particular, a careful and meticulous selection of insulation material that can work successfully in specific conditions. The most common and effective of the insulation used is considered polystyrene foam , which is often used to insulate walls inside the house.
Conditions for insulating external walls with foam plastic
Do-it-yourself insulation with polyurethane foam Types and Instructions Video
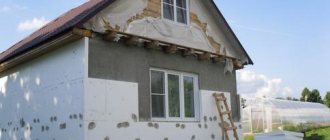
Like any other construction process, insulating a brick house from the outside with polystyrene foam requires a special approach, in particular, this concerns the preliminary preparation of the work front. So, in order for polystyrene foam to hold tightly and perform its functions, it is necessary that the weather for the last three days be dry and without rain.
You can measure the air humidity yourself, or refer to weather forecasters - it should not be higher than eighty percent. Therefore, it is better to start insulating a brick house with polystyrene foam in the summer, when hot, dry weather makes it convenient to apply the insulating material.
As for the temperature that will be outside during the period of insulation, it should be no lower than 0-3 degrees C. Otherwise, the foam will not be securely fastened, and the heat in the house will still be consumed. This is another point in favor of the fact that this method of insulation should be carried out in the spring and summer.
After all, if anything interferes with the normal adhesion of the polystyrene foam together with the binding substances, insulating a brick house with polystyrene foam will not give the necessary dividends. Therefore, it is necessary to carefully treat the wall, ridding it of everything that may be unnecessary.
Pay attention to cracks and surface irregularities. If this is necessary, you need to re-prime the wall
Only after this process should we begin to insulate the house.
Foam plastic - advantages and disadvantages
Polystyrene foam is the most advantageous of insulation materials due to its combination of useful qualities.
These include:
- Low thermal conductivity.
- The material is very light - 98% of it consists of gases.
- It cuts well, has convenient sizes - length, width and thickness of the sheets.
- Individual foam granules are completely neutral to the effects of water; for an array there is a slight absorption, but it is insignificant.
- Polystyrene foam is a good vapor barrier.
- It is practically non-flammable; in any case, foam plastic will not cause a fire.
- The price of the material is the lowest of all similar ones.
However, there are disadvantages:
- The material cannot withstand any deformation - it breaks immediately.
- Absolutely unresistant to solvents such as acetone or gasoline.
- Requires increased care in work, as it crumbles a lot if handled carelessly.
Types of foam vary in density. The industry produces brands of different densities:
- PSB-S-15.
- PSB-S-25.
- PSB-S-35.
- PSB-S-50.
The higher the number, the higher the density of the material.
IMPORTANT!
For internal insulation, the best choice would be the material with the highest density, since it is the material that allows the least amount of steam to pass through.
In addition to regular polystyrene foam, there is a more durable and dense variety - extruded polystyrene foam . It is produced a little differently and does not consist of welded individual granules, but is a single foamed monolith. It is best suited for internal insulation, but its price is about 3 times higher than that of conventional polystyrene foam.
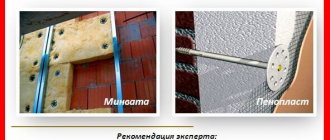
Based on the advantages and disadvantages of polystyrene foam, you can choose it or one of these insulation materials:
- mineral wool;
- penoizol;
- extruded polystyrene foam;
- penoplex;
- penofol;
- polyurethane foam.
Advantages of polystyrene foam for internal insulation of a house or apartment
With an abundance of thermal insulation materials on the construction market, foam plastic is constantly in stable demand due to its many advantages. In addition to the fact that it is an affordable, environmentally friendly material, very light in weight, easy to transport, cut, and install, it also has high performance characteristics:
- Thermal insulation properties are noticeably superior to many types of insulation. Polystyrene foam consists of compressed granule cells, inside which a closed cycle of air chambers limits heat exchange, preventing the penetration of cold from outside and the leakage of heat from the room.
- The sound insulation of walls is noticeably increased due to the cellular structure of the foam. Even a small thickness of the material (2-3 cm) can improve protection against the penetration of extraneous sounds from the street. A thicker layer of slab enhances sound insulation.
- Does not absorb water - low hygroscopicity allows you to maintain thermal insulation properties. Water does not get into the cells at all, it can only leak between them. Therefore, it is not recommended to use this material in rooms that are not heated for a long time. Due to prolonged exposure to cold and moisture, the foam may crumble into individual granules.
- Resistant to damage by microorganisms (fungi, mold), but vulnerable to rodents - mice can chew the foam and then repairs will need to be done;
- Strong, durable material if operating conditions are observed (easily damaged by mechanical stress). Resistant to many aggressive environments - acids, alkalis, salts, bitumen, etc. (except acetone, alcohol-containing compounds, diesel fuel, vegetable oils).
Despite all the advantages, polystyrene foam is used selectively, as it is not suitable for all operating conditions.
Internal insulation wall cake
The structure of the pie for internal wall insulation is not particularly complicated. The composition is as follows:
- Wall surface.
- A small leveling layer of primer.
- Foam glued or nailed onto dowels.
- Internal lining.
The structure of the pie can be changed or complicated, the main thing is to follow the rule:
NOTE!
The vapor permeability of the layers of the cake from the inside should be in decreasing order.
This means that the vapor permeability of the foam should be lower than that of the wall. To do this, you need to choose the densest material.
The meaning of this rule is that the release of steam from a denser material into a looser one will facilitate its release to the outside, and if on the contrary, steam will begin to accumulate and condense at the junction of the layers, in our case, on the surface of the wall.
The preparatory primer layer, by the way, also serves as an intermediate layer, removing large differences in the properties of materials and making a smoother transition to a low wall temperature.
Flaws
We will do the insulation of the wall from the outside with our own hands
Despite all the above advantages, polystyrene foam, the thickness of which is at least 25 mm, also has its disadvantages. Such as:
- Weak sound insulation properties;
- If exposed to high temperatures (about 80 degrees), partial destruction of the material is possible;
- The material is not resistant to most organic solvents;
- Low coefficient of permeability;
- It is used only for insulation of private and residential houses. Not suitable for insulating high-rise buildings, as well as public buildings whose height may exceed 25 meters.
How to calculate the thickness of insulation?
Correct calculation of insulation thickness solves several problems. First of all, it helps to eliminate undesirable phenomena - increased air humidity in the house, swelling and failure of wall material.
In addition, there are purely practical tasks - determining the width of window slopes, window sills and other elements that need to be replaced, taking into account the thickness of the foam.
The method for calculating the thickness of a material includes complex calculations using formulas that involve various quantities - the thermal resistance of the material, thermal conductivity coefficients and other intricacies.
Searching for data on a specific material (and you will have to look for values for existing grades of concrete or other wall materials) can lead into such a jungle that the ultimately obtained result may turn out to be completely inconsistent with the real situation. The fact is that a correct calculation requires taking into account many subtle effects, which together make up the real picture of the physical state of the object.
At the same time, you can find the required values much easier - just find several online calculators on the Internet, of which there are plenty, and, by substituting the available data, get the desired result. For greater reliability, such calculations are made on several independent resources so that it is possible to compare and clarify the data obtained.
IMPORTANT!
In practice, in the vast majority of cases, a foam thickness of 50 mm is used.
In any case, it is necessary to round the obtained calculated data to the actual dimensions of the commercially available material, and such rounding closes the calculation at this thickness.
Comparison of thermal conductivity
Thermal insulation overview
Insulation materials should be selected according to the following parameters:
- thermal conductivity - the lower the coefficient, the greater the thermal capacity of the heat insulator;
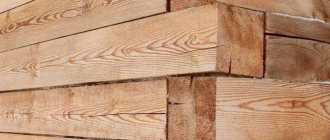
- level of vapor permeability - if you insulate the wall of a wooden house with a material with a lower index than wood, this will lead to rotting of the walls;
- water absorption - the less moisture the insulator absorbs, the longer it retains its properties;
- density – the degree of load on the supporting structures depends on the parameter;
- reliability - for materials used in ventilated facades, the requirements for fire and sanitary safety are increased, because the risk of fire or destruction is very high.
Depending on the type of walls, climatic conditions and design loads, the required thickness is selected.
Most often, insulation of load-bearing walls is carried out:
- mineral wool (basalt or fiberglass);
- Styrofoam;
- extruded polystyrene foam.
1. Mineral wool insulation consists of slabs or mats made of fiber obtained from molten rocks or raw materials for glass. The binder is special resins. Density varies from 20 to 220 kg/m3, the optimal thermal conductivity coefficient is from 0.030 to 0.041 W/mK, the degree of vapor permeability and moisture resistance depends on the manufacturer and purpose, thickness is from 5 to 20 cm.
Some factories produce hydrophobized products; sometimes flame retardant additives are added to increase flame resistance. The price of thermal insulation of a facade using mineral wool is from 160 rubles/m2. It is positioned as a non-flammable material, but practice shows that low-quality wall insulation is easily flammable and supports combustion.
2. Polyfoam is a foamed cellular plastic for insulation. It is characterized by its low weight and low thermal conductivity - 0.033 - 0.048 W/mK. The degree of density is 11-35 kg/m3, the water absorption coefficient reaches 3.5% by volume. It is produced in slabs 2-10 cm thick, the cost of which starts from 30 rubles/m2. It does not burn, but melts, releasing toxic substances into the air, which cause severe poisoning. The material is very fragile to break, is not suitable for houses of complex shapes, and does not dampen impact type noise well. Foam plastic has the advantage of low price and easy installation.
3. Extruded polystyrene foam (EPS) is obtained from polystyrene granules processed by extrusion. Available in slabs 2-100 mm with a density of 25-45 kg/m3, the choice depends on the scope of application. For load-bearing structures you should buy Penoplex Wall insulation, and for interior spaces - the Comfort series. The thermal conductivity level is 0.028 - 0.033 W/mK, the water absorption coefficient is one of the lowest in the group (0.4% by volume). It does not support combustion, but it melts; in the process, toxic toluene and styrene are released, which are dangerous to humans even in small concentrations; the cost is from 90 to 300 rubles/m2. It is used in cases where high moisture resistance, density with low weight, biostability, and simplified installation are important. Of the minuses: it emits an unpleasant odor, is fragile, and is not suitable for wooden houses.
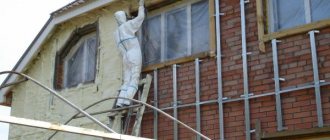
Preparing the wall surface
Insulating walls with foam plastic begins with preparing the surface. Preparatory work consists of removing old paint or wallpaper , inspecting the surface for cracks or other flaws that need to be repaired, and removing peeling or crumbling areas.
Checking the plane of the wall for dents, irregularities or depressions and, if necessary, eliminating defects by applying a layer of plaster or local leveling. Permissible deviations are 1 cm per linear meter.
After this, the wall surface is covered with a layer of deep penetration primer to give the wall material greater ability to adhere to adhesives.
Plastering walls
What is foam plastic
How to insulate a panel house from the outside and inside for winter living with your own hands Step-by-step Video
Before you start insulating walls with polystyrene foam (the video is presented below), you need to understand the fact that polystyrene foam is a material with zero vapor permeability. For this reason, insulating walls with foam plastic from the inside is prohibited.
The second aspect that must be taken into account is the density of the material. For wall insulation, 25-density foam is best suited
Using material with a lower density level can easily damage the walls during work. The use of foam plastic of a higher density will lead to a manifold increase in the cost of work, since the prices for such material are much higher. However, it must be remembered that no matter how high the density of the foam, this indicator in no way affects the thermal insulation properties.
The third parameter that is important to consider before purchasing material for insulation work is the thickness of the sheets. The thickness of the foam for wall insulation plays an important role, since the quality of thermal insulation depends on this indicator. The normal thickness is 50 millimeters. The use of foam plastic of this thickness will reduce the heat loss coefficient by approximately half. Of course, you can use thicker foam. For example, sheets with a thickness of 100 millimeters are very often used. Of course, this option will cost a larger amount. You can buy polystyrene foam for wall insulation at any hardware store. However, before doing this, it is better to consult with specialists who will calculate the optimal material thickness for a certain climate zone. Such calculations take into account many parameters, including the nature of winter in a given climatic zone (humidity, air temperature), the thickness of the walls of the building itself, the material used in its construction, and so on.
Installation of sheathing
Lathing may only be needed for mechanical fastening of sheathing material - lining, wall panels, etc., which cannot be attached directly to the foam. In such cases, a 50 by 50 mm wooden block is used, installed in horizontal rows on the wall before attaching the insulation.
After the foam is installed, vertical counter-lattice strips are attached to these bars, onto which the sheathing will be attached.
Installation of sheathing
Features of foam
“Foam is a lightweight foamed polymer material that consists of cells filled with air.” The main features of polystyrene foam insulation are:
- excellent sound and heat insulation;
- affordable price category;
- not subject to rotting and aging;
- environmental friendliness.
However, before choosing this material as insulation for walls from the inside, it is worth considering its disadvantages. The main disadvantage is its susceptibility to mechanical damage. Polystyrene foam is a fragile material, so it should be handled very carefully. When insulating with foam plastic, it is necessary to create additional protection from damage.
Methods for attaching foam to the wall
Three methods are used:
- Dry mixes . Materials like tile adhesive are diluted to the desired consistency with water.
- Special glue . Most often it is produced in cylinders, reminiscent of polyurethane foam.
- Dowels with a wide cap are fungi.
NOTE!
The use of fungi is carried out as an additional measure to strengthen adhesive joints.
The glue is applied directly to the foam. Usually the entire area of the slab is not covered, applying stripes along the perimeter and in the central part. The joints are additionally coated with an adhesive or, in special cases, filled with foam.
Fastening with polyurethane foam
Fastening with dowel-nails
Technological insulation
Foam insulation indoors is done by gluing polymer boards. The sequence of work is shown in the video.
To attach foam plastic, a special adhesive composition is used, designed specifically for this material. It is purchased dry and prepared by mixing with water according to the instructions. The consistency should be optimal in thickness.
The application of the adhesive mass is ensured by two methods: applying it to the wall surface or spreading it in the form of cakes at the corners of the insulation board. A possible option for additional fastening is the use of umbrella-type dowels, which are installed after the glue has completely dried.
Laying foam sheets begins from the bottom corner of the wall. Before attaching them, the slabs are pressed against a dry wall for marking. Cutting the foam into slabs of the required size is carried out using a heated string or a hacksaw with fine teeth. First, the first row of insulation is completely glued. The second one is applied so that the joint between the lower plates falls in the middle of the top sheet, i.e. the seam should have a T-shape.
Do-it-yourself insulation of internal walls
The installation process itself is simple:
- Foam boards are glued onto the prepared wall surface . The work is carried out from bottom to top in horizontal rows, with offset joints as in brickwork.
- Cutting the foam is done with a hacksaw with a fine tooth, so it crumbles less.
- As an adhesive, you can use a dry mixture , which is diluted with water for use, or special glue in cans (like polyurethane foam).
- Glue is applied along the perimeter of the sheet in a solid line , and in the center of the slab - in rows (for special glue), or in a continuous layer about 5-10 mm thick (for dry mixes).
- It is also necessary to apply glue to the ends of the sheets to connect them more tightly to each other.
- Remove the glue squeezed out of the joints during installation immediately and smooth the joints with a spatula.
- It will be necessary to dismantle the window slopes and window sill and carefully insulate these areas. Subsequently, it is necessary to install new, wider window trim elements.
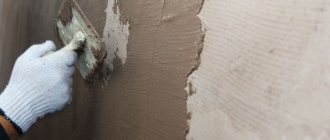
- The surface of the foam is covered with a layer of fiberglass mesh and a reinforcing layer of plaster is applied . (As an option, it is sheathed with clapboard or wall panels).
You can find more detailed instructions for insulating walls with foam plastic here.
Apply the solution
Fix the dowel with nails
Internal insulation is an additional or forced measure . If possible, it is better to insulate from the outside, and if this is not possible, then additional ventilation of the premises and removal of water vapor should be organized in parallel with the installation work. Then the work of the wall pie will be more efficient and the risk of wall swelling will be reduced, in addition, the decrease in air humidity will have a beneficial effect on the health of the residents.
Instructions for insulating walls with foam plastic from the inside
For the work you will need building materials and tools.
Material:
- Styrofoam;
- sickle tape for sealing joints;
- polymer mesh;
- cement-based adhesive;
- umbrellas (special dowels for attaching foam);
- universal primer;
Tool:
- a roller or brush for priming and a container for it;
- hammer drill and drills;
- spatulas;
- sandpaper;
- level, ruler and pencil for marking.
The technology of internal wall insulation with foam plastic involves performing work in several stages:
Pre-preparatory stage
The importance of this stage is difficult to overestimate. Because The quality of the sheet’s adhesion to the wall and the ability of the foam to maintain its thermal insulation properties depend on the quality of the base.
Before you start working you need to:
- replace windows if necessary. Otherwise, the effectiveness of insulation will be reduced to zero;
- clean the wall of wallpaper, clogged nails, etc.;
- seal all cracks;
- remove the fungus. If it does not wash off, it needs to be cleaned off with sandpaper;
- dismantle the baseboard;
- cut the flooring to the thickness of the sheet. The material is mounted only on the supporting coating;
- level out any possible unevenness in the wall. Otherwise, air will remain between the sheets, which can lead to a shift in the dew point.
Tip: To eliminate minor defects, use putty; to level a wall with transitions of more than 10 mm, use only plaster.
Preparatory stage
At this stage the following actions are performed:
- the prepared wall is treated with a primer. From a wide variety of priming solutions, give preference to a universal mixture from a trusted manufacturer. For example, good reviews about Ceresit ST-17. After its application, a thin film is formed on the wall, which will provide both bioprotection and better adhesion of the adhesive mixture to the wall;
Tip: Do not use a sprayer to apply primer. So it is applied and dries unevenly, and this reduces its properties.
- the wall must dry. To do this, it is enough to ensure good air ventilation in the room;
- markings are applied. As practice shows, the walls of most apartments built during the Soviet period (Khrushchev and panel houses) are uneven. If yours are the same, then draw a line as close to the floor as possible. You will look up to her. Then subsequent rows of sheets will lie relatively evenly. Why relatively? Yes, because DSTU provides for a deviation of +/- 10 mm on a sheet measuring 1x1 m. Seal the bottom and sides with foam plastic scraps. For the same reason, there is no need to make a large number of blanks and apply the drawing to the entire wall - only to the corner.
Main stage
Insulating walls with foam plastic from the inside can be done in two ways:
- Frame method
. This method is used if further finishing with plasterboard or clapboard is planned. This is mainly due to the fact that the thickness of the wall UD and SD profiles is 27 mm. Polystyrene foam is placed between them. And the thickness is 27 mm. is clearly not enough to perform high-quality insulation of walls with foam plastic inside the house. But the frame method is perfect for lining. This is due to the fact that a wooden frame with a beam thickness of at least 50 mm is installed under it.
- Frameless method
. If you plan to finish the walls with putty.
How to insulate walls with polystyrene foam from the inside - the sequence of execution for the frameless method of insulation under putty or plaster
Let's start installing the foam on the wall. Work begins from below, from a distant corner.
- An adhesive solution is applied to the sheet. The application method is shown in the diagram;
Method of applying glue to foam plastic
- the sheet is applied to the wall and floor (if it is uneven, then to the painted strip) and pressed;
Applying foam to the wall and floor
Tip: Do not press too hard, otherwise the sheet will be pressed through.
- a hole is drilled in the center of the sheet for an umbrella dowel (fungus);
- the sheet is fixed with an umbrella;
Tip: The umbrella cap should sink slightly into the foam or be flush with the sheet. Otherwise, finishing difficulties may arise.
- For more reliable fixation, umbrellas are also hammered into the corners of the sheet.
Placement of umbrellas to securely hold the foam in place
- If the polystyrene foam slabs are smooth, installation can be carried out according to this scheme.
Foam plastic installation diagram
This device makes it possible to save on umbrellas, but makes installation somewhat “flimsy”.
To ensure better insulation of the walls with foam plastic from the inside, the sheets of the second row are shifted. This installation scheme will ensure the absence of perpendicular joints.
Diagram of displacement of foam sheets during installation
- so that the structure does not allow heat to pass through, there should be no gaps at the junction of the sheets;
- To arrange the top row, you need to adjust the sheets to size. The foam is cut with a regular hacksaw or construction knife (if its thickness does not exceed 50 mm);
- sealing seams. Seams thicker than 10 mm must be sealed with foam cuttings. those that are less than 10 mm. can be blown out with foam;
Sealing seams with foam
Tip: To keep the piece tightly, you need to apply foam to its back side.
- Serpyanka tape sticker. The good thing about the tape is that it has one side treated with glue. It is easy to glue. The price of the tape is insignificant, but it is difficult to overestimate the value, because it protects the seam from deformation. Without using tape, cracks will appear along the seam;
Tip: Protruding joints are removed with a foam float.
- putty on umbrella caps. Only those that are recessed in foam. In principle, the caps will “hide” during the filling of the wall. But then the subsequent mixture will be applied in a thick layer and will take longer to dry.
Finishing stage
- Glue is applied to the surface of the top sheet. The width of the layer is equal to the width of the reinforcing mesh.
- a mesh is applied and hidden under a layer of mixture.
- After the wall has completely dried, you can begin decorative finishing.
Tip: Try to avoid wrinkles in the mesh. They are poorly camouflaged in the future.
Folds on the mesh
Advantages of polystyrene foam
Polystyrene foam is far from the most ideal material for insulation. But its many advantages are obvious:
- Low cost. This is a great factor for many people with low incomes.
- The material is very easy to install and does not cause problems during operation.
- Its lightness greatly simplifies a lot of tasks: installation, transportation, storage.
- Polystyrene foam does not rot.
- It is safe to use and during insulation, it is impossible to get injured.
- Relatively environmentally friendly, absolutely harmless at low temperatures.
- Effective for insulation in all respects.
- Does not thicken the wall visually.
- Perfectly compatible with many materials, chemically neutral.