1.More details about the material
Flexible stone appeared not so long ago, but has already gained considerable popularity. This is a very light, practical material that is no more than 6 mm thick and consists of three thin layers. The first is a non-woven fabric or flexible fabric base, the second is an adhesive, in this case an epoxy solution, the third is fine chips of natural marble, quartz or granite.
Flexible sandstone is suitable for both interior decoration and cladding of building facades.
It is very practical, durable and is able to maintain its properties and visual appeal unchanged for more than 25 years. Its surface has a slight roughness, and the variety of colors will allow you to choose a sample to suit every taste. The patterns that appear on the surface repeat the appearance of natural marble, sandstone, granite and other types of natural stones.
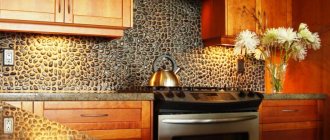
In the kitchen
Since flexible stone has moisture-resistant parameters, it can be used in the kitchen. It is usually used to decorate a work area. It perfectly replaces ceramic tiles or tempered glass.
An apron made of flexible stone can withstand high temperatures and is also easy to clean.
You can clean it not only with hot water, but also with various detergents. With the help of seamless installation, you get an even coating that is free of flaws, and you also don’t have to pay much attention to cleaning the seams.
2.Production technology
This interesting material was invented in Germany, and the process of its production involves two possible places of production - directly in quarries or in special workshops. These processes differ in the method of applying the last, third layer, that is, the pattern.
The first option is quite painstaking and specific. To produce in a quarry, you must first find a suitable source with interesting rocks, then prepare an even cut of sandstone with a beautiful natural pattern, polish it to achieve an almost perfectly smooth surface. After this, a special deep penetration adhesive solution is applied to the prepared area. For these purposes, binders based on epoxy resin are used. A thin layer of textile base is applied to the impregnated surface, the material is carefully smoothed to avoid the appearance of wrinkles and left until completely dry. very important to let the material dry completely so that when removed, all the grains of sand remain on the base and do not stick in separate places. It is very difficult to remove the sheets, because they are very thin. For this purpose, special equipment is used, which, as it were, cuts off the top layer of the stone surface along with the base. This produces a flexible sheet that completely copies the color and is environmentally friendly.
The advantage of this type of production is the completely natural origin of the material. But there are a number of significant disadvantages:
- Searching for a suitable quarry, which in fact may not happen as quickly as we would like;
- Small variety of colors and textures;
- Large expenditures of time and money to prepare a suitable surface;
In the case of production in specialized workshops, everything happens much faster. The pattern is formed artificially by mixing several types of components. advantages , but so far no disadvantages have been discovered:
- There is no need to look for a career;
- The color scheme and texture are very diverse and practically unlimited;
- The appearance of the surface is 100% similar to natural rocks;
- Only used for production natural ingredients.
3.Production at home
Since the release of flexible stone for free sale, many people immediately began to wonder whether it could be made at home. We tried to figure this out and came to the conclusion that, in principle, yes. To do this, you will need to prepare a workplace, which should have a flat, smooth and sufficiently large working surface. A desk will do. You also need a place to dry the finished sheets. Smooth wooden pallets placed in a well-ventilated place, for example, on a balcony, are ideal for this.
To make the stone itself, you need: a base material, such as fiberglass, natural sandstone in the form of fine chips or quartz sand, acrylic glue, a drill for mixing and a container.
Spread the required piece of fiberglass on the table, pour stone chips on top, imitating a natural cut of stone, and pre-level it.
Mix the glue and saturate the entire surface of the sheet with it along with the crumbs, then finally level it with a spatula. The layer should be thin and uniform; to do this, lightly press the spatula. Then place the resulting sheet on a tray, straighten it and leave until completely dry. In terms of its decorative properties, a flexible stone made on its own will be inferior to factory production, however, its technical characteristics will be similar. In order to diversify the appearance, you can use iron oxides to color the stone chips. This dye is the most durable, and also completely natural.
Fiberglass is recommended for use due to its high strength and good adhesion to adhesive components. You are unlikely to be able to make a large batch, but a few square meters for finishing a wall or fireplace area is quite possible to make at home.
The main pros and cons of the material
The main advantages of the material:
- Moisture resistance.
- Lightweight and elastic material.
- Eco-friendly and natural.
- Durable.
- Not fussy about maintenance.
It gained wide popularity relatively recently and was immediately loved by many. Interiors where flexible stone is used look interesting and unusual. The technology for laying flexible stone is similar to wallpapering.
The walls need to be cleaned, leveled, glue applied to the wall and a flexible stone applied. The subsequent strip should be applied with preheated edges.
This is the main difference from working with wallpaper. The edges must be heated so that the seam is not noticeable. Due to its structure, flexible stone is durable and light. It is very flexible during installation and easily takes the desired shape when heated. The material also has a beautiful appearance.
Let us highlight several main disadvantages of the material:
High price
If you buy coating from a well-known supplier with quality certificates, then the price per square meter starts from 1,300 rubles. That's why many craftsmen come up with homemade products.
It is up to you to decide whether to buy a flexible stone at this price. After all, the price of this material is close to the cost of natural stone. But unlike flexible stone, decorating a room with natural stone is much more difficult and expensive.
Before laying flexible stone, you need to prepare the surface
It should be completely flat. This requires additional preparation time and certain costs.
Large counterfeit market
Yes, of course, such products are much cheaper, but in terms of their characteristics they are much inferior to the original.
Instead of epoxy resin, these products use glue. This has a bad effect on the elasticity of the material. This can lead to the formation of a large number of cracks during operation. Stone chips begin to crumble from the edges.
And don’t forget about caring for flexible stone. In order for it to serve you for a long time, you need to wipe the material regularly. If there is a large accumulation of dust, you can go through it with a vacuum cleaner.
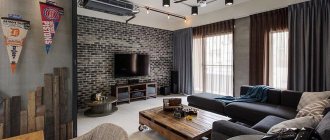
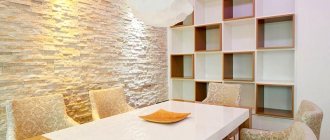
4.Interior use
Due to its lightness, flexible stone is used in interior design in a wide variety of options.
- For wall decoration, both in the living room or hallway, and in the children's room and in rooms with high humidity. The walls of a large hall in a private house, lined with this material, look especially attractive. Due to the fact that it is very easy to care for and easy to clean, it can also be used in a child’s room and there is no fear that children will paint on the walls and irreversibly damage the surface. During operation during wet areas, it was noticed that moisture does not collect on the surface in the form of condensation, which means that the material is breathable. This is one of the most practical ways to use it.
- For finishing fireplace area. Many people like to install electric fireplaces in the living rooms of their apartments. These devices are often built-in, which means creating special niches for them. Naturally, in order to quickly and easily cope with this task, many use drywall, which is later decorated with various materials. The most common are artificial stone or gypsum bricks. But not always a plasterboard structure can withstand weight facing materials, it is in this case that it is important to use flexible stone. its surface not afraid high temperatures and is suitable for cladding even real fireplaces and stoves.
- Surface cladding of decorative columns. This element of architecture has not yet gone out of fashion and is actively used to decorate modern interiors. Of course, not everyone can afford to use natural stone as a material, and this design will have considerable weight. Therefore, plasterboard frames of round or rectangular shape are often made, which are decorated depending on their preferences. There are a lot of options for finishing rectangular column posts, but with a round shape it is more complicated. This is either painting or decorative plaster, which is not everyone’s cup of tea. Finishing with flexible stone will allow you to easily cope with this task, without leaving even a hint of joints. A monolithic surface with a natural color will not make you doubt its naturalness.
- Frescoes based on flexible stone will help create a unique indoor environment. This is especially true for rooms where there are not so many options for diversifying the decoration. For example, in bathroom, where there is always high humidity and it is necessary to approach the choice of facing materials with particular practicality, now it is possible to decorate the walls with various designs. These can be luxurious gardens or the sea coast. The design is applied to the base using UV printing and is completely safe for health. Even after several years, such a fresco does not lose the brightness of the colors and clarity of the design.
- This unique material has found its application in the main room of each apartment - in the kitchen. The work area, which is often protected from steam, moisture and grease splashes by tiles or tempered glass, may well be lined with flexible stone. You have the opportunity to get a natural pattern without seams and save a little money when compared to a glass backsplash. By the way, you can give preference not only to plain surfaces, but also to UV printing. Such coverage will practical, simple V care, durable and original.
- An interesting feature of this material is its light transmittance. You can make unique ones with your own hands decorative lighting. If you cover the surface of the lamp with flexible stone, it will not only look very impressive, but will also emit a soft, pleasant light. Glowing spheres, flat light panels or wall lamps, the surface of which is covered with this material, look very beautiful and unusual. Such elements will help create a special atmosphere in the room.
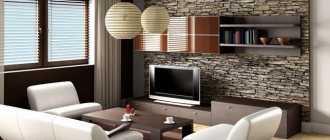
In the living room
Flexible stone is often used in the living room, for which the following options are used:
- decoration of the fireplace area, since with the help of this material a beautiful coating is formed that can easily cope with the effects of high temperatures, so the tiles do not ignite, do not change structure and color;
- design of decorative columns installed in a large living room, and they are ideal for the classic style of the interior;
- creation of frescoes and paintings that form a unique interior decorating the living room;
- wall decoration with rolls of flexible stone.
The cladding is easy to do with your own hands, since the material is very easy to use due to its high plasticity.
Attention! The base must be clean, dry and level.
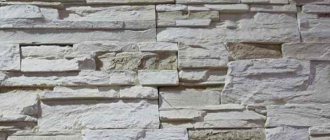
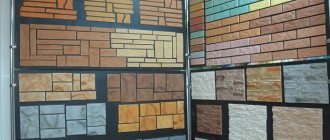
5.Types of material
Depending on the thickness of the stone chip layer, there are three possible types of delivery:
- Roll - is the most common option. Thickness decorative layer varies from 1 to 3 mm. Has two standard dimensions — 1020×2200 mm or 1200×2600 mm. It is this material that is most convenient for covering walls or the surface of columns.
- Tile - It has thickness sandstone 2.5-3 mm. In this case, you have three to choose from size - 80×265 mm, 160×265 mm, 340×550 mm. Due to the variety of dimensions, it is suitable both for cladding walls and fireplace areas, and for decorative finishing of steps or arched vaults.
- The slab has the greatest thickness - up to 6 mm and only one standard size - 1000x2500 mm. This type is most often used for cladding building facades.
Next, we will consider in more detail the first option and all the stages associated with its installation.
General information
Gluing decorative stone on top of wallpaper has recently become especially fashionable. It would seem that there is nothing complicated about this - you need to glue the canvases and decorate them with tiles on top. However, in reality everything is not so simple.
First of all, you should figure out whether decorative stone can be glued to wallpaper?
Let's look at the two main types of wallpaper, and what the consequences of gluing another material on top of them are:
- Paper - if the material is glued on top of the paper web, the glue will soak it, as a result of which the coating will begin to come off.
- Vinyl and other heavy canvases - adhesion on such a coating will be poor, as a result of which the decor will quickly fall off over time. In addition, such canvases themselves are heavy and additional weighting them can lead to the fact that they begin to lag behind the base.
From this we can conclude that decorating walls in this way is unacceptable. But, in this case, how to combine wallpaper and decorative stone so that the canvases are located under the stone? We will try to answer this question below.
Option for combining materials
6.Surface preparation
Since this finishing material is very thin and flexible , it can accurately follow all curves and irregularities. If there are defects on the surface of the walls, they will definitely be noticeable, so special attention must be paid to preparing the surface so that the final result pleases you.
The wall
must be thoroughly cleaned and the remnants of old wallpaper, glue, paint and other unnecessary materials removed. It is recommended to putty all chips, holes, deep scratches and very noticeable irregularities. Before applying the putty, treat the surface with a special deep penetration primer to improve adhesion and wait until it dries completely. After plastering, clean the surface with special meshes and remove excess putty. After this, re-treat the wall with primer to remove dust, otherwise the sheets of flexible stone will come off along with the glue. Now you need to do the marking. For these purposes, the easiest and fastest way is to use a homemade plumb line. Draw one vertical line as a guide for the first stripe. The remaining sheets will be glued end to end with the first one. When the preparation is finished, let's proceed to the installation itself.
Main areas of use
It is used for cladding the external walls of buildings and for interior decoration.
The exterior finishing material has a thick layer of sandstone and is much more expensive. Flexible stone has a wide range of applications. From bathrooms to fireplaces. Since the basis of the flexible stone is sandstone, it has the following advantages: a beautiful pattern, resistance to physical impact. It can be used on surfaces with many angles and curves.
You can also use the material to decorate windows, columns or fireplaces. Due to its advantages, it is popular among designers. There are about 200 varieties of the product. An interior where flexible stone is used will be distinguished by its originality.
7.Installation of flexible stone
This process is very similar to wallpapering. If you have had to do this at least once, you will not have any difficulties. The only thing you really need to pay attention is that the adhesive only needs to be applied to the wall. The back side of the flexible stone must remain dry. You will need: a smooth and serrated spatula, a utility knife, a rubber roller and a hair dryer. The latter can be rented at almost any hardware store.
Apply the adhesive to the wall in an even layer of medium thickness using a level spatula. Use a notched trowel to finally spread it, keeping one direction. Manufacturers recommend doing this for better connection with the surface. The manipulations are similar to the process of laying tiles. After applying the adhesive, lay the roll face down on the clean floor. Carefully inspect the back surface. There should be no debris or grains of sand on it. Use a dry cloth or soft bristle brush to clean the surface if necessary. Now you can attach the sheet to the wall.
to start from a corner, first pressing the top of the canvas, and smoothly move down. Be sure to align the edge of the sheet with the mark on the wall. After this, carefully smooth the glued section with a rubber roller. If excess glue begins to appear on the sides, it must be immediately removed with a damp cloth. Glue the next strip end-to-end with the previous one, so you can perform a seamless pasting and reduce material consumption.
If you prefer overlapping gluing, then to smooth the joints you will need a hair dryer. The edges must be heated until the mass becomes pasty and plastic and smoothed with a spatula. This option is applicable when finishing corners or surfaces with non-standard geometry.
After the glue has completely dried, it is necessary to prime the finished surface. To do this, use a wide brush and make upward movements. The soil will create a thin protective layer that will protect against moisture and simplify maintenance. It is recommended to apply in two passes after the first layer has completely dried. If during the end-to-end installation process you still have gaps between the panels, do not despair. Trimming the material will help you quickly and completely correct this nuance. Simply rub the joints with the face of the scraps like you would with sandpaper. The top layer will begin to peel off and fill the voids. After finishing the job, simply brush off any excess particles with a dry cloth or brush.
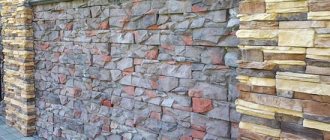
8.An interesting way of styling
There is one very interesting installation method called “wild stone”. It is suitable for cladding both indoors and outdoors. This method is unusual in that the finished wall, finished in this way, is very reminiscent of a wall made of natural, untreated rough stone. Because of this, a feeling of strength and reliability is created.
installation process simple. Surface preparation is similar to preparation for installation of rolls. We will imitate the irregular shapes of natural boulders. To do this, place the sheet face down on the floor. Mark the back side with a pencil Medium-sized fragments of irregular shape are what you need for a small room. You've probably seen high fences made of natural granite around private houses.
This is roughly what the markup should look like. Using regular scissors or a utility knife, carefully cut the fragments, maintaining their order. We will also lay them from the top corner, but between them it is deliberately necessary to leave gaps several millimeters wide. Press each piece with a rubber roller and let the entire composition dry well. The seams must be sealed with a special compound, which often comes with the material itself. Once dry, apply two coats of water-repellent primer. Your impenetrable wall is ready! In this way, only fragments of the surface can be finished, for example, around a fireplace or around an arch.
Decorating the facade of the house
Flexible stone was originally created to form exterior wall coverings. But before installation you will have to pay a lot of attention to the preparatory stages.
The installation process is divided into stages:
- Preparing the base. Builders initially make sure that the walls are ready for installation of the coating, so they must be strong, reliable and level. No loose material or mold is allowed. Unnecessary elements and dirt are removed from the wall. Leveling is often required, using high-quality plaster. After preparation, the base is coated with a primer.
- Gluing tiles or rolls. To do this, prepare an adhesive solution recommended by the manufacturer. It is advisable to use moisture-resistant and colorless glue, sold in the form of a dry powder. Before use, it is mixed with the optimal amount of water.
- Installation begins from the upper corner of the facade. If there are cracks in the base, they are filled with a special acrylic primer, after which a flexible stone is glued. The glue is applied with a spatula with teeth, the height of which does not exceed 2 mm. Rolls and tiles are glued either end-to-end or overlapping. They are pressed with a rubber roller, which allows you to get rid of air bubbles.
- When using an overlap, a seamless coating is obtained, and the excess is easily and quickly cut off with a regular knife. The material is smoothed over the base slowly, which will allow it to be pressed tightly to the surface.
- Treatment with protective compounds. Tiles and rolls are finally glued to the facade 40 minutes after finishing. If the material is used in corners or other difficult places, it is recommended to dry them with a hairdryer. To protect the coating from atmospheric influences, the material is coated with protective compounds represented by primers.
Difficulties arise when working at height, so you have to resort to the help of specialists and also use specialized equipment.
9.What to choose as an adhesive
The choice of adhesive for installing flexible stone should not be taken lightly. After all, it is this component that is the key to a long service life. There is no need to come up with anything supernatural. Sometimes it is enough to carefully read the manufacturer’s recommendations indicated on the package or use the adhesive mixture that is often included. Typically, the glue is dissolved in the specified amount of water and stirred continuously, avoiding the formation of lumps, let it sit for 10 minutes, then mix again. If there is none, choose glue with increased adhesive properties. A composition for installing tiles or a universal acrylic adhesive, for example, “crazy Velcro,” are perfect.
It differs from wallpaper in that it dries much more slowly.
This will give you the opportunity to process several square meters of wall at once, thereby speeding up the pasting process . To protect the skin of your hands, all work must be done with rubber gloves.
Finishing technology and care
Ease of application on surfaces of complex shapes is an important advantage of soft stone; finishing with the material is in many ways reminiscent of the technology of gluing ordinary heavy wallpaper. The work is carried out in compliance with the following simple rules:
- The surface of the wall is carefully leveled: the plastic material can highlight defects.
- For gluing, special mixtures or glue are used, sometimes tile adhesive (wallpaper does not shrink). Before applying the glue, the wall is primed and allowed to dry.
- The canvas is glued in compliance with the correct direction of the texture. If the coating is applied to corners or curved surfaces, it is slightly heated with a hair dryer. Elasticity appears, and the fragment takes the desired shape.
- There is a protective film on the front surface of the tile (roll). It is recommended to remove it a day after installation to prevent glue from getting in.
Caring for a surface made of flexible stone is not difficult. Dust is removed with a vacuum cleaner with a soft attachment, dirt is cleaned with a brush and water (you can add a little mild detergent). An acidic environment can damage the surface, but in residential areas there is no need to worry about this.