General information
Features of the material
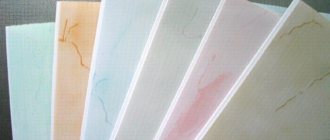
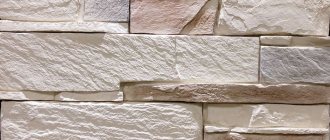
As a rule, decorative stone is produced in the form of gypsum tiles.
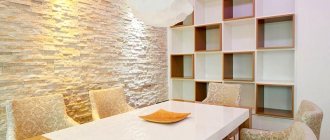
This cladding is used for:
- - fireplaces;
- - stoves;
- - bathroom finishing;
- - living rooms;
- - bedrooms;
- - bar counters.
High-quality decorative stone contains chips of natural marble or granite. In appearance, decorative stone is identical to natural stone. But its main advantage over the latter is that it can be glued to any surface.
Please note: quartz decorative stone is resistant to temperature changes and mold.
Advantages. Among the main advantages of decorative stone are the following:
- — a wide variety of finishing options;
- — almost 100% external resemblance to natural stone;
- — the surface is pleasant to the touch;
- - not a high price;
- - environmentally friendly;
- — strength and durability;
- - resistance to temperature changes.
Disadvantages: if the surface is poorly prepared, various defects will appear over time after laying the decorative stone. Cheap brands of decorative stone gradually lose their original color.
Materials and tools
In order to stick a decorative plaster stone, you will need:
- - cross-stitching;
- - notched and regular spatula;
- - hacksaw;
- - brush;
- - miter box;
- - foam sponge;
- - rubber hammer;
- — construction mixer;
- - container for preparing glue;
- - syringe (confectionery);
- - glue;
- — primer for walls;
- — paint for processing stone and seams.
Types of materials and their characteristics
The adhesive composition is designed to ensure a strong connection of materials to the surface. The right way to determine whether a high-quality gypsum mixture is presented is to study the ratio of water and gypsum that is required to prepare the solution. The final adhesion strength of the product depends on the amount of water added. If the manufacturer’s instructions indicate that less than 300 milliliters of water should be added per kilogram of gypsum mixture, then this is a sign of the presence of gypsum in small quantities, which means that there is a large volume of fillers. And the adhesion of the product will not be high.
Additional elements affect the properties of the adhesive as a whole. It should be investigated whether the constituent components contain quartz sand. It is used to reduce the cost of the product. Yes, there will be savings on the adhesive mixture, but the quality of adhesion of the materials may decrease, and as a result, the finish may last much less. Sand is characterized by its inability to repel water, and its presence in large quantities will worsen the properties of the gypsum base, which does not like water.
When a high-quality product is produced, quartz sand is either used in small quantities or is completely excluded from the composition.
An important parameter for the quality of the composition is the time required for the product to set. The shorter the setting period, the better for the work and the quality of the result. Not only will the period of repair work be shortened, but also the fastening will be more reliable. High-quality options do not lose their characteristics for about 60 minutes, and setting takes half an hour to seventy minutes.
Based on their components, adhesive mixtures are divided into:
- Specialized in gypsum material;
- Reactive glue, “liquid nails”.
For drywall, concrete, and brick bases, a mounting adhesive with a main gypsum component can be selected. It is a dry mixture where alabaster and plasticizing elements are added for better properties. Before use, the mixture is prepared by mixing it with water; manufacturers always write the required proportion of components on the product packaging. The mixture is suitable for sealing seam areas, cracks and the main task is to glue gypsum boards to the wall. The average consumption when working with gypsum plasterboard is 5 kg/sq.m; for porous bases, more product will be required; it is better to prime them first.
Reactive types get their name from their fast drying rate. The products consist of two components, the main mixture and a hardener. Can be used with different tile bases; the layer has an elastic property, which helps to avoid deformation of the material from vibrating factors.
Liquid nails are usually chosen to correct cladding and are used for small amounts of work. This is a ready-made solution that can be immediately applied to the base. It is convenient to work with the product; it is applied pointwise to the surface of the slabs, then wait a while and attach the material to the base.
Adhesive compositions
The quality of adhesion of surfaces and the service life of the cladding will depend on how correctly the glue is selected.
Installation of artificial stone can be done using the following types of compounds:
- PVA;
- dry cement mixture;
- acrylic;
- "liquid Nails";
- "Bustilat";
- thick rubbed paint;
- tile adhesive;
- putty;
- mastic
- polymer assembly sealant;
- CMC (CarboxyMethyl Cellulose).
Advice! When choosing, be sure to consider the type of base, how convenient it will be to apply a particular adhesion material and the reputation of the manufacturer.
The most popular brands of adhesive compositions used for cladding surfaces with artificial decorative boards:
- Ceresit;
- "Unice Plus";
- "Creps";
- "Acrylic";
- Confiad;
- Litokol;
- Corian.
Applying glue
If you have purchased a lightweight type of finishing material, it will be useful to know what to glue the decorative gypsum stone onto.
You can choose the appropriate adhesive from the following options:
- Composition based on PVA.
- Gypsum.
- Liquid Nails.
- Water-acrylic glue and other options.
Gypsum tiles are lightweight, so in most cases they can last much longer on the wall surface. It will be convenient to apply the adhesive layer to the wall using a spatula. The master must ensure the uniform distribution of the composition.
It is important! Do not immediately distribute the adhesive composition over the entire surface of the wall to be finished. It is better to move gradually, working in small areas of up to 1 m². After applying glue to the selected area, you should immediately glue the stones to the wall. Otherwise, the glue may simply dry out ahead of time.
Ordering glue for stone is a must!
Today you can purchase products of this type in a wide variety of production options. But thanks to the large selection of such glue, you can always choose the most ideal option. All products are manufactured only by reliable manufacturers, and the purchasing process will not take too much time.
Would you like to buy stone adhesive wholesale and retail at the best prices in the region? Then you should familiarize yourself with the available range of products and order stone adhesive from a reliable and time-tested supplier. Only here the price of stone glue will surprise any buyer without exception with its availability. The fastest possible delivery and unloading is guaranteed.
Cladding technology
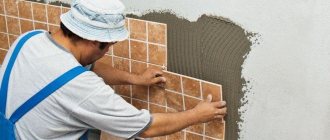
Regardless of the type of surface on which the tiles are applied (brick, concrete, etc.), installation is carried out according to the same scenario. First, you need to knead the glue until it has a homogeneous structure if dry cement compositions are used. After this, the material is evenly applied to the wall, covering an area not exceeding one square meter at a time. If sealant or liquid nails are used, then in the first case the glue is distributed in waves, in the second - drop by drop.
After this, you need to glue the first tile by pressing on the stone. It is not recommended to use excessive force at this stage. A small amount of adhesive should come out beyond the tiles. When laying tiles, you must follow several recommendations:
- with a seamless installation method, the procedure must begin from the bottom row (otherwise, from any corner);
- if a stone of the same size is used, then it must be laid so that the final pattern is uniform;
- the cut edges are attached so that they remain unnoticeable to the eye;
- if installation is carried out from the middle of the wall, then a guide rail is first attached to the surface;
- To level the decorative tiles, use a rubber hammer.
To form seams, it is necessary to leave equal gaps between the tiles. Rows of stone should run parallel to each other
If a seamless method is used, the tiles must be placed tightly against each other.
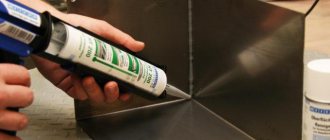
At the end of the procedure, excess glue is removed, and the seams are rubbed with a specialized compound, the type of which is indicated on the packaging. It is recommended to apply this product using a pastry bag.
At the end of the procedure, a protective layer should be applied to the tiles. This procedure extends the life of the decorative material. A protective layer is necessary in cases where artificial stone is installed in rooms with high humidity and in houses with children and animals.
When choosing a coating, it is recommended to give preference to those products that contain gypsum.
How to glue decorative stone instructions
Before gluing artificial decorative stone to the walls, you should take care of the surface, mark the walls according to the work plan, prepare the tiles, cut them, and stir the mixture for gluing. If it is necessary to glue tiles to wood, it should be treated with special compounds to prevent the formation of rot and thoroughly dried before starting work.
Load calculation
To calculate the load, you need to know the area of the wall and the area of the tile. For seamless technology, divide the square meter by the area of one tile, and then multiply the result by the area of the wall.
If technology with seam formation is used, when calculating the area of one tile, the width of the seam is added. After which the material requirement for 1 square meter is multiplied by the wall area.
Materials and tools
To be able to begin installation work, you should prepare not only the tiles and adhesive, but also the tools. You will need the following:
- saw;
- hacksaw;
- putty knife;
- roller;
- metal brush;
- hammer with rubber tip;
- level;
- ruler.
If necessary, the set of tools is expanded.
Surface and stone preparation
Before gluing decorative stone, you need to take care of the surface of the walls. To do this, several operations must be performed:
- Removal of old cladding (including a layer of glue and plaster).
- Cleaning the surface with a brush with metal bristles.
- Application of deep penetration primer.
After cleaning, the wall is left to dry. If the wall is wooden, you need to install a reinforcing mesh on it.
You also need to prepare the artificial stone itself. It should be cut with a saw or hacksaw into tiles of the required size. The sections are filed or processed with sandpaper. The back side of the tiles is treated with a primer and then left to dry. If necessary, the stone is painted and dried.
Rules and principles of installation
You can glue the stone to the wall using crosses, which allow you to place the tiles at the same distance from each other. This simplifies the installation process. The main thing is to strictly maintain evenness vertically and horizontally. This is necessary for a beautiful visual picture. The tiles are covered with a layer of glue no more than 1 cm thick. Otherwise, it may protrude between the stone.
Features of arranging seams and corners
If you have minimal tile laying skills, problems usually do not arise. However, the most painstaking process is the formation of seams and corners. The internal concrete joint between slabs is usually uneven and requires preparation. If necessary, it is processed using a special corner.
The overlapping corners look original. However, this technology is used with smooth walls. However, if the surface is far from ideal, a corner created from tiles cut at 45 degrees looks better. In this case, the gap is smaller and the cladding looks neater.
Application of a protective composition
After laying the tiles, a protective layer is applied to it. It will extend the service life of the cladding by increasing its strength. This treatment is necessary in rooms with high humidity. If small children live in the house and animals are kept, such a protective layer is a necessity.
Basic mistakes
Builders know how to properly glue artificial stone to walls. But novice masters often make minor mistakes that affect the final result:
- Problems often arise when cutting stone. The tiles are cut larger than necessary, and small remains have to be glued together or thrown away. The appearance of the masonry is deteriorating.
- Installers forget to remove the adhesive from the surface of the stone during the installation process. Hardened glue is much more difficult to remove.
- When forming seams, the tiles are not aligned along one line, which causes the rows to shift horizontally or vertically. Also, too wide seams between stones may be left, which negatively affects the appearance of the masonry.
- Sometimes priming of walls and tiles is ignored (increases the risk of mold), as well as treating with a protective layer (helps reduce service life).
To avoid such problems, you should follow the rules for laying stone.
The process of laying artificial stone
Having chosen what to glue the tiles with, we will figure out how to glue a decorative stone to the wall using adhesives.
There are two types of installation - bottom up or top down. Some craftsmen advise working from top to bottom to avoid getting the adhesive on the tiles. Others recommend laying from the bottom up to ensure that the masonry is as even as possible, especially if you are laying brick. Of course, if glue gets on the cladding, it should in any case be immediately wiped off with a rag so that there are no residues.
It is also recommended to work from the corners of the wall outward to get a nice, even pattern. Before laying tiles, especially if they have stones of different sizes, lay out the pattern on the floor so that you do not have to dismantle inappropriate elements later. In addition, it will save time when laying directly on the wall.
Advantages and disadvantages of decorative stone
The popularity of decorative panels is due to their positive properties, the most important of which are:
- the widest range of color solutions;
- small weight;
- ease of installation;
- the ability to recreate the most accurate imitation of natural material masonry;
- environmental friendliness;
- compressive and bending strength;
- the features of the components that make up the decorative stone allow you to regulate the microclimate in the room;
- resistance to high temperatures;
- long service life;
- low cost compared to natural stone;
- Almost any available adhesive composition is suitable for installation;
- texture, pleasant to tactile contact.
The disadvantage of this building material is its fragility - if you hit it, it will crack.
The last stage of work
The final part of proper installation is the application of a protective compound. This is done to ensure that the glued material lasts as long as possible. Protection is especially necessary if:
- there is a possibility that the decorative stone will come into contact with moisture or there is constantly high humidity at the installation site;
- there may be pets and children nearby;
- there is some paint on the glued stone;
- gypsum is of poor quality.
In these and other cases, a layer of protective composition will ensure that the surface does not become damaged. A truly high-quality product has no traces after drying.
Now you know what to glue artificial material to and how to make sure that the installation goes without surprises and makes you happy with the result.
Gluing instructions
Gluing artificial stone to the wall must comply with the requirements for the installation of coatings of this type. There should be no voids or uneven areas under the tiles, as the thin layer of gypsum above them will be especially vulnerable to impacts. The gluing technology is simple and does not require special skills.
Surface and Material Preparation
For work, you need to prepare all the necessary materials and tools to speed up the process of installing stone elements. Required:
- artificial stone made of gypsum (you should buy the entire amount of material needed for finishing at once);
- tile adhesive or special gypsum composition;
- primers;
- measuring instruments, building level;
- putty knife;
- hacksaw;
- metal brush;
- brush or roller;
- a narrow blade for filling the seam (6-8 mm).
Work begins with preparing the base: it needs to be leveled and rubbed, eliminating large differences in surface height. Small irregularities can be filled with glue during the installation of each element, so alignment is done on your own, without calling in professionals:
- Remove the old coating from concrete and plastered surfaces and eliminate potholes; after drying, treat the wall with a wire brush;
- stick a fiberglass reinforcing mesh onto a wooden wall;
- Apply the primer solution according to the manufacturer's instructions, maintaining the drying time of the composition.
What glue is used when working with decorative stone?
Depending on the material of the surface to be finished, different types of glue can be used:
- putty, tile or cement-sand mixtures - for brick, concrete, plastered walls;
- PVA, acrylic, Bustilat - for installation on drywall under putty;
- liquid nails, thick rubbed paint, sealants and mastics - for fastening to metal, plastic and similar partitions and architectural elements.
When choosing an adhesive, you need to pay attention to its suitability for use on existing surfaces. The manufacturer indicates this information on the packaging. Gypsum brick tile adhesive can also be used to fill joints.
How to glue a decorative stone with your own hands?
When choosing a method for interior decoration, take into account the need to leave a gap between the elements. There are:
- Installation without jointing. Used for finishing to resemble torn or chipped stone, trying to create a uniform surface without joints. The masonry elements are installed close to each other.
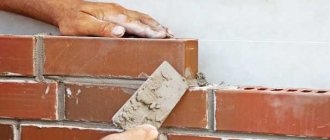
- Masonry with jointing. It is used to imitate a brick wall, flagstone or cobblestone paving, pebble mosaics, etc. A gap of 0.5-1 cm remains between the individual stones, which, after gluing the coating, must be filled with grout mixtures.
Application
Cement compositions are used mainly for external masonry. Cement-based glue is very easy to prepare. Simply pour the prepared mixture into a bucket, add latex compound or water, and mix everything with a mixer. If the composition for artificial stone has hardened, it should not be re-diluted with water. Stone tiles will no longer stick to such glue. Therefore, the adhesive must be used within 6 hours after its preparation. For express glue, the “shelf life” is 1.5 hours.
Artificial compounds are used for indoor masonry. Working with glue for artificial stone is a little more complicated. Sold in packages with cartridges with filler and hardener. They are squeezed out using a gun and mixed in a ratio of 10:1. This glue is applied to any surface and allows you to make ceiling cladding. Work with the finished composition should be carried out within 15-30 minutes, depending on the temperature: the higher it is, the faster polymerization occurs.
Always follow the instructions on the package, and you won’t have any problems working with any glue!