Every person may have a moment when he suddenly realizes that he is tired of what he sees around him every day. But this understanding does not always entail a readiness to radically change the interior and completely remodel the apartment. Then a successful design solution comes to the rescue - replacing the usual wallpaper with photo wallpaper. And if during the first finishing of a new building apartment there is no doubt about the need for rough preparation of the walls, then during subsequent cosmetic repairs the volume, cost and dustiness of the work cause justified panic. There may also be a need to cover not the entire wall with photo wallpaper, but only a section of it (as an option - a photo panel). In these cases, a logical question arises: is it possible to glue photo wallpaper onto old wallpaper? The answer to this can only be positive if strict conditions are met.
Important! Despite the fact that the new canvases are planned to be glued to the old ones, the wall will still have to be prepared, and the preliminary work will depend on the materials of both coatings.
Conditions for gluing the second layer of wallpaper
If you plan not to remove the old finishing material from the wall, but to update it by gluing photo wallpaper, then first you need to make sure that the following conditions are met, which are mandatory for this type of repair work:
- During the previous gluing, the surface was prepared, that is, leveled using plaster and putty.
- The first layer adheres firmly to the wall (especially at the joints), there are no defects or tears.
- Old wallpaper must be moisture resistant, that is, when applying glue to it, the paint layer should not dissolve and leave marks.
- If the existing coating is textured, then the depth of the relief should not exceed 0.2–0.3 mm. Even subtle differences in height can distort the picture, especially when it comes to fashionable 3D photo wallpapers.
USEFUL INFORMATION: Do you know enough about vinyl wallpaper?
If the wall covering meets all the conditions, you can proceed. Well, if the old material does not suit at least one of the points, alas, you will have to abandon this idea and prepare the surface for gluing according to all the rules.
The advantages of such wallpapers
This type of wallpaper has some significant advantages:
- They are easy to remove so can be reused. If you want to change the design, then just remove the wallpaper and stick it in another place.
- They help maintain the integrity of the surface on which they are glued. Therefore, they do not tear during shrinkage of the house.
- When glued to the wall, bubbles do not appear, and the wallpaper is quite easy to join, as it stretches well.
- Thanks to its structure, the material easily masks small flaws on the wall.
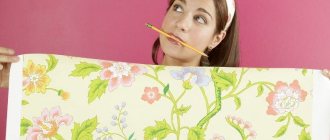
Selecting photo wallpaper
When choosing photo wallpaper for gluing on a wall with wallpaper, you should focus on the material of the existing coating.
- If there are light paper sheets glued to the surface with high quality, this is an ideal option; the material of the photo wallpaper can be anything. In this case, the glue applied in several stages will saturate both the old material and the wall underneath it, which means that the glued layer of photo wallpaper of any density and texture will adhere well to such a surface. You can use vinyl wallpaper based on paper or non-woven, paper, textile, non-woven.
- In the case where the opposite situation exists, and the new canvas is supposed to be glued to vinyl wallpaper, as well as dense and heavy non-woven wallpaper, for the second layer it is better to choose a high-density paper-based coating.
Advice! When choosing photo wallpaper, it is worth considering that too soft pastel shades of paper material may not be able to hide the previous finish, so it is better to use brighter and more contrasting images.
What are photo wallpapers and how to hang them
At its core, photo wallpaper is a huge photo, printed on separate sheets, which, to be “assembled,” must be glued to the wall, like a puzzle. The specifics of gluing such a set differ from conventional wallpaper in a number of specific requirements:
- Almost always, thin paper is used in photo wallpaper, which is why all surface imperfections appear clearly on the outside;
- Each fragment of the image needs to be joined as accurately as possible with the edges of neighboring sheets; it depends on how developed your eye and joining skills are, whether you can glue the whole picture without losing proportions, tilts or the appearance of a grid of light joints;
- It is very difficult to peel off, correct the position and re-glue individual fragments on the wall due to the fact that photo wallpaper paper very quickly absorbs the glue and loses its strength.
Comment!
There are photo wallpapers made on a non-woven base. For such photo wallpapers, it is not a problem to paste each of the fragments several times. In addition, there are so-called designer photo wallpapers. Most often, the image on such wallpaper is made to order, printed on special equipment, which allows you to reduce the number of fragments and adjust the overall size of the picture strictly to the size of your wall on which the masterpiece will be glued. They cost an order of magnitude more than conventional materials, and are easier to glue.
Choose and buy photo wallpaper online
Leroy Merlin has a huge range of photo wallpapers - about 2000 options. You can’t look through such a quantity in a regular store - you don’t have enough time or energy.
At the same time, buying online is convenient and safe: you can buy goods without leaving your home or visiting a store. All purchases will be delivered to your home. And if something doesn’t work, you can issue a return.
In addition, in the online store, on each page of photo wallpaper you can find the exact characteristics (dimensions, material: paper, non-woven fabric, vinyl, etc.) and real customer reviews .
USEFUL INFORMATION: Is it necessary to prime the walls after puttying before wallpapering?
To select photo wallpapers, follow the link>>>
Compliance with norms and criteria
Gluing new wallpaper onto old ones can significantly save time.
During renovation work, the owners of the premises often receive certain questions, one of which is - is it possible to glue new wallpaper onto old ones? Often the appearance of such questions is dictated by the desire to save time and money. After all, gluing wallpaper over old ones is a quick process. Although, according to all the rules, before gluing the wallpaper, it is necessary to carefully level and putty the surface of the wall.
To do this, the top layer of the wall covering is always removed, but if for some specific reason the old wallpaper needs to be left, then it is still possible to stick new ones on the old ones.
When carrying out the repair process, it is recommended to strictly follow technical rules and regulations and observe certain criteria when gluing wallpaper to wallpaper. Work must begin with a complete check of the wall surface; it must be flat and smooth, without cracks, pieces of torn wallpaper or bumps.
If no visible defects are found, then you can safely proceed to wallpapering. But if there is at least one flaw, then it is better not to risk it and dismantle the old coating and first prepare the walls for repairs.
It is better not to apply new wallpaper to non-woven wallpaper, as they do not allow moisture to pass through and have repulsive properties, which completely excludes the possibility of their use.
If the old covering is difficult to remove from the walls, then it is recommended to glue wallpaper directly onto it.
Many repair experts do not recommend gluing new wallpaper onto existing ones. The only exception may be that the old coating is glued to the wall with PVA glue, which complicates their dismantling.
To avoid all sorts of risks, you should pay attention to what kind of wallpaper was originally glued to the walls. All of the following conditions must be met:
- old wallpaper should adhere well and fit tightly to the wall;
- it can only be paper wallpaper;
- the surface should be smooth and not have relief patterns;
- A minimum layer thickness of the previous wallpaper is allowed.
Preparatory work
To prepare the wall, you must complete the following steps:
- Carefully glue (even reliable at first glance) joints of old wallpaper.
- Putty over defects (most often a finishing mixture is sufficient).
- Degrease “suspicious” stains.
- Prime the wall.
- After 24 hours, you can begin marking and gluing new finishing material.
Surface marking
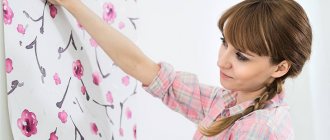
Each kit, as a rule, contains a description and a list of sizes of canvases with drawings, as well as recommendations regarding the gluing process.
- Using a tape measure, the required height of the entire picture is measured and marked on the wall in the place where it is planned to locate the center of the picture.
- Then measurements are taken along the width of the canvas, and using a level, clear boundaries of each part of the pattern are marked.
How to glue photo wallpaper from 8 parts?
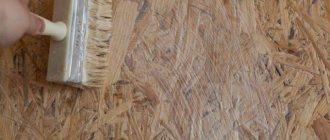
The walls, as in the previous versions, must be perfectly smooth, because the wallpaper will only emphasize all the existing unevenness and roughness.
- To smooth out all imperfections, you can use a special brush.
- If there are any depressions, they must first be covered with putty, and then rubbed well with a brush.
- The temperature should not be higher than 19°C so that all parts stick well to the surface.
- Before starting the process, lay out all 8 parts of the drawing, forming a complete composition. As in the previous version, draw horizontal and vertical lines on the wall.
- Dilute the glue to a thick consistency and apply it for no more than 3 minutes to the first part of the wallpaper. Glue them, then glue all subsequent fragments of the pattern with an overlap of 2-3 mm to the previous ones.
- Approximately the entire composition dries in 10-12 hours, provided that all application rules are strictly followed.
- Carefully remove excess glue particles using a damp sponge. If somewhere the seams are not glued, then go over again with a thin brush and lightly press with a rag so as not to damage the design applied on top.
- Carefully examine all seams and, if necessary, apply glue again.
Choosing glue for photo wallpaper
The choice of wallpaper glue directly depends on the density of the coating materials. If the first layer is paper, then it is enough to follow the manufacturer’s recommendations indicated on the packaging. Typically these are the following types of glue:
- Composition for light wallpaper, used for paper sheets.
- Adhesive for heavy wallpaper material, suitable for coverings made of textiles, vinyl, non-woven fabrics.
If there is a base layer of increased density (even if the material to be glued is on a paper backing), it is recommended to choose “heavy” types of glue. When a special composition is used for photo wallpaper, it is usually included in the proposed kit.
Advice! In order to simplify gluing and make the adhesion of new wallpaper to old more reliable, it is recommended to add PVA glue to the prepared solution, approximately 10–15% of the total amount.
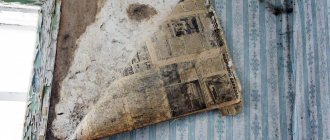
How to remove old wallpaper
Scratch the wallpaper and moisten it with water.
If a situation arises that the old wall covering still needs to be removed, you need to know how to do it correctly. Different types of wallpaper differ in their degree of waterproofness. To break this protective layer, you need to make scratches over the entire surface, wet it with water and let it soak.
To speed up peeling, you can add detergent to the water. The solution is applied to the walls several times, allowed to stand for about 4 hours, then the old wallpaper begins to be scraped off. They are easily removed with a metal spatula.
When the wallpaper is vinyl, the top ball is first removed from it, and then done in the same way as with paper wallpaper. If there are numerous layers of wall covering, they should be treated with a special compound to soften the wallpaper; it can be found in specialized stores. For more information on how to easily remove wallpaper, watch this video:
Having studied all aspects of the issue and found out whether it is possible to glue new wallpaper onto old ones, it is necessary to draw some conclusions. By following all the recommendations, you can easily hang wallpaper yourself, the main thing is to correctly determine the condition of the old coating. A scrupulous approach to this issue will allow you to avoid many mistakes and achieve excellent results.
Gluing process
Brief instructions will help you stick photo wallpaper on the wall in a high-quality manner.
- The material can be glued starting from any fragment, while carefully following the markings.
- When working with photo wallpaper, glue is applied both to the canvas and to the wall and left for several minutes (the exact time is in the manufacturer's instructions) without folding, so that the base is well saturated.
- It is important to ensure that there are no air bubbles and to smooth the canvas from the center to the edges using rubber rollers or a spatula.
- After gluing all the fragments onto the old wallpaper, check the joints, roll them until they are completely fixed, and remove excess glue with a sponge.
USEFUL INFORMATION: What types of wallpaper to glue in the living room (40 photos)
- After drying, a special finishing coating can be applied to the surface to protect the image from fading.
In the room where you plan to apply photo wallpaper, there should not be the slightest air movement for at least a day, and the temperature should be maintained in the range of 15–20 degrees.
Expert's answer: is it possible to glue wallpaper onto wallpaper?
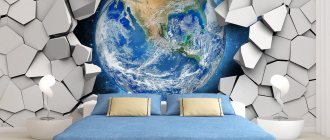
Before you buy photo wallpaper, you need to decide where to stick it. After all, the choice of the size of the photo wallpaper, its color scheme, and the theme of the image depend on this. Modern photo wallpapers can be hung in any room: living room, bedroom, kitchen, nursery, hallway and hallway. This is a universal decorative element that is great for decorating any interior and room of any size. The effect depends on which wall you stick the photo wallpaper on.
1. The main rule is moderation. We glue photo wallpaper to only one wall. If you want to expand the space, then stick photo wallpaper on the narrowest wall, as it is the one that makes the room smaller.
2. If the room is rectangular in shape, it is worth gluing photo wallpaper on a wall that is wider to make the room visually of the correct shape.
3. You should not glue wallpaper on the wall where the TV will be placed, as the pattern will distract attention from TV shows.
4. If there is a sofa near the wall where you plan to glue the photo wallpaper, then it should not block the image, since this will lose the integrity of the composition.
5. Walls with racks, cabinets and shelves are taboo for photo wallpaper.
1. Preparatory stages.
A. First you need to decide what kind of glue to use to glue the photo wallpaper. Since photo wallpapers are made from various materials, the glue must be special, suitable specifically for this type of material. When producing such glue, manufacturers take into account the properties and features of photo wallpaper. The glue must be diluted according to the instructions before starting work.
It should not have a strong unpleasant odor.B. Also, do not forget about preparing the wall on which the photo wallpaper will be glued. The surface must be perfectly flat, clean and dry. Level the wall, apply primer, putty if necessary. Be sure to remove baseboards, sockets, and all switches.
Read more: What to glue wallpaper or ceiling plinth first
The room must be isolated from drafts. The air temperature is not higher than 25 degrees C. Then we mark the wall. This is the most important stage of gluing and should be given special attention. To do this, you need to take into account the number of parts of the photo wallpaper. Modern wallpaper consists of 8 parts, 12 parts or 16 parts.
2. The process of gluing photo wallpaper.
A. Prepare all canvases by trimming the white margins with a utility knife.B. Number the pieces in the correct sequence to avoid confusion.C. Arrange the parts in order, in the correct sequence.D. Apply glue to one part first. Do not fold, as this will create a strip that will be difficult to straighten later.
Let the glue soak in for a couple of minutes.E. Place the first piece and smooth it onto the wall with a roller, expelling the air.F. Let's start gluing the next strip. We move to the right and follow the picture. If the wallpaper needs to be glued with an overlap (read the instructions on the photo wallpaper itself), then do not exceed 4-5 mm.G. We apply special protection from sunlight to the finished photo wallpaper and wait a day until it dries completely.
1. One thing should be patterned: either the walls or the ceiling. You can’t make a room into a closed box with drawings on everything that covers the eye. If you choose photo wallpaper for the ceiling, then the walls should be decorated with calm wallpaper without active patterns.2. If the drawing allows, then you can cover the ceiling and one wall with photo wallpaper.
Many people are interested in the question “is it possible to glue photo wallpaper onto wallpaper?” , as this will help not only update the interior, but also hide some of the imperfections of the coating. This is especially true for a children's room, where little artists often create art on the walls. Pasting photo wallpaper onto old wallpaper is not recommended by professionals for a number of reasons:
- Gluing onto non-woven or vinyl wallpaper with a relief pattern is strictly prohibited. The drawing will appear on the photo wallpaper and distort the image. In addition, the coating itself will not look aesthetically pleasing.
- There is no certainty that old wallpaper will stick well to the wall. They may not be able to withstand the additional load in the form of new photo wallpapers and simply peel off.
- Glue for gluing photo wallpaper will soften the old layer of wallpaper, and the drying time will be increased.
1. Using a sponge or foam roller, treat the wall with old wallpaper. A spray bottle is also perfect for these purposes.2. You need to wait 10-15 minutes for the wallpaper to get wet. If they are washable, then use steel wool, which will remove the protective layer.3. Remove old wallpaper using a spatula.4. Sandpaper the bare wall, paint it with water-based paint and prime it with primer.
After this, you can begin gluing photo wallpaper to the prepared wall.
So, if you follow our advice and put in enough effort, you can hang photo wallpaper with your own hands no worse than professional craftsmen do. At the same time, you will significantly save your family budget and get amazing results.
- there is no need to level the walls;
- saving time and money;
- the ability to carry out gluing work independently without the involvement of specialists.
Gluing new wallpaper onto old canvases
- inability to correct surface defects;
- Poor adhesion between old and new canvases is possible;
- even if the gluing was done efficiently, there is a possibility that after some time the new wallpaper will begin to lag behind the old coating, which naturally shortens its service life;
- If the old layer of wallpaper begins to peel away from the wall, you will have to re-paste all the wallpaper in the room.
The joints between the canvases are one of the most problematic areas, so do not skimp on glue
There is another drawback in the form of air bubbles. Sometimes they smooth out on their own, and in some cases they can be removed with a hot iron or puncture with a needle. If none of the above helps, then you will have to redo everything and completely remove the old coating, and this will additionally cost time and money.
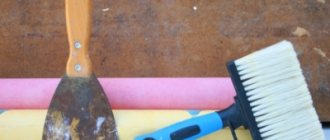
To hang wallpaper you need a minimum of materials and tools
So, we found out that for high-quality wallpapering you need to remove the old covering, level, putty and prime the walls. But that's not all. Before you hang wallpaper beautifully, you must first decide on the type of finishing material, its design, glue and, of course, the necessary tools.
Required tools and materials:
- wallpaper;
- glue;
- container for glue;
- stationery knife;
- roller or wide brush for applying glue;
- plastic spatula;
- paper tape for joints;
- clean rags.
Before gluing new wallpaper onto the old trim, you need to make sure that it is thin and firmly glued to the wall. If the bottom sheets are not made of paper, then it is better to abandon the idea of gluing new wallpaper onto old ones.