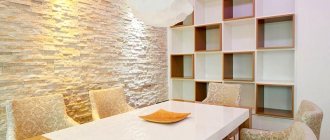
The use of decorative stone has no strict restrictions. The variety of shapes, textures, shades, high performance and physical characteristics allow it to be used for both interior and exterior decoration. These qualities are especially highly valued in wall cladding. The main thing is to make the right choice of material and follow the rules for its fastening.
Types of decorative stone
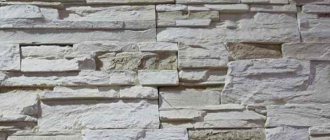
The material can be of artificial or natural origin. Natural decorative stone, which includes marble, onyx and others, is distinguished by its heavy weight and high cost. Not every wall can withstand such cladding. Therefore, most often, artificial stone on a gypsum or cement base is used for finishing.
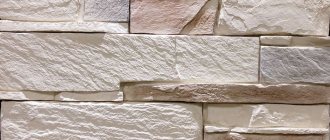
Gypsum tiles do not tolerate moisture well and are not recommended for use in bathrooms and kitchens. Stone with a cement base, on the contrary, will be an excellent choice for these rooms. Wall cladding is usually done with medium-sized stone that imitates brick or slate.
Gypsum - why exactly?
Gypsum tiles have many advantages, although at first glance it may not seem so. But no one will deny that there are certain shortcomings. Whether to make your choice in favor of this material or not is up to you. A list of pros and cons will help you with this.
Advantages of gypsum tiles
- Easy to install - no special skills required.
- Decorative functions: high-quality imitation of brick or natural stone.
- Low cost, from about 460 RUR/m2.
- Light weight, which means that such tiles can be laid on plasterboard walls. It is even lighter than cement decorative tiles.
- Environmentally friendly, since gypsum is a natural material.
- You can make it yourself.
- The material itself is “warm”.
Disadvantages of gypsum tiles
Low frost resistance and high level of water absorption. Stone-like gypsum tiles absorb water, which means they are only suitable for interior decoration in a dry room.- Difficulty of care. After a period of time, dust accumulates on the surface, which is quite difficult to remove with simple cleaning products. To protect against dust, the tile will also have to be coated with a protective varnish.
- High probability of purchasing low-quality material. The quality of the material itself depends on the brand of raw materials, but often unscrupulous manufacturers choose to save on raw materials, which will subsequently lead to rapid destruction of the slab.
Selecting consumables
Finishing of stone on a cement base is done with an adhesive mortar containing cement, and on gypsum - with mastic, tile adhesive, or a cement-sand composition. PVA glue is suitable for cladding plasterboard and wooden walls. The wooden surface is treated with an antiseptic before gluing the stone.
The color of the grout for the joints is selected to match the shade of the stone. The finish using slate decorative stone turns out to be monolithic. The tiles are coated with acrylic impregnation or water-based varnish. This protects the material from negative influences and increases its decorative effect.
Cladding of plasterboard and wallpapered walls
It is not recommended to glue this facing material to wallpaper. First, the walls are trimmed with stone, and then wallpaper is pasted. The slabs of the side rows are glued in such a way that they overlap the wallpaper by no more than 2 cm. If the walls are already covered with wallpaper, some of the canvases are removed for finishing with stone.
Plasterboard walls can withstand loads from 10 to 60 kg per 1 m2. This allows you to stick decorative stone slabs on them, which are lightweight. To ensure reliable fastening, many experts recommend reinforcing the structure with reinforcing mesh. Especially when the load per 1 m2 is 30 kg or more.
Preparing walls and mixing mortar
Decorative stone is glued only to the prepared base. The walls must be smooth, solid and durable. All old coating is removed from their surface, stripping it down to the base. This also applies to particles of dust, dirt, traces of various solutions and oil stains.
The walls are puttied, plastered and primed. If work is carried out in the summer, when the temperature rises above +30 degrees, the walls are moistened with water. It is also better to prime the slabs on the inside. This increases their degree of adhesion to the base.
The adhesive solution is prepared in accordance with the instructions. It sets quite quickly, so it is better to mix it in small portions, given that the consumption per 1 m2 of stone is about 6 kg. If the glue is prepared from a dry mixture, uniformity can be achieved using an electric drill.
Laying order
Rectangular slabs are glued in rows, oval slabs - in random order. Elements of non-standard shape are first laid out in the desired pattern on the floor. This allows you to transfer it to the wall surface.
Slabs of different sizes should be alternated, changing the sequence in each row. To create a masonry effect using elements of the same size, the first tile of the second row is cut. This ensures that the seams between the rows do not match. Cut the slabs with a hacksaw or miter box.
You can start laying stones both from above and from below. If the wall is covered over its entire height, it is better to glue the elements from the ceiling. In this case, the cut tiles will be at the bottom and will not be noticeable.
Choosing a stone
There are no special recommendations on this matter, however, for plinths it is best to use large, heavy types of material that imitate:
- wild stone;
- cobblestone;
- rough limestone.
Sometimes home owners also want to reproduce stone or brickwork on it. Remember that identical large stones immediately catch the eye, while the repetition of small ones is not so noticeable .
Advice: order stones for finishing the plinth not of one color, but from a mixture of 2-3 matching shades, since in nature it is very difficult to find minerals of the same shape and color.
Scheme for finishing the plinth of a pile foundation
When choosing artificial stone for finishing the basement of a house, look:
- on its appearance;
- surface quality;
- coloring (superficial or volumetric),
- aggregate fraction (up to 5 mm),
- thickness, which should be uniform.
Additional recommendations:
- It is also important that the material has strength and frost resistance (50-100 cycles);
- price per square meter is also of great importance;
- the back of the stone for finishing the base should not be too embossed, but rough. The best option is with shallow furrows;
- the material must be coated with a hydrophobic compound; if not, treat the entire surface with it after work;
- Damaged or missing gutters can cause material to peel off immediately after frost.
Laying artificial stone on the plinth
We calculate the material
When finishing the base, planar elements are used, which are measured in square meters, and angular elements - in linear meters.
Formula for calculation:
A = (S - 0.2L),
where A – flat elements, S – surface area, L – total length of external corners, 0.2 – area of one linear meter of corner elements.
Light: when purchasing material, add 10% to the calculated quantity so that there is a reserve in case of mechanical damage and waste.
Prepare the base
Before finishing the basement of a house with artificial stone, the house must stand for at least 6 months for temperature and shrinkage cracks to appear. The surface preparation option is determined by its type.
There is one general requirement, regardless of the type:
- dry;
- durable;
- smooth (deviation up to 20 mm per 1 m2 is possible).
Carrying out cladding of the base
You need to remove from it:
- dirt;
- dust;
- stains from oils and petroleum products;
- ice;
- frost;
- peeling plaster;
- protruding parts of concrete, mortar or other irregularities.
Advice: seal small cracks larger than 2 mm, but do not touch cracks up to 1 mm.
- Be sure to prime the surface, otherwise the artificial stone will simply collapse after a while.
- You can mount the material directly on the wall if it is new brickwork, smooth, strong and without voids in the seams.
- Pre-apply notches to a smooth surface.
- Clean the old masonry from efflorescence, treat it with a primer or plaster.
Preparing the stone
- Lay out the selected cladding pattern on the ground near the prepared surface (it will be easier if all the work is pre-applied on paper or displayed on a laptop screen).
- Open several packages at once and mix the entire stone. To achieve maximum effect, alternate in thickness, size, texture and color. This will help avoid color and texture spots when selecting a pattern.
Tip: to adjust the stones to size, use wide nippers, a hacksaw or an angle grinder with a stone disc.
- Alternate materials with a pronounced texture with smoother elements so that you do not end up with masonry with only flat or protruding areas.
- Lay out smooth stones and products with a well-defined texture alternately. To make the overall look more natural, alternate small stone elements with larger ones.
Start of finishing
Tip: make sure that there is no layer of hardened foam on the smooth side of the material; clean it with a metal brush.
There are two options for installing artificial stone - seamless and with jointing. The latter is more common, since due to the seams you can save a certain amount of stone, the seam width is 15-25 mm.
Lay with jointing from top to bottom. For seamless stitching, on the contrary, press the top rows against the bottom ones.
Below are the instructions:
- Start laying from top to bottom with the first uncut element from any corner, alternating the short and long sides of the corner stones.
- Continue further installation, avoiding the coincidence of seams diagonally, horizontally and vertically.
- Try to place all stones with the same gap, which is indicated on the package. In this case, elements can be trimmed. You can fill the voids between large stones with substandard parts, installing them so that they are not noticeable or seal them with mortar.
- When laying rectangular stones such as bricks or others with the same height, make sure that horizontal lines and right angles are maintained.
- Lay the stone type tiles with your own hands from the bottom up. Once the corner pieces are installed, move along the horizontal row toward the center.
Tip: Before starting the next row, complete the previous one.
It is not recommended to lower the plinth lining below 50 mm to the ground level, since the soil may contain alkali and other substances that cause corrosion. Wooden slats that need to be installed under the bottom row of stones will help achieve this. When installation is complete, remove them.
Laying
- Moisten the installation surface and the flat side of the stone with a spray or paint brush. Wait a while for the moisture to be absorbed.
- Prepare the adhesive solution and apply it with a trowel or spatula to the entire back side of the stone, level it with a notched trowel.
- Press the stone onto the surface, turning it slightly. Make sure to squeeze out the excess adhesive solution, this will remove air from under the element.
- Apply a thin layer of glue to the ends of the stones if seamless installation is provided.
Using a rubber hammer to adjust elements
- Joining the seams is an important stage of installation. Since it will prevent moisture from getting between the elements. Use special grout for artificial stone for this.
Gluing decorative stone
The glue is spread on the wall with a flat spatula and a thin layer on the back side of the decorative element. Small sides are formed on the sides of the tiles and the solution is additionally applied pointwise. The tiles are pressed against the wall and leveled with a building level.
To hold the stone tighter, lightly tap it with a mallet. Exposed adhesive must be removed immediately. To do this, you can use a damp sponge or rag. It is almost impossible to remove most solutions in their frozen form without leaving traces.
These steps are repeated with each element, laying out the entire wall or a separate section of it. Corner slabs are cut at an acute angle.
The final stage is grouting the joints. They are filled using a pastry syringe or a special bag. The top of the stone is coated with varnish or impregnation.
Video: How to glue decorative stone to walls
The process of creating an imitation stone surface
Applying plaster to the wall should be done in sections of no more than 2-3 m2, depending on the skill and speed of processing. Surface structuring is carried out using various techniques.
Interior work
Wild stone - apply the mixture in small volumes to the walls and lightly compact it with a trowel. A covering layer is thrown onto the surface, which is also lightly rubbed to remove the most prominent places. After the mixture begins to set, rub it in with a grater with strong pressure.
Travertino technology is one of the simplest, do-it-yourself decorative stone plaster, video sequence of processes:
Marmorino technology. Special decorative plaster is applied and rubbed down, the stone is imitated by knocking out the boundaries using a chisel. The result is a surface covered with rectangles of various shapes and sizes.
One of the simplest imitation methods is marmorino.
The texture of torn stone plaster is created in a similar way, only the notches are made not along rectangular boundaries, but randomly. In addition, it is possible to create notches of different thicknesses.
Despite the similar name, the technology for applying fine stone decorative plaster is significantly different. In this case, the textured surface is formed with a trowel, which creates a relief, and then rubbed until a fine-meshed shape is formed. For more details on how this type of stone textured plaster is made, watch the video:
There are several more complex techniques that give excellent results. One of them is creating a surface with the effect of an old stone and then rubbing it with wax. Descriptions of processes and demonstrations of work methods and application of various materials can be seen at the following links:
- Creating the base:
- Waxing:
External, facade works
In external cladding work, a mold is widely used to extrude relief on the surface of a foundation or wall. This decoration of house facades is called stamped texture. It is characterized by a deep relief and, accordingly, a large thickness of plaster for its application. There is a wide variety of stamps that imitate torn, Roman, or small stone.
The application technology is extremely simple. The polymer matrix is placed on the plastered foundation under the stone and held until the mixture begins to harden. The resulting relief must be treated with a steel brush to remove cement laitance.
More detailed instructions for plastering a plinth under a stone - video:
Decorative cracks
The secret to the formation of cracks on the wall is the use of a hair dryer
- Forced drying is carried out at the maximum temperature of the hair dryer at a distance of at least 10-15 cm from the wall, and the brighter the decorative coating, the more powerful the device should be.
- The number, size and depth of cracks in the finish depends on the moisture content of the mortar and its thickness.
- The facing material is grouted, first with sandpaper, and then sanded with a spatula until gloss appears.
- Cracks are covered with varnish, which prevents dust from entering the room.