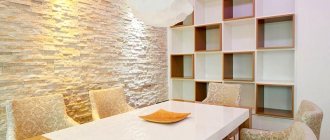
Advantages and disadvantages of decorative stone
Gypsum decorative stone tiles are on sale. They are quite heavy, so they are used not only for cladding the interior walls of the house, but also for fireplaces, stoves, finishing window sills and bar counters.
The material has many advantages:
- wide range of models;
- imitation of natural material;
- pleasant surface for hands;
- environmental friendliness of tiles;
- resistance to temperature changes;
- strength;
- long service life.
But the main disadvantage is the need to carefully prepare the surface of the material itself before starting work. The result of the work and its preservation over a long period depend on the quality of pre-treatment. Some tiles react poorly to contact with moisture and physical activity. Glue for laying decorative stone can improve its properties. Also, you should not use gypsum tiles for cladding in rooms without heating, as they can fall off and crack due to low temperatures.
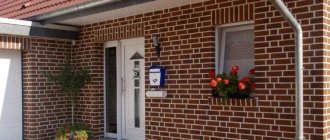
Material advantages
Decorative brick has a number of advantages over wallpaper and water-based paint as a coating on walls:
large selection of colors. You can choose almost any color, pattern, design; durability.
This material is quite durable, on average it can last up to 20-25 years without significant deformation; it is environmentally friendly. It is made from neutral materials, impregnated from rust and fungal mold; easy to operate. When dirty, such a surface can be easily cleaned with any detergent, but avoid liquids for ovens and toilets because of their aggressiveness; it does not create additional pressure on the surface due to its small mass.
Laying on various surfaces
Laying artificial stone can be done on the following types of surfaces:
- Brick, sand-lime brick;
- Ceramics;
- Concrete, pumice concrete, foam concrete;
- Painted walls, wallpaper;
- Polystyrene foam insulation;
- Plaster, drywall;
- Tree;
- Metal, glass, plastic, etc.
The photo shows artificial stone laying on a painted surface
How to lay artificial stone on a plastered wall or paint?
Decorative stone fits perfectly on concrete surfaces, since its composition is as close as possible to them. If you have plastered walls at home, you can glue the tiles directly on them. However, the plaster should not be old, damp, crumbling, etc. Also, the wall should be as flat as possible. If you do not have this, then it is better to remove the old layer of plaster and apply a new one up to 2 cm wide. If the walls require the application of larger layers, then it is recommended to install a special mesh on which the plaster layer will be applied. If you are laying light-colored tiles, it is better to use galvanized mesh.
This is how artificial stone is laid on the wall
The same applies to painted walls. The paint is brushed off or sandblasted and then the wall is plastered. You can attach the plaster mesh directly to the painted wall and then carry out the plastering work.
After drying, the surface is thoroughly primed, 2-3 times. The primer additionally protects the wall from microorganisms, mold and ensures maximum adhesion to other materials.
How to lay decorative stone on a concrete wall?
Concrete masonry does not require plastering and the tiles are laid directly on the wall using special adhesives. However, it is worth considering that masonry on concrete surfaces is carried out only after the concrete structures have been idle for at least six months. During this time, the concrete completes all shaking and shrinkage and is ready for subsequent work.
How to put decorative stone on cinder blocks, foam aerated concrete and sand-lime bricks?
The fastening of artificial stone to this type of structure is carried out after preliminary preparation. To do this, at the initial stage the wall is leveled - all joints and unevenness between bricks and blocks are puttied, and then plastered with lime-cement mortar. It is also possible to use a mesh, especially when the thickness of the leveling layer exceeds 2 cm.
Also, after plastering, the surfaces are carefully treated with a primer to prevent moisture absorption.
The photo shows artificial bricks being laid on a special mesh.
Fastening tiles to wooden surfaces
Since wood is less resistant to adverse weather conditions and can dry out, rot and become deformed, before cladding it must first be protected from moisture. Therefore, before plastering work, we form a waterproofing layer. For this you can use roofing felt, glassine, and hydrophobic construction paper. The paper is laid horizontally with an overlap of 4 to 8 cm at the seams.
After preparing the surface, a plaster mesh with an anti-corrosion coating is applied to it, preferably in two layers. After applying a two-layer mesh, it is plastered with 1 cm of plaster mortar. Before installation begins, the materials must dry completely.
How to attach a decorative stone to wallpaper?
Many people are interested in the question: can decorative stone be glued to wallpaper or not. Of course, you can do whatever you want, but how long will such a design last? Any craftsman counts on the longevity of his work, and the wallpaper, under the weight of the stone, will sooner or later begin to fall off or create other inconveniences. Therefore, if you are definitely planning to decorate your wallpaper with decorative stone, then you have several options for solving this issue.
Preparing wallpaper before laying artificial stone
The process of installing artificial stone
How to attach artificial stone? Before laying the stone on the wall surface, the wall itself is checked with a level: if curvature of the plane is noticed, then the wall should be leveled with plaster or putty. You should also apply an antifungal solution to the wall: it is better to walk over the surface at least a couple of times. After this layer has dried, a layer of primer is applied.
Installation of artificial stone - when performing work, you can use special gloves to protect your hands
Artificial stone should be installed at positive temperatures. In the case when the temperature exceeds the barrier of twenty-five degrees Celsius, you should wet the wall and the stone itself on the back side with a water solution.
Before applying adhesive to the stone, you should check the correct shape of the stone several times to see if it will fit. Fastening the artificial wall stone begins from the lower parts of the wall and then moves upward. The stone is secured to the wall with liquid nails or sealants.
When working with stone, you should prepare an adhesive that will last about twenty minutes of work: with a longer working time, such glue begins to dry out. Place the stone in the desired location on the wall, apply a little pressure and secure it.
Final stone processing
At the final stage of masonry, the seams are filled with a special jointing mortar. To apply it, it is recommended to use a large cooking syringe or a bag made of polyethylene and filled with a solution. The mortar used to fill the seams should be leveled using jointing or a rubber hose.
Final processing is carried out until the impregnation ceases to be absorbed. The number of layers of impregnation depends on the porosity of the material. Impregnation protects the stone from cracks, preserving its natural color for a long time.
Remains of the solution (adhesive or jointing) are removed with a broom or dry brush. Do not use a damp cloth for this as it will leave stains that will be difficult to remove. Before laying artificial stone, carefully read all stages of the work. If you are not sure that you can do this work yourself, then it is better to turn to professionals who will do everything quickly and efficiently.
How to care for stone
Caring for gypsum stone will not require much effort on the part of the housewife.
All that is required is to periodically wipe off the dust from the varnish base. It is worth noting that if bricks with an aging effect were used in the interior, then the dust on them is not visible as on dark varnished bricks. The varnish, in turn, protects the plaster from moisture. Gypsum bricks for decorating a room are the best budget solution. With the help of such inexpensive materials, you can create a cozy interior in any corner of the house, and all that is required to design an interior solution is imagination, time and compliance with installation technology.
The best modern materials for imitation brick
| Photo | Name | Rating | Price | |
| #1 | Gypsum | ⭐ 4.9 / 5 16 — votes | Find out more | |
| #2 | Clinker | ⭐ 4.85 / 5 4 - votes | Find out more | |
| #3 | Porcelain tiles | ⭐ 4.8 / 5 6 — votes | Find out more | |
| #4 | Acrylic | ⭐ 4.8 / 5 3 - votes | Find out more | |
| #5 | Flexible stone | ⭐ 4.75 / 5 5 — votes | Find out more |
What modern materials would you choose to imitate brick or would you recommend purchasing?
Take the survey
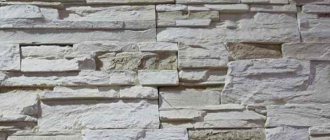
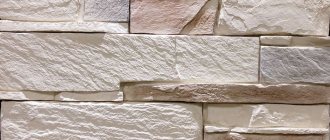
Types of decorative stone
The finishing material for walls differs in its composition. Therefore, after studying the features of each of them, you can independently select options for cladding surfaces on the street and in the house. Artificial stone is produced in several ways and is divided into the following types:
- Ceramic – creation requires annealing at high temperatures.
- Made from gypsum - ideal for internal cladding. You can make tiles at home. The appearance is difficult to distinguish from natural. It is not used as an external element due to its instability to cold.
- Concrete - concrete is the main component, so the cladding is heavy and is not always appropriate as interior decor. Resistant to frost and negative weather conditions.
- Acrylic - plastic during the molding process, production is allowed at home.
- Flexible is a modern cladding element in which a thin layer of sandstone is applied to a flexible surface.
Where is it appropriate to use artificial stone:
| Place: | Description: |
| Yard | A wide range makes it possible to decorate not only the external walls of the house, but also paths, gazebos and fences. |
| Facade | Installation on a foundation creates additional protective properties from wind, rain and frost. The base is most susceptible to mechanical stress. |
| Fireplace | Finishing of stoves and fireplaces has long been done using both natural and artificial materials. Even brick-like tiles that can withstand high temperatures are suitable. |
| Arch | Interior portals without doors are designed in any order. Wallpaper, plaster, painting goes well with the finishing material. |
| Entrance door and hallway | Cladding work begins from the corner; pre-shaped tiles are used for the opening. |
| Window | A room in which not only the interior portals are decorated with stone looks beautiful. An apartment with clear zoning of space looks advantageous. |
Features of the material
Decorative masonry material is in great demand, because it has many advantages over natural brick. Artificial bricks are created from different materials, which are presented in the table:
Material: Description: Clinker: Clinker material is durable and the surface is wear-resistant. Sold in different colors. It can be used as a finishing material for interior and exterior work. Gypsum: Gypsum bricks are fragile, but their weight is small, which makes it possible to stick the material on plasterboard sheets, plywood and other non-durable materials.
The blanks are made white, but during production they are painted or the person himself will paint the brick in the desired color. Polyurethane: This type of brick is lightweight and is often used for finishing walls in a house or apartment. Often sold in white, but pigmented materials are also available. Foam plastic: Foam plastic materials are intended only for cladding inside buildings. The material is very light and fragile.
To decorate the walls inside, it is recommended to choose the best option - gypsum brick. It will be cheaper than clinker and even more so than porcelain stoneware.
Gypsum is stronger than other polymeric materials and is natural. Gypsum tiles are easy to make with your own hands by mixing water, gypsum and PVA glue. After pouring into the mold, the facing material should dry and it can be used for work.
Details
Preparation of materials and surfaces
You can attach gypsum tiles to almost any type of surface - concrete, brick or wooden walls, plaster, metal and glass. The main requirement that ensures a high-quality installation is dryness, strength and cleanliness of the base.
Surface preparation is as follows:
- Remove the remnants of the old facing layer - you will need to remove all the plaster and the old adhesive.
- Clean the base surface with a wire brush.
- Apply an acrylic-based primer coat to the surface with deep penetration. After this, you should leave the walls to dry in accordance with the priming instructions.
Helpful advice! If the walls are wooden, then reinforcing fiberglass mesh should be installed.
Another step will be preparing the material for cladding. Initially, you need to calculate the cladding area. The standard overconsumption of material will be 10%, which should be kept in mind when calculating the required amount of material.
Preparatory stage for the material:
- Cut the artificial stone into pieces of the required configuration and size using a hacksaw or saw.
- The cut areas should be cleaned with a file or sandpaper to give them a natural appearance.
- The reverse side of the stone slabs should be lubricated with the same primer that was used to treat the wall surfaces. Then leave to dry.
- Apply paint and varnish composition to the cladding material and let it dry. You will need to use several shades.
Next, let's look at the direct instructions for use.
Gluing instructions
So, let's look at how to glue decorative stone to walls. For laying decorative stone, two technologies are used - seamless, and also with jointing. You should choose the ideal option before starting installation work so that you can correctly calculate the amount of material.
Please note that with a seamless laying method, the consumption of stone material will increase by 10-15%.
The principle of performing cladding work is very similar for both technologies:
- Place gypsum tiles (artificial stone) on the floor near the cladding area in the same order as they will be placed on the surface of the walls. This will make it possible to see the final finishing result and make the required adjustments.
- Mark the surface of the walls to ensure the most accurate placement of materials.
- Carefully study the instructions for the composition of the glue and only after that you can begin diluting the solution. This is extremely important because ready-made mixtures have a limited shelf life.
- Prepare the adhesive composition - it should be without lumps, not very fluid, thick, but definitely not sticky.
- If you use a cement-based mixture, it should be applied to the walls in a layer with a thickness of a maximum of 0.6 cm. Do not cover an area of more than 1 square meter at a time with glue - to prevent the adhesive composition from drying out.
- Apply a spot solution on the back side of the tiles (8 points each) or in wave strips if the composition chosen as an adhesive is a polymer sealant for installation.
- Start gluing the decorative stone from the bottom of each corner, where it will be more convenient.
- Press each tile into the mortar applied to the walls so that it extends along the edges of the piece. The material should be pressed as tightly as possible to the surface.
- If you choose a laying method with seams, then you do not need to make gaps between the tiles larger than 1 cm. With the method without seams, the edges of the fragments should fit as closely as possible to each other.
- Fill the joints between the tiles with the special grout or adhesive that was used for installation. In certain cases, the adhesive squeezed out along the edges is enough to level the surface and seal the seams.
- Grout the seams after the adhesives or grout have begun to set, but it is unacceptable to wait until the composition has completely hardened. It should be borne in mind that the approximate hardening time for different products can vary from 10 to 30 minutes.
- The surface covered with panels should be treated with polyurethane or acrylic varnish. This will provide reliable protection from moisture, as well as long-term operation. For the same purposes, you can use any product that has water-repellent properties.
- Complete drying of the surface, which is covered with gypsum tiles, is achieved within 3-4 days.
Helpful advice! Gypsum decorative stone, which is easy to glue to walls, is a lightweight material, and it attaches well to vertical surfaces. But it’s still better to start gluing the tiles from the very bottom row. This will make it possible to make the lines as smooth as possible with a seamless installation method and prevent individual fragments from slipping.
How to wallpaper
Despite their relatively light weight, decorative stones are a slightly heavy wall covering. For this reason, it is not recommended to stick it over wallpaper. Otherwise, there is a high risk that the gypsum panels will come off the walls and collapse. If the design includes a combination of decorative stones and wallpaper, you will need to leave bare areas under the panels.
It is recommended to mark the surfaces of the walls in advance so that when installing wallpaper you do not have to cover the places where the decorative stone will be attached. The surface must be prepared for wallpapering and stone installation - leveled and treated with a primer.
The fastening of artificial stone is carried out only after the wallpaper has been glued, and not on top of it, but on the remaining free wall areas.
If you want to install decorative slabs on walls whose surface will be ideally covered with wallpaper, you need to follow the instructions:
- Mark with a pencil on the surface of the walls the places where you plan to glue the stone, step back 2 cm and outline the boundaries. The indentation is required so that the wallpaper sheets slightly extend under the plaster panels and there are no unsightly gaps left between the two types of cladding.
- Using a sharp knife or blade, cut out the outlined fragments and remove the wallpaper in such areas.
- Prepare a glue solution and attach the slabs to the walls according to the instructions.
- Treat the surface that is finished with panels with a special varnish.
If for some reason you should install the decorative stone first, and only after the wallpaper, you should use one of two methods:
- Attach all the slabs to the surface of the walls, except for the last, top row. Next, glue the wallpaper; you need to make a spade on the area under the stone. At the end, attach the last row of gypsum boards.
- Lay all the slabs, without exception, and the wallpaper should be glued with a margin of 6 cm (depending on the type of wallpaper). After perfect drying, use a sharp knife to cut off the excess by running along the joints. The resulting seam should be covered with decorative skirting boards (baguette).
Helpful advice! If you are not using paper wallpaper, but liquid wallpaper, then you do not need a spade under the slabs - the joint will already be neat.
How to lay decorative bricks
To avoid force majeure, the laying is carried out on a clean, flat surface. The wall and the back side of the brick are moistened with a primer composition. The pattern is laid out on the floor like grooves.
This way the appearance of the finished application will be immediately clear. You can change the type of masonry along the way. The wall is marked, a kind of beacons are made with thread, this way you will reduce the number of inconsistencies and trimmings.
Laying can be done with or without seams, all this should be taken into account.
Installation begins from the corners, using special bricks, combining long and short sides. The glue is prepared manually or using a puncher with a special attachment. Read the instructions carefully and strictly follow the proportions of water and dry mixture.
First, apply a thin layer of glue to the wall, ensuring complete wetting. Afterwards it is applied again in a larger layer. Also coat the brick that you primed with glue.
Your goal is to ensure that both surfaces are carefully treated to ensure good adhesion. You cannot press the elements too hard against each other, as you can deform the material. The consistency of the glue should be moderately thick so that the rows do not “float”.
Try to maintain a certain symmetry. There is no concept right, this process is very creative. Step back often and visually evaluate the resulting drawing.
It is important to achieve a combination of colors, textures and sizes. The colors of bricks from different boxes may vary slightly. To avoid disharmony, use different materials at once during installation or carefully monitor the series of materials.
Trimming is done with a hacksaw and a plane, the edges are cleaned with sandpaper or mesh. Try to avoid pruning as much as possible. Your task is to create an elegant and stylish canvas with a touch of sophistication.
If you are decorating a wall with artificial or natural stone, it is advisable to attach a metal mesh to the surface for strength.
After completion of the work, in order to avoid the appearance of efflorescence and other deformations on the brick, it is coated with a primer or varnish.
This final treatment helps protect your coating from moisture and various mechanical loads. Don't neglect this. Be sure to use this decoration for your home, it will be truly original.
61716
To create an aesthetic surface both outside and inside a building, the technique of laying decorative tiles under brick is widely used.
This type of cladding can be made from different materials. The simplest and most affordable is gypsum. Let's take a closer look at how to lay such a coating with your own hands.
Brick-like gypsum tiles are often used for interior decoration.
Common Mistakes
When laying decorative tiles in an apartment, installers often cut off more material than necessary. As a result, small bricks either go to waste or are attached to the walls, thereby spoiling the created pattern from the facing material.
Often installers (especially inexperienced ones) forget to remove any glue that gets on the plaster surface. And after hardening, it is difficult to remove such a composition without damaging the lining. Inexperienced installers, when forming joints, forget about the need to align the tiles along the same line. Thanks to this, a beautiful and clear drawing is created. There are also frequent cases when a wide gap is left between the tiles, as a result of which the cladding takes on an aesthetically unattractive appearance.
And the last common mistake is ignoring the priming of the walls and the inside of the tiles and refusing to treat the decorative material with a protective layer. In the first case, the chances of mold appearing on the walls increase, in the second, the service life of the finishing material is reduced.
Surface preparation
The surface of the wall must be thoroughly cleaned of any contaminants, the remnants of the previous coating must be removed and all detected cracks and crevices must be sealed using polyurethane foam or any plaster mixture. It is better to putty the walls with a gypsum-based composition. Gypsum plaster or putty will provide reliable, high-quality adhesion. After the putty has completely dried, it is necessary to treat the surface twice with a deep penetration primer mixture.
This is reliable and effective protection against fungus and mold, high humidity and insects. Now you can start gluing the canvases. If desired, the outline of the proposed panel, which will be created from decorative stone, is outlined in advance so as not to glue extra sheets and calculate the amount of material required with maximum accuracy. The last sheet should extend beyond the boundaries of the picture. After drying in accordance with the specified boundary, the edge of the canvas is carefully cut and work with stone tiles begins.
Often the idea to decorate part of the wall with stone panels comes at a time when the walls have long been completely covered with sheets of wallpaper. In this case, the edge of the decorative coating is marked directly on the surface with a pencil or marker and the canvas is cut along it, so that later the unnecessary part, after wetting with warm water, can be removed.
Laying is carried out so that there is a distance to the edge equal to the size of the tile.
Installation on an insulated facade
Houses insulated on the outside with expanded polystyrene slabs and mineral wool can also be decorated with decorative stone. In this case, even before installing the thermal insulation, it is important to evaluate the quality of the base and choose a reliable method of fixing the insulation and the entire subsequent structure. Usually, the insulation glued to the wall is also secured with dowel nails or anchors, depending on the type of base. A reinforcing galvanized mesh is laid on top of it. It is also attached to the base and covered with plaster. The stone is mounted on the hardened plaster layer. The double anchoring system provides reliable support for the stone cladding. But this is one of the options, and there are many of them when working with artificial stone cladding. Much depends on the skills of the craftsmen. The average cost of stone laying work is from 1200 rubles. for 1 m², and it’s hardly worth saving on this.
The logical conclusion of the formation of the architectural appearance of a country house is its design with elements of facade decor