How to make it yourself
For those who like to do everything themselves, we have prepared instructions on how to make a partition in a brick bathhouse with your own hands.
Instructions
First of all, it would be worth mentioning the soaking of bricks. Since you are doing it for yourself, it’s worth soaking, even if you are not a beginner. What does this give? Of course, the solution will be mobile longer, like on clinker - the slightest movement and everything will move. But there is time to do everything smoothly. But the result will still please you - the adhesion to the solution from this simple manipulation will be stronger.
ADVICE! Well, and without fail, wet the used bricks.
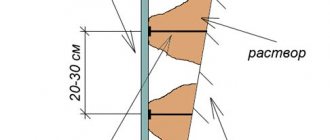
Preparatory work in the room begins with the waterproofing flooring. At least on the base on which the partition will be located. This could be a concrete foundation, screed, or curb. (In general, it is laid over the entire floor, but we assume that everything was done correctly when installing the floor, and waterproofing is present on the lower layers, and on top you most likely have a drain on which nothing needs to be laid.)
A tape a few centimeters wider than a brick one is enough.
Next, use a laser level or an old-school tool to mark the location of the future masonry. There is no need to talk about cleaning. You can use a special mason’s hammer to chop it in advance or use a grinder with a brick cutting disc to cut the bricks for the sling. You can calculate in advance how many bricks you will have in height. In general, try it on.
And the lace can be set as shown in this video:
BY THE WAY! You can generally use metal profiles nailed to the walls as guides for your partition. They do the same thing - they put a brick between two corners.
The first row is the most difficult. It starts with the fact that you lay the solution in a layer thicker than usual, level it and let it adhere to the base. If there are uneven foundations, it’s time to take them into account and correct them.
Next, a thinner layer is laid, there is no need to let it stick, bricks are laid immediately. Everything is aligned very carefully - by level, by cord.
Up to the 5th row, maximum attention - you form a plane, which you will then catch visually. Check and double-check.
If you are making a brick on an edge, then reinforcement with mesh or another method is mandatory; if not, then optional. Masonry of a quarter of a brick must be reinforced, because it is too thin; masonry of half a brick is optional. Reinforcement options - mesh, reinforcement, strips of metal. The reinforcement is inserted horizontally into the masonry joint. The thickness of the reinforcing materials should not exceed the thickness of the masonry joint. Just like the reinforcement bars in the wall, which are placed in the seam. You can attach it with corners - one side into the wall, the other side of the corner into the brick. In a wooden bathhouse, you shouldn’t tie a wooden wall to the partition at all - the wood takes a long time to shrink, and it also changes dimensions due to moisture.
How exactly the masonry is done can be understood from the following videos (we hope that you will find useful information in them):
Don't forget to leave some space under the ceiling. It is proposed to fill it, for example, with tow soaked in cement mortar and scrap bricks (small).
You can see how the door frame is inserted in the video above, where they teach how to position the lace on magnets.
You need to get rid of excess mortar on the wall immediately, but if anything remains, remove it with a metal brush.
If the partition is under the insulation, it is not necessary to unstitch the seams; if not, unstitching comes down to creating a concavity or convexity of the seam. Both are purely for beauty. For the first one, simply scrape out the solution with a wire loop.
***
In general, nothing difficult if you have a little experience. But we wish the newcomers success!
Foam block, aerated concrete
Construction of a partition from aerated block
A partition wall made of this material is built according to the brick principle, but it has its own nuances.
- When purchasing, choose a material whose sides are as smooth as possible, this will make the whole process easier for you.
- It is better to use a special glue for the solution, which is more flexible and dries faster. If you want to prepare it yourself, then the proportions will be 4:1; in addition to sand and cement, you will also need a plasticizer and a foam additive (they need 50 grams per batch).
- The first row is tried on without glue. If one of the blocks needs to be trimmed, it is better to trim the two outer ones to the same size to get a good dressing.
- In the same way as in the previous case, ligation is carried out with load-bearing walls using reinforcement or metal plates.
- After two rows, a metal mesh is placed in the seam.
- The doorway and the partition above it are planned in the same way as in the previous version.
- Finishing is done using facing material or putty.
Interfacing walls made of aerated concrete
Note! Be sure to provide ventilation in all rooms. This will help prevent the growth of fungus and mold.
To do this, you can install supply valves that will shut off. You can also install anemostats into the ceiling and draw leads from them through the ceiling to the roof.
Now you know how to make a partition in a bathhouse. There are no barriers to trying to build it yourself.
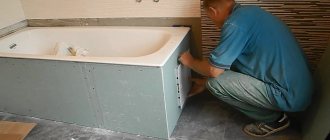
In a brick bath, the partition between the steam room and the relaxation room can be made of foam blocks - a material that is more accessible to install and use.
The significant advantages of the blocks are:
- low weight compared to brick;
- large dimensions, thanks to which the construction of the structure is completed faster;
- convenience and ease of installation;
- low cost.
The technology for installing the material is similar to brickwork and involves the following stages of work:
- The preparatory stage is carried out in the same way as in the previous version. Carrying out the necessary markings, fixing the cord to determine the contours of the future structure.
- Dry laying of the initial block row. If necessary, the blocks can be cut with a grinder or a hacksaw to obtain the required width.
- To connect individual elements, a special adhesive solution for foam blocks is used, prepared according to the instructions.
- The adhesive mixture is applied evenly in a thin layer, after which the foam blocks are installed in a row. For additional structural strength and reliable connection to the walls, reinforcing rods or nails up to 6 cm long are used. They are installed in holes previously prepared in the wall.
- After the partition has been erected to the upper level of the doorway, several reinforcing bars are installed above it along its entire length as a base, after which the blocks are laid up to the ceiling.
The same adhesive mixture is suitable for plastering foam blocks. After drying, the wall is primed and puttied. Painting composition or ceramic tiles are used as decorative materials.
Making a brick partition
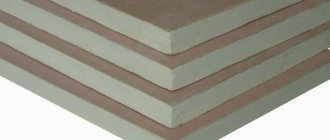
The partition in the bathhouse between the steam room and the sink can also be made of brick. Here it is better to use ½-brick spoon masonry (or, alternatively, a whole brick). Such a structure will weigh quite a lot, so to lighten it, you can use hollow bricks.
Making a brick partition
Stage one. Preparation
Before starting work, it is necessary to prepare all working surfaces. The plank covering is removed from the floor all the way to the foundation, then everything is cleaned with a wet broom. Next, the workplace is equipped with good lighting, all items that are not needed for work are removed from the room. The contours of the structure are outlined.
Stage two. Solution
To work you will need the following equipment:
- sieve;
- Sander;
- shovel;
- mixing tank.
Tools for work
Step 1. First you need to sift the sand to clean it from foreign objects. A sieve is constructed from a fine mesh chain-link mesh and 4 beams. The sand is carefully sifted.
Sifting sand
Step 2. Next you need to take care of the mixing container. It can serve, for example, as an old iron barrel, cut lengthwise into two parts. The barrel is firmly installed for ease of operation.
Step 3. Mixing proportions – 3:1. First, you should fill in six buckets of sand and two of cement. Water is added and the solution is mixed with a shovel. This volume of solution is enough for about an hour of work.
Step 4. The solution is mixed to the consistency of thick sour cream. At the end of kneading, it will begin to harden and shrink, but there is no need to add water - just stir it once every 15 minutes.
Stage three. Construction
For this stage you need the following tools:
- level;
- pick;
- trowel;
- plumb line;
- rule.
| Step, No. | Description | Illustration |
| Step 1. | The string is stretched - it will serve as a guide. The solution is laid and leveled with a trowel, and the horizontalness is checked. Then you need to wait a little for the solution to set. | First row - diagram |
| Step 2. | Another layer is applied on top of it and the laying of row No. 1 begins. | Second row |
| Step 3. | The first brick with mortar applied to the end is laid on the surface and pressed against the wall. Next, the brick is tapped and leveled with twine, and excess mortar is immediately removed. | Bricklaying |
| Step 4. | If a doorway is planned (and most partitions have one), then it needs to be set in advance. Using spacers, you should install the door frame. It is checked for horizontal/verticality and, if necessary, its position is adjusted. | Laying a brick partition |
| Step 5. | The brick is laid close to the box. To tie the partition to it or to wooden walls, metal strips are used: they should be bent and screwed to the side surfaces so that they (the strips) are between the bricks; You can also use reinforcing bars. | Door frame |
| Step 6. | At the end of laying row No. 1, the brick is broken into two parts using a pick. The second row begins with one of these halves. The string stretched horizontally is carried higher to make it easier to navigate. The third row begins in the same way as the first. | Laying brick partitions |
- Every five rows, steel strips or pieces of reinforcement are placed in the seams - this will strengthen the structure.
- The structure is tied to the walls with steel strips, and auxiliary reinforcement can be used for the door frame (ideally, this should be a channel of the appropriate size).
- The gap formed between the ceiling and the wall is filled with small pieces of bricks previously soaked in concrete. The pieces need to be pressed as tightly as possible to each other. All cracks are sealed with tow, also treated with cement mortar.
Good advice
- If you plan to plaster the partition, then when laying it you don’t have to put too much effort into the quality of the seams.
If a brick structure serves as a design element, then the seams must be neat, so excess mortar must be removed in a timely manner. Plastering a brick partition - If the partition is to be plastered, then it is quite acceptable to use even used bricks - this will significantly reduce costs.
- If any communications must pass through the partition, it is recommended to use a piece of pipe of the appropriate diameter for this purpose. The pipe is lined with brick, but is not attached to the structure with mortar - this way, in the event of any changes, the masonry will not be disturbed. The voids formed between the trim and the masonry are blown in with polyurethane foam.