The equipment of the bathroom is no less important than other rooms in the apartment. For a long time it looked quite official and boring: plastered walls and a panel of poisonous green or blue paint. There were practically no other options, except for the possibility of covering the walls with nondescript tiles. Over time, cracks and chips appeared on the walls, giving the bathroom a rather unsightly appearance that repair and restoration work could not save.
The equipment of the bathroom is no less important than other rooms in the apartment
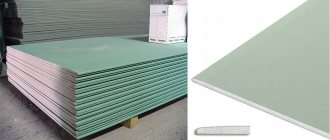
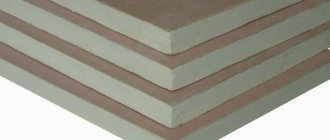
Today, the choice of materials that can be used in equipping this wettest place in the home has expanded, for example, moisture-resistant drywall has appeared on sale, which can be installed and then lay tiles on it.
Typically, plasterboard coatings do not tolerate moisture well: they get wet, swell, become loose and lose their appearance. If you decide to line the walls with them, when purchasing it, you must definitely pay attention to the color: waterproof material is usually blue or green - or to the markings. If you have any questions, consult the seller: is the material waterproof?
Typically, plasterboard coatings do not tolerate moisture well: they get wet, swell, become loose and lose their appearance.
Requirements for plasterboard base
To use this type of material for bathroom equipment, drywall must meet certain requirements, including:
- special moisture-resistant impregnation of gypsum coating;
- low weight of a standard sheet;
- ease of processing;
- environmental Safety;
- possibility of installing finishing materials on it.
To use this type of material for bathroom equipment, drywall must meet certain requirements
Advantages of the material
Bathroom renovations require homeowners to focus their financial resources and energy, and moisture-resistant cardboard can save money and time spent on such untidy tasks as dismantling and stripping old wall coverings. Covering walls or ceilings with this inexpensive but durable material reduces the duration of repairs by 20-30%, and also increases the quality of laying ceramic tiles.
The use of drywall gives the following effect:
- The walls and ceiling of the bathroom become perfectly aligned in a matter of hours, without grueling dismantling and removal of large amounts of construction waste. Tile or other finishing materials adhere well to drywall.
- Fungus or mold does not form on the walls under plasterboard sheathing, as it has high air permeability.
- The walls are protected from moisture, so the finishing material lasts longer.
- The use of drywall reduces the time for preparatory work by a third, which allows you to complete the repair in the shortest possible time.
- Only environmentally friendly, safe materials are used in finishing. All components of GKLV are safe for humans, so there is no risk to health.
Professional finishers claim that from moisture-resistant gypsum plasterboard it is possible to create complex, shaped structures that embody any desires of the customer. However, it must be taken into account that this material has low resistance to pinpoint impacts. Therefore, in places where you can accidentally touch the wall with your hand, you need to install drywall in two layers.
- GKLV - green. Sheet thickness 12.5 mm. Height and width depend on the manufacturer. This type is used for leveling walls, hiding pipes, and creating a suspended ceiling.
- Fire and moisture resistant GKLVO. This type is produced by Knauf. It has the property of both resisting moisture and not burning. It is also used for leveling walls and ceilings. In those places where there is a danger of fire in the wiring (old) or in a private house the wall is rough, then this type is applicable.
If the wall is painted, you must avoid getting water on it. Otherwise, wipe immediately. Do not use detergents containing acids and alkalis.
What to consider when choosing tiles
Although moisture-resistant drywall provides the ability to level walls and give a room a more pleasant appearance, renovations usually go beyond just installing it. As a rule, tiles are laid on top of plasterboard, which gives the room aesthetics, comfort, and additional protection from moisture penetration onto the plasterboard base. Mosaic or ceramic tiles are used for tiling the bathroom. However, to install additional tile covering in the shower, you need to know its features in order to buy the “right” tile; it must have:
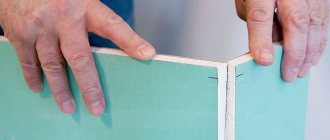
- smooth surface without chips or cracks and smooth edges;
- clear and high-quality pattern design;
- integrity of the structure;
- relevant information on consumer properties on the product packaging and labeling.
As a rule, tiles are laid on top of gypsum boards, which gives the room aesthetics.
Cladding a plasterboard wall surface with ceramic tiles
Materials for tiling plasterboard
To ensure high-quality work and reliability of tiling bathroom walls with ceramic tiles, care should be taken to purchase high-quality materials. This applies to the tile itself, the glue for it, and everything necessary to prepare the drywall surface.
Let's take a look at a diagram of what tiling in a bathroom might look like.
One example of a diagram of the general “design” of tiling in a bathroom
- Floor base.
- Plasterboard fixed to the walls.
- Primer layer.
- Sealing waterproofing tape for gluing at corner joints of surfaces.
- Waterproofing layer.
- Sealing waterproofing linings, glued in places where pipes exit from the wall for connecting plumbing fixtures and in places where pipes pass through
- Tile adhesive.
- Facing tiles.
- Grouting joints between tiles.
- Sealant for corner joints of lined surfaces.
So, first of all, ceramic tiles are needed for cladding. Its quantity depends on the size of the bathroom and on the planned design option. This means that even on the walls several different models can be used, and this is without taking into account the dividing frieze or other decorative details.
Perhaps the online calculator below will help you calculate the required quantity of ceramic tiles.
It is quite easy to use and allows you to separately calculate the number of tiles for the walls and floors in the bathroom. We hope that the user will be able to easily understand the application interface - everything should be intuitive.
How to lay tiles on drywall in a bathroom
The bathroom is a place of high humidity, so the installation of tiles must be done with utmost care, fulfilling a number of mandatory requirements. The first step will be to carefully measure the room and calculate the quantity and cost of the required material. There is no need to take the material “back to back” - a certain, at least small reserve is required, taking into account:
- possible manufacturing defect;
- the presence of a fight as a result of careless handling;
- additional use during installation, taking into account the specific layout of the room, and other cases.
Drywall is mounted on an aluminum frame and puttied. After the first layer of putty, a second one is applied, and after drying, the surface must be cleaned with sandpaper and the seams between the plates and the entire surface leveled.
The next step will be priming the plasterboard coating, which is carried out with a special primer in two layers with a break between applications of 45 minutes. At the same time, you need to apply it sparingly so that it deeply saturates the base.
Drywall is mounted on an aluminum frame and puttied
Now you can start installing tiles on drywall in the bathroom. To do this, you need to prepare the material, glue and necessary tools. The installation operation is carried out as follows:
- the first row is laid at the bottom of the wall and thoroughly leveled, while you need to use high-quality glue with the consistency of thick sour cream and carefully apply it to the surface;
- subsequent rows must be mounted on top of the first.
There is no need to rush when laying tile flooring. Experts recommend installing no more than five rows at a time, otherwise the structure may collapse under its own weight.
Advice: since it is best to lay the tiles in stages, you should not dilute a large amount of glue at once.
It is best to lay tiles in stages
How to sheathe
The wall is leveled with plasterboard, which is fixed to a frame made of galvanized profiles. To do this, carry out a strict phased work:
- The surface must be prepared. Dry, clean, cover with waterproofing material.
- After this, precise measurements are taken to calculate the number of required elements.
- The next step is marking. To do this, use a laser level, plumb lines, upholstery cord or marker. It is important to ensure the evenness of the intended stripes.
- The profiles are fixed according to the markings. The guides are attached to the floor and ceiling with dowel nails. Hangers are attached to the wall along the markings in 40 cm increments. The PS (CW) rack profile is fixed to them.
- Between the rack profiles horizontally, with a step of 40 cm, transverse ones are attached. They are cut from a rack profile. Crabs are used for fixation.
Each attached element must be checked with a level for evenness.
- The entire created frame is tested for strength and rigidity.
- Sheets of plasterboard are fixed to a metal base. First they are whole, and then they close the remaining windows. The sheets must be fastened in a checkerboard pattern so that the horizontal joints do not coincide.
- Afterwards, the plasterboard wall is coated with a primer and allowed to dry.
- The joints are reinforced, the fasteners are covered with joint putty.
- Next, the entire surface must be puttied and coated with primer again.
The wall is ready for finishing. If everything is done correctly, the surface will be smooth, durable, and able to withstand a certain load.
Required tools and materials
Productive work on gluing tiles to a plasterboard base depends on the timely preparation of tools and materials that should be at hand during work:
- rack building level;
- spatula with different edge relief;
- rubber grout spatula;
- tile cutter;
- additional materials for even installation - plastic crosses and corners;
- a rubber hammer or mallet with a rubber nozzle for laying large tiles;
- jointing, rollers and brushes.
If possible, it is good to use a construction mixer or a drill with an attachment to mix the adhesive.
Before you start work, you should prepare all the necessary tools
Materials for leveling under tiles
A smooth surface of a partition/wall can be obtained in two ways:
- apply a layer of plaster or any other air-hardening mixture along the beacons;
- glue or fasten sheet material with a flat surface to the frame.
The first option allows you to level the walls in the bathroom for tiling without losing the working area of the room. However, for hidden wiring of cold water/hot water supply, sewerage and installation of water meters, filtering equipment and shut-off valves, this method is of little use. Plaster is a “wet” technology; finishing with tiles is possible after the leveling layer has completely dried.
Boxes and false panels are assembled from moisture-resistant gypsum plasterboard and gypsum plasterboard sheets on a frame made of galvanized profile. Less commonly used are DSP and SML, fiberboards. For concrete and brick, cement-sand, lime and gypsum mixtures are usually used.
Most often, a combined method is used: on those walls where there are sewer pipes, risers, taps, a frame is made of gypsum plasterboard, and where there is nothing to hide, plaster is used. It is better to embed thin pipes (supplies to the sink, toilet, heated towel rail) into the wall and plaster; this is much cheaper and will save a lot of space. There are special thin sewer pipes, 32 mm in diameter, for connecting to the wall, for example, to a washbasin or washing machine.
Alignment of DSP walls
Cement particle board is not the best solution for leveling enclosing structures for decorating with tiles for a number of reasons:
- a sheet of DSP costs about three times more than moisture-resistant plasterboard of the same thickness;
- the material is fragile, poorly processed, difficult to cut;
- The slabs are heavy, the work needs to be done by two people.
Cement-based plaster mixtures, after hardening, form a hard, durable coating that normally holds heavy ceramic cladding. The main nuance before plastering the surface is the revision of the wall material:
- cracks are sealed with special compounds;
- loose and crumbling bricks and sections of concrete are removed and sealed.
In the presence of cement, the mixtures last for 40 - 50 minutes before setting begins, which is very convenient for a home craftsman with low qualifications in plastering work. Very wet areas are treated with plaster mixtures with the addition of water repellents, which, after drying on the walls, acquire water-repellent properties by default.
Leveling with plasterboard
The gypsum board sheet can be glued to the wall or fixed with screws on a frame made of wooden beams or galvanized profiles. The first option has a number of disadvantages:
- it is impossible to correct the geometry of heavily obstructed corners;
- when leveling large differences, the gypsum board sheet may sag;
- In places where pipes exit, plasterboard has to be installed in small pieces.
Therefore, false panels are most often used, which are full-fledged gypsum board systems:
- guide profiles on the floor and ceiling;
- rack profiles inserted into them in increments of 0.6 m;
- stiffening ribs from horizontal jumpers;
- sheets of waterproof gypsum board with horizontal seams;
- reinforcement of all joints with sickle tape.
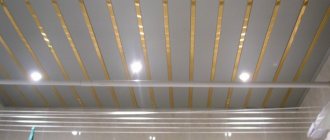
Leveling the walls with plasterboard allows you to hide communications.
Drywall is attached with self-tapping screws to vertical posts and horizontal lintels. The heads of the hardware are slightly recessed and later covered with starting putty. At the last stage, the false panels are waterproofed with a coating or painting composition. To attach shelves, curtains and hanging furniture, additional profiles are placed in the frame. Then a diagram of the location of the racks and jumpers is drawn up.
Plaster
Most manufacturers produce gypsum plasters for wet rooms. For Unis it is Teplon, for Knauf it is Rotband, respectively. The application technology does not differ from standard plastering with cement-sand compositions:
- installation of beacons;
- throwing the solution with a ladle;
- alignment by beacon rule;
- grouting the slightly dried layer.
You can also use cement-based plasters, but this is not necessary, and working with them is much more difficult.
By analogy with plasterboard, waterproofing is necessary, even for compositions that have water-repellent properties.
There are no other methods, other than plastering and making false panels from sheet material, for leveling walls under tiles.
How to choose glue
The result of installing tiles on drywall will directly depend on the correctness of the chosen adhesive and its use. Three types of adhesive coating are used:
- universal adhesive – “liquid nails for ceramic tiles”, which has a high level of moisture resistance;
- elastic glue, which can be found on sale in dry and ready-to-use form;
- cement-based adhesive coating.
Installation using each type of glue has its own characteristics, which are described in detail in the instructions for use.
Attention! If voids are formed when applying glue to the surface, this can lead to defects, which will entail repairing the entire wall.
The result of the installation of tiles on drywall will directly depend on the correctness of the chosen adhesive and its use
What kind of drywall should I use?
The sheet has a smooth surface. From this point of view, it is the most suitable basis for laying tile coverings. If the walls in the room are uneven, then this finishing material can be used after leveling with plaster or drywall. The last option is easier to install. It is used for finishing premises for various purposes.
The drywall + tile material combination is common in commercial properties. In offices, partitions and walls are finished using this method.
However, drywall is susceptible to moisture. There are different types of this material. The option with the simplest properties is gradually destroyed upon contact with water. For this reason, you should choose plasterboard for bathroom tiles with improved properties.
Exposure to moisture is due to its composition: the material is produced using pressing technology using gypsum and cellulose (cardboard, waste paper).
Standard sheets (GKL) do not stand out from a number of other materials. However, there are fire and moisture resistant drywall: GKLO and GKLV. The last option is preferable when finishing is done in the bathroom. It does not deform even in direct contact with water.
Sheets that are characterized by moisture resistance can also be used as a heat-insulating screen. This property manifests itself provided that the coating is dry. Under the influence of water, the material swells, the lining is deformed, and such a structure will no longer retain heat.
To improve its properties, gypsum is mixed during production with various additives that provide rigidity and moisture resistance.
Properties of drywall
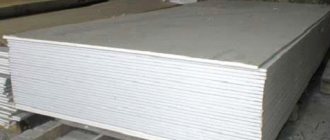
Different types of material differ from each other in some respects. In addition to markings, they also note the difference in shade between standard and moisture-resistant sheets. For example, gypsum plasterboard products are characterized by a gray color. The material with hydrophobic properties is colored green. Other properties of moisture-resistant sheets:
- standard thickness – 12.5 mm;
- inside contains additives that provide moisture resistance, the outer layers are also impregnated with hydrophobic solutions, which contributes to an increase in weight: gypsum board is 2 kg heavier than gypsum board;
- length and width of sheet with hydrophobic impregnation - these parameters do not differ from the parameters of standard material;
- GKL can withstand humidity of no more than 70%, while GKLV is produced for the purpose of installation in more difficult conditions (humidity up to 85%);
- permissible limit of moisture absorption – up to 10%;
- Considering that there is a gypsum layer inside, and the degree of adhesion between this material and cardboard is so high that it is not possible to separate the layers, this means that the strength of gypsum plasterboard is not inferior to some other types of coatings, so it will last a long time (in suitable conditions).
Requirements for plasterboard construction
It should immediately be noted that the quality of subsequent facing work will directly depend on the strength of the base. Although drywall is a durable and dense material, it can slightly deformed under the influence of fairly heavy tiles and a layer of adhesive. Any “movements” of the structure will sooner or later lead to the fact that a layer of tiles will simply fall off the wall, but before that the grout at the joints between the tiles will begin to crack. To avoid this you need to:
- First of all, ensure the rigidity and absolute immobility of the structure. The plasterboard base should not float;
- Decide on the method of installation of the material. This will depend on the degree of curvature of your walls.
Let's say the walls have significant differences that need to be leveled. In this case, it is permissible to install sheets only on metal profiles.
- Many sources mention that metal can be replaced with wooden beams. However, given that the bathroom is a room with high humidity, and wood is capable of absorbing this moisture and expanding under its influence, we would advise against experimenting in this way. Especially considering that the bars cost the same, if not more, than special profiles;
- To ensure reliability, metal strips are attached to the wall in increments of no more than 40 cm;
- If, after attaching the profile to the wall, you see that there are very few contact points, you need to reduce the step between the guides.;
- The profile must be attached to the wall using special hangers;
- In European countries, this installation technology necessarily implies the presence of a double layer of drywall. In this case, the first layer is screwed with self-tapping screws to the profiles, and the second is glued or also screwed to the first sheet in a checkerboard pattern. For additional reinforcement, a reinforcing mesh is glued between the sheets using regular PVA glue and additionally secured with staples. Believe me, such a wall will be “dead”. However, it is advisable to do this if the size of the tiles is very large, and you are afraid that one layer of drywall simply will not support it, or if the wall is very long.
If your walls are relatively smooth and have defects in the form of holes, you can glue the sheets directly to the wall.
- To do this, you can first attach a reinforcing mesh to the surface, which will increase the level of adhesion and strengthen the drywall;
- There are special dry mixtures on sale that are designed specifically for fixing drywall. Some people use polyurethane foam. However, in this case, it is necessary to take into account the coefficient of its expansion and constantly monitor its evenness until the process of its crystallization is completed. There is a high probability that you will not be able to apply the same amount of foam to two adjacent sheets and avoid the formation of differences, so it is better to refrain from this method;
- It is also necessary to ensure the moisture resistance of the base. To do this, it is necessary to purchase a special type of gypsum board, which has the appropriate impregnation and is designated as gypsum board. It is very easy to distinguish it from the usual one - it has a green front side. And be sure to pay attention to the thickness of the sheet. Wall plasterboard has a thickness of 12.5 mm;
After the installation of moisture-resistant drywall is completed, all that remains is to make the base airtight.
- To do this, you will need to fill the joints between the sheets with putty, stick a mesh on them and apply the putty again. Finishing compounds can be used for these purposes;
- Particular attention should be paid to the unprotected ends of the material, which are vulnerable to moisture contained in the adhesive composition. They are treated with special moisture-resistant mastics or sealants.
Whatever installation method you choose, be sure to check the evenness with a building level and, most importantly, use a square to maintain angles strictly equal to 90 degrees.
Can drywall be used in a bathroom?
Not really
Seam treatment, priming and waterproofing
After completing the installation of the tiles on the plasterboard base, it is necessary to put in order the places where they are connected. The seams need to be processed only after the glue has thoroughly set, and there is no threat of sections collapsing or individual tiles falling out. This procedure is carried out using bark, which forms peculiar grooves, which are then filled with a grout mixture. It is applied with a rubber spatula from top to bottom at an angle of approximately 45 degrees. When the grout has dried, it must be covered with a protective layer of varnish, liquid glass or silicone sealant, which will protect the surface from harmful fungal growths and mold. To increase the water resistance of the coating, you can apply a layer of waterproofing.
After completing the installation of tiles on a plasterboard base, it is necessary to put in order the places where they are connected
Arguments of opponents of laying
Wall leveling refers to preliminary rough work performed by builders. Many tilers refuse to cover such surfaces precisely because they do not know how well the sheets are fixed. In addition, good waterproofing of the entire system, including the supporting frame, also plays an important role in this case.
If you discuss the laying of plasterboard systems in advance with a master tiler, you can receive firm guarantees of the reliability of such a structure. Typically, professionals know how to prevent possible problems when tile adhesive interacts with plaster surfaces.
Installation of gypsum structures in bathrooms requires certain knowledge and experience. A plasterboard wall in a bathroom is very sensitive to the humid environment of the room, so craftsmen who do not have practical skills in working with such material often refuse to work with it. In this case, the optimal solution would be to hire a competent finisher who knows all the nuances of installing plasterboard sheets and tiling them.
Using drywall you can quickly and efficiently level walls
It must be said that today's technologies make it possible to adapt almost any material to the conditions of bathrooms. In this case, drywall is no exception. Only an extremely unskilled tile maker can argue with this. Any master with knowledge of modern installation technologies knows that proper processing of drywall in the bathroom guarantees an excellent result.
Installation of gypsum boards on the wall
In order for the gypsum board to hold firmly, it must be mounted to the wall using an aluminum profile. Installation directly to the wall is not possible, as is installation on a wooden base. Wood rots very quickly when in a humid environment. Its surface is an excellent breeding ground for the formation of pathogenic bacteria and mold, which will “eat” the wooden frame in a short time.
The preference for metal sheathing, which is resistant to corrosion, rust and rot, is due to the fact that the plasterboard is fastened in a room with high humidity, and the metal frame ensures the reliability and safety of the fastenings and the longevity of the structure.
Tiles are the most suitable option for gypsum board
The drywall surface, cleaned and treated accordingly, can be designed:
- cork covering;
- ceramic or mosaic tiles;
- moisture-resistant paint;
- decorative plaster;
- using special moisture-resistant wallpaper;
- plastic panels.
However, practice shows that it is most advisable to use tiles for equipping a room with a high level of humidity and plasterboard.
Installation of tiles should be carried out from the center or edge of the wall
The optimal way to tile a bathroom with plasterboard
In small rooms with smooth walls, drywall can be attached using glue. But if in the future you plan to decorate the walls with tiles, then it should be secured with a frame.
The frame method is an excellent option for uneven walls, allowing you to close all communications and create a screen for the bath. Also, in this case, there is no need to clean the walls from the previous coating. While performing this work you will need:
- Rack profile 50x50 (galvanized metal or aluminum);
- Guide profile 50x40;
- Direct hangers;
- Galvanized dowels and screws;
- Level and plumb;
- Hammer.
Attention! Do not use wooden profiles to create the frame. Wood is susceptible to moisture, so in a room with high humidity it will soon become unusable.
Before installing the frame, it is necessary to hide all electrical wires in soft corrugated plastic hoses. The corrugation will protect them from the harmful effects of moisture, mechanical damage and prevent short circuits against the metal profile.
Before installing drywall, you must carefully hide the wires
Also, before installing the frame, metal pipes should be coated with primer twice. Then you need to ensure their thermal insulation: wrap them with mineral wool or other insulators designed specifically for these purposes. There must be a distance of at least 3 cm between the pipes and waterproof drywall. Special inspection doors must be inserted at the locations of valves and meters.
Gluing tiles to the gypsum board surface
Installation of tiles on plasterboard covering is carried out from the center or edge of the wall as follows:
- first, glue is applied to the base with a spatula, which should be evenly distributed over the entire surface of the gypsum board;
- the tile must be glued until the composition sticks to your hands; if it dries, you will have to apply another layer;
- In order for the tile to hold firmly, you can strengthen it by lightly hammering it with a rubber mallet;
- All rows of covering are laid in the same way.
It is necessary to lay the tiles in stages.
It is not recommended to lay the tiles “in one fell swoop”: their mass, laid in one step, does not yet have a strong connection with the plasterboard base, so it may collapse.
Methods of additional moisture insulation
Despite fairly good hydrophobic properties, this material has some areas where the risk of moisture penetration is increased. Usually these are its end parts, as well as the reverse plane. However, even in this case it is possible to correct the situation with minor losses. A competent tile maker will definitely reduce existing risks to a minimum before laying tiles.
Particular attention should be paid to the lower end of the sheet. Moisture-resistant plasterboard for the bathroom, like all other gypsum-based materials, is a fragile and brittle substance. Any damage to its coating during installation may lead to further penetration of moisture into the panel itself and its gradual destruction. In addition, constant contact with wet floors will also contribute to this.
Professionals never fix the panels close to the floor and ceiling, but always leave gaps of about thirty millimeters between the planes. The distance from the top edge to the ceiling of the bathroom will save the structure if the apartment is flooded by residents of the top floor. In addition, open plaster areas and gaps are carefully covered with a layer of tile adhesive, which, when dry, will reliably protect the slab from moisture penetration. Also, do not neglect the grouting of tile joints. If you carefully seal all possible areas of steam and water penetration into the plasterboard base, such a structure will serve you for decades.
The ends of the sheet do not have special protection from moisture, so they require additional insulation measures
There is another reliable method of insulation. It must be said right away that its implementation is possible only if the system is mounted on a frame base. To do this, cover the entire back side of the panel with plastic film. Fix it on the front part so that the ends of the sheet are under the film. This is an inexpensive but very effective way to protect the structure from evaporating liquid entering it.
Preparing the bathroom for drywall installation
Before you begin installing drywall in the bathroom under the tiles, you must clear the workspace by first turning off the water supply and turning off the electricity.
Care must be taken to provide the necessary lighting. You can install a portable lighting device made in a safe and sealed design. All switches, sockets, floor and ceiling plinths are also dismantled.
Having removed everything unnecessary from the room, you should install temporary devices to tightly close the holes - plugs at the places where devices are connected to the water supply and sewerage. This technique will eliminate the possibility of construction debris or cement mortar getting into these holes.
If the walls in the room have been painted, then only mounting boxes from switches, sockets and distribution boxes must be dismantled. They should be replaced with special boxes designed for installation in plasterboard construction. After all dismantling activities, it is recommended to check the evenness of the surfaces and begin attaching the partition profiles to the walls. How to cover a bathroom with plasterboard will be described in more detail below.
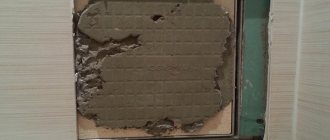
If the walls in the bathroom were tiled, then the old coating must be removed along with the tile adhesive. This will allow you to maintain the volume of the room when finishing the working surface with plasterboard sheets. It is recommended to use an electric hammer as the most suitable device for dismantling tiles.
As soon as all work on dismantling the previous coating is completed, it is necessary to inspect the working surface for any bulges. Bathroom walls made of plasterboard under tiles must be thoroughly cleaned. The process of preparing the room also includes drying the walls for several days. During this time, you need to cover the inner surface of the gypsum board with an aqueous solution of DVHB-70 latex at a ratio of 1:2. The treated sheets must dry for at least 24 hours.
Choosing drywall for the bathroom
Often, refusal to use plasterboard sheets in this room and toilet is due to their lack of proper resistance to the effects of increased moisture, which is often present here. It should be borne in mind that this drawback is inherent only in ordinary gypsum plasterboards, which is why if you purchase moisture-resistant material, then you don’t have to worry about humidity at all. The reason is the presence of hydrophobic substances and other special components that are added to the core of such plasterboard sheets during manufacture, providing them with complete protection from fungi and mold. On the outside, the material is made from moisture-resistant cardboard, which undergoes additional treatment with antiseptics.
High-quality moisture-resistant drywall does not lose its high technical performance when exposed to conditions of increased dampness (up to 90%) and constant temperature fluctuations. Such sheets are produced in green color with the GKLV marking. If there is a need to protect the bathroom from possible fire, then it is advisable to give preference to GKLVO - a fire-resistant material, which, in addition, is also simultaneously protected from moisture.
Advantages and disadvantages of the material
Any person who is familiar with the specifics of making plasterboard asks the question: is gypsum board moisture resistant, can the material be used in the bathroom? Smooth slabs can be used not only to level surfaces, but also to create arched structures, niches, and partitions. The material perfectly hides communications and simplifies the work of ordinary home craftsmen who are accustomed to doing repairs themselves.
Moisture-resistant plasterboard Knauf
And the idea that drywall is not suitable for wet rooms is a misconception. If you use specialized and high-quality material, it will not swell or delaminate when water gets on it. You can lay ceramic tiles on moisture-resistant drywall yourself. This action has many advantages:
- The smooth surface simplifies the finishing process, since only filling the seams is required. This is also an additional saving when designing on a budget.
- Plasterboard sheet allows for additional insulation
- You can process or trim the slabs yourself - thanks to this, laying in corners is no problem
- Tiles require surface leveling. In the case of drywall, this is not required.
- Finishing material minimizes time spent on repairs
Important! Waterproof drywall is an excellent rough material that requires subsequent finishing.
The only disadvantage of using drywall is the need to purchase additional fastening elements. Most often, installation occurs on the sheathing, so you will have to buy metal profiles. In addition, due to the installation of the frame, the area of the room to be finished is reduced. How to cover moisture-resistant drywall in a bathroom at home, materials:
- Tile, ceramic mosaic.
- Plastic panels.
- Oil and water-based paints.
- Trellis.
Laying tiles in the bathroom on drywall with your own hands (video)
Disadvantages of using moisture-resistant drywall
Unfortunately, ideal building materials do not yet exist, so people still have to choose one of several available options. There are some factors that can cause a consumer to refuse to use moisture-resistant drywall.
- If you want to change the finish of the bathroom, you will also have to change the plasterboard sheets underneath. The fact is that the sheets are usually not distinguished by either great thickness or significant strength, so in the best case they will simply become deformed and cease to perform the leveling function, which means they will not be suitable for re-finishing; in the worst case, they will no longer be a single whole.
- Low strength is also dangerous in the context of any impacts. One careless fall or careless movement of any furniture is enough, and the wall, which seemed strong, will be crushed. You can get out of this situation by installing thicker sheets or even several sheets close to each other in especially “dangerous” places, but this will affect the cost of repairs.
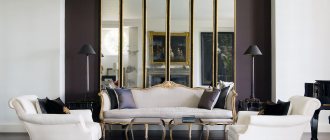
- You can’t hang anything heavy on a plasterboard wall, all for the same reason of fragility. The interior of the entire room is done only once - during the actual renovation process, because then it is possible to design decorative niches and cabinets from the same plasterboard. If you want to hang at least a simple large mirror after the renovation is completed, it’s better to think carefully about whether it’s worth the risk.
- Drywall on its own provides little to no sound insulation, and the bathroom is traditionally a significant source of noise. To prevent the splashing of water from being heard throughout the apartment, you will have to think about additional noise insulation.
Using drywall, you can hide the pipes, but to avoid dampness in the box, you need to take care of additional thermal insulation.
Among other things, there are often complaints that moisture-resistant drywall is still unable to withstand direct contact with water. A relatively small hit at a certain point is enough for the entire sheet to “fold.” In order to avoid such problems, in places directly close to the plumbing, a special coating waterproofing is used, with which the drywall is coated even before installation.
In other words, if you are planning to level the walls using moisture-resistant drywall, immediately take care to think about a design that you will not want to change for a long time, and also pay attention to additional insulation and general neatness in the bathroom.
Selection of materials
To make the finishing of a bathroom with tiles on plasterboard durable, you need to use high-quality materials and follow technology. To complete the work you will need the following materials.
Profile
The frame for attaching gypsum boards in the bathroom is best assembled from metal profiles, since wooden beams, even treated with an antiseptic, begin to rot over time. The profile for plasterboard structures is made of galvanized steel. Frames assembled from metal profiles have high load-bearing capacity, rigidity, they are reliable, durable and do not corrode.
When choosing a profile, you should pay attention to the following parameters.
Size
The rack profile, which is the main element of the frame structure, is available in the following sizes: 50×50; 75×50; 100×50 mm. A profile with any width is suitable for constructing a frame, but at the junction of sheets it is more convenient to use wide products to secure the edges of both sheets.
Metal thickness
Profiles are manufactured with a wall thickness of 0.3; 0.4; 0.5 and 0.6 mm. The greater the thickness of the metal, the stiffer the structure and the greater its load-bearing capacity. But at the same time, the mass of the frame also increases. A profile with a thickness of 0.5 or 0.6 mm is considered optimal for a frame for tiling.
Manufacturer
If everything is clear with the profile thickness, then choosing a manufacturer is a little more complicated. On the one hand, well-known brands adhere to SP 163.1325800.2014 regarding the requirements for profiles for plasterboard structures, undergo certification and guarantee the quality of their products, but they are most often counterfeited by unscrupulous manufacturers. Products from little-known manufacturers are cheaper, but there is a risk that the requirements of GOST 14918–80 for the thickness and quality of galvanized coating are not met, which will shorten the service life of the profiles in conditions of high humidity.
Below is a list of several of the most well-known manufacturers of profiles for plasterboard systems:
- KNAUF is the market leader in plasterboard systems. The profile of this brand is easy to recognize - all shelves have longitudinal grooves that increase the rigidity of the structure, and on one of the side walls there is a marking indicating the manufacturer, type and size of the product.
Knauf rack profile 50×50 mm. - GYPROC is another popular brand specializing in the production of profiles for gypsum boards. The difference between the metal products of this company is the special corrugated surface of all product shelves. Self-tapping screws are easily screwed into the corrugated surface, and this can be done at any angle and in any place.
Gyproc company profile. - Metalhead. A domestic manufacturer of profiles for plasterboard systems produces products that have two longitudinal corrugated grooves that increase rigidity, and relief notches are applied to the side flanges.
Profile "Metalist".
Drywall or gypsum fiber
You can often hear that for wet rooms it is better to use gypsum fiber (GVL) sheets instead of drywall. Let's briefly look at the differences between these two materials.
Drywall
It is made of gypsum enclosed in a cardboard shell (GOST 6266–97). For sheets intended for dry rooms, the cardboard is gray, for wet ones (moisture-resistant plasterboard) - green.
Moisture-resistant drywall: white gypsum core and green cardboard shell.
It is convenient to work with gypsum plasterboard: the material is easy to cut, does not crumble during the cutting process, and with careful work the sheets do not break.
Gypsum fiber
GVL is a board made from a pressed mixture of cellulose fibers and gypsum (GOST R 51829–2001). In addition to ordinary gypsum fiber sheets, moisture-resistant ones (GVLV) are produced. Some manufacturers offer fiberglass reinforced sheets that have improved strength and load-bearing characteristics.
It is more difficult to work with gypsum fiber boards, the slabs crumble when cutting, they break quite often (corners especially break off), but broken pieces can be mounted with sealing of the joints.
What to choose?
If you do not have the skills to work with gypsum fiber, then to do wall cladding in the bathroom with your own hands, it is better to use moisture-resistant plasterboard (GKLV). This material is easy to work with, and when sealed with moisture-resistant grout, it can last for a very long time.
Glue
There are 3 types of glue suitable for gluing tiles to drywall.
Mixtures based on cement and sand
Outdated technology, which is now practically not used. The reason for this is the strong shrinkage of the mortar during setting and drying, which leads to rapid peeling of the tiles. Plasticizers are added to ready-made dry mixtures, due to which the plasticity and workability of the solution increases, and shrinkage decreases. Such mixtures are used for gluing tiles if the budget is limited, since their price is lower than other types of glue.
Liquid Nails
Adhesive in tubes can also be used for installing tiles. But if you need to glue a lot of tiles, then the cost of such finishing will be very high. Therefore, this option is acceptable if you need to make minor repairs, for example, gluing damaged tiles that have fallen off the base.
Liquid nails are ideal for spot repairs.
Adhesive mixtures for laying tiles
The best option is to use special adhesive mixtures for ceramic tiles. Such compositions have high adhesion to various substrates, are elastic, plastic, and easy to use. The leader in use is Ceresit tile adhesive. You can use CM 9, intended for interior use, CM 11 Plus (standard adhesive) or CM 14 Extra with enhanced adhesive properties, which is suitable for gluing porcelain tiles yourself.
In addition to CM Ceresit, craftsmen on specialized forums praise IVSIL FIX adhesive - an inexpensive, economical composition for interior work, as well as Knauf-Fliesen, designed specifically for gluing tiles to bases made of gypsum plasterboard, gypsum fiber board and other sheet materials.
Tile
Any type of ceramic wall tiles is suitable for laying on gypsum plasterboard. The main criterion for choosing a tile is its appearance. Here you should be guided by personal preferences, as well as take into account the features of the bathroom interior and the general style of the house or apartment.
Tile size
The smaller the size of the tile, the more difficult it is to lay it, especially if there is not enough experience in such work. The standard size of wall tiles is 200×200 or 200×300 mm.
Note! According to GOST 6141–91, the permissible deviation of tile dimensions in length and width is ±0.8%. In this case, the difference between the largest and smallest tiles from one batch should not exceed 1.5 mm.