The times when whitewashing was the only way to restore the appearance of a ceiling are long gone. Now there are many options, each of which has both pros and cons - the latter mainly being the complexity of self-installation and the unavailability of some materials. Arrangement of the ceiling in the corridor made of plasterboard can be called the most popular solution, which can be inspired by photos of beautiful interiors made using this material.
Advantages of plasterboard ceilings
By deciding to use plasterboard as a ceiling covering for the hallway, you can become the owner of not only a beautiful finish, but also receive a number of other advantages:
- Smooth surface . An ideal repair involves careful alignment of all planes, and walls alone cannot do it. Drywall will eliminate the need to thoroughly adjust every centimeter, because it itself is smooth and perfectly even.
- Installation . It is worth noting another convenience of using plasterboard sheets - the installation process is greatly facilitated, because it becomes possible to correct even very large unevenness in the floors; plaster in this case would be powerless.
- Disguise . The joy of contemplating wires or pipes is very doubtful; often it spoils the interior so much that you have to give up some interesting ideas. A suspended structure can easily help solve this problem.
- Soundproofing . Although the material is not very thick, it has good performance in protecting against excess noise.
- Flexibility . Gone is the era of monotonous renovations with carbon copy interiors; with the help of gypsum plasterboard you can create a real masterpiece on the ceiling: fancy curves and unpredictable shapes, several levels.
- Multi-level lighting . Plasterboard sheets easily allow you to install multi-level lighting of any complexity, so that, if necessary, only a separate part of the spacious hall is illuminated.
- Installation . It's hard to believe, but installation doesn't require much effort. You can even do this on your own, just by watching good training videos. It is enough to know how to install slatted bases to secure the material. However, it is worth considering that the sheets of gypsum cardboard are quite large in size and it is impossible to install them in the correct position alone; a team of at least two people will be required.
General principles for selecting materials
The market for modern materials is so rich and diverse that the question of what kind of ceiling to make in the hallway is no longer as pressing as it was 10-15 years ago. All options for arranging the ceiling surface can be divided into two types:
- installation of materials on the base (main) ceiling;
- fastening to already installed structures.
The first type includes whitewashing and painting, as well as wallpapering. Even with the advent of modern materials, these classic finishing methods do not lose their popularity. Also, ceiling tiles and decorative plaster are attached to the ceiling. Before installation, the base surface requires pre-treatment. The previous finish is removed and the ceiling is primed.
We include plastic panels in the second group as a practical and inexpensive type of finishing. Competing with them are plasterboard and suspended ceilings, as well as multi-level structures. All of them involve reducing the height by a few centimeters, but do not require special surface preparation.
We will consider each of the materials listed above in detail. This will allow you to compare your expectations with the actual result and help you make a final decision.
Whitewash
When the ceiling is perfectly flat and no one has any special requirements for it, whitewashing becomes a truly good choice. It has two significant advantages: low cost and ease of implementation. True, the quality leaves much to be desired. It’s just that white ceilings are becoming less and less common in modern apartments.
Painting
Compared to whitewashing it looks more presentable. If you look hard enough, you can find an interesting shade or choose the right texture. Let us repeat once again - the paint will look good only on a pre-leveled ceiling.
Decorative plaster
A good choice for a corridor with a flat surface. Many people choose decorative plaster for the reason that they can create an original design without serious financial costs.
You can paste the wallpaper on the ceiling in the hallway yourself - and this is the first plus. The variety of designs, limited only by the consumer’s imagination, is the second advantage. By the way, if the coating is of high quality, it will look no worse than expensive types of ceiling finishes. Keep in mind that to achieve the desired result, the plane must be leveled.
PVC tiles
Each of us has heard the phrase “cheap and cheerful.” So, it is very suitable for a corridor in which the ceiling is made of PVC tiles. If you take proper care of the material, you can forget about the next repair for many years.
Drywall
A material that puts all previous finishing methods on both blades. How to make the ceiling in the corridor beautiful, reliable and at the same time unusual? That's right - use gypsum board. The advantage is that spectacular spotlights can be mounted into a plasterboard ceiling.
And if you do the installation yourself (by the way, every owner can do it), you can significantly save costs.
Aluminum rack design
Aluminum panels are no better or worse than drywall, they're just different. They are stylish and practical. By the way, here too you will have the opportunity to install spotlights. Aluminum is good because it does not allow water to pass through and is resistant to high temperatures.
Slatted wooden structure
Even in a narrow corridor, wooden slats create a warm, homely atmosphere. The quality of the material plays a huge role. You can get either a simple and unremarkable surface or an expensive, luxurious surface. There will also be no problems with the installation of lighting fixtures.
Tension fabric
We declare with all confidence: stretch ceilings this year remain the most popular, attractive and practical option for finishing ceilings in the corridor. They haven’t come up with anything better yet - perhaps multi-level structures with a combination of plasterboard and stretch ceiling.
Indeed, this material is distinguished by its durability and simply endless choice of textures and colors. If you turn to professionals, installation is done quickly and relatively inexpensively. You can do the installation yourself, but it will take a lot of time.
Standard Design Options
Working with materials made of plaster and cardboard allows you to achieve any results; during repairs, all ideas, even the most daring ones, can be taken into account and put into practice. But there is not always a need for original solutions; sometimes a simple and well-implemented project is enough.
The usual one-level suspended ceiling made of plasterboard with a minimal amount of finishing, or a two-level version, usually in this case, is added with spotlights, is deservedly popular. The most common design consists of a box for recessed lighting and a main level with an outlet for central lighting.
You can make the hallway ceiling bright using contrasting shapes or colors. The photo gallery shows how good stucco or painting looks on such ceilings.
Gallery of standard options:
Plasterboard ceiling in the corridor: advantages
Narrow corridors are often a continuation of the hallway. Here you need to visually expand the space, which is easy to achieve using multi-level light structures made of gypsum board. In addition, the walls in the corridor cannot always be used to create a unique design, so it is appropriate to make the ceiling the main interior feature here.
Lighting plays an important role in the design: it can also be used to visually increase the volume of the room if you install not a massive chandelier, but small spotlights, which are most popular when installing plasterboard ceilings.
An interesting option is when fancy curved elements are mounted on the ceiling, additionally illuminated with LED strip. When installing such equipment, it is advisable to take the advice of a designer who will help turn the room into a real art space.
Note: low ceiling heights are not an obstacle to installing drywall. In this case, preference should be given to the hemming method of fastening rather than the more familiar hanging one. In this case, the height will decrease only by the thickness of the sheathing mounted to the rough surface.
The advantages of a gypsum ceiling in terms of decorative possibilities are obvious. As for practicality, drywall requires some care in operation: it must be protected from dirt, dust and grease. However, this problem can be easily solved if you paint the ceiling with a suitable paint: enamel, water-based, acrylic.
Modern design options
Fashion is changing, so you shouldn’t stand still when decorating ceilings. Modern design ideas will allow you to create a special mood even in a small hallway.
Probably the most interesting solution would be to line the plasterboard ceiling with ordinary boards. This finishing option will perfectly reflect the natural style of the entire apartment, combining the hallway and other rooms.
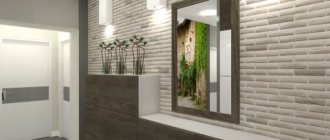
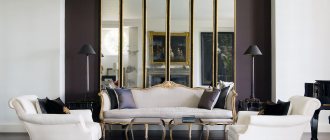
The high-tech trend will literally be reflected in the mirror fragments on the multi-level ceiling.
Loft style lovers will love the idea of decorating drywall with an image of a bare concrete floor. The gallery contains other examples of decorating ceilings using three-dimensional drawings.
Gallery of modern options:
Design rules - everyone should know
Whatever material you choose, do not forget about simple design techniques that affect the overall perception of the ceiling. For example, in narrow corridors it is recommended to install a glossy stretch ceiling. Together with well-organized lighting, it significantly expands the ceiling space.
It is recommended to decorate a ceiling that is too low in light colors. The walls are painted in dark colors based on the principle of contrast.
If the ceilings in the room are very high, and you want to visually lower them, the surface is painted in dark colors.
In a large hallway it is better to give preference to multi-level structures. They will allow you to create a three-dimensional drawing, and they look interesting. A matte finish with several bright spots is considered a real classic. It looks expensive and elegant. And the dark, shiny ceiling gives the room a fantastic, mysterious atmosphere.
Remember that people are greeted by their clothes, and an apartment is greeted by the atmosphere in the hallway. That is why it is so important to think through all the details, from the interior to the ceiling. You can get acquainted with the most successful ceiling options in the corridor in our gallery.
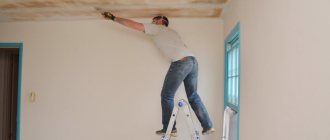
Thin plasterboard boards are an excellent alternative to plaster. With their help, you can level any surface without unnecessary construction debris and the need to wait for drying; moreover, there is absolutely no risk of seeing a “web of cracks or crumbling cement mixture” after some time, which is especially important for ceilings. Having appeared in the mid-twentieth century, cardboard sheets with a gypsum layer quickly gained popularity throughout the world. Due to its affordable price, ease of processing, environmental friendliness and high aesthetic qualities, this material has become widely used for interior renovation work in apartments and offices. The corridor can be considered the face of the house.
Its decoration already from the threshold sets the mood for the guests and owners of the house. But during repairs, most of the funds are spent on paying for the services of craftsmen. But you can also save money. You can wallpaper the corridor and assemble a plasterboard ceiling with your own hands. This requires basic skill and patience.
These are just some of the design tips that will help you create an elegant and stylish entryway. It would seem impossible to transform a room beyond recognition using such simple and ingenuous techniques. But thanks to them, even the smallest corridor will change dramatically and sparkle with completely different colors if you just slightly modified the ceiling and added spotlights.
Single-level ceilings
In a small apartment with a small corridor it is difficult to implement any large-scale design idea, but you don’t want to give up a good renovation with an interesting result, and you don’t need to. In small rooms, single-level plasterboard ceilings look great. It would be a mistake to think that such a finish looks boring compared to two-level and more complex structures.
A textured or grainy surface, or maybe even a marble effect - there is such a huge number and variety of options available that it is not easy to decide on just one of them. You will need to look through many photos and videos of plasterboard ceilings in the hallway to make your choice.
There are many ways to finish such ceilings:
- Decorative plaster . The perfectly flat surface of plasterboard sheets looks beautiful in itself, but you can liven up the interior of a classic hallway by adding plaster. An easy-to-follow method that gives truly brilliant results.
- Stretch ceiling . A small corridor will be visually enlarged with the help of a very unusual combination of two finishing options. If you combine a plasterboard ceiling and a suspended ceiling, you will get an interesting finishing option with a zoning effect.
- Drapery . If the style of the hallway furnishings allows, the ceiling can even be decorated with various textiles. Draperies will smooth out sharp corners and add comfort.
- Wallpaper . The surface of the gypsum board is smooth and wallpaper fits perfectly on it. This method of decorating a hallway is recommended for those who want to change something in the design more often, because changing wallpaper is simple and does not require excessive costs.
- Tile . A quick and relatively inexpensive way to freshen up the appearance of your hallway.
- Dye . The simplest and fastest decor option for a plasterboard suspended ceiling in the hallway.
Gallery of single-level ceilings:
Criteria for choosing the type of design and possible color solutions
- With a small area and height of the room, it is better to use single-level structures that practically do not reduce the height of the room.
- For very narrow corridors, a single-level ceiling technique with shaped inserts in the form of a circle or rectangle is used. They visually expand the space and give an original stylish look.
- To visually expand the ceiling area, plasterboard should be covered with light-colored materials.
- For more spacious hallways, you can use more original designs consisting of several levels.
- Large rooms allow you to play with the color background of the structure. For example, use several colors or shades at once.
- Drywall has a good combination with tension materials. Having stretched the glossy ceiling, you can decorate it with a plasterboard cornice, in which it is possible to install spotlights using rotating lamps. When turning them in different directions, the impression of a ceiling flooded with light is created. Combining stretch films with drywall also allows you to use different colors. By choosing the most suitable option for the overall interior of the room, you can create your own original and unusual style.
- The simplest and most classic option for finishing the ceiling surface with plasterboard is a single-level design without unnecessary finishing and decorative elements. This style is characterized by the presence of straight and strict lines. The advantage of this style is that it can be combined with any interior design.
- Designs with smooth curves significantly expand and brighten the room. When using this technology in large corridors, you can experiment with color contrasts;
- In the creation of multi-level structures, the texture of the material plays an important role. So, an interesting option for finishing the ceiling is the combination of a glossy base with a matte edging.
- It is possible to design plasterboard panels with photo printing or painting.
- For small hallways, an unusual option would be to decorate the surface with mirror panels. With this approach, the corridor not only visually expands, but also creates an infinity effect.
How to make a plasterboard ceiling yourself
Multi-level ceilings
The multi-level design of plasterboard ceilings in the hallway looks very impressive. Various ornaments, stucco molding, gypsum slabs, and complex waves flowing from one level to another are allowed here.
When drawing up a design project, a huge number of different ways to design multi-level ceilings are offered:
- Neon lights . It looks especially luxurious on such complex structures. Using lighting, you can create the appearance of a ceiling floating in the air; you get the feeling that the lower levels are not attached to the others and are simply frozen at a height.
- Texture . The combination of various contrasting textures - gloss with a matte surface, smooth and grainy textures - helps to achieve a stunning effect.
- Details . To decorate the ceiling, various small fragments are even cut out - leaves, birds or animals, etc. The use of such decor turns an ordinary hallway into a work of art.
- Styles . Multi-level ceilings can reflect any style of the hall. Vintage ceilings are especially popular now. Even in a photo gallery, this option catches the eye.
The ceiling covering in the hallway can become a real masterpiece, provided that you have a good imagination and a competent design project. A well-executed idea will give you a great mood and a comfortable atmosphere from the first minutes of being in the apartment.
Gallery of multi-level ceilings:
What solutions are relevant for large hallways?
In such rooms you can completely rely on your imagination. The spacious corridor allows you to create any desired design; it is important that it matches the overall style of the renovation.
- Multi-stage systems made from gypsum plasterboard look original. Even complex heavy structures will look quite harmonious with the right lighting.
- Ceilings with smooth lines dilute strict boundaries, giving the surface airiness.
- The corridor, which occupies a fairly large space, allows you to use a variety of color schemes. The ceiling can be designed to match the overall style or make it contrasting, thereby focusing all the attention on it.
USEFUL INFORMATION: Bits for a drywall screwdriver: bits with a limiter
Advantages of such solutions
Like all suspended solutions, plasterboard solutions have one very important quality - you don’t have to worry about floor defects that will be hidden behind the surface of the new ceiling. In the ceiling space you can hide all utilities and various wiring.
The lamps can be installed anywhere and will perfectly illuminate everything, even the darkest corners of the corridor. In addition, such compositions are usually equipped with built-in decorative lighting, which also helps illuminate the space.
When choosing an appearance, you can practically not limit yourself - from this material it is easy to assemble a part of absolutely any shape, and the color design is chosen to suit the taste of the owner of the house.
Even the not-so-interesting shape of the entrance area can be greatly changed for the better if you add a few relevant details to the ceiling decor. For example, a hallway that is too “square” can be made more interesting if several volumetric waves are made on the surface of the ceiling. They will dilute the overall angular style.
Such tricks are usually typical for designers or professional decorators, but nothing prevents you from using them when decorating yourself.
The costs of such repairs will not be too high if you choose a design option without a large number of details. At the same time, you can perform all installation operations yourself, which will further reduce the final cost.
Correctly installing the ceiling frame under plasterboard
In order for the ceiling in the hallway to be smooth, beautiful, meet your expectations and serve for many years, you need to carefully mark and correctly install the ceiling frame under the plasterboard. First, guide profiles are marked and installed. Since they are located along the perimeter of the room, their total length should slightly exceed the length of the perimeter. We divide the resulting value by 3 and get the number of guides (profile length 3 meters). The minimum distance from the old ceiling should be 5-6 cm. If the future ceiling is equipped with spotlights, this distance increases by another 5-6 cm.
Place the first mark on the wall with a marker or pencil. Using a laser or hydro level, we transfer this height to the remaining walls of the corridor. Then, using a paint cord, we connect these points into a continuous line. To do this, press the cord to two marks on the wall, pull it in the middle part towards you parallel to the ceiling, and then release it. The cord hits the wall and leaves a clear, even line. This is the boundary along which the guide profile is installed; holes are pre-drilled in it for dowel-nails at a distance of 40-50 cm from each other. A sealing tape is glued to the profile on the back side.
All that remains is to attach it to the line and mark the holes for mounting on the wall. Holes in the wall are drilled with a hammer drill equipped with a concrete drill. The profile is secured with dowel nails. Now you can begin more serious work.
Scheme of fastening gypsum plasterboard profiles
Ceiling profiles are conventionally divided into longitudinal (long) and transverse (cut into pieces of a certain length). For a more precise placement of the profiles, the ceiling is marked into rectangles of 60x50 cm, the distance between the centers of the longitudinal profiles is 60 cm, the distance between the transverse ones is 50 cm. If there is a drawing of the ceiling with such markings, then it is easy to calculate the total length of all ceiling profiles and their number.
How best to arrange the longitudinal profiles depends on the size of the hallway. If the width of the room is 3 m or slightly less, it makes sense to save material by arranging them along the width rather than along the length.
Longitudinal profiles are attached to the ceiling using direct hangers. They are placed according to markings at a distance of 45-50 cm from each other. The suspension is applied to the ceiling, the marking line should pass through its center. Places for fastening are marked, after which holes are drilled. The suspension is attached to the ceiling using anchor wedges.
When installing longitudinal profiles, one end is inserted into the guide profile. To ensure that the ceiling level is the same everywhere, the installation of longitudinal strips is carefully controlled. To do this, you can use an aluminum rule, pressing its ends to the lower edges of the guide profiles. In this case, the longitudinal profile rests on the rule and is attached along the entire length to the suspensions with PSh screws. Often, instead of a rule, tensioned threads are used to level the horizon. Another option is to use a laser level.
The ends of straight hangers protruding below the profile level are bent upward or cut off with metal scissors. Crabs are inserted into the profile from above at the intersection of the transverse lines. A transverse profile will be attached to them.
This final element of the frame for the ceiling plasterboard is cut into pieces using metal scissors or a grinder. Its length is 1 cm less than the distance between two adjacent longitudinal profiles. These pieces are inserted into the crabs and secured with screws. Additionally, the straight connector is fixed with self-tapping screws to the longitudinal profile. The ceiling frame for plasterboard for the hallway is ready. It is imperative to check the strength of the connections by trying to loosen the frame. If it moves, it doesn't hurt to re-tighten all the screws or add a few dozen new ones. The frame must be monolithic. Detailed secrets of working with your profile