Before attaching the gypsum board, it is necessary to determine the accuracy of the location of the part. This is not difficult to do, because the differences are very noticeable, and the chance of making a mistake is minimal.
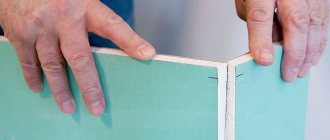
On a note! To properly attach small fragments or remnants, it is recommended to mark them on the reverse side.
The importance of the exact location of the plasterboard
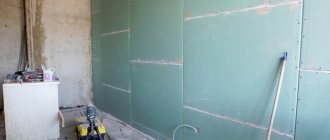
When carrying out work on the construction of plasterboard foundations (especially with your own hands), attention is not always paid to which side the slab is screwed to the profiles or the base. If you incorrectly place a few minor fragments, then dismantling will not be required, but when covering the ceiling or walls with the wrong side out, a lot of problems can arise.
Correct placement allows you to:
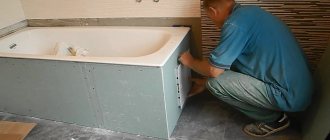
- Preserve product properties. The front part of the gypsum board has a more stable treatment, which affects the reliability of the resulting coating. Therefore, if you screw moisture-resistant drywall to the wall in the bathroom or shower room with the wrong side, you may not fully achieve the desired effect. Of course, the surface will withstand high humidity, but the service life will be significantly reduced.
- Ensure better adhesion of tiles or wallpaper. If you sew the sheets on the wrong side, then the desired adhesion can only be achieved through complex preparation.
Save finishing materials. The outer coating of the sheet, subject to production technology, has a more dense structure, which reduces the consumption of compounds used for surface treatment during finishing work.
For large volumes of finishing work, an error in the location of the sides of the drywall, due to different levels of adhesion, can lead to significant consumption of primer and putty.
Thus, it is not difficult to correctly determine the front side.
But this allows you to lay drywall in such a way as to eliminate problems in the future.
Which side is the correct way to mount moisture-resistant drywall?
Moisture-resistant plasterboard is indispensable when installing walls or ceilings in a bathroom, steam room or even sauna. Moisture-resistant plasterboard is also sometimes used for kitchens. This will make the coating more durable, and its operation will take place without fear of damaging the surface with excessive moisture.
To understand which side to screw moisture-resistant drywall, use the following tips:
- Both sides of the moisture-resistant material have a greenish tint. But the front part is several tones lighter.
- The reverse side can be distinguished by rolling, as the sides are slightly tapered towards the edges.
- The front side has such a surface that tiles can be attached to it almost immediately after installation.
Moisture-resistant drywall is not resistant to water, so direct exposure to water is not allowed. Only moisture can coexist harmlessly with moisture-resistant drywall.
Correct installation, which side is the drywall attached to?
An ignorant person may naturally ask, which side should I attach the drywall to the wall? There should be no mistakes in this, since in the future this will lead to defects in the entire finish.
To understand this issue, you need to know the structure and features of the sheet of material with which we will work. They determine the technology and rules for the installation process.
Full contents of the material
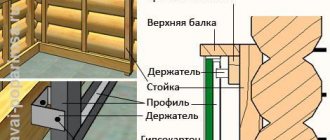
Features of fastening to the profile
However, in addition to choosing the “correct” side of the drywall, it is also worth observing the technique of attaching it to the frame. Violation of some rules can lead to damage to the front layer, and subsequently to the entire attached sheet of material.
After measurements, the sheet can be cut to the required size if necessary. This is best done using a special or regular stationery knife. In this case, initially, according to the markings, a cut is made on one side, and then on the opposite side. After this, the sheet easily breaks along the cut. Irregularities in the plaster can be easily smoothed out with a plane or the same knife.
Attaching drywall to the profile
When screwing self-tapping screws into a sheet of material, you do not need to press hard on the tool. In this case, the “golden mean” is observed, the head of the fastener is slightly recessed into the surface (1-1.5 mm), but does not damage the cardboard itself. Such attachment points can be easily hidden with putty in the future, and their strength is sufficient to hold a sheet of drywall.
Knowing the nuances of proper fastening, you can finish the gypsum board walls, which will serve for a long time without problems.
How to choose
It is very important to choose the right drywall. The store offers a wide variety of products from different manufacturers. Of course, the determining criterion is cost. It is necessary to pay attention to the ratio of price and quality. Sometimes, overall wear resistance and durability make a more expensive material much more attractive in terms of cost.
When choosing a specific material, you must take into account that drywall can be very different. In particular, these are degrees of protection. Simple light cardboard is standard. You can see green sheets in the store. This is moisture resistance. This material can be safely used even for the bathroom. In addition, fire-resistant options are offered, they are characterized by increased safety and during a fire they can slow down the spread of fire.
Sometimes you can find a combination panel. It is a good quality drywall to which a special heat-insulating layer will be attached.
Features of the material
This material is actively used in a variety of rooms. Now there are even options for balconies and kitchens, they have special protection against water. This is an opportunity to level the walls relatively inexpensively and prepare them for further finishing. In addition, plasterboard has thermal insulation and sound insulation properties. This is a great way to transform any room. Now it is possible to create multi-level structures to make the layout to your own taste.
Some complain about the negative aspects. In most cases, they appear if you don’t figure out which side to mount the moisture-resistant drywall. If you make mistakes with the installation of a regular one, troubles can also arise.
First of all, it is important to understand the structure of the material. There are not just 2 sides:
- Facial layer
- Back layer
- Gypsum filler
Most manufacturers can help you figure it out. Which side should you attach the drywall using various markings? They must be applied to the back. The front is made perfectly white, light, so that you can do absolutely any decoration and nothing will show through, even if we are talking about thin wallpaper or a small layer of paint. The front side itself also has a nice smooth texture. It is usually multi-layered itself. This is the basis that allows you to perfectly level the surface, and only then the surface is positioned so that you can directly stick wallpaper on it or apply paint, decorative plaster and other materials.
The back side is usually uneven. Here manufacturers can save on the quality of the material. If you mix up the sides, the finish may lie unevenly. It is very important to install moisture-resistant drywall correctly, because in this case only one, the outer side, has additional impregnation and protection from water.
In general, you need to pay attention to several details. These are markings indicating which side is lighter, as well as the fact that the wrong side is slightly tapered at the edges.
Installation fastening materials
To secure the drywall to the profile you need to use special screws.
Important! You should not buy expensive screws, but always make sure that they are coated with a phosphated agent (black color of the head). This reduces friction when tightening and is not susceptible to corrosion.
1. For metal profile. They are produced in 2 subtypes:
- Metal-to-metal - at its end there is a drill that easily connects profile elements;
- Metal-wood - its sharp end is slightly difficult to pass through the metal, but the blade sits in the wood, reliably holding the structure together.
2. For drywall. They are presented in a wide variety of types, but the main division is made by thickness and length.
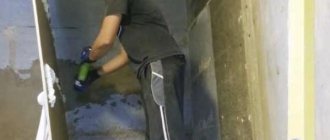
Difficulties
Some of the work may be carried out with minor difficulties. In particular, if a waterproof material is used, care must be taken to insulate the fasteners themselves. Without special gaskets, moisture can easily penetrate through the screws.
If you need to attach a multi-level structure, then similarly we place drywall on a special frame and try to screw it well. Difficulties may arise not when they are fixed, but directly during the creation of the base.
It is important to note that the fastening must be special elongated screws. Otherwise, even if the drywall is screwed, it is not very reliable. This is especially true for gypsum boards; in this case, accuracy is important, because it is necessary to try to neutralize all holes and prevent moisture from getting inside the structure, because the back side will not be protected from such influence in any way.
It is worth noting that during installation there will definitely remain a small gap between the two sheets. This groove will be well sealed with mortar in the future; you don’t have to worry about its existence.
How to screw self-tapping screws
Self-tapping screws are attached with a gap of 15-20 cm between each other. They are attached to all jumpers, profiles or bars of the frame, including horizontal seams. An approximate calculation of the number of screws is 60 pieces per gypsum sheet or 24 pieces per square meter.
You should also pay attention to the corners. It is not recommended to tighten the screws in the very corners of the sheets, since the crosshairs of the profiles are there and it will be difficult to do this (the sheets can simply be broken):
If you tighten the screw with force, it will break through the drywall, and such a screw will not hold the sheet well:
If the self-tapping screw is not tightened, it will interfere with further putty and subsequently there may be unevenness in this place. This screw must be tightened:
The screws should be slightly recessed into the plasterboard by literally 1 mm or even a little less. This is the correct way to screw self-tapping screws into drywall.
Finishing
It is worth noting that after selecting and installing a specific drywall, you can proceed to absolutely any finishing. Be it a multi-level structure or just a flat surface. The front side has a certain adhesiveness. Thanks to this property, it manages to adhere to any materials. You should definitely pay attention to this point.
Often, drywall is used simply for wallpapering. It does not need any additional processing; you can immediately apply glue and glue any wallpaper. The only point is the neat, clear finishing of the joints; they should not be visible. That is why the resulting groove is first sealed with putty. Drywall can absorb materials; to prevent this, you can prime the entire surface; this task will not take much time and effort.
Don't stop at just the wallpaper. In fact, drywall allows you to realize any fantasy. This can be decorative plaster, paint, some kind of panels and almost any materials. It is also worth noting that these sheets are very easy to work with in the future. In addition, they can create built-in lighting if we are talking about the ceiling. When you need to attach a picture, lamp or any other interior element, you just need to make a hole using a self-tapping screw.
Many people choose drywall as a starting point for repairs. This is insulation, sound insulation, and also a way to quickly and inexpensively level all walls. Afterwards, you can make any cosmetic repairs you wish. This material is easy to handle. The single most important mistake may be that a beginner confuses the front side of the sheet with the back, or thinks that in this case there is no difference. It is worth remembering simple signs and it will be possible to neutralize the likelihood of this mistake.
Should drywall be hung horizontally or vertically?
Only vertically , that’s the proof and the truth!
Why and how the horizontal is wrong (and why the vertical is right) ... don’t spoil the new from the very beginning:
1 - Defective Joint - Horizontal courses requiring more than one drywall panel create (rather than avoid) butt joint ends that are not flat and present a double (minimum) defect . Socket and switch covers, window and door trim, baseboards, paintings, mirrors and cabinets do not stand still. Using any “butt joint product” erases all the “claimed” advantages of horizontal!
2 - Unsupported seam - the conical edge of the horizontal is not supported by 90% , only 10% (instead of 100%) of the contacts are framed, the seam will crack. Light switch and electrical panels inside the seam equal more weakness and double the butt joint, minimum effort.
3 - Structural Defect - Horizontal reinforces only a wall that is 4 feet high or less, the top slab of a full height wall is never connected to the bottom slab. As per #2 above, frictional contact is minimized (instead of maximized vertically).
4 - Cheating a Seam... 4x8" Panels - Example 1: 48" tall by 102" long wall, horizontal = 48" (technically) and that's a 24" wide butt joint or a minimum of double 48" ( Vertical = same, generous , 96", but they are simple 6" wide connections). Example 2: 96" high by 102" long wall, Horizontal = 222" with 50% being 24" wide butts (Vertical = 192" Easy joints 6" wide, yes less) ... in kitchen horizontal plane = 100% wide butts 24 inches (vertical = 0%). Yes, horizontally the cone area is halved (at least) to hide its butts, so very minimally, and the #5 below didn't count in Horizon's monumental fraud.
5 - Self-breaking corners - Horizontal uses only one of the tapered edges of the panel and places the other cone at the corner of the ceiling and baseboard, creating (instead of being avoided as with vertical) a crooked corner that must be rolled up or further caulked. This also instantly erases all the "claimed" benefits of horizontal by doubling the amount of seam, correcting itself to equal vertical!
6 - Unfriendly Seams - Chest-high horizontal seam makes it look like there is no 24" wide floor to ceiling joint and ever existing baseboard bevel for work in progress . (The vertical has light joints, and the top part is screwed on, glued and rubbed in later along with the ceiling corner, and the spots on the baseboard can also be done separately)
7 - Fire Hazard Liability - The horizontal fill only fills the face of the thinnest joint and does not block the back, causing smoke and fire to spread , inviting fuel air for the fire to grow (The vertical is full and airtight if simply screwed on).
8 - Unsafe Installation - Horizontal position requires 2 people to install safely and the panel is in the air, literally creating the potential for injury (vertical position is easily lifted by one person). Using a panel lift is not as easy or safe as tilting the vertical.
9 - Extra Waste - When properly covering a knee wall, half wall, tub front, column or ceiling by first removing both tapered edges, Horizontal cannot use tapers elsewhere (Vertical can and does). Plus , Horizontals waste 4 times the dirt on their completely unnecessary butt joints and baseboard bevels...if that was ever done.
10 - Destructive Ignorance - The Foundation and Framing crews work hard to keep everything flat, level, plumb and square. The horizontal destroys these efforts with their defective humps and baseboard bevels (the vertical retains perfection).
11 - grasping at straws with outright fraud - Horizons falsely and unknowingly brandishes the absurdly invalid (FPL439) 1983 test "The Contribution of Gypsum Board to the Durability of Light Frames" by self-incriminated fraudster Ronald W. Wolfe. FPL439 found that all tapered wrapped edges of the paper must be completely intact in order to hit horizontally vertically. In the real world, the bottom edge of the paper, wrapped horizontally in paper, is legally removed to remove it from all floors and thereby completely nullifies Wolfe's unforgivably deceitful and useless "research" ( ridiculous ) and summation.
12 - Seam or Joint Treatment - According to ASTM C840 8.2, horizontal joints must be caulked to provide any resistance to fire, smoke and air movement (vertical is so good that it does not require treatment at all).
13 - Expensive, slow complication. The horizontal position depends on expensive special dirt and even dirty tape or tools that waste dirt. The strapping tools still require a 2nd step of cutting the tape, and the mud requires a mixing step. That's more cost, more time, more tools and equipment, and more water... for a poor job! Vertical outperforms the cheapest ready-mixed solutions and dry adhesive tape. Again, the Vertical seam treatment is just for looks.
14 - Poor fire rating. To obtain an actual drywall estimate, single-ply or single-ply commercial drywall is required This is well known to most horizontals, but you and your children are not important to the horizontal. And why, to respect the fraudsters who taught them wrong? Now you've seen that Vertical is faster and better in every way.
Just advertise Horizontal as wrong and confidently quote the above-mentioned irrefutable facts.
Installation technology and rules for fastening drywall
Published on September 30, 2017 in the category Building materials // 0 comments // Author: Admin
- 5
- 4
- 3
- 2
- 1
(0 votes, average: 0 out of 5)
Drywall is a popular material and a good choice for DIY repairs. Ideal for leveling, thanks to which the wall acquires an aesthetic appearance, it is also used to create partitions in the room. The material is low-cost and easy to use, and following all installation rules will allow you to create a beautiful and unique interior. To achieve the desired result, it is important to know which side to attach the drywall and how to screw the drywall to the profile, which will allow you to quickly and easily transform any room.
Choosing drywall
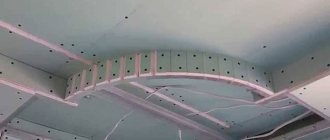
Installation diagram of a plasterboard ceiling.
Companies that produce moisture-resistant or water-resistant drywall are known by names such as Knauf, Lafarge and Gyproc. These companies are the leaders in sales. All of them have different types of sheets in their assortment. The sheets we need for construction are designated by the abbreviation GKLV, have a green color and blue markings on the back side. A feature of these sheets is their reduced ability to absorb moisture, which is possible when hydrophobic substances are added to the gypsum core. These characteristics make it possible to attach drywall in rooms with high air humidity and in rooms where condensation is possible. Which company should I choose moisture-resistant drywall? You can solve this on the spot yourself. When purchasing drywall, pay attention to these markings and the color of the sheets.
At what distance should I fix drywall?
Experts offer several recommendations on how to properly screw the material:
- Fix the wall sheet correctly onto the support strips, the distance of which is at least 40 cm from each other
- Moisture-resistant plasterboard - 60 cm
- A mesh is assembled onto the ceiling from the profile, the cell size of which is no more than 40x40 cm
The desired result also depends on the correct spacing of the screw holes. Screwing in too often will lead to crumbling of the slab, the same will happen if there are not enough fasteners. It is optimal to place the parts at a distance of 20 cm.
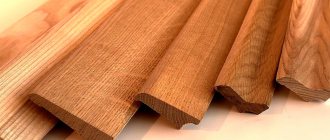
Materials for work
The simplest option for fastening gypsum plasterboard to walls is to install it on a frame made of wooden beams. But it will be better if you use a profile for drywall, its price is not very high. In specialized stores it can be purchased for 40 rubles per linear meter and more. It all depends on what type of profile you need. There are two profile options:
- D - designed to form a plane for fastening drywall.
- W – with its help you can construct the overall frame of the structure.
Moreover, each of the options can be divided into guide and support types. In the specifications they are designated by the Latin letters U and C, respectively. Guide profiles are a common frame component. Its main difference is that it has smooth walls and a shape like the letter P. It is in it that the support profile is fixed. The latter is slightly ribbed, which significantly increases bending rigidity.
Differences between the front and back sides
There are signs that will indicate the correct location of the gypsum board:
- The markings are located on the reverse side, there are no inscriptions or signs on the front side
- The front side of drywall is the same color with edges
- The front part has a different chemical composition, it has a higher cellulose content, which ensures minimal costs of finishing materials
The front side of ordinary drywall is white, moisture-resistant is characterized by a green tint, fire-resistant - pink.
It is important to carefully inspect the sheet before starting work and know exactly which side to screw the drywall on. Correct screwing guarantees convenience and ease of operation, as well as a long service life.
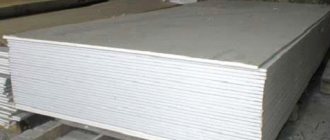
Structure and individual characteristics of gypsum board types
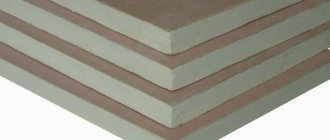
Any sheet of drywall consists of three layers, each of which differs from one another:
- Front layer of cardboard.
- Gypsum with additives.
- Back layer of cardboard.
The back side of the sheet of material is usually made from gray cardboard, onto which all markings corresponding to the type of plasterboard are applied. It is by these designations that you can understand the purpose of this drywall.
Drywall structure
The internal filler is made from natural gypsum, and in the case of special (moisture-resistant/fire-resistant) types it contains additives that improve its properties.
The front side of the sheet is also made from cardboard, but there is a significant difference in the material. It comes in three colors, depending on the purpose of the particular type. A regular wallboard has white cardboard, moisture-resistant green, and fire-resistant red. It is this side that is external when installing the material, and is intended for further finishing by puttying.
Types of gypsocraton
The peculiarity of the front side of the gypsum board is in its manufacture. Initially, the outer layer of gypsum is covered with inner cardboard, the main purpose of which is to level the entire surface. But the outer side, which will serve as the main surface, is made from a material (cardboard) with a high percentage of cellulose in its composition.