The rule for plaster belongs to the measuring types of instruments that are used at almost all stages of repair and finishing work. The main purpose of this device is to maintain high precision when plastering walls and leveling the floor when screeding it with concrete. Its design is quite primitive - a metal product of rectangular shape and great length. However, a simple design does not mean that this tool is also easy to use. How to use the building rule is mostly asked by novice workers or home craftsmen, because plastering walls is a rather complex and responsible process that requires adherence to a certain technology.
Rule for plastering walls - what is the tool
The first rule was made of wood, for which smooth wooden slats were used. The disadvantage of such devices was the absorption of moisture, which contributed to rapid wear of the tool. As a result, a new type of devices appeared, which began to be made from aluminum alloy. Why aluminum and not steel? There are several determining factors for this:
- Aluminum is not subject to corrosion, so the structure of the workpiece remains smooth over a long period of operation and does not rust.
- Weight - compared to ferrous metal, aluminum is several times lighter. This not only makes the device easier to use, but also allows it to be used to remove large amounts of excess mortar when plastering walls.
The name of this tool comes from the synonym “sample”, used to compare with something or do something. Looking ahead, it should be noted that such tools come in different types, but the simplest is the device, which is a flat aluminum strip with an acute angle on one side (in the form of a trapezoid). Initially, such devices were used to check for dents and bulges on various surfaces, but later they began to be used when plastering walls and screeding floors.
This is interesting! One of the important characteristics of a tool is its level of rigidity. The higher the length of the device, the greater the thickness of its walls, and, accordingly, the strength.
Leveling using the plaster layer rule.
Leveling the plaster is done by cutting off excess mortar using a rule sliding along pre-installed support slats - beacons.
They are leveled and represent slats located in an ideal plane. If they are present and properly installed, it is almost impossible to plaster unevenly.
Plastering is usually the most affordable way to finish walls.
Scope of application of the device
The main area of use of this type of tool is the construction sector. It is an almost indispensable device (practically, since a long bubble level can be used instead) when leveling solutions applied to the surface of a wall when plastering it. This device is no less in demand when pouring concrete on the floor, when in the end it is necessary to obtain the most even surface possible. However, this is not all types of work for which the building rule applies. It is also used to solve the following problems:
- marking - when it is necessary to draw a straight and even line of great length;
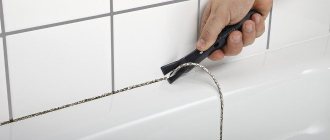
- emphasis when cutting glass - how to use a glass cutter, and how important it is to use straight metal strips, you can read here;
- an auxiliary tool when determining the level of surface slope - small bubble levels are not suitable for determining the evenness of large surfaces. In order not to buy a long level, you should use an auxiliary tool - a rule;
- installation of beacons for subsequent plastering of walls;
- level when laying tiles - unevenness is determined by the presence of a gap between the surface and the edge of the tool;
- ruler when working with a construction knife or pencil.
When performing any type of construction work, this type of tool will always be useful, because its main advantage is the perfectly flat plane of the sides. It should be noted that building regulations come in different sizes, so when choosing this type of tool, you must first determine the size of the room.
This is interesting! The most popular models of the rules are devices with a length of 1.5 and 2 meters. Their maximum length is up to 3 meters.
Although a flat wooden slat or a long level can be used to level the liquid solution, the work is usually more comfortable and efficient. This is due to the specific design of the tool, where there is an acute angle that should be used to remove excess solution. Separately, it is worth noting the low weight of the device, which eliminates not only the fatigue of the master during long-term work, but also the possibility of removing excess plaster.
A perfectly flat plane allows you to evenly distribute the mixture on the surface of the wall or floor. This is achieved by passing the rule over the surface of the liquid solution, cutting off the excess amount of the composition. The consequence of this procedure is to obtain a flat plane that can be used for laying tiles, laminate or other types of building materials.
The rule is more often used during construction and repair work. However, the tool is also in demand among craftsmen involved in the production and assembly of furniture. Carpenters use tools to end up with straight pieces of wood.
This is interesting! An undeniable advantage of modern rules is their long service life. After all, aluminum is not subject to corrosion, like metal, and does not deform from moisture, like wood.
Variety and features of models
The name of the tool itself shows why it is needed. Using a device for plastering work, you can correctly perform the steps to create a perfectly flat surface during the manipulations associated with applying the plaster mixture. The device is an absolutely flat trapezoidal strip.
By applying it to a plastered wall, you can detect even minor defects in the form of protrusions or dips. Plastering walls as a rule makes it possible to correct all detected defects and prepare the walls for further processing.
The rule used for plastering walls can be made from:
- stainless steel and have a rectangular shape;
- from a wooden block or slats using the most durable wood species.
Aluminum was chosen as the starting material for the manufacture of tools due to its low weight and high strength properties. Such products are reliable and durable. In addition, the abundance of moisture during plastering makes it necessary to abandon wooden tools, since after drying such a lath loses its original shape.
Impregnation of slats made of wood with special compounds or the well-known drying oil helps to avoid such troubles. In some cases (when working with a solution with minimal humidity), a wooden tool is more convenient and reliable.
The most popular models today are those equipped with a spirit level.
A specific feature of the rule used when plastering walls is its size. Modern manufacturers produce products in lengths:
- 1m;
- 1.5 m;
- 2 m;
- 2.5 m.
These are the most commonly used and most suitable sizes for devices with which walls are plastered as a rule. A device of the greatest length is necessary not only when plastering, but also when checking the quality of the work performed. This device is convenient to check the diagonal of the created surface to eliminate unnoticed irregularities.
You can eliminate identified defects after plastering has been completed using the same rule. Using a sharp edge, cut off excess semi-dry mortar from the wall.
For these purposes, it is best to use a device equipped with a steel edge. It is not subject to deformation and, despite the slight weighting of the instrument, makes it convenient, reliable and multifunctional.
Types of building rules and advantages of their application
If the main tool of a carpenter is a hammer, then the rule is the main tool of a plasterer. Moreover, to effectively perform work, it is important to use not one tool, but at least several. The rules are produced in different types, which was done specifically to facilitate their use, as well as expand the range of work performed. Each type of device has characteristic differences, due to which they are used to carry out certain types of work.
Building regulations classify the design into the following types:
- h-shaped;
- trapezoidal;
- corner;
- rectangular;
- toothed;
- combined.
To find out which type of tool is best suited for the job at hand, it is necessary to consider the features of each type.
As a rule, check the evenness of the wall
You can easily analyze the evenness of the base. The tool is placed with the sharp side to the surface; if there are any defects, the rail will wobble. Or, in the light, it will be noticeable that the edges of the device are hanging. The flowing areas will also be visible in the light.
You can easily analyze the evenness of the base.
The rule facilitates the process of plastering the surface; if the work is one-time, then there is no point in buying expensive steel variations or highly specialized types. In such a case, you can resort to making the tool yourself.
H-shaped tool: purpose and application
The h-shape rule is characterized by simplicity of design and light weight. Reducing its weight is achieved by manufacturing the tool from thin-sheet aluminum alloy and a minimum number of stiffeners. Light weight is both an advantage and a disadvantage. The advantage is the ease of performing the work, but the disadvantage is their limited capabilities.
The special design of the profile of this rule simplifies its operation, since the protrusion acts as a handle, through which the device is conveniently grasped by hand. It is intended for plastering walls (not suitable for floors) using light solutions, which include gypsum. It is least suitable for working with cement mortar, since the possibility of profile deformation under the influence of heavy loads cannot be ruled out.
The presence of one cutting edge allows you to effectively remove undercuts that arise when the solution is applied to the surface. Due to its low strength, the tool is only suitable for working with light gypsum mixtures. It is often used by home craftsmen when performing one-time jobs.
This is interesting! The handle design may have other options, as shown in the photo above.
Criterias of choice
One of the main issues that every novice home craftsman should pay special attention to is related to the choice of building rules. In principle, there is nothing complicated here. You just need to know what parameters to pay attention to.
Profile form
First of all, you should pay attention to the profile shape of the product you are purchasing. This is very important, since this characteristic directly determines the strength of the tool. Rules for plastering walls are available in two versions:
- Trapezoidal. It is the rules of this form that can most often be found in construction stores. They allow you to perform many operations, including those with high loads on the product.
- H-shaped. A rarer option, which is used mainly for interior decoration and is not intended for finishing surfaces with heavy compounds.
Stiffening rib
One of the main requirements that all rules for plaster must satisfy is high strength. Therefore, when choosing this tool, you need to pay attention to its design features. Traditionally, this device consists of two tubes, on which the tool’s resistance to loads and deformation during operation depends.
Geometric correctness
If the rule is of the wrong shape, then it will be very difficult to guarantee high-quality finishing work. Therefore, when studying different models, pay attention to the fact that the working end of the product is absolutely flat.
Trapezoidal rule - distinctive advantages
The trapezoidal rules have a more rigid design, therefore, compared to the previous version, they are more popular and in demand. They can be used for work not only on plastering the internal and external walls of a building, but also for leveling heavy mortars. Due to the wide range of work that can be performed by the device, it is also called universal. The acute angle of the trapezoidal rule is designed to remove the resulting influx of solution.
Compared to h-shaped devices, such devices are more expensive and heavy. The internal cavity of the trapezoidal profile is empty, which was done specifically to reduce the weight of the tool. The rigidity of the structure is achieved precisely due to the geometric shape of the profile, and an acute angle is the strongest. It can also be used for drawing lines or as an auxiliary tool when working with a construction knife or glass cutter.
The back (called the heel) is the handle, and provides a good rest for the hands. To strengthen the structure, the internal cavity is filled with a round tube (one or two) running along the entire length. The weight increases slightly, but the level of rigidity increases several times. Typically, long devices have this design.
This is interesting! Trapezoidal models can have grooves on both sides, the main purpose of which is to more conveniently hold the tool in the hands.
Helpful advice
Experienced craftsmen advise using such rules only to fill the space between the beacons and redistribute the solution. It is not very convenient to expose surfaces with them, since they can still bend, albeit a little. To refine plaster, craftsmen most often use strict trapezoidal rules.
Experienced craftsmen also advise choosing h-shaped tools very carefully in accordance with the width of the area being processed. If necessary, such a device can be cut to the desired length. When finishing, for example, slopes, some craftsmen separate a small piece from such tools, making an H-shaped “trowel” that is very easy to use.
The rule with a rectangular profile shape: in what cases is it applied?
For their work, masters also use rectangular rules, which are almost completely reminiscent of bubble levels. Some models may have a built-in water flask, which allows the tool to be used to control the plane. A distinctive feature of such products is their high level of rigidity. It is for this reason that they are used to level the mortar when screeding the floor.
The high degree of rigidity of the rule is an advantage, but due to its design, it is not recommended to use the tool for plastering walls. The reason is that it is inconvenient to work in a vertical plane. The wide parts of the ribs do not allow you to see the clearance when checking the level of surface evenness, therefore the device is not intended for such work.
This is interesting! When using a rectangular rule with a bubble capsule, it must be taken into account that before determining the angle of inclination, the instrument must be adjusted. After all, when the rule is used for its intended purpose, the accuracy of the readings is violated. This information is also useful when selecting a rectangular rule with a bubble level feature.
How to remove beacons and whether it is necessary to do so.
Many developers do not remove them at all. This has nothing to do with technical feasibility. There are only two reasons why workers do not remove the orientation strips:
- Time. Plastering on beacons is usually done quickly, and workers ignore the need to remove them, trying to finish the job even faster.
- Inability. It is not difficult to remove; it is more difficult to fill the formed grooves. Not all amateurs manage to level the wall in such a way that no marks remain.
Beacons (especially cheap, non-galvanized ones) are removed because they rust inside the wall, causing brown spots to appear on its surface.
The beacons are removed after the plaster has almost completely dried (although the procedure can be performed after a month, if necessary). To do this, find the very top part of the profile, pry it up with a convenient tool and, taking it with pliers, break it out, tilting it down. The work is carried out in fragments of 20-25 cm. You should not try to “rip out” the entire profile at once - this will lead to much greater damage.
Wooden beacons must be removed! The reason is the difference in materials: plaster and wood react differently to environmental conditions and “breathe” differently. A more mobile tree will definitely come off the plaster, and a crack will appear at the place of their contact. This reduces the thermal performance of the structure, not to mention the aesthetics.
How to seal beacon holes.
Moisten the surface and allow the water to drain and be absorbed. Pour mortar into the recess and level it with a tool (scraper, float, trowel) or using a small rule for plaster. It is important to ensure that the solution is not on the finished pieces of plaster. Otherwise the insert will be noticeable.
Angle rules and the importance of their application
Another type of rule is the angular one, which looks like an ordinary square. However, a distinctive feature of the corner device is the trapezoidal profile shape. The angle between the two bases is 90 degrees, and such a device is used for plastering and leveling the internal corners of rooms.
The tool can be equipped with a comfortable handle that connects the shoulders of trapezoidal bars that form a right angle. Such a handle not only has a positive effect on the ease of use of the tool, but also increases the level of rigidity, eliminating the possibility of skewed corners.
Devices of a similar configuration are used by plasterers and craftsmen who are engaged in finishing work. Moreover, they are applicable not only for internal, but also external work. Some even use them instead of a square, but it is important to take into account one feature - the angle rule does not have a degree of accuracy, so it is not suitable for critical work.
This is interesting! Unlike all types of rules, corner devices cannot be called an indispensable type of tool. Craftsmen who professionally plaster walls use such devices extremely rarely, and often only to control corners. However, for beginners and home craftsmen, such a device is a useful find.
Features of use
The nuances of applying the painting rule depend on the chosen task. It is also important to consider the size of the tool here. There are options that help create smooth corner areas.
It can be noted that if the edge is made of steel rather than aluminum, then it will work longer and be more durable. And it is usually chosen by professionals.
If the edge is made of steel rather than aluminum, then it will work longer and be more durable.
The toothed rule: when does it apply?
A separate type of rule is gear. The profile shape has an H-shaped design, but a distinctive feature is the presence of teeth at the edge. Its main purpose is to apply a plaster-adhesive composition, onto which tiles or other types of facing materials are subsequently glued.
It has the same purpose as a notched spatula, but differs from it not only in the design of the handle, but also in size. Allows you to cover a large area in one pass, thereby speeding up the work.
This is interesting! It has identical disadvantages as the h-shaped rules, and can additionally be equipped with water capsules for use as bubble levels. With their help, the master can control the layer of solution applied to the surface.
Practical example - plastering walls according to the rule
Let us return to plaster and use this example to look at how to use such a tool in practice. Moreover, the rule is associated with plastering more than with other types of work. According to technological data, plastering walls is usually a high-quality job. Also, this type of plastering can be done with or without beacons . We will focus on plaster using beacons.
- First of all, we need to install a beacon strip, which will provide us with a future flat surface. The rail is attached to the wall using putties, maintaining vertical and horizontal alignment. All these moments can be controlled by a rule with a level.
- Afterwards, you need to let the newly installed beacons settle. This is done so that the mounting points harden properly and the lighthouse stays firmly on the wall; it usually takes twenty-four hours.
- After the beacons have settled, you can begin plastering. It is desirable that the plaster solution be elastic; it should not be made too thick.
- Using a trowel, apply the mortar mixture between the two lighthouse slats. After using the pointed side of the rule, cut off the excess.
- If you see that there are holes on the surface in the form of a lack of mortar, apply additional plaster mixture and remove the excess again using the rule.
- If your plaster layer thickness exceeds five millimeters, do not try to level the surface right away; let the first layer settle and dry. If you try to continue working, the applied solution may begin to fall off due to its weight.
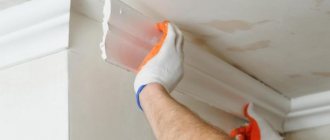
- After applying the second layer and leveling the surface as a rule, the finished surface must be rubbed with a plaster float and leveled to zero.
It is possible that you will not succeed the first time, but with due diligence you will very quickly get the hang of it and perform high-quality plastering work.
Such a tool, usually for plastering, is used to level the walls during the application process. In most cases, this is a metal object with a pointed edge, which is used to get rid of excess mortar and make the surface of the walls perfectly smooth. This tool is used not only for wall leveling functions. Thanks to it, you can perform other manipulations. The rules for plastering have their own types and characteristics.
Combination Rule: Today's Best Tools
For starters, let's look at another type of plastering rules - combined ones. These are the most advanced rule models to date, which have only positive reviews. They combine the design of h-shaped and trapezoidal devices, and have the following appearance, as shown in the photo below.
The advantages of such a combined tool include:
- High degree of rigidity, which is even higher than that of rectangular models.
- Ease of use - achieved due to the presence of a comfortable handle.
- Reduced weight due to the thin-walled material from which the device is made.
- The working part has a long service life, as it does not wear out with regular use.
- Suitable for any job.
Another important advantage is the price, which is not much higher than the trapezoidal product. If you are engaged in professional finishing work, then the combined type of rules will be the best choice.
Description of the tool
Rules (sometimes called "construction rules") are one of the most popular measuring tools used in the construction industry. For a better understanding of what this device is, it is necessary to refer to the etymology of the term, which arose from the word “correctly”. Having such a tool at hand, any specialist and even a novice craftsman will be able to perform finishing work correctly, minimizing the risk of making a mistake.
This extremely useful tool is used today on literally any construction site, which is largely due to its very simple design. In essence, it is a perfectly smooth strip, which allows you to detect any defects on it while checking the plane.
The most affordable is the wooden rule , although today you can also purchase its metal analogue. At first, this tool was used mainly to check the absence of dents or bulges on different types of plane. Today, the rule continues to be used for this purpose, but it is also used when carrying out other work.
Rule length - what you need to know about it
Length rules are available in different sizes, but the most popular are models for 1, as well as 1.5 and 2 meters. The length of the longest product is 3 meters, but it is difficult to work with it alone. In addition to long ones, there are also short devices that are used to perform specific work. And every professional master must have at his disposal not only long, but also several types of short rules.
Length affects the performance of the tool. However, it is not necessary to use long rules in all cases, for example, if the walls in a small storage room are plastered. When choosing length rules, you need to consider the following:
- The large length of the device, although it helps to increase the speed of work, also complicates the process itself, so the occurrence of defects is possible.
- The possibility of applying long rules is limited by the size of the room where the work is planned to be carried out.
- Such a parameter as rigidity suffers from their large length.
- The cost of long-length products is much higher than short models.
- It will be problematic to work with a rule whose length is more than 2 meters on your own, so you will need an assistant.
If you can’t decide on the choice of tool length, then you should choose the most popular models with a length of 1-1.5 meters. This will be enough for beginners and home craftsmen. The optimal tool for a professional is a rule of 1.5-2.5 meters.
How to make a rule with your own hands
The necessary tools are not always at hand at the right time. This is especially true for devices that are rarely used. However, this does not mean that you need to immediately run to the store. You can make a structure for leveling plaster yourself.
A long piece of wood works best. It is important that it is level. The wood is treated with sandpaper. Sanding removes irregularities and nicks from the surface, which leave marks on the plaster.
To make your own leveling device, use wood
Additionally, the slats are treated with an antibacterial and moisture-resistant wood product. Impregnation significantly extends service life and protects the surface from swelling and cracking. The homemade device has a number of shortcomings, due to which it is significantly inferior to its aluminum counterpart. Its edge is not sharp enough, and there is not enough rigidity to level out bulky areas. Homemade slats are used on small walls or where high quality and attention to detail is not required. A wooden lath will serve excellently in case of one-time leveling.
A rule is a design that facilitates and speeds up repairs. In case of one-time operations, it is enough to use an inexpensive aluminum model. But if repairs become a professional activity, then the purchase issue should be approached responsibly. Mandatory criteria for evaluation are shape, size, grip characteristics and other important details. A correctly selected product will become an indispensable assistant when leveling walls and subsequently assessing the quality of work.
What rule do you use? What are the advantages and disadvantages of your tool? Share your experience in the comments.
How to use the rule: detailed description for different instrument options
The question of how to correctly use the rule has been relevant for a long time. And they are asked mainly by novice workers and home craftsmen. Knowing what types of rules there are, we should move on to consider the issue of their correct use.
First, let's look at the general instructions on how to use the rule when plastering walls. The first step is to install beacons if the surface requires leveling. Beacons do not need to be installed if the wall is flat and you only need to plaster it. The beacon installation interval is selected depending on the length of the rule used. It should be such that the tool overlaps them on each side by a distance of 5-10 cm. The reserve is needed in order to be able to “add” the mixture (carry out wave-like movements).
After installing the beacons, you need to wait until the mixture on which they are planted hardens. Using the rule, it would not be superfluous to once again check the compliance of the plane of each beacon. The process begins with the fact that the wall must be moistened with water (it must first be treated with soil liquids to increase adhesion properties). The mortar is applied using a spatula or trowel. If you are a beginner master, then you should not immediately cover a large volume. Select a small area to practice on.
Further actions are performed in the following order:
- When the mortar is thrown onto the wall, you can proceed to leveling it. Now we will not consider the consistency of the solution, since you can read about this in other articles. The main goal of this section is to learn how to use construction rules when plastering walls.
- The next step involves applying the rule. It is used to “pull” the solution. Moreover, the direction of pulling is from bottom to top, but not vice versa.
- It is not only possible, but also necessary to carry out broaching in the horizontal direction.
- When pulling, spaces are formed that are not filled with solution. The solution should be added to these places using a spatula, and the leveling procedure should be repeated again.
- After the entire wall has been processed, you will need to dismantle the beacons and cover their locations with mortar.
This completes the process of plastering the walls. However, now we will consider in detail how to correctly use the rules of different types:
- h-shaped rule - due to the large size of the shelf, it is very convenient to draw the solution immediately after its application. Excess solution accumulates on the shelf, after which it should be re-applied to the surface to be plastered in places where “islands” form. When working, keep the h-shape rule perpendicular to the surface. When applying the solution from the tool shelf, it is necessary to make a slight slope. Work with this rule continues until large areas are sealed, after which it is recommended to switch to using a trapezoidal device.
- Trapezoidal - used when the mortar on the wall has already frozen. With its help, the remaining defects are eliminated. To do this, the solution can be applied directly to the edge of the tool and pulled along the surface, holding it perpendicular with a slight slope. The angle of inclination should be selected individually, depending on the specifics of the work. When leveling the solution, you should not put pressure on the rule, as this will lead to its temporary deformation, as a result of which the correct fit of the composition will be disrupted.
- Combined - eliminates the need to use the two rules of h-shaped and trapezoidal. All of the above steps can be performed using a combination tool.
- Corner - it is used to seal corners. Moreover, it is recommended to do this first, having initially installed the beacons. The process is similar to that described above and does not present any difficulties.
Plastering walls using the rectangular rule is not carried out. This type of tool is used when screeding a floor with cement mortar. Actually, there is nothing complicated in this process, and the technology is identical to plastering walls. The video below describes in detail the process of how to work with the rectangular rule when screeding a floor.
The most important thing you need to know when plastering walls or pouring a floor is to choose the right tool. That is why it is recommended to first familiarize yourself with the types of devices in order to know for what work they should be used.
Especially for those who are looking for a way to plaster walls without using beacons, below is a video instruction. With its help, you can get the hang of plastering walls using the rule without first installing beacons.
Placing and fixing beacons.
Before installing plaster guidelines, a full inspection of the room is carried out. The accuracy of angles, slope and deformation of walls are revealed. Plastering corners is an important finishing stage.
The geometric distortion of the walls is especially noticeable in the corners - they should be straight.
Installation by level.
The wall is examined with a plumb line - “weighed out”. In this way, they find the “zero” point - a place that will become a reference point, a standard.
Then screws are screwed into the wall, which will allow the beacons to be installed evenly.
First, they are screwed into the two upper corners.
Then, using a plumb line or vertical level, from below.
Beacons are oriented towards their exposed heads:
- Wooden ones are placed side by side so that their plane exactly matches the area of the screw head;
- The metal profile is applied directly to the screws.
Fix the slats with a solution, making some kind of “blunders” along the installation line.
Metal profile slats are quite flexible (made of tin), so for beginners it is advisable to rest them not on 2 screws, but on 4-6, screwed in in increments of 50 cm.
When the solution has set, all the voids under the guides are filled with it, and they are “coated” from the sides to achieve the most rigid fixation.
Having placed two landmarks at the corners, they begin to strengthen additional slats, if the length of the wall requires it.
2 screws are screwed into the wall between the batten and the corner, onto which the rope is secured. It should press tightly against the surface of the rail.
Now you can install as many guides as you like without resorting to precise and painstaking operations with a level.
The mixture used for plastering indoors is used as a fixing solution. But a gypsum-containing mixture is also used, which speeds up the work (gypsum hardens very quickly).
The thread can be stretched above the level of the slats. This is especially true for tin beacons - when pressed into the solution, they are easy to bend. Therefore, the rule for plaster applies here - it is applied to the lighthouse and pressed, leaning against its entire length. In this case, it is better to pull the rope at a distance from the slats equal to the width of the rule.
Laser installation.
The use of a construction laser makes the work easier: a special mark is applied to the rule (it is enough to draw a line with a simple pencil; it “sticks” perfectly to aluminum). The laser is installed so that it deviates from the ideal, “zero” point (the plane of the future plaster) to a distance equal to the width of the outlined fragment of the rule (see figure).
Thus, by pressing the guide, the worker strives to align the line drawn on it with the laser plane.
In this case, there is no need to pull ropes, weigh and screw in many screws.
Choosing a building code: basic recommendations
The choice of rule begins with inspecting the tool for its integrity and the absence of defects on the surface. Warping, chips and other types of deformation indicate that the product was manufactured using low-quality equipment. It is not recommended to purchase such devices, since with their help it will not only be difficult to achieve a positive result, but there is also a high probability of damage to the devices during operation.
Below is a list of recommendations that should be considered when choosing a rule to work with:
- It is recommended to choose trapezoidal products with a special groove in the design, which facilitates the operation of the tool when plastering.
- The presence of stiffening ribs - the more of them, the easier it is to work with the tool, and besides, the surface to be plastered will have fewer defects.
- Material of manufacture - the most popular are aluminum products, the advantages of which have already been mentioned.
- Dimensions - the easiest way to work is with rules that have a size of 1-1.5 meters, but for large volumes of work, it is not rational to use them. The choice of tool length should be approached individually depending on the size of the room.
- The presence of a level - the presence of a bubble with water will never be superfluous, and will only speed up the process of completing the work. However, there is one “but” - before using it, you need to check its correctness and make adjustments. You can find out how to adjust the spirit level here.
The price of such tools is not so high, so every master can afford to purchase them. The disadvantage of 2-3 meter products is the difficulty of transporting them, since a 3-meter bar will not fit into every passenger car.
To summarize, it should be noted that learning to use the rule is not difficult; it is more important to choose the right tool for the job. Of course, it will be difficult to get a flat surface the first time, and you will need to spend a lot of time learning, but once you get the hang of it, plastering the walls in your house or apartment will be a mere trifle.
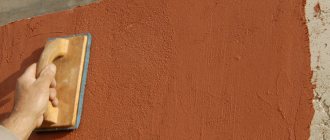
Applying plaster mortar.
Plastering begins after the fixing solution has completely dried.
Plaster usually consists of three layers - spray, primer and cover. The first layer (spray) is applied with a liquid solution (the consistency of sour cream). This allows you to achieve the greatest adhesion to the wall surface.
After the covering has almost completely dried, the next (main) layer is applied - primer. To do this, apply the mortar onto the wall with a trowel or spatula. The density of the “slaps” should be as high as possible to provide excess (with a slight excess) coverage.
It is better to sketch in spans - wall fragments within the distance between two landmarks.
Plastering the walls between the lighthouses usually starts from below, from the floor.
Having covered the span completely, it is leveled: the rule is applied horizontally to the wall so that its edges rest on two beacons that limit the working area. The force is directed from bottom to top.
If, after smoothing with the rule, the plaster has dents and grooves, apply mortar over them and again “pass” with the rule. In this way, perfect evenness is achieved.
It is important to keep in mind some features of working with the rule:
- Do not press! The rule for cutting plaster is to remove excess mortar from the end. You should not press it with a wide plane (although this is more convenient), since it bends, making the wall not completely flat. Such a wall looks like alternating vertical panels, clearly visible even under the wallpaper.
- Damp. At first, when removing excess, you can work with a dry rule. But when finishing the work, in order to achieve the greatest smoothness, it is better to wet the rule.
- Care. Aluminum tools are quite flexible and easy to bend and deform. In addition, you should not let the cement harden on the surface of the rule; it is better to wash it periodically during the working day.
Dried mixtures will have to be cleaned with a hard tool, which will leave a lot of scratches on the aluminum. A rougher surface will become dirty even faster.
If it is decided not to remove the beacons, then the next layer (covering) is applied after the soil has almost completely dried.
Application of plastering technology without beacons
Plastering without the use of profiles allows you to speed up the work, since you do not need to wait until the beacons are fixed. In addition, financial savings can be seen here. However, despite the benefits of using beacon profiles, in some situations their absence is completely justified:
- With a slight slope of the wall, which cannot be seen with the naked eye. And also when small flaws are visible on the surface.
- A flat surface with slight slopes at the corners.
- There are waves or only the upper part of the wall is blocked.
- The need to eliminate defects on a flat surface.
- Plastering small areas.
- If the evenness of the walls is not an important requirement.
It is worth noting the use of attached and hanging furniture. If objects hide the middle of the wall from view, then its unevenness will be effectively hidden.
Carrying out work on leveling walls with plaster without beacons requires a lot of effort and time
Most property owners try to do it on their own when planning plastering work. But it is worth noting that performing plastering without the use of beacons is fraught with certain difficulties. It is worth practicing on some section of the wall that is subject to further processing. Throw on a rough layer, remove it and repeat the procedure until the skill is mastered. This will allow you to hone your skills, after which you can proceed directly to the main part of the work.
Did you learn something new? Share it in the comments!