Sanding the surface after applying the putty material is required to obtain a surface without streaks left by the spatula and to eliminate even the smallest defects. After this treatment, the base will be finally ready for finishing work. The quality of the repair itself depends on the choice of sandpaper for sanding the putty. Therefore, you need to know which sandpaper is best for sanding putty, and how to carry out the process correctly. These points will be discussed in more detail in the article.
Required Tools
How to sand walls after puttying? For this purpose, special tools are used for grinding surfaces. How to sand the walls after puttying to make the wall as even and smooth as possible:
- For sanding, a sanding block is most often used. This device acts like a grater with a manual base. The block is equipped with sandpaper or an abrasive mesh.
- It is better to use a grinder if grouting needs to be done as quickly as possible. The choice of device is selected depending on the required power - the higher the power, the faster the grinding will be completed.
How to sand the putty becomes completely clear. Now it is important to decide not on the device itself, but on the auxiliary materials. Therefore, the question arises: what kind of sandpaper to rub the putty on and what kind of mesh is needed for sanding the putty.
What kind of sandpaper to use and what advantages are determined here:
- Mesh for grouting putty. It is the most convenient option, since grinding is carried out efficiently and quickly, and most importantly, without dust. In this case, there is no clogging of the material, and its high wear resistance is maintained. The sanding mesh requires periodic change during active work. The dimensions and quality of the mesh can be determined before purchasing.
- Sandpaper for grouting putty. It is a less successful option, but quite effective. It is better to choose sandpaper with a grain number of 60, 80, 100, and then number 120. It is better to take the material in small quantities, as you should check the compliance. Most often, grit number 60 is suitable. For final sanding of walls, sandpaper with grit number 120 is used.
Sanding putty not only requires special tools and devices, but is also performed in accordance with a certain technique. It is important to carry out the treatment without using a primer.
On video: how to sand a wall after puttying.
Why do you need to sand walls?
All the procedures that we did before: plaster, putty - these are all procedures for leveling the wall. Plastering is rough, puttying is fine. And now the process of sanding or polishing the walls begins.
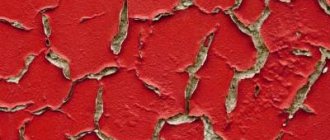
Even after applying a thin layer of putty, in any case, small irregularities and tubercles remain on the wall, formed mainly by the sharp ends of the spatula, which remain when we disperse the putty and connect one part of the putty wall to another.
That is why when putting putty it is better to use a large spatula so that the area of leveling the wall is maximized. But the joints, no matter how hard we try, can still be traced. Therefore, after you have puttyed the wall, you need to let it dry (at least a day) and you can start sanding the walls.
IMPORTANT!
Don’t try to accidentally prime the wall after puttying! Sanding begins immediately after puttying!
How to sand walls
How to sand walls after puttying so that the surface becomes perfectly smooth? It is important to know the technology and methods of how to sand walls after puttying. But first you need to decide on some characteristics of the walls in order to choose what to sand the putty with.
Grouting putty begins with choosing a tool. If the question arises about what kind of sandpaper to do the work with, then you should decide on the degree of processing: the initial sanding is 60 grains, and the final sanding is 120. How to sand the walls of a room with a large area? A machine is best for this, although corners, recesses and depressions will still have to be sanded by hand using sandpaper.
Sanding the walls after puttying is carried out in accordance with the following instructions:
1. First, the most visible irregularities and defects on the surface of the walls are highlighted. What kind of technology is needed for this? A powerful spotlight or lantern that is installed as close to the wall surface as possible. Thus, shadows appear on it from the protrusions or depressions of the putty. These places should be circled with a pencil.
2. How to rub putty correctly? It is better to start cleaning the putty from the corner. You need to move from top to bottom, occupying a strip of about one meter. After processing the designated strip, you should proceed to the next one. The movements should be spiral.
3. The putty on the walls should be sanded carefully, without applying much force. In this case, it is better to use sandpaper. Do not press too hard on the canvas to prevent holes from appearing in the putty. And there is no need to align the recesses with the general level.
4. Cleaning the finishing putty consists of the same steps as the starting one. In this case, polishing is done carefully, but with extreme caution so as not to damage the putty layer. It is better to sand the finishing putty using sandpaper.
To sand walls, you do not need to have experience in the construction industry. It is enough to adhere to a certain technology that is very easy to learn and apply.
Grinding process and rules
How to sand putty correctly? In order for the sanding of walls after putty to go flawlessly, you need to follow some rules:
- Proceed with sanding only when the surface is completely dry. As a rule, it takes a day for the walls to dry.
- Before starting work, protect all furniture from dust with plastic wrap. If this is not done, subsequent cleaning may take a long time.
- Find the most visible defects. How to identify them? It’s very simple - take a bright lamp, place it as close to the surface as possible, and direct the light along the wall: a shadow will appear from obvious bumps. These irregularities can be marked with a pencil.
- Grouting putty usually starts from the corner. Work the block from top to bottom, scraping the putty in a circular motion. Press smoothly and carefully. Don't rush or force too much to avoid removing too much and leaving holes.
- For the first stage of sanding, you can choose a mesh or sandpaper with a grit from 60 to 90. Do not alternate one type with another - start with 60 and continue with it.
- If there is a small depression in the putty, do not try to level it with the wall. Leave this defect and carefully fill with putty after processing, if necessary.
- You can use a homemade tool to handle corners. For example, glue sandpaper to a rectangular wooden block on all sides. Instead of a block, you can take a dense small box.
- Before wallpapering, it is enough to polish the surface just once. But if you are going to paint the walls, you should take the process more seriously and reapply the putty, paying attention to even minor defects.
- For final sanding, choose either a finer mesh or 100-120 grit sandpaper.
- Sanding walls after puttying with a sander is much faster, but also requires final revision, as some imperfections may remain. Therefore, you will still need to sand the putty by hand.
- You can check the evenness of the walls in the same way as in the third step. Turn on the flashlight and shine the light along the wall. Are there any shadows from unevenness? Then the putty grout is complete!
Ceiling sanding rules
How to sand a ceiling after puttying correctly, what tools and methods should be used for this? The ceiling is sanded using almost the same technology as the walls. To perform the work, you should prepare sandpaper. An abrasive mesh may also come in handy.
Wet grinding is ideal in this case. But in this case, the procedure takes much longer, since after each session you should wait until the surface dries.
The ceiling is usually rubbed using a tool such as a grinder. Sometimes the procedure is done manually. How to properly sand the ceiling:
- The sandpaper for puttying the ceiling is the same as for puttingtying the walls. First, with 60 grit, and 120 sandpaper as a polishing tool. If you use the surface for wallpaper, then sanding is done thoroughly and completely.
- It is necessary to produce illumination, which will highlight all the defects against which the skin will be produced. The grater is carried out along a designated strip from one corner to another.
- Secondary putty should be disposed of in the same way. The choice of tool is the same as for the first layer of putty surface.
- After this, the ceiling is primed and treated with antifungal agents. It does not matter whether the ceiling will be painted or wallpapered in the future.
- To process the corners between the walls and the ceiling, use a tool such as a round sanding block. We use this technology for rubbing protrusions and shaped objects.
In any case, the grout base should be sandpaper or graters in the form of a sanding mesh. If it is necessary to paint the ceiling, it is necessary to carry out the treatment with puttying.
In places where depressions appear, it is necessary to carry out secondary treatment with putty.
Necessary tools, materials
There is a large selection of sanding devices. There are several groups of tools:
- power tools;
- manual (this type includes hand graters, the models of which differ significantly in design and size).
The popularity of hand tools is explained by:
- ease of use - no construction experience required;
- availability in any price range;
- quality of work performed;
- the versatility of the grouting material - sandpaper of different grain sizes or sanding mesh.
There are the following types on the market:
- The basic tool is a handle in the middle and a threaded fastening with “wings” on the sides. This is a hand-friendly device. The main disadvantage is the time spent on the process of installing a new skin: unscrewing the “wings”, fastening and adjusting the new one, centering the jaws of the fasteners before finally fixing the nuts. The traditional design is a plastic or metal surface with a wooden handle. The first option is short-lived, unlike iron, but lighter.
- A classic grater in the shape of a bar, but with mechanical spring-loaded fasteners for tightening the sanding sheet. The design simplifies and speeds up the installation of a new canvas. On the sides of the timber there are indentations for fingers - this method of holding in the hand is much more convenient during the sanding process.
- Plastic sponge bars made of polymer with an applied abrasive layer. This is an additional device of different shapes - in the form of a trapezoid or a rectangle for grouting corners and flat decor (sockets for chandeliers, stucco).
- Dust removal devices. They differ from the classic device in the pipe located on the body, where the vacuum cleaner hose is connected. This equipment is convenient in the process of sanding the ceiling. Although the suction corrugation slightly limits human actions, if you need to carry out work with a minimum amount of dirt that appears, the inconvenience is worth it.
- Graters with a hinged fitting and a removable telescopic handle. The device can be used under a factory product, which is included in the basic configuration, or under a homemade pen. The equipment makes it possible to clear a large area. For low ceilings, the device is used while on the floor.
For grinding you will additionally need the following tool:
- respirator, plastic glasses;
- light bulb with extension cord;
- spatula with a blade length of at least 30 cm;
- a set of sanding mesh, sandpaper;
- ladder
- pencil.
Important! The light bulb is not for illuminating a room - by holding it up to the wall, you can identify small defects, monitor their correction and the result of the work performed in general. Therefore, it is advisable to use lighting on a tripod; it is easy to make yourself, and the lamp can be held in your hands.
Surface treatment after grinding
After surface treatment, further finishing cannot be started immediately. First you need to remove all construction dust that has settled on the walls and ceiling during the sanding process. To do this, you can use a tool such as a construction vacuum cleaner.
You need to walk around the entire perimeter of the surface and carefully remove all dust. If it is subsequently mixed with paint or wallpaper glue, lumps and lumps may form.
The second method of cleaning surfaces from dust does not require the use of a special tool, so it is the most acceptable in many cases, although it is much more labor-intensive. The methods used are as follows:
- Use a wide brush with soft bristles to brush off as much dust as possible. You can use a regular broom. The main thing is not to press too hard, since putty is a very plastic building material.
- After this, a secondary cleaning method is performed. Wet a cloth in cool water and wring it out well. Run the cloth over the walls and ceiling. Textiles should not fade, otherwise marks and stains will remain, which may subsequently appear through the paper layer or paint.
- You need to wait until the putty is completely dry, and only then proceed with further finishing. To avoid washing out the construction mixture, the fabric should be slightly damp.
In any case, dust must be removed completely to avoid corrosion of secondary building materials. You should not use only a rag, as it is almost impossible to remove dust in this way.
After cleaning, you need to proceed with further actions: priming and treatment with antifungal agents.
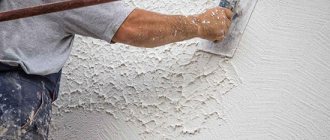
High-quality grinding and further processing before finishing is the key to a successful repair. The sanding surface can be several types of sandpaper or mesh.
Sanding after plastering the walls must be done, as this solution will be an ideal option for a good basis for repair work. Even if the leveling was initially performed poorly, then with the help of further finishing it is possible to visually compensate for this defect. It is possible to carry out such a procedure, that is, to rub the putty, without the involvement of specialists - independent processing is quite suitable.
Recommendations for cleaning walls (2 videos)
What you might need for work (25 photos)
How to do the job correctly
Even if you are doing the renovation yourself, sanding the walls will not take you much time. This procedure is much simpler than plastering or puttying surfaces, but no less labor-intensive.
Application of grinders
Repair professionals use special grinding machines. They can significantly speed up the process of grinding putty and make the grout better than a conventional abrasive mesh with a bar. The unit is a metal or wooden plate on which sandpaper is attached using clamps. According to the principle of operation of the machine there are:
- orbital eccentric;
- flat vibrating;
- tape
Using the former does not allow the corners to be processed well enough. The use of the latter is universal. And the latter can be rationally used with a thick layer of putty.
Buying a sander will cost a pretty penny, so it is not necessary to purchase one for home repairs.
Advice! You can start sanding the wall no earlier than 24 hours after applying putty to it.
Grinding process
Once the putty has completely hardened and dried, you can begin sanding. Starting cleaning is very simple: place the abrasive mesh on the block and secure it. Your working tool is completely ready for use. It is best to start sanding walls at a corner and work in the opposite direction. Most often, when sanding from ceiling to floor, they try to make strips about one meter wide.
Advice! Be sure to use a high-power spotlight or pendant lamp. This way you can see all the shortcomings at once and correct them. The spotlight is installed on the side of the wall. So the light will fall on it at an acute angle, and all defects will give a shadow and will be immediately noticeable.
Rub with smooth movements with slight pressure so as not to scratch the surface of the putty. In particular, this applies to sandpaper, since it is coarser than abrasive paper. Movements should not be chaotic, but consistent: up-down, left-right. During the process, be careful not to sand the same area several times. The main thing is not to overdo it. The finishing putty is easy to work with and with strong pressure you can erase it down to concrete or drywall. This can cause changes, and the wall will become uneven again. Therefore, if you see that there are no defects, move on to the next fragment of the surface.
Advice! When sanding the starting base, you should not achieve a completely smooth surface, since the finishing putty still needs to be applied. As for the finishing surface, you need to work hard here, especially if you plan to finish it with paint. Acrylic paints highlight even the smallest imperfections, especially if you plan to decorate the walls with light shades.
The nuances of choosing sandpaper and abrasive mesh
Any novice repairman should know that painting walls is carried out only after cleaning the surface. However, it is quite difficult to determine which sandpaper should be used to sand the putty. The choice of abrasive mesh and sandpaper must be approached wisely.
Abrasive mesh for putty has its own characteristics:
- The starting putty should be sanded with a coarse abrasive;
- Fine-grained products are used for finishing putty.
Note! Since abrasive sandpaper, when leveling the base with putty, is the main tool for finishing sanding ceilings and walls, this type of work requires certain skills and abilities.
This work is carried out in several stages:
- Applying a starting putty to the base, which makes it possible to eliminate large defects.
- Using a finishing layer to level the surface.
Abrasive meshes are used to clean small areas of the wall. For large areas, it is wiser to use a sanding machine, which significantly reduces sanding time.
Advantages of abrasive:
- perforation of the base - in this case, all dust will easily pass through the holes, and the device will not clog, unlike sandpaper;
- Duration of operation - this material is more durable and efficient at work;
- the ability to choose the desired size - this measure eliminates additional modifications to the device.
Among the disadvantages of the product, only high cost can be highlighted.
You can sand the base with sandpaper, which allows you to select the material of the desired size and purchase it in the desired form - a roll, a piece or a roller. However, such a product quickly becomes clogged with construction dust and wears out, which significantly increases material consumption.
How to sand walls after puttying
Wall sanding is necessary for any renovation. Processing walls after putty can be done manually or mechanically. Let's consider both options. First of all, you need to remember that sanding should be done immediately after applying the putty. You cannot prime the walls right away. Only after the sanding work has been completed. Otherwise, the surface will remain uneven and you will rub off the primer layer.
The most common tool is a sanding block, or as it is popularly called, a manual skinner. It comes in two types: a standard tool with a handle or with special recesses for the arm. The cost of such a tool is about 300 rubles. You can also use a sanding sponge with a beveled side. It helps to treat corners and hard-to-reach places. The price will cost 100 rubles.
Sandpaper or sanding mesh is the easiest option. The mesh takes much longer to become clogged with dust, which means it will last longer. But it's harder to find. Sandpaper costs little and is sold everywhere. In addition to grinding tools, you will need others.
Bright lamp. With its help you can identify wall defects. The shadows cast will indicate flaws. The lamp must be mobile so that it can be installed anywhere and moved back and forth; A stepladder or table to reach the top. It is more convenient to work on a table, since you can move around it freely, and the stepladder will have to be constantly rearranged; Protection. Sanding is a very dirty process, so be sure to wear special clothing. Wear goggles to protect your eyes. Use a respirator to close your airways.
2
Emery and abrasive mesh - hand work
If sanding the walls after puttying is planned to be done manually, the performer will initially have to make a choice between an abrasive mesh and sandpaper. These grinding means have their own advantages and require an individual approach to the process of performing the planned finishing work.
Abrasive mesh
The main advantage of the abrasive mesh is its structure with holes. The dust generated during the processing of the walls will pass through these holes, which means that it is easier to work with it than with sandpaper. But this does not eliminate the physical wear of the tool during surface grinding. You can determine the appropriate time to replace the mesh with a new one by its appearance (broken links), or when the grinding process becomes noticeably less effective than at the beginning of the finishing work. On the market, abrasive mesh is sold in pieces the size of sanding bars, so at home all that remains is to assemble the tool for the job and start sanding the wall.
Sandpaper is used less and less today for sanding walls, as it quickly becomes clogged with dust during finishing. Because of this, the paper has to be changed very often, which in turn leads to an increase in work time.
If, answering the question “How to sand putty,” the performer chooses sandpaper, he should know that this material is presented in a wide range on the market. To achieve high-quality wall finishing, you must first understand what grain size of paper is best suited. Sandpaper grit is a value that determines the number of grains per square centimeter of sheet area. That is, the higher the grain size, the more grains there will be on a piece of paper under the sanding block, and vice versa. Coarse-grained sandpapers are marked from P20 to P220 (number of grains per centimeter). Fine-grain paper is considered to be paper in the range of P240 to P2500.
Sandpaper for sanding walls
How to sand walls with sandpaper? Very simple. The whole process is carried out in two stages. First, the walls are rough treated with coarse-grained paper, and fine-grained emery is used for final sanding. At home, they usually use sandpapers in the range from P80 to P280, in rare cases they use abrasives marked up to P360. Considering the relatively low cost of sandpaper, we recommend purchasing several types of coarse and fine-grained paper for sanding walls; in this case, the most suitable marking can be selected already during the finishing of the walls.
Work technology
I will begin considering the topic from the moment when the finishing layer of putty has already been applied to the surface. We'll look specifically at how to sand a surface, what you'll need to do it, and what little tricks will make your workflow easier.
It is important to remember that you can begin this stage no less than a day after finishing, and if wet spots are visible on the surface, then the start of work should be postponed until it has completely dried. This is very important, since it will not be possible to grout wet material (there are compositions for wet rubbing, but that’s a completely different story).
Necessary tools and equipment
It is impossible to carry out work efficiently and quickly without using special tools and equipment. Therefore, you must prepare in advance and stock up on everything you need. The list of main elements is presented in the table below.
| Name | Recommendations for selection |
| Grater for abrasive mesh or sandpaper | There are different width options, but I advise you to purchase the 120-130 mm option; you shouldn’t take narrow 80-100 mm graters, you need to cut paper for them, and it’s still more convenient to work with a wide tool. The clamps should be metal and fit securely to the body, the working surface should be a little soft for shock absorption. Also check if the handle is comfortable for you |
| Abrasive material | The first option is a special mesh, which is designed specifically for putty, so it hardly gets clogged during work and lasts a long time. The second solution is sandpaper in a 130 mm wide strip; its main advantage is its low price, but during operation it clogs much faster and needs to be changed more often. Below I will touch on this aspect in more detail, as it is very important. |
| Putty knife | We will not putty anything, but we will need a spatula for the short term for initial surface preparation. It is best to use a wide version of 25-35 cm |
| Step ladder | It will greatly simplify the work when sanding walls and you can’t do without it when working on the ceiling. Of course, you can use a table or a specially constructed flooring, but a ladder is more convenient due to its mobility |
| Light bulb with extension cord or spotlight | This element is so important that without it it is impossible to achieve an ideal result. No matter what you have on hand, the main requirement is that the light stream is strong enough; flashlights and low-power lighting devices will not work |
| Means of protection | To be honest, the first time I started working with nothing, I realized within 10 seconds how poorly prepared I was. It’s good that I had a respirator and safety glasses at home, but not everyone has them, so you need to purchase them in advance. It is also better to wear dust-proof clothes and cover your head with something so that a kilogram of dust does not settle on your hair |
If you have corners, it is better to additionally purchase a special sanding sponge with a beveled edge. This is an elastic element coated on four sides with an abrasive material, with which you can perfectly align both external and internal corners.
Now let's look at the abrasive elements, since this nuance requires special attention:
- For primary sanding, paper or mesh with a grain size of P100-P120 is required. I read reviews on the Internet where pseudo-experts advise using the P60-P80 options, I was shocked, with such a coarse abrasive you will damage the fine-grained putty so much that you will have to redo the work and re-apply the composition ;
- If you are sanding a surface for painting, then you need to achieve an ideal smoothness of the surface, in this case you need to carry out a secondary treatment with mesh or paper with a grain size of P180-P240; personally, I always use the finer option. It is important not only to remove all flaws, but also to avoid the appearance of so-called scratches, when the abrasive leaves streaks;
- As for the question - paper or mesh, I will tell you this: high-quality mesh is much more convenient and durable than sandpaper, and cheap mesh is much worse in quality. It is better to purchase a good-quality mesh and ensure convenient work , it is sold in sheets, its consumption may vary depending on the unevenness of the surface, I have one element for an average of 2-3 square meters.
We figured out how to sand putty on walls and ceilings; this set of devices is used when doing work manually. There are graters with long handles, but I do not recommend using them, as you will not be able to control the flatness and quality of processing, and the result will be much worse.
But there is also an automated option - a grinding machine for putty, it is used by professional specialists, since with its help the process goes much faster. But when the speed of work increases, one significant drawback appears - the quality of processing suffers, and if this option is good for wallpaper, then even professionals carry out the work manually for painting, unless of course they want to achieve the best result.
Of course, it’s not worth purchasing power tools for repairs in an apartment, but if you have the opportunity to rent equipment, then you can use it; you can prepare walls for wallpaper very well and quickly. The sandpaper is purchased separately and can have different sizes and configurations depending on the type of sander and the size of its working part.
Surface preparation
I have already written about the fact that you need to start working only when the base is completely dry, but I will remind you of this nuance once again. If the composition has dried, then you can begin the preparatory measures; they are simple, so you can handle them without problems:
- Since the work is very dusty, it is necessary to remove everything unnecessary from the room, this will make it easier for you to clean up later . If it is not possible to remove the same furniture, then you need to do this: if the walls are being processed, then all the objects are moved to the middle and carefully covered with a special film. When working with the ceiling, you need to think about the location of the furniture so that it does not interfere with work; again, you need to carefully cover it;
- Then you need to carefully sweep the surface and inspect it. Sometimes there are situations when, due to finishing errors, cracks appear in some places or the composition shrinks very much. You should first check whether everything is in order, so that if necessary, you can repair problem areas immediately, rather than leaving them for later;
In no case should you prime the surface before sanding, this will cause great harm, because the surface will harden and we will have to apply much more force to level it. And you can achieve an ideal result only by working with an elastic layer.
- The last stage of surface preparation is cutting off all sagging and adhering pieces of mortar with a spatula . To do this, you take the tool, apply it at an acute angle to the surface at the location of the bead and, moving forward, carefully cut off the excess. This will greatly simplify our further work and save sandpaper, because we will not need to erase all the major flaws.
When all the preparatory work has been completed, make sure that everything you need is at hand and you can work calmly without being distracted by shopping trips for missing materials and components.
Main stage
Now let’s figure out how to properly sand the putty; detailed instructions for the work look like this:
- In order to achieve the best result, it is necessary to properly fix the sandpaper or mesh. In the usual versions, you need to unscrew the thumb, move the bar, insert the end of the paper under it, and then fix the element. Grinding stones and some new float models have an automatic clamp that is raised and lowered using a lever, this is very convenient;
The mesh is usually sold in sheets to fit the grater (the elements must be longer than the sole to attach them). As for the paper, it comes in a roll, so that during the work you do not tear off pieces and spoil the material, I advise you to pre-cut the elements to the required size, this will greatly simplify the replacement of sandpaper.
- Work begins from any corner on the ceiling, and if you are sanding walls, then you need to choose its upper corner. The process is quite simple: you gently press the tool and grind the surface; you don’t need to press hard, otherwise you will remove too much and make the surface not even, but even more crooked. During the grinding process, constantly monitor the condition of the abrasive element - lightly tap the block to remove the putty;
- The work is carried out in the chosen direction, it is important to process all areas, so follow the order. You also need to move the grater not at random, but in a kind of spiral . This will ensure the best sanding quality and speed up the work process. To make it clearer for you, a simple diagram is presented below; it will help understand the process even for those who have no idea how to work;
- When working, constantly monitor each area using a spotlight or lamp, this allows you to quickly correct individual areas and move on without returning to them. It is more convenient to use a regular carrier near the ceiling, and you can place a spotlight on a tripod near the wall, then you will constantly see the plane, and you will not need to be distracted by highlighting the area you just treated;
- If during the work you find problem areas, then you need to remember their location and after sanding, prepare a small amount of putty to seal all the flaws . Don’t worry, after finishing everything will be level, and the repair areas will not be visible, because you will remove all excess with a block;
- Finishing is done only if you paint the surface, it is done with fine-grained sandpaper or mesh. The technology is no different from the one described above, everything is repeated in the same sequence, it is important to be careful and try to achieve a perfectly smooth surface. If your sandpaper leaves lines, then you need to take a finer option.
If you have corners, then you should pay special attention to them, the fact is that the grater leaves a strip of untreated surface, which worsens the appearance. With the help of a sponge you can eliminate this flaw very quickly and efficiently; the photo below clearly shows the difference.
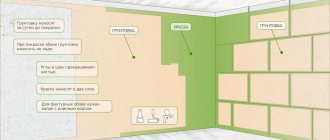
After carrying out the work, you need to clean the surface from dust and apply primer; it will strengthen the putty layer and make it much more resistant to damage. After this, you can either paint the surface or apply any decorative compositions to it.
obustroeno.com
How to sand a ceiling after puttying?
The ceiling attracts no less attention than the walls, and every flaw on its surface will be evident. The technology for sanding this surface is no different from sanding walls, except that working on the ceiling is much more difficult. Therefore, it is better to understand the question of how to sand a ceiling after puttying if you have grinding machines in your arsenal.
A mesh for grinding putty No. 60–80 is put on the machine if rough cleaning is being done; mesh No. 100 if finishing sanding is performed. To reach the surface, you need to use a stepladder. If a machine with a special rod is used, surface treatment is performed directly from the floor. The surface is sanded in a circular motion until it is perfectly smooth.
Related article: How to disassemble a wall made of tongue-and-groove slabs
Primary grinding of the putty allows you to remove large defects. After its completion, you need to remove construction debris, debris, dust and check the surfaces for cracks and minor flaws, and then you can apply a layer of finishing putty. When the surface is dry, you can begin final sanding using a fine-grained abrasive. The technology remains the same as described above, but in this case all movements should be less sweeping and more accurate.
How to sand the finishing coat of walls and ceilings?
Sander
The sanding machine can quickly process large areas. The mechanization process is progressing at a good pace. Sanding takes on a higher quality appearance than hand-done work. There are 2 types of grinding machines:
- Pneumatic. It is light in weight and easy to use. The price is quite affordable, it runs on a compressor. The unit directs compressed air and makes the entire mechanism work. It is very profitable to use it for large volumes of work, since the cost of the equipment is justified for one major overhaul. But it is not profitable to use a sander to finish one room.
- Electric. Mobile devices that are slightly heavier in weight than pneumatic ones. They are also more expensive in price, but are perfect for home use. There are belt, orbital-eccentric and flat vibration models.
To sand thick layers of putty, use a belt sander. It is best used after applying and processing the starting composition. A special feature is the complete absorption of existing construction dust into the engine cooling fan.
Important
Flat tools are more versatile; they grind and polish well. The working surface resembles a rectangular sole, which is fixed with clamps. For walls and ceilings use sandpaper number 120, for wood - 180 or 240.
Abrasive sponge with rounded edges
It is convenient to treat the surface with a sponge with a hard abrasive and round grains. This method is good for the final finishing stage. The difference between abrasive sponges is where the grains are located. The grain size is important and will affect the quality and structure of the final layer.
An abrasive sponge with rounded edges will replace sandpaper, as it has excellent wear resistance, flexibility, and it lasts a long time. There are universal types (for dry grinding and wet work).
The ideal surface is achieved by the manual processing method ; for this, it is good to use devices with an abrasive layer of polyurethane foam. They are needed for processing hard-to-reach places. The sanded base turns out to be very soft and moderately porous. Silicon carbide or aluminum oxide is bonded to the base of the tool. They provide the grit required for successful sanding.
Advantages of abrasive sponges with rounded edges:
- flexibility, impossibility of breakage even in hard-to-reach places;
- elasticity;
- the inability to make a curved layer due to the soft plastic included in the composition;
- spraying, which gives the tool durability;
- Alumina-based grains form the cutting base.
Thanks to the flexibility of the tool, the surface does not receive damage and is carefully ground at any angle of the grain tool. At any time , you can make any plane smooth if you take a sponge with an abrasive layer.
Sanding block
Such blocks have a compartment where all the collected dust accumulates. This property of the tool allows it to be used in the most inaccessible and dirty places. The mesh in the bar has a perforated structure, all the putty passes through it. It needs to be replaced when it is partially worn out so that the appearance of the entire surface is not spoiled.
To replace the base, you need to choose the right size, which depends on the width of the block. The wider the block itself, the larger the base will be. Meshes that are not suitable in volume may work, but the work will take longer. You have to press hard on the surface to achieve the desired smoothness and hide all visible defects on the wall.
Attention
Sanding blocks are very convenient to use for a small amount of work in case of minor cosmetic repairs. With a complete overhaul, you need to choose a tool that is suitable in terms of grain size. It is different for blocks.
Cleaning the finishing putty includes the same steps as the starting putty. Polish thoroughly, but carefully so as not to damage the putty layer. It is better to sand the finish coat with sandpaper if you do not have a sanding block.
Fine sandpaper
Sandpaper quickly becomes clogged with dust when used vigorously. It is changed more often than the mesh. You can purchase three types of sandpaper:
- a large roll from which the required size is cut;
- a small roller that may be suitable in size for the job;
- a rectangular block of standard sizes convenient for any type of work.
It is better to take paper from a hardware store, grain size – 60, 80 or 100. To check, you need to take a small amount of it to test it on the surface.
There is no exact recommendation regarding grain size, since different grains give different results when working. There is no need to take paper with a grain size of less than 60 (this is coarse sandpaper for putty work) and more than 100 (it will become heavily clogged with construction dust and will constantly require replacement).
Putty sanding tool
When sanding putty, we face two tasks. Firstly, we must level the surface, and secondly, create marks on it of a certain shape and size, which will ensure reliable adhesion of the primer layer applied over the putty and the absence of shrinkage defects (for this, the primer must fill all the sanding marks, leaving no voids on the surface). their day).
In practice, it has been established that the optimal cross-section of the notch should be close to triangular (it is also desirable that its bottom be slightly rounded). A mark of this shape can be achieved using eccentric (rotary-vibrating) grinders or manually.
Sanding putty using a professional eccentric sander Festool ETS 150/5 EQ
“High-speed” mechanical tools (“grinders”) cannot be used to level the putty. They are good for removing rust, cleaning up welds and other rough jobs, but the shape of the mark they create on the putty is far from correct. Most often it has a “torn” shape. No paint and varnish material can completely fill such risks.
The figures below clearly demonstrate the difference between the risks created by an angle grinder and an eccentric sander.
Risks after grinding with an angle grinder (grinder)
Risks after sanding with an eccentric sander
Surface grinders are also excellent for processing putty on large surfaces. They allow you to quickly give the surface the required profile when processing the first rough layers.
Surface grinder Festool RS 100 CQ
Risks after sanding with a surface grinder
So, thanks to the proliferation of sanding machines, we can perform a significant part of the grinding work faster and easier.
However, it is not entirely correct to constantly work only with a grinder. Grinders are good for quickly processing rough layers, for reducing scratches and for “soft” processing before priming. The main work of shaping and delicate leveling is still done using hand tools. Only it gives us the opportunity to subtly feel the surface and understand where and how much effort needs to be applied to level it.
Hand tools come in the form of grinding blocks of various sizes and characteristics.
They are also called grinders, floats, blocks and even planes, for their resemblance to the woodworking tool of the same name.
Festool hand sanders with dust extraction
Thus, we must be able to correctly select a tool for each specific case and stage of processing. Only then can we achieve ideal surface quality.
Useful tips for sanding walls after puttying
The puttying process, no matter how well it is performed, does not allow obtaining a perfectly flat surface. There are traces left on the wall from the spatula, transitions between layers, small irregularities, bumps and depressions are visible.
You can't do it without sanding the surface. Sanding is the final process that prepares the surface for final finishing.
Any person with the desire, patience and perseverance can perform sanding after puttying. The main thing is to choose the right tools, consumables and accessories, and know the technology for doing the work.
Sanding is performed dry or wet. Wet sanding is advisable on plasterboard, normally plastered walls. The main advantage of wet grinding is the relative purity of the process. You will not be bothered by the dust that is necessarily present during dry sanding. The subsequent cleaning process is forgiven.
Dry sanding is more commonly used in home renovations.
Rule 1
Sanding after puttying is carried out no earlier than 24 hours after applying the putty layer.
Tips for choosing tools, abrasives and accessories
Without the right tools and devices, it will not be possible to perform high-quality sanding of walls after puttying.
You must have:
sandpaper and sanding mesh; Sanding sponge with angled edges for sanding in hard-to-reach areas.
Let us immediately note that the sanding mesh does not become clogged with dust during operation, but it costs slightly more than sandpaper.
You will need to purchase a sanding block or mandrel to secure the sandpaper or sanding mesh. This device is properly called a manual skinner.
Rule 2
Sanding paper has different grain sizes and this is important for sanding walls and ceilings for painting. Numbers from 20 to 220 indicate a coarse-grained structure of the material, numbers 250-2500 correspond to fine-grained sandpaper.
In terms of equipment, you will definitely need a stepladder, a lamp or spotlight, and a wide spatula. A wide table or trestle will also work if their height allows for work on the ceiling.
To ensure safety when performing grinding work, be sure to buy safety glasses, a mask or respirator, a cap, a beret or a scarf.
Let's move on to the process of grinding the surface after puttying.
Sanding walls and ceilings after puttying is done in a well-lit, ventilated room on a completely dry surface.
Wall grinding technology
At the first stage, use a spatula to go over the entire surface of the wall. Remove tubercles, all kinds of protrusions, and swellings. If you find large depressions or pits, fill them with putty, do not try to remove them by sanding.
Rule 3
Start sanding only when the surface is completely dry.
Rule 4
High-quality lighting should be installed on one side at an angle to the surface. Its position must not be changed during the entire grinding cycle.
The second stage involves treating the surface with coarse sandpaper or sanding mesh. The consumable material is attached to the sanding block.
Surface grinding is carried out from top to bottom, processing small areas with rotational movements. The size of the plot should not exceed 1×1 m.
It is better to grind from top to bottom in strips no wider than 1 m. When grinding, hand movements are made in a circle, but you can also move up and down or left and right.
Do not press hard on the tool or grind for a long time in one place. You can erase the entire layer of putty.
After going through the entire surface with a coarse abrasive, continue sanding with fine sandpaper. When using finer sanding material, be sure to bring the light source as close to the wall as possible.
Rule 5
Finishing grinding is performed with less sweeping movements and with less pressure on the tool.
Hard-to-reach places are sanded using sanding sponges or the old-fashioned method of adding sandpaper in several layers.
Never use a skinner to clean corners and hard-to-reach places. You will only ruin the surface.
Rule 6
Select the correct grit size of consumables. Properly selected sandpaper should not leave deep scratches on the plaster.
If the abrasive material leaves scratches, choose a finer sandpaper. Under the wallpaper, minor scratches are allowed on the polished surface after puttying. But before painting, the surface of the walls must be absolutely flat. Read how to prepare a wall for painting.
The grinding process is labor-intensive and requires considerable effort to complete. It can be mechanized if you use a special grinding machine. Grinding machines are available that can be connected to a vacuum cleaner, which makes the grinding process virtually dust-free.
Do not use belt sanders. They are suitable for working with wood. An eccentric or orbital sander will work.
Although the use of a grinding machine speeds up the grinding process, it is very difficult for a novice builder to obtain a high-quality sanded surface without special skills.
It is necessary to feel the tool not only to move it correctly, but also to regulate the force of pressing the tool on the plane being sanded. And such a tool is quite expensive.
After sanding, remove the dust layer, do a wet cleaning and check the quality of the surface. Before finishing, a layer of primer must be applied.
Tip 1
It is better for a novice builder to use hand grinders.
devices.
Sanding a ceiling is no different from sanding walls. The process is more labor-intensive and requires patience and accuracy.
Once again about abrasive material
Sanding mesh is more convenient than sandpaper because it does not become clogged with debris and dust during operation. But the right sandpaper also gives good results, and it is much cheaper. When sanding walls after puttying with your own hands, it is best to use sandpaper numbers 120...180 (coarse-grained), and finish sanding with abrasive numbers 220-280 (fine-grained).
Tip 2
We grind the first layer of putty using coarse abrasive with grit number 120-180. For the second layer of finishing putty, use an abrasive with a smaller grit No. 220-280.
Sandpaper and mesh are marked the same way, on the back of the material.
How to control the grinding quality?
At the beginning of the article it was stated that the grinding process must be performed under good lighting, constantly directed from one place. Properly configured lighting allows you to constantly monitor the grinding process and its quality by looking at reflections on the surface or in the light, applying an even ruler or building level. There should be no gaps between the control tool and the wall.
When it comes to the ceiling and it is being prepared for painting, the ceiling needs to be sanded better. Illuminate the grinding area with light, this will allow you to see surface defects. Visible scratches are puttied and cleaned after drying.
Sanding work ends with thorough cleaning of the surface and room and applying a primer to the dry and sanded surface.
In addition, we recommend watching a video on sanding walls and ceilings. Good luck in this dusty business!
Video: Sanding walls and a little more.
We recommend: Warm floors under tiles - electric, infrared, cable and film, laying and installation
Video: Sanding the ceiling without dust
Source: sdelalremont.ru
Sanding with a sander
A very practical sander. A large area is processed in a short time, and the high cost of work is justified by productivity.
After processing with a sander, you will still have to work with your hands at the end, but when figuring out how to sand the ceiling after puttying, you can still stop there. And even at heights, working with a grinding machine will not be difficult.
An abrasive mesh is put on the machine (for starting grinding - from No. 60 to No. 80, for finishing - No. 100). You will also need a stepladder or table. We process the ceiling in a circular motion, starting with the largest defects. We don’t stay in one place for a long time, because of this, unevenness may appear. We remove the dust, correct small errors with a spatula and perform the final grouting with fine-grained sandpaper.